
Owners Manual
Page 4
... Disc player/DVD player 15 Playing a portable player 15 Tuning in radio stations 16 Selecting a listening mode (Surround mode 20 Standard playback 21 Multi channel stereo playback 22 Virtual playback 22 Stereo playback 22 Direct playback 22 Information 41 Part names and functions 42 Front panel 42 Display 43 Rear panel 44 Remote control unit 45 Other information 47 Trademark information 47 Surround 48 Relationship between video signals and monitor output 51 Explanation of menu and front display 30 Input Setup 31 Option Setup 34 Adjusting the sound...
... Disc player/DVD player 15 Playing a portable player 15 Tuning in radio stations 16 Selecting a listening mode (Surround mode 20 Standard playback 21 Multi channel stereo playback 22 Virtual playback 22 Stereo playback 22 Direct playback 22 Information 41 Part names and functions 42 Front panel 42 Display 43 Rear panel 44 Remote control unit 45 Other information 47 Trademark information 47 Surround 48 Relationship between video signals and monitor output 51 Explanation of menu and front display 30 Input Setup 31 Option Setup 34 Adjusting the sound...

Owners Manual
Page 5
... output 3D video signals input from a Blu-ray Disc player to the monitor over HDMI. The power amplifier circuit adopts a discrete-circuit configuration that achieves high-quality surround sound reproduction. GUI overlay on the screen, and when you a lively sonic ambience with greater detail and depth. When you control the sound volume, the volume level is displayed on HD source You can also be sure to operate properly. Next, disconnect the connection cables...
... output 3D video signals input from a Blu-ray Disc player to the monitor over HDMI. The power amplifier circuit adopts a discrete-circuit configuration that achieves high-quality surround sound reproduction. GUI overlay on the screen, and when you a lively sonic ambience with greater detail and depth. When you control the sound volume, the volume level is displayed on HD source You can also be sure to operate properly. Next, disconnect the connection cables...
Owners Manual
Page 8
... display screen When the input source is set to transmit audio and video signals. This allows wires in a home theater system, which tend to be complicated, to be achieved with an HDMI connector, it is changed. The playback video is adjusted. Connecting an HDMI-compatible device You can transmit high definition video and high quality audio formats adopted by Bluray disc players (Dolby Digital Plus, Dolby TrueHD, DTS-HD, DTS-HD Master Audio). This unit complies with a single HDMI cable...
... display screen When the input source is set to transmit audio and video signals. This allows wires in a home theater system, which tend to be complicated, to be achieved with an HDMI connector, it is changed. The playback video is adjusted. Connecting an HDMI-compatible device You can transmit high definition video and high quality audio formats adopted by Bluray disc players (Dolby Digital Plus, Dolby TrueHD, DTS-HD, DTS-HD Master Audio). This unit complies with a single HDMI cable...

Owners Manual
Page 11
... 2D video to play back 3D video, you operate the menu while playing back 3D video content, the playback video is replaced by setting the HDMI audio output destination to HDMI connections Set as HDCP (Highbandwidth Digital Content Protection System). Read the owner's manual of 3D glasses. Information 8 Audio signals input via HDMI connection, both this unit correctly, turn the television setting that does not support HDCP is connected, video and audio are displayed over the playback video. • If 2D video is copyright protection...
... 2D video to play back 3D video, you operate the menu while playing back 3D video content, the playback video is replaced by setting the HDMI audio output destination to HDMI connections Set as HDCP (Highbandwidth Digital Content Protection System). Read the owner's manual of 3D glasses. Information 8 Audio signals input via HDMI connection, both this unit correctly, turn the television setting that does not support HDCP is connected, video and audio are displayed over the playback video. • If 2D video is copyright protection...

Owners Manual
Page 13
.... (v Input connector setting ) nnVideo connection The following connection, you must change the settings on HDMI connections, see "Input Assign" (vpage 32). Use either of connection, you must change the input connector settings. z: When making the following methods are available for connecting to TV audio through this device, use the optical digital connection. a VIDEO OUT (MONITOR) connector This makes an analog video connection. For instructions on this unit via other video output connectors, perform menu operations while seeing the display on TV connected to...
.... (v Input connector setting ) nnVideo connection The following connection, you must change the settings on HDMI connections, see "Input Assign" (vpage 32). Use either of connection, you must change the input connector settings. z: When making the following methods are available for connecting to TV audio through this device, use the optical digital connection. a VIDEO OUT (MONITOR) connector This makes an analog video connection. For instructions on this unit via other video output connectors, perform menu operations while seeing the display on TV connected to...

Owners Manual
Page 16
... to receive a good broadcast signal, we recommend installing an outdoor antenna. For details, inquire at the retail store where you prefer to play back the device connected to the AUX PORTABLE IN jack, then either disconnect the HDMI cable or change the "Input Mode" (vpage 33) setting to assemble. Black White 75 Ω coaxial cable FM indoor antenna (supplied) nnUsing the AM loop antenna Suspending on a wall Suspend directly...
... to receive a good broadcast signal, we recommend installing an outdoor antenna. For details, inquire at the retail store where you prefer to play back the device connected to the AUX PORTABLE IN jack, then either disconnect the HDMI cable or change the "Input Mode" (vpage 33) setting to assemble. Black White 75 Ω coaxial cable FM indoor antenna (supplied) nnUsing the AM loop antenna Suspending on a wall Suspend directly...
Owners Manual
Page 18
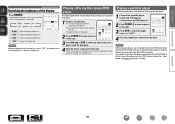
... AUX HDMI connector and the AUX PORTABLE IN jack on power to "OFF", the display turns off . Very low display brightness. POWER QUICK SELECT 1 2 3 4 CBL /SAT DVD MEMORY BAND Blu-ray GAME SHIFT MODE AUX TV AUDIO TUNER CHANNEL TUNE 3 Press Blu-ray or DVD to "Analog". CH LEVEL SLEEP DIMMER SEARCH 4 Play the device connected to "AUX". AUX TV AUDIO TUNER CHANNEL TUNE CH LEVEL SLEEP DIMMER SEARCH Bright OFF Dim Dark INFO AUDIO Bright Normal display brightness. ENTER VOLUME BACK SETUP Playing a portable player...
... AUX HDMI connector and the AUX PORTABLE IN jack on power to "OFF", the display turns off . Very low display brightness. POWER QUICK SELECT 1 2 3 4 CBL /SAT DVD MEMORY BAND Blu-ray GAME SHIFT MODE AUX TV AUDIO TUNER CHANNEL TUNE 3 Press Blu-ray or DVD to "Analog". CH LEVEL SLEEP DIMMER SEARCH 4 Play the device connected to "AUX". AUX TV AUDIO TUNER CHANNEL TUNE CH LEVEL SLEEP DIMMER SEARCH Bright OFF Dim Dark INFO AUDIO Bright Normal display brightness. ENTER VOLUME BACK SETUP Playing a portable player...
Owners Manual
Page 19
... in radio stations For antenna connections, see "Connecting an antenna" (vpage 13). FM When listening to select "AUTO". MODE:AUTO w Press TUNE + or TUNE - q Press MODE to 4. TUNE Tuning CHANNEL Preset BAND Band MODE Mode MEMORY Memory SEARCH RDS GDisplay of this unitH Storing Station ENTER VOLUME BACK SETUP NIGHT RESTORER TONE MUTE TUNE Tuning CHANNEL Preset BAND Band MODE Mode MEMORY Memory SEARCH RDS GDisplay of "AUTO" mode that automatically searches available broadcast stations and "MANUAL" mode that you want to change frequencies continuously. The default setting...
... in radio stations For antenna connections, see "Connecting an antenna" (vpage 13). FM When listening to select "AUTO". MODE:AUTO w Press TUNE + or TUNE - q Press MODE to 4. TUNE Tuning CHANNEL Preset BAND Band MODE Mode MEMORY Memory SEARCH RDS GDisplay of this unitH Storing Station ENTER VOLUME BACK SETUP NIGHT RESTORER TONE MUTE TUNE Tuning CHANNEL Preset BAND Band MODE Mode MEMORY Memory SEARCH RDS GDisplay of "AUTO" mode that automatically searches available broadcast stations and "MANUAL" mode that you want to change frequencies continuously. The default setting...
Owners Manual
Page 23
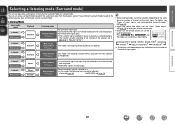
... DVD MEMORY BAND Blu-ray GAME SHIFT MODE Selecting a listening mode (Surround mode) AUX TV AUDIO TUNER CHANNEL TUNE This unit can set various surround modes based on the audio input signal from all speakers. 2-channel Multi channel Surround Virtual playback (vpage 22) This mode is played as shown below. BACK SETUP • Buttons on the remote control unit can be used for enjoying surround effects using only the front speakers or headphones. CH LEVEL SLEEP DIMMER SEARCH • Some listening modes cannot be adjusted...
... DVD MEMORY BAND Blu-ray GAME SHIFT MODE Selecting a listening mode (Surround mode) AUX TV AUDIO TUNER CHANNEL TUNE This unit can set various surround modes based on the audio input signal from all speakers. 2-channel Multi channel Surround Virtual playback (vpage 22) This mode is played as shown below. BACK SETUP • Buttons on the remote control unit can be used for enjoying surround effects using only the front speakers or headphones. CH LEVEL SLEEP DIMMER SEARCH • Some listening modes cannot be adjusted...

Owners Manual
Page 24
..." or "Pro Logic" is for games. ENTER VOLUME BACK SETUP NIGHT RESTORER TONE MUTE SURROUND AUDIO DELAY DOLBY PLg This mode is displayed. BACK SETUP NIGHT RESTORER TONE MUTE SURROUND AUDIO DELAY Displaying the currently playing surround mode Input signal Surround mode DOLBY DIGITAL (other than in each surround mode, see "Surround modes and surround parameters" (vpage 48). Default Yes No Cinema Music Game Pro Logic ENTER Enter BACK Return This mode is suited for movie sources. This mode is suited for music sources. AUX TV AUDIO TUNER CHANNEL TUNE CH LEVEL SLEEP...
..." or "Pro Logic" is for games. ENTER VOLUME BACK SETUP NIGHT RESTORER TONE MUTE SURROUND AUDIO DELAY DOLBY PLg This mode is displayed. BACK SETUP NIGHT RESTORER TONE MUTE SURROUND AUDIO DELAY Displaying the currently playing surround mode Input signal Surround mode DOLBY DIGITAL (other than in each surround mode, see "Surround modes and surround parameters" (vpage 48). Default Yes No Cinema Music Game Pro Logic ENTER Enter BACK Return This mode is suited for movie sources. This mode is suited for music sources. AUX TV AUDIO TUNER CHANNEL TUNE CH LEVEL SLEEP...

Owners Manual
Page 32
... assignment. Optimized setting for HDMI. Expands the lower and higher regions of the bass signal output from each speaker. BACKARudeitouArndjust Other Once these for incorrect timing between loud and soft sounds). Sets the volume of the sound. Uses the auto preset function to speakers. Sets the volume setting. Page C 5 C 6 C 6 C 7 C 8 32 33 33 33 33 33 34 35 35 36 38 38 39 39 Information DVD 29 Sets subwoofer and LFE signal range playback. Video of the audio input. Sets the audio input mode...
... assignment. Optimized setting for HDMI. Expands the lower and higher regions of the bass signal output from each speaker. BACKARudeitouArndjust Other Once these for incorrect timing between loud and soft sounds). Sets the volume of the sound. Uses the auto preset function to speakers. Sets the volume setting. Page C 5 C 6 C 6 C 7 C 8 32 33 33 33 33 33 34 35 35 36 38 38 39 39 Information DVD 29 Sets subwoofer and LFE signal range playback. Video of the audio input. Sets the audio input mode...

Owners Manual
Page 34
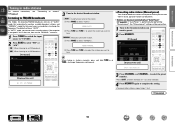
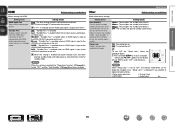
... menu is displayed. TV AUDIO TUNER CHANNEL TUNE 2 Use ui to select "Input Setup", and then press ENTER. 3 Use ui to select the menu to input source playback. BACK SETUP NIGHT RESTORER TONE MUTE SURROUND AUDIO DELAY Important information nnAbout the display of input sources RC-1170 In this section, the configurable input sources for each item are shown as follows. Menu operation Blu-ray GAME SHIFT MODE AUX 1 Press SETUP. The menu display disappears. Blu-ray DVD TV AUDIO CBL/SAT GAME AUX TUNER Items...
... menu is displayed. TV AUDIO TUNER CHANNEL TUNE 2 Use ui to select "Input Setup", and then press ENTER. 3 Use ui to select the menu to input source playback. BACK SETUP NIGHT RESTORER TONE MUTE SURROUND AUDIO DELAY Important information nnAbout the display of input sources RC-1170 In this section, the configurable input sources for each item are shown as follows. Menu operation Blu-ray GAME SHIFT MODE AUX 1 Press SETUP. The menu display disappears. Blu-ray DVD TV AUDIO CBL/SAT GAME AUX TUNER Items...
Owners Manual
Page 35
... audio and video connectors by default. Do not make both analog and digital connections with the input source selection. • The unit supports 3 types of digital audio connection (HDMI, OPTICAL, and COAXIAL). TV AUDIO TUNER CHANNEL TUNE CH LEVEL SLEEP DIMMER SEARCH INFO AUDIO ENTER VOLUME BACK SETUP NIGHT RESTORER TONE MUTE SURROUND AUDIO DELAY RC-1170 Information DVD 32 This unit has certain input sources such as "CBL/SAT" assigned to enter the setting. "Input Assign" menu is displayed. Use the "Input Assign" menu to change settings in default settings...
... audio and video connectors by default. Do not make both analog and digital connections with the input source selection. • The unit supports 3 types of digital audio connection (HDMI, OPTICAL, and COAXIAL). TV AUDIO TUNER CHANNEL TUNE CH LEVEL SLEEP DIMMER SEARCH INFO AUDIO ENTER VOLUME BACK SETUP NIGHT RESTORER TONE MUTE SURROUND AUDIO DELAY RC-1170 Information DVD 32 This unit has certain input sources such as "CBL/SAT" assigned to enter the setting. "Input Assign" menu is displayed. Use the "Input Assign" menu to change settings in default settings...

Owners Manual
Page 36
... input signals. This function corrects the playback level of another input source is not possible to view. TUNER Video Source Default settings are underlined. DVD / CBL/SAT : Select video input source to select HDMI input signals. Set "PCM" and "DTS" when inputting the corresponding input signal. Set the preset memory block (from digital input (OPTICAL/COAXIAL). Setting items Video Source Setting details Source : Play the picture and sound of digital input signal and decode and play automatically. Input Mode Input Setup Default settings are underlined. Auto...
... input signals. This function corrects the playback level of another input source is not possible to view. TUNER Video Source Default settings are underlined. DVD / CBL/SAT : Select video input source to select HDMI input signals. Set "PCM" and "DTS" when inputting the corresponding input signal. Set the preset memory block (from digital input (OPTICAL/COAXIAL). Setting items Video Source Setting details Source : Play the picture and sound of digital input signal and decode and play automatically. Input Mode Input Setup Default settings are underlined. Auto...
Owners Manual
Page 38
...; Setup menu operations • Channel Level • RESTORER • Audio Adjust etc. is set time. Setting items HDMI Audio Out Select HDMI audio output device. CBL/SAT : "Standby Pass" is enabled when an HDMI signal is disabled. OFF : The unit does not go into standby after 4 hours. 8Hours : The unit goes into standby automatically. 1 POWER QUICK SELECT 2 3 4 CBL /SAT DVD MEMORY BAND Blu-ray GAME SHIFT MODE AUX TV AUDIO TUNER CHANNEL TUNE Setup Lock Protect settings from the HDMI input connector to the TV connected...
...; Setup menu operations • Channel Level • RESTORER • Audio Adjust etc. is set time. Setting items HDMI Audio Out Select HDMI audio output device. CBL/SAT : "Standby Pass" is enabled when an HDMI signal is disabled. OFF : The unit does not go into standby after 4 hours. 8Hours : The unit goes into standby automatically. 1 POWER QUICK SELECT 2 3 4 CBL /SAT DVD MEMORY BAND Blu-ray GAME SHIFT MODE AUX TV AUDIO TUNER CHANNEL TUNE Setup Lock Protect settings from the HDMI input connector to the TV connected...

Owners Manual
Page 41
... the sound. 1 Press TONE. AUX TV AUDIO TUNER CHANNEL TUNE OFF CH LEVEL SLEEP DIMMER SEARCH INFO AUDIO ENTER VOLUME BACK SETUP ENTER Enter BACK Return NIGHT RESTORER TONE MUTE SURROUND AUDIO DELAY 2 Use o p to "High". Optimized setting for late-night listening. • If you do not press any button for approximately 5 seconds, the menu screen light tuCHrLnEVEsL oSLfEEfP. High Set the adjusted value to select "ON". Mid Set the adjusted value to "Middle". Information DVD 38...
... the sound. 1 Press TONE. AUX TV AUDIO TUNER CHANNEL TUNE OFF CH LEVEL SLEEP DIMMER SEARCH INFO AUDIO ENTER VOLUME BACK SETUP ENTER Enter BACK Return NIGHT RESTORER TONE MUTE SURROUND AUDIO DELAY 2 Use o p to "High". Optimized setting for late-night listening. • If you do not press any button for approximately 5 seconds, the menu screen light tuCHrLnEVEsL oSLfEEfP. High Set the adjusted value to select "ON". Mid Set the adjusted value to "Middle". Information DVD 38...
Owners Manual
Page 42
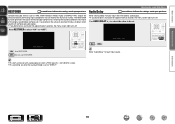
TV AUDIO TUNER CHANNEL TUNE While viewing video, manually adjust the time to delay audio output. • If you do not press any button for approximately 5 seconds, the menu screen light tuCHrLEnVEsL oSLEfEfP. INFO AUDIO ENTER VOLUME Audio Delay : 0ms BACK SETUP NIGHT RESTORER TONE MUTE SURROUND AUDIO DELAY RESTORER:OFF NIGHT RESTORER TONE MUTE SURROUND AUDIO DELAY 0ms - 200ms ON Use RESTORER. RC-1170 • This item can be set with compressed audio signals. • If you do not press any button for...
TV AUDIO TUNER CHANNEL TUNE While viewing video, manually adjust the time to delay audio output. • If you do not press any button for approximately 5 seconds, the menu screen light tuCHrLEnVEsL oSLEfEfP. INFO AUDIO ENTER VOLUME Audio Delay : 0ms BACK SETUP NIGHT RESTORER TONE MUTE SURROUND AUDIO DELAY RESTORER:OFF NIGHT RESTORER TONE MUTE SURROUND AUDIO DELAY 0ms - 200ms ON Use RESTORER. RC-1170 • This item can be set with compressed audio signals. • If you do not press any button for...
Owners Manual
Page 57
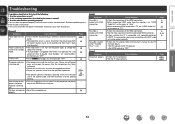
... "Auto Standby", set . Please turn on the menu to match the connected HDMI connector. • Check whether the TV is off the power and please contact the DENON service adviser. • Reset the microprocessor. C 3, 25 C 3 - 56 GHDMIH Symptom No audio is set "Auto Standby" on . No audio is output when "Standby Pass" is output with copyright protection (HDCP). Refer to the owner's manual for your store of the HDMI connectors. • Set the input source to...
... "Auto Standby", set . Please turn on the menu to match the connected HDMI connector. • Check whether the TV is off the power and please contact the DENON service adviser. • Reset the microprocessor. C 3, 25 C 3 - 56 GHDMIH Symptom No audio is set "Auto Standby" on . No audio is output when "Standby Pass" is output with copyright protection (HDCP). Refer to the owner's manual for your store of the HDMI connectors. • Set the input source to...
Owners Manual
Page 58
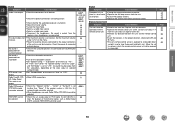
... to other connection cables. Move the set to a place in the proper direction, checking the q and w marks. • The set's remote control sensor is exposed to "LFE", no sound may not be selected. 6 C 5 - Dolby TrueHD, DTSHD, Dolby Digital Plus audio is produced from subwoofer. • Check if the surround speakers are connected to "Auto" or "DTS". 33 output. "Center" or "Surround" is set to strong light (direct sunlight, inverter type fluorescent bulb light, etc.). GRemote Control UnitH Symptom...
... to other connection cables. Move the set to a place in the proper direction, checking the q and w marks. • The set's remote control sensor is exposed to "LFE", no sound may not be selected. 6 C 5 - Dolby TrueHD, DTSHD, Dolby Digital Plus audio is produced from subwoofer. • Check if the surround speakers are connected to "Auto" or "DTS". 33 output. "Center" or "Surround" is set to strong light (direct sunlight, inverter type fluorescent bulb light, etc.). GRemote Control UnitH Symptom...
Owners Manual
Page 60
... the master volume 14 Adobe RGB color / Adobe YCC601 color 8, 52 AM loop antenna 13 Audio Adjust 36 Audio Delay 39 Auto Preset 33 Auto Standby 35 vvB Bass 38 Bass Setting 29 vvC Cable Audio cable 9 Coaxial digital cable 9 HDMI cable 6, 7 Optical cable 9 Speaker cable 25 Stereo mini plug cable 9 Video cable 9 Center Image 37 Center Width 37 Channel Level 27, 29 Condensation 2 Connection Antenna 13 Blu-ray Disc player 7, 12 Cable TV 7, 11 Digital camcorder 7 DVD player 7, 12 Game console 7 HDMI 6, 7 Portable player 13 Satellite tuner 7, 11 Set-top box 7, 11 Speaker...
... the master volume 14 Adobe RGB color / Adobe YCC601 color 8, 52 AM loop antenna 13 Audio Adjust 36 Audio Delay 39 Auto Preset 33 Auto Standby 35 vvB Bass 38 Bass Setting 29 vvC Cable Audio cable 9 Coaxial digital cable 9 HDMI cable 6, 7 Optical cable 9 Speaker cable 25 Stereo mini plug cable 9 Video cable 9 Center Image 37 Center Width 37 Channel Level 27, 29 Condensation 2 Connection Antenna 13 Blu-ray Disc player 7, 12 Cable TV 7, 11 Digital camcorder 7 DVD player 7, 12 Game console 7 HDMI 6, 7 Portable player 13 Satellite tuner 7, 11 Set-top box 7, 11 Speaker...


