
User Manual
Page 2
... SIG, Inc. CAUTION: A CAUTION indicates potential damage to the following two conditions: 1) this tablet PC may not cause harmful interference and 2) this text: Dell™ and the DELL logo are trademarks of your tablet PC. and is a registered trademark owned by Dell under license. Microsoft®, Windows® and Internet Explorer® are not followed...
... SIG, Inc. CAUTION: A CAUTION indicates potential damage to the following two conditions: 1) this tablet PC may not cause harmful interference and 2) this text: Dell™ and the DELL logo are trademarks of your tablet PC. and is a registered trademark owned by Dell under license. Microsoft®, Windows® and Internet Explorer® are not followed...
User Manual
Page 3
... level surface. • Do not stack the equipment, place it is present. Restricting airflow can cause fire or electric shock by Dell. Doing so can damage the equipment or cause overheating. • If your equipment in operating or calibrating medical devices. When Working ...Inside Your Device WARNING: Hazardous moving fan blades. Keep away • from the tablet including the headphone cable before docking to the mobile keyboard dock. • Check the voltage rating before you by shorting out interior ...
... level surface. • Do not stack the equipment, place it is present. Restricting airflow can cause fire or electric shock by Dell. Doing so can damage the equipment or cause overheating. • If your equipment in operating or calibrating medical devices. When Working ...Inside Your Device WARNING: Hazardous moving fan blades. Keep away • from the tablet including the headphone cable before docking to the mobile keyboard dock. • Check the voltage rating before you by shorting out interior ...
User Manual
Page 4
... Do not use with the power button or finger gesture. These power-management features are preset to allow the tablet and screen to reduce air pollution by Dell. For additional information on the product is a joint effort between the EPA and manufacturers to power down (sleep...) after operation. Potential methods include reuse of parts or whole products and recycling of inactivity: The tablet and screen can help...
... Do not use with the power button or finger gesture. These power-management features are preset to allow the tablet and screen to reduce air pollution by Dell. For additional information on the product is a joint effort between the EPA and manufacturers to power down (sleep...) after operation. Potential methods include reuse of parts or whole products and recycling of inactivity: The tablet and screen can help...
User Manual
Page 5
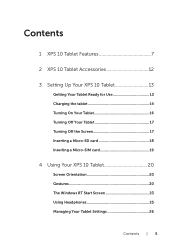
Contents 1 XPS 10 Tablet Features 7 2 XPS 10 Tablet Accessories 12 3 Setting Up Your XPS 10 Tablet 13 Getting Your Tablet Ready for Use 13 Charging the tablet 14 Turning On Your Tablet 16 Turning Off Your Tablet 17 Turning Off the Screen 17 Inserting a Micro-SD card 18 Inserting a Micro-SIM card 19 4 Using Your XPS 10 Tablet 20 Screen Orientation 20 Gestures 20 The Windows RT Start Screen 23 Using Headphones 25 Managing Your Tablet Settings 26 Contents | 5
Contents 1 XPS 10 Tablet Features 7 2 XPS 10 Tablet Accessories 12 3 Setting Up Your XPS 10 Tablet 13 Getting Your Tablet Ready for Use 13 Charging the tablet 14 Turning On Your Tablet 16 Turning Off Your Tablet 17 Turning Off the Screen 17 Inserting a Micro-SD card 18 Inserting a Micro-SIM card 19 4 Using Your XPS 10 Tablet 20 Screen Orientation 20 Gestures 20 The Windows RT Start Screen 23 Using Headphones 25 Managing Your Tablet Settings 26 Contents | 5
User Manual
Page 6
5 Synchronizing Your Tablet 33 6 Using XPS 10 Mobile Keyboard Dock 34 Mobile Keyboard Dock Features 34 Docking Your Tablet to the Keyboard Dock 36 Undocking Your Tablet from the Keyboard Dock............38 Charging the tablet and dock 39 7 Cleaning Your Tablet 42 8 Troubleshooting 43 9 Contacting Dell 47 10 Locating Your Service Tag and Express Service Code 48 11 Specifications 49 12 Glossary 51 13 Index 55 6 | Contents
5 Synchronizing Your Tablet 33 6 Using XPS 10 Mobile Keyboard Dock 34 Mobile Keyboard Dock Features 34 Docking Your Tablet to the Keyboard Dock 36 Undocking Your Tablet from the Keyboard Dock............38 Charging the tablet and dock 39 7 Cleaning Your Tablet 42 8 Troubleshooting 43 9 Contacting Dell 47 10 Locating Your Service Tag and Express Service Code 48 11 Specifications 49 12 Glossary 51 13 Index 55 6 | Contents
User Manual
Page 7
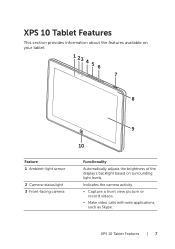
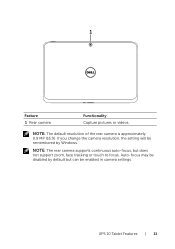
Indicates the camera activity. • Capture a front view picture or record videos. • Make video calls with web applications, such as Skype. XPS 10 Tablet Features This section provides information about the features available on your tablet. 1 23 4 5 6 7 8 9 10 Feature 1 Ambient-light sensor 2 Camera-status light 3 Front-facing camera Functionality Automatically adjusts the brightness of the display's backlight based on surrounding light levels. XPS 10 Tablet Features | 7
Indicates the camera activity. • Capture a front view picture or record videos. • Make video calls with web applications, such as Skype. XPS 10 Tablet Features This section provides information about the features available on your tablet. 1 23 4 5 6 7 8 9 10 Feature 1 Ambient-light sensor 2 Camera-status light 3 Front-facing camera Functionality Automatically adjusts the brightness of the display's backlight based on surrounding light levels. XPS 10 Tablet Features | 7

User Manual
Page 8
... sounds. • Records voice for calls made from web applications, such as Skype. 7 Power and Sleep/Wake button • Press and hold to turn the tablet on or off. • Press to turn the touchscreen display on or off. 8 Battery-status light Indicates the battery charge status. 9 Touchscreen display Touch the..., and the on-screen keyboard. 10 Windows button • Press to open the Windows Start screen. • Press for quick access to focus. 8 | XPS 10 Tablet Features NOTE: The default resolution of the front camera is approximately 0.9 MP (16:9).
... sounds. • Records voice for calls made from web applications, such as Skype. 7 Power and Sleep/Wake button • Press and hold to turn the tablet on or off. • Press to turn the touchscreen display on or off. 8 Battery-status light Indicates the battery charge status. 9 Touchscreen display Touch the..., and the on-screen keyboard. 10 Windows button • Press to open the Windows Start screen. • Press for quick access to focus. 8 | XPS 10 Tablet Features NOTE: The default resolution of the front camera is approximately 0.9 MP (16:9).
User Manual
Page 9
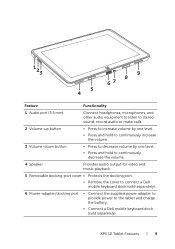
... volume. 4 Speaker Provides audio output for video and music playback. 5 Removable docking-port cover • Protects the docking port. • Remove the cover to connect a Dell mobile keyboard dock (sold separately). 6 Power-adapter/docking port • Connect the supplied power adapter to provide power to the...
... volume. 4 Speaker Provides audio output for video and music playback. 5 Removable docking-port cover • Protects the docking port. • Remove the cover to connect a Dell mobile keyboard dock (sold separately). 6 Power-adapter/docking port • Connect the supplied power adapter to provide power to the...
User Manual
Page 10
Feature Functionality 7 Micro-USB port • Connect USB devices or connect to your computer for transferring or synchronizing data, music, photos, videos, contacts, and so on. • Connect USB cable to trickle charge the battery. • Capable of providing up to 1 amp power. 8 Removable docking-port cover • Protects the docking port. • Remove the cover to connect a Dell mobile keyboard dock (sold separately). 9 Speaker Provides audio output for video and music playback. 10 | XPS 10 Tablet Features
Feature Functionality 7 Micro-USB port • Connect USB devices or connect to your computer for transferring or synchronizing data, music, photos, videos, contacts, and so on. • Connect USB cable to trickle charge the battery. • Capable of providing up to 1 amp power. 8 Removable docking-port cover • Protects the docking port. • Remove the cover to connect a Dell mobile keyboard dock (sold separately). 9 Speaker Provides audio output for video and music playback. 10 | XPS 10 Tablet Features
User Manual
Page 11
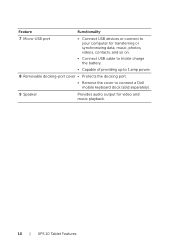
NOTE: The rear camera supports continuous auto-focus, but can be disabled by Windows. 1 Feature 1 Rear camera Functionality Capture pictures or videos. NOTE: The default resolution of the rear camera is approximately 0.9 MP (16:9). If you change the camera resolution, the setting will be remembered by default but does not support zoom, face tracking or touch to focus. Auto-focus may be enabled in camera settings. XPS 10 Tablet Features | 11
NOTE: The rear camera supports continuous auto-focus, but can be disabled by Windows. 1 Feature 1 Rear camera Functionality Capture pictures or videos. NOTE: The default resolution of the rear camera is approximately 0.9 MP (16:9). If you change the camera resolution, the setting will be remembered by default but does not support zoom, face tracking or touch to focus. Auto-focus may be enabled in camera settings. XPS 10 Tablet Features | 11
User Manual
Page 12
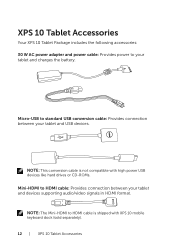
...drives or CD-ROMs. Mini-HDMI to standard USB conversion cable: Provides connection between your tablet and devices supporting audio/video signals in HDMI format. XPS 10 Tablet Accessories Your XPS 10 Tablet Package includes the following accessories: 30 W AC power adapter and power cable: Provides ...power to HDMI cable is not compatible with XPS 10 mobile keyboard dock (sold separately). 12 | XPS 10 Tablet Accessories NOTE: The Mini...
...drives or CD-ROMs. Mini-HDMI to standard USB conversion cable: Provides connection between your tablet and devices supporting audio/video signals in HDMI format. XPS 10 Tablet Accessories Your XPS 10 Tablet Package includes the following accessories: 30 W AC power adapter and power cable: Provides ...power to HDMI cable is not compatible with XPS 10 mobile keyboard dock (sold separately). 12 | XPS 10 Tablet Accessories NOTE: The Mini...

User Manual
Page 13
Setting Up Your XPS 10 Tablet | 13 WARNING: Before you begin any of the procedures in this section, read the safety information that shipped with your tablet. Setting Up Your XPS 10 Tablet This section provides information about how to set up the XPS 10 Tablet for Use Connect the AC power adapter and power cable 1 Connect the supplied power cable into the supplied power adapter. Getting Your Tablet Ready for first time use. For additional best practices information, see www.dell.com/regulatory_compliance.
Setting Up Your XPS 10 Tablet | 13 WARNING: Before you begin any of the procedures in this section, read the safety information that shipped with your tablet. Setting Up Your XPS 10 Tablet This section provides information about how to set up the XPS 10 Tablet for Use Connect the AC power adapter and power cable 1 Connect the supplied power cable into the supplied power adapter. Getting Your Tablet Ready for first time use. For additional best practices information, see www.dell.com/regulatory_compliance.

User Manual
Page 14
... The battery requires up to 24 hours to fully charge depending on the tablet. 2 Connect the power adapter to an electrical outlet and charge the tablet until the battery is not fully charged when you unpack your tablet. 1 Connect the power adapter to the 40-pin power-adapter port on ... power adapter and power cable to your tablet. Using unauthorized power adapters or power cables may cause severe damage to charge your tablet. NOTE: You can also trickle charge the tablet via USB connection. NOTE: The battery is fully charged. Charging the tablet CAUTION: Charge the battery in an ambient...
... The battery requires up to 24 hours to fully charge depending on the tablet. 2 Connect the power adapter to an electrical outlet and charge the tablet until the battery is not fully charged when you unpack your tablet. 1 Connect the power adapter to the 40-pin power-adapter port on ... power adapter and power cable to your tablet. Using unauthorized power adapters or power cables may cause severe damage to charge your tablet. NOTE: You can also trickle charge the tablet via USB connection. NOTE: The battery is fully charged. Charging the tablet CAUTION: Charge the battery in an ambient...
User Manual
Page 15
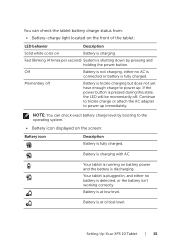
...exact battery charge level by pressing and holding the power button. Battery is at critical level. Battery is charging with AC. Battery is discharging. Your tablet is running on battery power and the battery is at low level. If the power button is pressed during this state, the LED will be... adapter to power up immediately. Fast Blinking (4 times per second) System is detected, or the battery isn't working correctly. Setting Up Your XPS 10 Tablet | 15 Off Battery is not charging, either no AC is connected or battery is fully charged. Momentary off .
...exact battery charge level by pressing and holding the power button. Battery is at critical level. Battery is charging with AC. Battery is discharging. Your tablet is running on battery power and the battery is at low level. If the power button is pressed during this state, the LED will be... adapter to power up immediately. Fast Blinking (4 times per second) System is detected, or the battery isn't working correctly. Setting Up Your XPS 10 Tablet | 15 Off Battery is not charging, either no AC is connected or battery is fully charged. Momentary off .
User Manual
Page 16
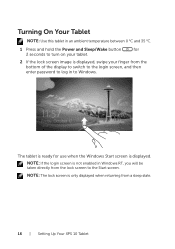
NOTE: If the login screen is not enabled in to the Start screen. NOTE: The lock screen is displayed. Turning On Your Tablet NOTE: Use this tablet in an ambient temperature between 0 °C and 35 °C. 1 Press and hold the Power and Sleep/Wake button for use when the Windows Start screen ...is only displayed when returning from the lock screen to Windows. The tablet is ready for 2 seconds to turn on your tablet. 2 If the lock screen image is displayed, swipe your finger from the bottom of the display to switch to the login...
NOTE: If the login screen is not enabled in to the Start screen. NOTE: The lock screen is displayed. Turning On Your Tablet NOTE: Use this tablet in an ambient temperature between 0 °C and 35 °C. 1 Press and hold the Power and Sleep/Wake button for use when the Windows Start screen ...is only displayed when returning from the lock screen to Windows. The tablet is ready for 2 seconds to turn on your tablet. 2 If the lock screen image is displayed, swipe your finger from the bottom of the display to switch to the login...

User Manual
Page 17
Turning Off Your Tablet • Using power button: Press and hold the Power and Sleep/Wake button least 4 seconds to turn off ), press the Power and Sleep/Wake button ... Screen • Using power button: Press the Power and Sleep/Wake button the screen. NOTE: If your tablet is in a sleep state (tablet is on, but screen is off the tablet. Setting Up Your XPS 10 Tablet | 17 to turn off • Using Charms: 1 Swipe from the right edge of the display to access...
Turning Off Your Tablet • Using power button: Press and hold the Power and Sleep/Wake button least 4 seconds to turn off ), press the Power and Sleep/Wake button ... Screen • Using power button: Press the Power and Sleep/Wake button the screen. NOTE: If your tablet is in a sleep state (tablet is on, but screen is off the tablet. Setting Up Your XPS 10 Tablet | 17 to turn off • Using Charms: 1 Swipe from the right edge of the display to access...

User Manual
Page 18
For more information on removing the Micro-SD card, see Remove the Micro-SD card. 18 | Setting Up Your XPS 10 Tablet Inserting a Micro-SD card 1 2 3 1 Open the slot cover. 2 Follow the illustration to insert the Micro-SD card into the Micro-SD card slot. 3 Close the slot cover.
For more information on removing the Micro-SD card, see Remove the Micro-SD card. 18 | Setting Up Your XPS 10 Tablet Inserting a Micro-SD card 1 2 3 1 Open the slot cover. 2 Follow the illustration to insert the Micro-SD card into the Micro-SD card slot. 3 Close the slot cover.

User Manual
Page 19
CAUTION: Inserting an incompatible SIM card, such as a Nano-SIM card, into the Micro-SIM card slot. 3 Close the slot cover. For more information on the card. Setting Up Your XPS 10 Tablet | 19 Inserting a Micro-SIM card 1 2 3 1 Open the slot cover. 2 Follow the illustration to insert the Micro-SIM card into the Micro-SIM card slot may damage the card or the tablet, and may corrupt data stored on removing the Micro-SIM card, see Remove the Micro-SIM card.
CAUTION: Inserting an incompatible SIM card, such as a Nano-SIM card, into the Micro-SIM card slot. 3 Close the slot cover. For more information on the card. Setting Up Your XPS 10 Tablet | 19 Inserting a Micro-SIM card 1 2 3 1 Open the slot cover. 2 Follow the illustration to insert the Micro-SIM card into the Micro-SIM card slot may damage the card or the tablet, and may corrupt data stored on removing the Micro-SIM card, see Remove the Micro-SIM card.

User Manual
Page 20
... toggle to lock the screen orientation, or touch toggle to portrait or landscape format depending on how you to operate the tablet. Using Your XPS 10 Tablet Screen Orientation For optimal viewing experience, the screen orientation changes automatically to unlock the screen orientation. You can touch the screen... Touch buttons on the screen. • Input text using the on the display with your fingertip. Allows you hold the tablet. Gestures Your tablet has a multi-touch display. NOTE: Some applications may not support automatic screen rotation to portrait or landscape format.
... toggle to lock the screen orientation, or touch toggle to portrait or landscape format depending on how you to operate the tablet. Using Your XPS 10 Tablet Screen Orientation For optimal viewing experience, the screen orientation changes automatically to unlock the screen orientation. You can touch the screen... Touch buttons on the screen. • Input text using the on the display with your fingertip. Allows you hold the tablet. Gestures Your tablet has a multi-touch display. NOTE: Some applications may not support automatic screen rotation to portrait or landscape format.
User Manual
Page 21
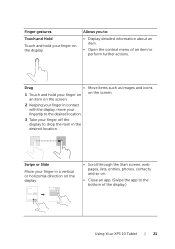
... the display, move your fingertip to : • Display detailed information about an item. • Open the context menu of the display.) Using Your XPS 10 Tablet | 21 Drag • Move items such as images and icons 1 Touch and hold your finger on on the screen. an item on the display.
... the display, move your fingertip to : • Display detailed information about an item. • Open the context menu of the display.) Using Your XPS 10 Tablet | 21 Drag • Move items such as images and icons 1 Touch and hold your finger on on the screen. an item on the display.


