User Manual
Page 3
... resting directly on exposed skin for use damaged equipment, including exposed, frayed, or damaged power cords. • Do not push any cover(s) (including tablet covers, bezels, filler brackets, front-panel inserts, and so on the back panel must be manufactured with the modem should have least 10.2... in your device includes a modem, the cable used with a minimum wire size of clearance on the Regulatory Compliance page, www.dell.com/regulatory_compliance. The equipment should be manually set to permit the airflow required for use in an enclosed space, or otherwise install ...
... resting directly on exposed skin for use damaged equipment, including exposed, frayed, or damaged power cords. • Do not push any cover(s) (including tablet covers, bezels, filler brackets, front-panel inserts, and so on the back panel must be manufactured with the modem should have least 10.2... in your device includes a modem, the cable used with a minimum wire size of clearance on the Regulatory Compliance page, www.dell.com/regulatory_compliance. The equipment should be manually set to permit the airflow required for use in an enclosed space, or otherwise install ...

User Manual
Page 8
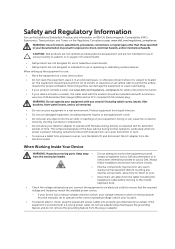
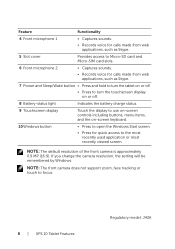
...Windows. Feature Functionality 4 Front microphone 1 • Captures sounds. • Records voice for calls made from web applications, such as Skype. 5 Slot cover Provides access to Micro-SD card and Micro-SIM card slots. 6 Front microphone 2 • Captures sounds. • Records voice for calls made ...from web applications, such as Skype. 7 Power and Sleep/Wake button • Press and hold to turn the tablet on or off. • Press to turn the touchscreen display on or off. 8 Battery-status light Indicates the battery charge status. 9 ...
...Windows. Feature Functionality 4 Front microphone 1 • Captures sounds. • Records voice for calls made from web applications, such as Skype. 5 Slot cover Provides access to Micro-SD card and Micro-SIM card slots. 6 Front microphone 2 • Captures sounds. • Records voice for calls made ...from web applications, such as Skype. 7 Power and Sleep/Wake button • Press and hold to turn the tablet on or off. • Press to turn the touchscreen display on or off. 8 Battery-status light Indicates the battery charge status. 9 ...
User Manual
Page 9
...; Press and hold to continuously decrease the volume. 4 Speaker Provides audio output for video and music playback. 5 Removable docking-port cover • Protects the docking port. • Remove the cover to connect a Dell mobile keyboard dock (sold separately). 6 Power-adapter/docking port • Connect the supplied power adapter to provide power to the...
...; Press and hold to continuously decrease the volume. 4 Speaker Provides audio output for video and music playback. 5 Removable docking-port cover • Protects the docking port. • Remove the cover to connect a Dell mobile keyboard dock (sold separately). 6 Power-adapter/docking port • Connect the supplied power adapter to provide power to the...

User Manual
Page 10
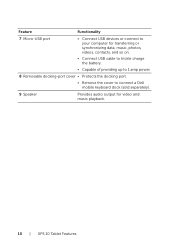
Feature Functionality 7 Micro-USB port • Connect USB devices or connect to your computer for transferring or synchronizing data, music, photos, videos, contacts, and so on. • Connect USB cable to trickle charge the battery. • Capable of providing up to 1 amp power. 8 Removable docking-port cover • Protects the docking port. • Remove the cover to connect a Dell mobile keyboard dock (sold separately). 9 Speaker Provides audio output for video and music playback. 10 | XPS 10 Tablet Features
Feature Functionality 7 Micro-USB port • Connect USB devices or connect to your computer for transferring or synchronizing data, music, photos, videos, contacts, and so on. • Connect USB cable to trickle charge the battery. • Capable of providing up to 1 amp power. 8 Removable docking-port cover • Protects the docking port. • Remove the cover to connect a Dell mobile keyboard dock (sold separately). 9 Speaker Provides audio output for video and music playback. 10 | XPS 10 Tablet Features

User Manual
Page 18
Inserting a Micro-SD card 1 2 3 1 Open the slot cover. 2 Follow the illustration to insert the Micro-SD card into the Micro-SD card slot. 3 Close the slot cover. For more information on removing the Micro-SD card, see Remove the Micro-SD card. 18 | Setting Up Your XPS 10 Tablet
Inserting a Micro-SD card 1 2 3 1 Open the slot cover. 2 Follow the illustration to insert the Micro-SD card into the Micro-SD card slot. 3 Close the slot cover. For more information on removing the Micro-SD card, see Remove the Micro-SD card. 18 | Setting Up Your XPS 10 Tablet

User Manual
Page 19
For more information on the card. Inserting a Micro-SIM card 1 2 3 1 Open the slot cover. 2 Follow the illustration to insert the Micro-SIM card into the Micro-SIM card slot may damage the card or the tablet, and may corrupt data stored on removing the Micro-SIM card, see Remove the Micro-SIM card. CAUTION: Inserting an incompatible SIM card, such as a Nano-SIM card, into the Micro-SIM card slot. 3 Close the slot cover. Setting Up Your XPS 10 Tablet | 19
For more information on the card. Inserting a Micro-SIM card 1 2 3 1 Open the slot cover. 2 Follow the illustration to insert the Micro-SIM card into the Micro-SIM card slot may damage the card or the tablet, and may corrupt data stored on removing the Micro-SIM card, see Remove the Micro-SIM card. CAUTION: Inserting an incompatible SIM card, such as a Nano-SIM card, into the Micro-SIM card slot. 3 Close the slot cover. Setting Up Your XPS 10 Tablet | 19

User Manual
Page 26
Make sure your tablet has finished all icons in the notification area at the bottom-right corner of the screen. A message appears confirming that the Micro-SD card can be removed, ensure all data transfers involving the Micro-SD card are complete. 3 Open the slot cover. 4 Press on the inserted ...release the card. 5 Slide the card out after it pops out from the Micro-SD card slot. 2 3 4 26 | Using Your XPS 10 Tablet Managing Your Tablet Settings Remove the Micro-SD card CAUTION: Removing the Micro-SD card when transferring data may cause data loss or result in application errors.
Make sure your tablet has finished all icons in the notification area at the bottom-right corner of the screen. A message appears confirming that the Micro-SD card can be removed, ensure all data transfers involving the Micro-SD card are complete. 3 Open the slot cover. 4 Press on the inserted ...release the card. 5 Slide the card out after it pops out from the Micro-SD card slot. 2 3 4 26 | Using Your XPS 10 Tablet Managing Your Tablet Settings Remove the Micro-SD card CAUTION: Removing the Micro-SD card when transferring data may cause data loss or result in application errors.

User Manual
Page 27
Make sure your tablet is on the inserted Micro-SIM card to release the card. 4 Slide the card out after it pops out from the Micro-SIM card slot. 2 3 4 Using Your XPS 10 Tablet | 27 For more information on turning off your tablet, see Turning Off Your Tablet. 2 Open the slot cover. 3 Press on may cause data loss or damage the card. Remove the Micro-SIM card CAUTION: Removing the Micro-SIM card when the tablet is turned off or the network connections are disabled. 1 Turn off your tablet.
Make sure your tablet is on the inserted Micro-SIM card to release the card. 4 Slide the card out after it pops out from the Micro-SIM card slot. 2 3 4 Using Your XPS 10 Tablet | 27 For more information on turning off your tablet, see Turning Off Your Tablet. 2 Open the slot cover. 3 Press on may cause data loss or damage the card. Remove the Micro-SIM card CAUTION: Removing the Micro-SIM card when the tablet is turned off or the network connections are disabled. 1 Turn off your tablet.

User Manual
Page 36
NOTE: The hinge holder can be rotated manually to a better position for easy docking. 36 | Using XPS 10 Mobile Keyboard Dock Or, center the Windows button to the painted line on the keyboard dock. Docking Your Tablet to the Keyboard Dock 1 Remove the two docking-port covers from the tablet. 2 Align the power-adapter/docking port on the tablet with the 40-pin docking connector on the front of the hinge holder.
NOTE: The hinge holder can be rotated manually to a better position for easy docking. 36 | Using XPS 10 Mobile Keyboard Dock Or, center the Windows button to the painted line on the keyboard dock. Docking Your Tablet to the Keyboard Dock 1 Remove the two docking-port covers from the tablet. 2 Align the power-adapter/docking port on the tablet with the 40-pin docking connector on the front of the hinge holder.
User Manual
Page 37
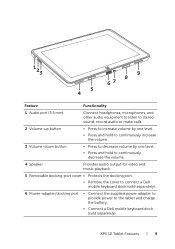
Using XPS 10 Mobile Keyboard Dock | 37 3 Slide the tablet downward until the tablet clicks into place. NOTE: When the connection is made, you need to the Locked position. When the tablet is correctly connected, the tablet-release latch on the dock will move to manually turn the on-screen keyboard off if it is not docked. NOTE: You can reinstall the docking-port covers when the tablet is displayed on the screen.
Using XPS 10 Mobile Keyboard Dock | 37 3 Slide the tablet downward until the tablet clicks into place. NOTE: When the connection is made, you need to the Locked position. When the tablet is correctly connected, the tablet-release latch on the dock will move to manually turn the on-screen keyboard off if it is not docked. NOTE: You can reinstall the docking-port covers when the tablet is displayed on the screen.
User Manual
Page 45
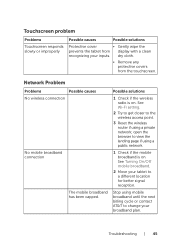
... using a public network. 1 Check if the mobile broadband is on . Troubleshooting | 45 dry cloth. • Remove any protective covers from display with a clean recognizing your inputs. See Wi-Fi setting. 2 Try to get closer to view the landing page if...Move your broadband plan. Touchscreen problem Problems Touchscreen responds slowly or improperly Possible causes Possible solutions Protective cover • Gently wipe the prevents the tablet from the touchscreen. Network Problem Problems Possible causes No wireless connection No mobile broadband connection The ...
... using a public network. 1 Check if the mobile broadband is on . Troubleshooting | 45 dry cloth. • Remove any protective covers from display with a clean recognizing your inputs. See Wi-Fi setting. 2 Try to get closer to view the landing page if...Move your broadband plan. Touchscreen problem Problems Touchscreen responds slowly or improperly Possible causes Possible solutions Protective cover • Gently wipe the prevents the tablet from the touchscreen. Network Problem Problems Possible causes No wireless connection No mobile broadband connection The ...

User Manual
Page 48
NOTE: Before you may also be found on a label at the bottom right of the tablet back cover. 48 | Locating Your Service Tag and Express Service Code You may contact DELL for your Service Tag. The code helps Dell's automated-support telephone system direct your Express Service Code ready. The Service Tag and Express Service...
NOTE: Before you may also be found on a label at the bottom right of the tablet back cover. 48 | Locating Your Service Tag and Express Service Code You may contact DELL for your Service Tag. The code helps Dell's automated-support telephone system direct your Express Service Code ready. The Service Tag and Express Service...

User Guide
Page 3
...contact with exposed skin can damage the equipment or cause overheating. • If your product contains a tuner, see www.dell.com/regulatory_compliance for safety instructions for extended periods of your documentation may become very warm during normal operation, particularly when AC ... liquid intrusion. • Do not use adapter plugs that the required voltage and frequency match the available power source. -- Before touching any cover(s) (including tablet covers, bezels, filler brackets, front-panel inserts, and so on) removed. • Do not use : • Place the equipment on...
...contact with exposed skin can damage the equipment or cause overheating. • If your product contains a tuner, see www.dell.com/regulatory_compliance for safety instructions for extended periods of your documentation may become very warm during normal operation, particularly when AC ... liquid intrusion. • Do not use adapter plugs that the required voltage and frequency match the available power source. -- Before touching any cover(s) (including tablet covers, bezels, filler brackets, front-panel inserts, and so on) removed. • Do not use : • Place the equipment on...
User Guide
Page 8
...screen. Feature Functionality 4 Front microphone 1 • Captures sounds. • Records voice for calls made from web applications, such as Skype. 5 Slot cover Provides access to Micro-SD card and Micro-SIM card slots. 6 Front microphone 2 • Captures sounds. • Records voice for calls made ...from web applications, such as Skype. 7 Power and Sleep/Wake button • Press and hold to turn the tablet on or off. • Press to turn the touchscreen display on or off. 8 Battery-status light Indicates the battery charge status. 9 ...
...screen. Feature Functionality 4 Front microphone 1 • Captures sounds. • Records voice for calls made from web applications, such as Skype. 5 Slot cover Provides access to Micro-SD card and Micro-SIM card slots. 6 Front microphone 2 • Captures sounds. • Records voice for calls made ...from web applications, such as Skype. 7 Power and Sleep/Wake button • Press and hold to turn the tablet on or off. • Press to turn the touchscreen display on or off. 8 Battery-status light Indicates the battery charge status. 9 ...
User Guide
Page 9
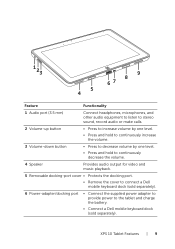
XPS 10 Tablet Features | 9 1 23 9 8 67 5 4 Feature Functionality 1 Audio port (3.5 mm) Connect headphones, microphones, and other audio equipment to listen to stereo sound, record audio or make calls. 2 ...; Press and hold to continuously decrease the volume. 4 Speaker Provides audio output for video and music playback. 5 Removable docking-port cover • Protects the docking port. • Remove the cover to connect a Dell mobile keyboard dock (sold separately). 6 Power-adapter/docking port • Connect the supplied power adapter to provide power to the...
XPS 10 Tablet Features | 9 1 23 9 8 67 5 4 Feature Functionality 1 Audio port (3.5 mm) Connect headphones, microphones, and other audio equipment to listen to stereo sound, record audio or make calls. 2 ...; Press and hold to continuously decrease the volume. 4 Speaker Provides audio output for video and music playback. 5 Removable docking-port cover • Protects the docking port. • Remove the cover to connect a Dell mobile keyboard dock (sold separately). 6 Power-adapter/docking port • Connect the supplied power adapter to provide power to the...
User Guide
Page 10
Feature Functionality 7 Micro-USB port • Connect USB devices or connect to your computer for transferring or synchronizing data, music, photos, videos, contacts, and so on. • Connect USB cable to trickle charge the battery. • Capable of providing up to 1 amp power. 8 Removable docking-port cover • Protects the docking port. • Remove the cover to connect a Dell mobile keyboard dock (sold separately). 9 Speaker Provides audio output for video and music playback. 10 | XPS 10 Tablet Features
Feature Functionality 7 Micro-USB port • Connect USB devices or connect to your computer for transferring or synchronizing data, music, photos, videos, contacts, and so on. • Connect USB cable to trickle charge the battery. • Capable of providing up to 1 amp power. 8 Removable docking-port cover • Protects the docking port. • Remove the cover to connect a Dell mobile keyboard dock (sold separately). 9 Speaker Provides audio output for video and music playback. 10 | XPS 10 Tablet Features

User Guide
Page 18
Inserting a Micro-SD card 1 2 3 1 Open the slot cover. 2 Follow the illustration to insert the Micro-SD card into the Micro-SD card slot. 3 Close the slot cover. For more information on removing the Micro-SD card, see Remove the Micro-SD card. 18 | Setting Up Your XPS 10 Tablet
Inserting a Micro-SD card 1 2 3 1 Open the slot cover. 2 Follow the illustration to insert the Micro-SD card into the Micro-SD card slot. 3 Close the slot cover. For more information on removing the Micro-SD card, see Remove the Micro-SD card. 18 | Setting Up Your XPS 10 Tablet

User Guide
Page 19
Setting Up Your XPS 10 Tablet | 19 For more information on the card. CAUTION: Inserting an incompatible SIM card, such as a Nano-SIM card, into the Micro-SIM card slot. 3 Close the slot cover. Inserting a Micro-SIM card 1 2 3 1 Open the slot cover. 2 Follow the illustration to insert the Micro-SIM card into the Micro-SIM card slot may damage the card or the tablet, and may corrupt data stored on removing the Micro-SIM card, see Remove the Micro-SIM card.
Setting Up Your XPS 10 Tablet | 19 For more information on the card. CAUTION: Inserting an incompatible SIM card, such as a Nano-SIM card, into the Micro-SIM card slot. 3 Close the slot cover. Inserting a Micro-SIM card 1 2 3 1 Open the slot cover. 2 Follow the illustration to insert the Micro-SIM card into the Micro-SIM card slot may damage the card or the tablet, and may corrupt data stored on removing the Micro-SIM card, see Remove the Micro-SIM card.

User Guide
Page 26
... to display all data transfers involving the Micro-SD card are complete. 3 Open the slot cover. 4 Press on the inserted Micro-SD card to the Micro-SD card. 1 Enter the Desktop mode. Managing Your Tablet Settings Remove the Micro-SD card CAUTION: Removing the Micro-SD card when transferring data may... appears confirming that the Micro-SD card can be removed, ensure all icons in the notification area. 2 Touch Eject SD Memory Card. Make sure your tablet has finished all save operations to release the card. 5 Slide the card out after it pops out from the Micro-SD card slot. 2 3 4 26 |...
... to display all data transfers involving the Micro-SD card are complete. 3 Open the slot cover. 4 Press on the inserted Micro-SD card to the Micro-SD card. 1 Enter the Desktop mode. Managing Your Tablet Settings Remove the Micro-SD card CAUTION: Removing the Micro-SD card when transferring data may... appears confirming that the Micro-SD card can be removed, ensure all icons in the notification area. 2 Touch Eject SD Memory Card. Make sure your tablet has finished all save operations to release the card. 5 Slide the card out after it pops out from the Micro-SD card slot. 2 3 4 26 |...

User Guide
Page 27
Remove the Micro-SIM card CAUTION: Removing the Micro-SIM card when the tablet is turned off or the network connections are disabled. 1 Turn off your tablet. For more information on turning off your tablet, see Turning Off Your Tablet. 2 Open the slot cover. 3 Press on may cause data loss or damage the card. Make sure your tablet is on the inserted Micro-SIM card to release the card. 4 Slide the card out after it pops out from the Micro-SIM card slot. 2 3 4 Using Your XPS 10 Tablet | 27
Remove the Micro-SIM card CAUTION: Removing the Micro-SIM card when the tablet is turned off or the network connections are disabled. 1 Turn off your tablet. For more information on turning off your tablet, see Turning Off Your Tablet. 2 Open the slot cover. 3 Press on may cause data loss or damage the card. Make sure your tablet is on the inserted Micro-SIM card to release the card. 4 Slide the card out after it pops out from the Micro-SIM card slot. 2 3 4 Using Your XPS 10 Tablet | 27

