User Manual
Page 3
... intended for use in close proximity to patients or in oxygen rich environments. • Dell products are not designed for use damaged equipment, including exposed, frayed, or damaged power cords. • Do not push any cover(s) (including tablet covers, bezels, filler brackets, front-panel inserts, and so on a hard, level surface. • Do...
... intended for use in close proximity to patients or in oxygen rich environments. • Dell products are not designed for use damaged equipment, including exposed, frayed, or damaged power cords. • Do not push any cover(s) (including tablet covers, bezels, filler brackets, front-panel inserts, and so on a hard, level surface. • Do...

User Manual
Page 8
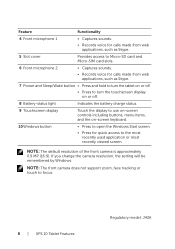
... will be remembered by Windows. Feature Functionality 4 Front microphone 1 • Captures sounds. • Records voice for calls made from web applications, such as Skype. 5 Slot cover Provides access to Micro-SD card and Micro-SIM card slots. 6 Front microphone 2 • Captures sounds. • Records voice for calls made from web applications...
... will be remembered by Windows. Feature Functionality 4 Front microphone 1 • Captures sounds. • Records voice for calls made from web applications, such as Skype. 5 Slot cover Provides access to Micro-SD card and Micro-SIM card slots. 6 Front microphone 2 • Captures sounds. • Records voice for calls made from web applications...
User Manual
Page 9
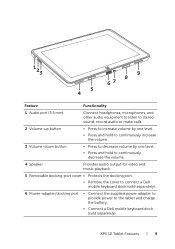
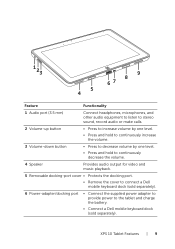
...; Press and hold to continuously decrease the volume. 4 Speaker Provides audio output for video and music playback. 5 Removable docking-port cover • Protects the docking port. • Remove the cover to connect a Dell mobile keyboard dock (sold separately). 6 Power-adapter/docking port • Connect the supplied power adapter to provide power to the...
...; Press and hold to continuously decrease the volume. 4 Speaker Provides audio output for video and music playback. 5 Removable docking-port cover • Protects the docking port. • Remove the cover to connect a Dell mobile keyboard dock (sold separately). 6 Power-adapter/docking port • Connect the supplied power adapter to provide power to the...

User Manual
Page 10
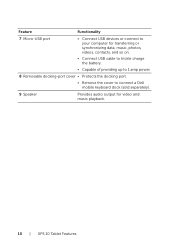
Feature Functionality 7 Micro-USB port • Connect USB devices or connect to your computer for transferring or synchronizing data, music, photos, videos, contacts, and so on. • Connect USB cable to trickle charge the battery. • Capable of providing up to 1 amp power. 8 Removable docking-port cover • Protects the docking port. • Remove the cover to connect a Dell mobile keyboard dock (sold separately). 9 Speaker Provides audio output for video and music playback. 10 | XPS 10 Tablet Features
Feature Functionality 7 Micro-USB port • Connect USB devices or connect to your computer for transferring or synchronizing data, music, photos, videos, contacts, and so on. • Connect USB cable to trickle charge the battery. • Capable of providing up to 1 amp power. 8 Removable docking-port cover • Protects the docking port. • Remove the cover to connect a Dell mobile keyboard dock (sold separately). 9 Speaker Provides audio output for video and music playback. 10 | XPS 10 Tablet Features

User Manual
Page 18
For more information on removing the Micro-SD card, see Remove the Micro-SD card. 18 | Setting Up Your XPS 10 Tablet Inserting a Micro-SD card 1 2 3 1 Open the slot cover. 2 Follow the illustration to insert the Micro-SD card into the Micro-SD card slot. 3 Close the slot cover.
For more information on removing the Micro-SD card, see Remove the Micro-SD card. 18 | Setting Up Your XPS 10 Tablet Inserting a Micro-SD card 1 2 3 1 Open the slot cover. 2 Follow the illustration to insert the Micro-SD card into the Micro-SD card slot. 3 Close the slot cover.

User Manual
Page 19
CAUTION: Inserting an incompatible SIM card, such as a Nano-SIM card, into the Micro-SIM card slot. 3 Close the slot cover. Setting Up Your XPS 10 Tablet | 19 Inserting a Micro-SIM card 1 2 3 1 Open the slot cover. 2 Follow the illustration to insert the Micro-SIM card into the Micro-SIM card slot may damage the card or the tablet, and may corrupt data stored on removing the Micro-SIM card, see Remove the Micro-SIM card. For more information on the card.
CAUTION: Inserting an incompatible SIM card, such as a Nano-SIM card, into the Micro-SIM card slot. 3 Close the slot cover. Setting Up Your XPS 10 Tablet | 19 Inserting a Micro-SIM card 1 2 3 1 Open the slot cover. 2 Follow the illustration to insert the Micro-SIM card into the Micro-SIM card slot may damage the card or the tablet, and may corrupt data stored on removing the Micro-SIM card, see Remove the Micro-SIM card. For more information on the card.

User Manual
Page 26
A message appears confirming that the Micro-SD card can be removed, ensure all data transfers involving the Micro-SD card are complete. 3 Open the slot cover. 4 Press on the inserted Micro-SD card to the Micro-SD card. 1 Enter the Desktop mode. NOTE: If you don't see Safely Remove Hardware , touch ...
A message appears confirming that the Micro-SD card can be removed, ensure all data transfers involving the Micro-SD card are complete. 3 Open the slot cover. 4 Press on the inserted Micro-SD card to the Micro-SD card. 1 Enter the Desktop mode. NOTE: If you don't see Safely Remove Hardware , touch ...

User Manual
Page 27
Remove the Micro-SIM card CAUTION: Removing the Micro-SIM card when the tablet is turned off or the network connections are disabled. 1 Turn off your tablet is on the inserted Micro-SIM card to release the card. 4 Slide the card out after it pops out from the Micro-SIM card slot. 2 3 4 Using Your XPS 10 Tablet | 27 For more information on turning off your tablet. Make sure your tablet, see Turning Off Your Tablet. 2 Open the slot cover. 3 Press on may cause data loss or damage the card.
Remove the Micro-SIM card CAUTION: Removing the Micro-SIM card when the tablet is turned off or the network connections are disabled. 1 Turn off your tablet is on the inserted Micro-SIM card to release the card. 4 Slide the card out after it pops out from the Micro-SIM card slot. 2 3 4 Using Your XPS 10 Tablet | 27 For more information on turning off your tablet. Make sure your tablet, see Turning Off Your Tablet. 2 Open the slot cover. 3 Press on may cause data loss or damage the card.

User Manual
Page 36
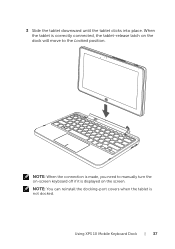
Docking Your Tablet to the Keyboard Dock 1 Remove the two docking-port covers from the tablet. 2 Align the power-adapter/docking port on the tablet with the 40-pin docking connector on the front of the hinge holder. Or, center the Windows button to a better position for easy docking. 36 | Using XPS 10 Mobile Keyboard Dock NOTE: The hinge holder can be rotated manually to the painted line on the keyboard dock.
Docking Your Tablet to the Keyboard Dock 1 Remove the two docking-port covers from the tablet. 2 Align the power-adapter/docking port on the tablet with the 40-pin docking connector on the front of the hinge holder. Or, center the Windows button to a better position for easy docking. 36 | Using XPS 10 Mobile Keyboard Dock NOTE: The hinge holder can be rotated manually to the painted line on the keyboard dock.
User Manual
Page 37
When the tablet is correctly connected, the tablet-release latch on the screen. NOTE: When the connection is made, you need to manually turn the on-screen keyboard off if it is not docked. Using XPS 10 Mobile Keyboard Dock | 37 NOTE: You can reinstall the docking-port covers when the tablet is displayed on the dock will move to the Locked position. 3 Slide the tablet downward until the tablet clicks into place.
When the tablet is correctly connected, the tablet-release latch on the screen. NOTE: When the connection is made, you need to manually turn the on-screen keyboard off if it is not docked. Using XPS 10 Mobile Keyboard Dock | 37 NOTE: You can reinstall the docking-port covers when the tablet is displayed on the dock will move to the Locked position. 3 Slide the tablet downward until the tablet clicks into place.
User Manual
Page 45
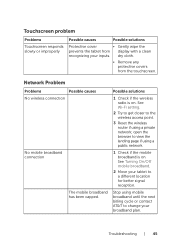
dry cloth. • Remove any protective covers from display with a clean recognizing your broadband plan. Possible solutions 1 Check if the wireless radio is on . Network Problem Problems Possible causes No ...billing cycle or contact AT&T to a different location for better signal reception. Touchscreen problem Problems Touchscreen responds slowly or improperly Possible causes Possible solutions Protective cover • Gently wipe the prevents the tablet from the touchscreen. See Turning On/Off mobile broadband. 2 Move your tablet to change your inputs. See...
dry cloth. • Remove any protective covers from display with a clean recognizing your broadband plan. Possible solutions 1 Check if the wireless radio is on . Network Problem Problems Possible causes No ...billing cycle or contact AT&T to a different location for better signal reception. Touchscreen problem Problems Touchscreen responds slowly or improperly Possible causes Possible solutions Protective cover • Gently wipe the prevents the tablet from the touchscreen. See Turning On/Off mobile broadband. 2 Move your tablet to change your inputs. See...

User Manual
Page 48
You may contact DELL for your call , have your tablet, you may also be found on your Express Service Code ready. NOTE: Before you call more efficiently. Locating Your ... to resolve the problems or require any additional help on a label at the bottom right of the tablet back cover. 48 | Locating Your Service Tag and Express Service Code The code helps Dell's automated-support telephone system direct your Service Tag. The Service Tag and Express Service Code for your tablet can...
You may contact DELL for your call , have your tablet, you may also be found on your Express Service Code ready. NOTE: Before you call more efficiently. Locating Your ... to resolve the problems or require any additional help on a label at the bottom right of the tablet back cover. 48 | Locating Your Service Tag and Express Service Code The code helps Dell's automated-support telephone system direct your Service Tag. The Service Tag and Express Service Code for your tablet can...

User Guide
Page 3
...FCC compliant RJ11 modular plug. Keep away • from the moving parts. If the equipment is provided with any cover(s) (including tablet covers, bezels, filler brackets, front-panel inserts, and so on exposed skin for use in instructions otherwise provided to you...from all cables from liquid intrusion. • Do not use : • Place the equipment on the Regulatory Compliance page, www.dell.com/regulatory_compliance. Safety and Regulatory Information You can find additional Safety Best Practices and information on REACH, Electromagnetic Compatibility (EMC), Ergonomics, ...
...FCC compliant RJ11 modular plug. Keep away • from the moving parts. If the equipment is provided with any cover(s) (including tablet covers, bezels, filler brackets, front-panel inserts, and so on exposed skin for use in instructions otherwise provided to you...from all cables from liquid intrusion. • Do not use : • Place the equipment on the Regulatory Compliance page, www.dell.com/regulatory_compliance. Safety and Regulatory Information You can find additional Safety Best Practices and information on REACH, Electromagnetic Compatibility (EMC), Ergonomics, ...
User Guide
Page 8
Feature Functionality 4 Front microphone 1 • Captures sounds. • Records voice for calls made from web applications, such as Skype. 5 Slot cover Provides access to Micro-SD card and Micro-SIM card slots. 6 Front microphone 2 • Captures sounds. • Records voice for calls made from web applications, ...
Feature Functionality 4 Front microphone 1 • Captures sounds. • Records voice for calls made from web applications, such as Skype. 5 Slot cover Provides access to Micro-SD card and Micro-SIM card slots. 6 Front microphone 2 • Captures sounds. • Records voice for calls made from web applications, ...
User Guide
Page 9
...; Press and hold to continuously decrease the volume. 4 Speaker Provides audio output for video and music playback. 5 Removable docking-port cover • Protects the docking port. • Remove the cover to connect a Dell mobile keyboard dock (sold separately). 6 Power-adapter/docking port • Connect the supplied power adapter to provide power to the...
...; Press and hold to continuously decrease the volume. 4 Speaker Provides audio output for video and music playback. 5 Removable docking-port cover • Protects the docking port. • Remove the cover to connect a Dell mobile keyboard dock (sold separately). 6 Power-adapter/docking port • Connect the supplied power adapter to provide power to the...
User Guide
Page 10
Feature Functionality 7 Micro-USB port • Connect USB devices or connect to your computer for transferring or synchronizing data, music, photos, videos, contacts, and so on. • Connect USB cable to trickle charge the battery. • Capable of providing up to 1 amp power. 8 Removable docking-port cover • Protects the docking port. • Remove the cover to connect a Dell mobile keyboard dock (sold separately). 9 Speaker Provides audio output for video and music playback. 10 | XPS 10 Tablet Features
Feature Functionality 7 Micro-USB port • Connect USB devices or connect to your computer for transferring or synchronizing data, music, photos, videos, contacts, and so on. • Connect USB cable to trickle charge the battery. • Capable of providing up to 1 amp power. 8 Removable docking-port cover • Protects the docking port. • Remove the cover to connect a Dell mobile keyboard dock (sold separately). 9 Speaker Provides audio output for video and music playback. 10 | XPS 10 Tablet Features

User Guide
Page 18
Inserting a Micro-SD card 1 2 3 1 Open the slot cover. 2 Follow the illustration to insert the Micro-SD card into the Micro-SD card slot. 3 Close the slot cover. For more information on removing the Micro-SD card, see Remove the Micro-SD card. 18 | Setting Up Your XPS 10 Tablet
Inserting a Micro-SD card 1 2 3 1 Open the slot cover. 2 Follow the illustration to insert the Micro-SD card into the Micro-SD card slot. 3 Close the slot cover. For more information on removing the Micro-SD card, see Remove the Micro-SD card. 18 | Setting Up Your XPS 10 Tablet

User Guide
Page 19
Inserting a Micro-SIM card 1 2 3 1 Open the slot cover. 2 Follow the illustration to insert the Micro-SIM card into the Micro-SIM card slot may damage the card or the tablet, and may corrupt data stored on removing the Micro-SIM card, see Remove the Micro-SIM card. Setting Up Your XPS 10 Tablet | 19 For more information on the card. CAUTION: Inserting an incompatible SIM card, such as a Nano-SIM card, into the Micro-SIM card slot. 3 Close the slot cover.
Inserting a Micro-SIM card 1 2 3 1 Open the slot cover. 2 Follow the illustration to insert the Micro-SIM card into the Micro-SIM card slot may damage the card or the tablet, and may corrupt data stored on removing the Micro-SIM card, see Remove the Micro-SIM card. Setting Up Your XPS 10 Tablet | 19 For more information on the card. CAUTION: Inserting an incompatible SIM card, such as a Nano-SIM card, into the Micro-SIM card slot. 3 Close the slot cover.

User Guide
Page 26
... screen. Make sure your tablet has finished all save operations to display all data transfers involving the Micro-SD card are complete. 3 Open the slot cover. 4 Press on the inserted Micro-SD card to release the card. 5 Slide the card out after it pops out from the Micro-SD card slot...
... screen. Make sure your tablet has finished all save operations to display all data transfers involving the Micro-SD card are complete. 3 Open the slot cover. 4 Press on the inserted Micro-SD card to release the card. 5 Slide the card out after it pops out from the Micro-SD card slot...

User Guide
Page 27
Make sure your tablet is on may cause data loss or damage the card. Remove the Micro-SIM card CAUTION: Removing the Micro-SIM card when the tablet is turned off or the network connections are disabled. 1 Turn off your tablet, see Turning Off Your Tablet. 2 Open the slot cover. 3 Press on the inserted Micro-SIM card to release the card. 4 Slide the card out after it pops out from the Micro-SIM card slot. 2 3 4 Using Your XPS 10 Tablet | 27 For more information on turning off your tablet.
Make sure your tablet is on may cause data loss or damage the card. Remove the Micro-SIM card CAUTION: Removing the Micro-SIM card when the tablet is turned off or the network connections are disabled. 1 Turn off your tablet, see Turning Off Your Tablet. 2 Open the slot cover. 3 Press on the inserted Micro-SIM card to release the card. 4 Slide the card out after it pops out from the Micro-SIM card slot. 2 3 4 Using Your XPS 10 Tablet | 27 For more information on turning off your tablet.