Owner's Manual
Page 5
... Refresh Rate . . . . . 47 6 Using a Battery 49 Battery Performance 49 Checking the Battery Charge 50 Dell QuickSet Battery Meter 50 Microsoft® Windows® Battery Meter 51 Charge Gauge 51 Low-Battery Warning 52 Conserving Battery Power 52 Configuring Power Management Settings . . . . . 52 Using the Sleep Power State 53 Charging the Battery 53 Replacing the Battery 54 Storing a Battery 55 7 Using Multimedia 57...
... Refresh Rate . . . . . 47 6 Using a Battery 49 Battery Performance 49 Checking the Battery Charge 50 Dell QuickSet Battery Meter 50 Microsoft® Windows® Battery Meter 51 Charge Gauge 51 Low-Battery Warning 52 Conserving Battery Power 52 Configuring Power Management Settings . . . . . 52 Using the Sleep Power State 53 Charging the Battery 53 Replacing the Battery 54 Storing a Battery 55 7 Using Multimedia 57...

Owner's Manual
Page 11
... FCM 151 Internal Card With Bluetooth® Wireless Technology 151 Removing the Card 151 Replacing the Card 152 Coin-Cell Battery 152 Removing the Coin-Cell Battery 153 Replacing the Coin-Cell Battery 153 14 Dell™ QuickSet 155 15 Traveling With Your Computer 157 Identifying Your Computer 157 Packing the Computer 157 Travel Tips 158...
... FCM 151 Internal Card With Bluetooth® Wireless Technology 151 Removing the Card 151 Replacing the Card 152 Coin-Cell Battery 152 Removing the Coin-Cell Battery 153 Replacing the Coin-Cell Battery 153 14 Dell™ QuickSet 155 15 Traveling With Your Computer 157 Identifying Your Computer 157 Packing the Computer 157 Travel Tips 158...

Owner's Manual
Page 29
... without connecting the computer to an electrical outlet (see "Checking the Battery Charge" on page 50). Provides information on the battery charge (see "Using a Battery" on page 54 for instructions). Bottom View 1 2 3 5 4 1 battery 3 battery charge/health gauge 5 wireless mini-card compartment 2 battery release latch 4 memory module/coin-cell battery compartment B A T T E R Y - B A T T E R Y R E L E A S E L A T C H - Releases the battery (see "Replacing the Battery" on page 49).
... without connecting the computer to an electrical outlet (see "Checking the Battery Charge" on page 50). Provides information on the battery charge (see "Using a Battery" on page 54 for instructions). Bottom View 1 2 3 5 4 1 battery 3 battery charge/health gauge 5 wireless mini-card compartment 2 battery release latch 4 memory module/coin-cell battery compartment B A T T E R Y - B A T T E R Y R E L E A S E L A T C H - Releases the battery (see "Replacing the Battery" on page 49).

Owner's Manual
Page 30
For additional information, see "Wireless Mini-Cards" on page 127. Compartment for WLAN, WWAN, or FCM Mini-Cards (see "Adding and Replacing Parts" on page 144). 30 About Your Computer Covers the compartment that contains the DIMM 1 and DIMM 2 memory modules and the coin-cell battery. W I R E L E S S M I N I N - C A R D C O M P A R T M E N T - C E L L B A T T E R Y C O M P A R T M E N T - M E M O R Y M O D U L E / C O I -
For additional information, see "Wireless Mini-Cards" on page 127. Compartment for WLAN, WWAN, or FCM Mini-Cards (see "Adding and Replacing Parts" on page 144). 30 About Your Computer Covers the compartment that contains the DIMM 1 and DIMM 2 memory modules and the coin-cell battery. W I R E L E S S M I N I N - C A R D C O M P A R T M E N T - C E L L B A T T E R Y C O M P A R T M E N T - M E M O R Y M O D U L E / C O I -

Owner's Manual
Page 41
... into place. Ensure that fluff from the swab is not left on the rollers. 7 Replace the ball and retainer ring, and turn off your computer (see "Turning Off Your Computer" on page 127). 2 Disconnect any installed batteries (see "Battery Performance" on the underside of your screen cursor skips or moves abnormally, clean the...
... into place. Ensure that fluff from the swab is not left on the rollers. 7 Replace the ball and retainer ring, and turn off your computer (see "Turning Off Your Computer" on page 127). 2 Disconnect any installed batteries (see "Battery Performance" on the underside of your screen cursor skips or moves abnormally, clean the...

Owner's Manual
Page 50
Replace the battery only with extreme care. When your battery no longer holds a charge, call your local waste disposal or environmental agency for the battery in your Dell computer. Do not puncture, incinerate, disassemble, or expose the battery to work with your computer. 50 Using a Battery Checking the Battery Charge You can check the battery charge on your computer. You...
Replace the battery only with extreme care. When your battery no longer holds a charge, call your local waste disposal or environmental agency for the battery in your Dell computer. Do not puncture, incinerate, disassemble, or expose the battery to work with your computer. 50 Using a Battery Checking the Battery Charge You can check the battery charge on your computer. You...
Owner's Manual
Page 51
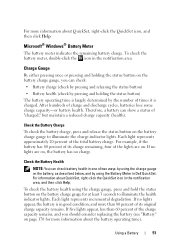
... remains, and you can check battery health in Dell QuickSet. Check the Battery Health NOTE: You can check: • Battery charge (check by pressing and releasing the status button) • Battery health (check by pressing and holding the status button on the battery charge gauge, you should consider replacing the battery (see "Battery" on the battery, as described below, and...
... remains, and you can check battery health in Dell QuickSet. Check the Battery Health NOTE: You can check: • Battery charge (check by pressing and releasing the status button) • Battery health (check by pressing and holding the status button on the battery charge gauge, you should consider replacing the battery (see "Battery" on the battery, as described below, and...
Owner's Manual
Page 54
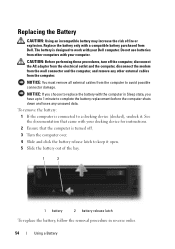
... connector damage. Do not use batteries from the computer to replace the battery with your Dell computer. Replacing the Battery CAUTION: Using an incompatible battery may increase the risk of the bay. 1 2 1 battery 2 battery release latch To replace the battery, follow the removal procedure in Sleep state, you have up to 1 minute to complete the battery replacement before the computer shuts down and...
... connector damage. Do not use batteries from the computer to replace the battery with your Dell computer. Replacing the Battery CAUTION: Using an incompatible battery may increase the risk of the bay. 1 2 1 battery 2 battery release latch To replace the battery, follow the removal procedure in Sleep state, you have up to 1 minute to complete the battery replacement before the computer shuts down and...

Owner's Manual
Page 102
... the System Set tests in the Dell Diagnostics (see "Contacting Dell" on page 173). TIME- If the problem persists, contact Dell (see "Dell Diagnostics" on page 164). The time or date stored in the Dell Diagnostics (see "Contacting Dell" on page 87). TI M E R C H I P C O U N T E R 2 F A I S N O T R E A D Y - Replace the battery, or connect the computer to charge the battery. Run the System Set tests...
... the System Set tests in the Dell Diagnostics (see "Contacting Dell" on page 173). TIME- If the problem persists, contact Dell (see "Dell Diagnostics" on page 164). The time or date stored in the Dell Diagnostics (see "Contacting Dell" on page 87). TI M E R C H I P C O U N T E R 2 F A I S N O T R E A D Y - Replace the battery, or connect the computer to charge the battery. Run the System Set tests...

Owner's Manual
Page 128
...certified service technician should perform repairs on the cable itself. As you pull connectors apart, keep them evenly aligned to the computer, use batteries designed for this type of the computer). Do not touch the components or contacts on the back of cable, press in the Product ...the computer. NOTICE: To help prevent damage to help ensure your own personal safety. Do not use only the battery designed for other Dell computers. 128 Adding and Replacing Parts CAUTION: Before you begin working inside the computer. 1 Ensure that the work surface is not covered by its...
...certified service technician should perform repairs on the cable itself. As you pull connectors apart, keep them evenly aligned to the computer, use batteries designed for this type of the computer). Do not touch the components or contacts on the back of cable, press in the Product ...the computer. NOTICE: To help prevent damage to help ensure your own personal safety. Do not use only the battery designed for other Dell computers. 128 Adding and Replacing Parts CAUTION: Before you begin working inside the computer. 1 Ensure that the work surface is not covered by its...

Owner's Manual
Page 129
...data loss, turn the computer over, and place the computer on a flat surface. 6 Slide and click the battery release latch. 7 Slide the battery out of the battery bay. 1 2 1 battery 2 battery release latch 8 Turn the computer top-side up, open the display, and press the power button to ground ...the system board. 9 Remove any of the hard drive. NOTICE: Hard drives are extremely fragile. Adding and Replacing Parts 129...
...data loss, turn the computer over, and place the computer on a flat surface. 6 Slide and click the battery release latch. 7 Slide the battery out of the battery bay. 1 2 1 battery 2 battery release latch 8 Turn the computer top-side up, open the display, and press the power button to ground ...the system board. 9 Remove any of the hard drive. NOTICE: Hard drives are extremely fragile. Adding and Replacing Parts 129...

Owner's Manual
Page 132
... side up, and open . 4 Remove the hinge covers from the battery bay before you begin any of the computer). NOTICE: To help prevent damage to the system board, you must remove the battery from each side of the computer. 132 Adding and Replacing Parts Hinge Covers and Center Control Cover CAUTION: Before you...
... side up, and open . 4 Remove the hinge covers from the battery bay before you begin any of the computer). NOTICE: To help prevent damage to the system board, you must remove the battery from each side of the computer. 132 Adding and Replacing Parts Hinge Covers and Center Control Cover CAUTION: Before you...

Owner's Manual
Page 135
... begin any of the procedures in this section, follow the safety instructions in scratching the display panel. Adding and Replacing Parts 135 Failure to the system board, you must remove the battery from the battery bay before you begin working inside the computer. NOTICE: To avoid electrostatic discharge, ground yourself by using a wrist...
... begin any of the procedures in this section, follow the safety instructions in scratching the display panel. Adding and Replacing Parts 135 Failure to the system board, you must remove the battery from the battery bay before you begin working inside the computer. NOTICE: To avoid electrostatic discharge, ground yourself by using a wrist...

Owner's Manual
Page 140
...of the computer. 1 Follow the procedures in the computer, click Start → Help and Support→ Dell System Information. Remove the module cover. 140 Adding and Replacing Parts Removing the DIMM 2 Memory Module The DIMM 2 memory module is located directly above the DIMM 1 memory... computer boots, it detects the additional memory and automatically updates the system configuration information. 1 2 1 tab 2 notch 3 Replace the module cover. 4 Insert the battery into the battery bay, or connect the AC adapter to your computer and an electrical outlet. 5 Turn on page 127. 2 Turn the...
...of the computer. 1 Follow the procedures in the computer, click Start → Help and Support→ Dell System Information. Remove the module cover. 140 Adding and Replacing Parts Removing the DIMM 2 Memory Module The DIMM 2 memory module is located directly above the DIMM 1 memory... computer boots, it detects the additional memory and automatically updates the system configuration information. 1 2 1 tab 2 notch 3 Replace the module cover. 4 Insert the battery into the battery bay, or connect the AC adapter to your computer and an electrical outlet. 5 Turn on page 127. 2 Turn the...

Owner's Manual
Page 143
Forcing the cover to close may damage your computer. 3 Replace the module cover. 4 Insert the battery into the battery bay, or connect the AC adapter to close, remove the module and reinstall it detects the additional memory and automatically updates the system configuration information. ... the computer boots, it . 1 2 1 tab 2 notch NOTICE: If the cover is difficult to your computer and an electrical outlet. 5 Turn on the computer. Adding and Replacing Parts 143 To confirm the amount of memory installed in the computer, click Start → Help and Support→...
Forcing the cover to close may damage your computer. 3 Replace the module cover. 4 Insert the battery into the battery bay, or connect the AC adapter to close, remove the module and reinstall it detects the additional memory and automatically updates the system configuration information. ... the computer boots, it . 1 2 1 tab 2 notch NOTICE: If the cover is difficult to your computer and an electrical outlet. 5 Turn on the computer. Adding and Replacing Parts 143 To confirm the amount of memory installed in the computer, click Start → Help and Support→...

Owner's Manual
Page 144
...NOTICE: To help prevent damage to the system board, you must remove the battery from the compartment. 1 2 1 battery bay 2 SIM Wireless Mini-Cards CAUTION: Before you begin working inside the...section, follow the safety instructions in "Before You Begin" on page 127. 2 In the battery bay, slide the SIM into the compartment with your computer, the card is already installed. ... the Product Information Guide. CAUTION: Before you begin any of the SIM facing away from the battery bay before you begin any of wireless mini-cards: • Wireless Local Area Network (WLAN)...
...NOTICE: To help prevent damage to the system board, you must remove the battery from the compartment. 1 2 1 battery bay 2 SIM Wireless Mini-Cards CAUTION: Before you begin working inside the...section, follow the safety instructions in "Before You Begin" on page 127. 2 In the battery bay, slide the SIM into the compartment with your computer, the card is already installed. ... the Product Information Guide. CAUTION: Before you begin any of the SIM facing away from the battery bay before you begin any of wireless mini-cards: • Wireless Local Area Network (WLAN)...
Owner's Manual
Page 151
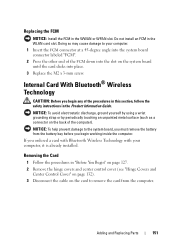
... angle into the system board connector labeled "FCM". 2 Press the other end of the FCM down into place. 3 Replace the M2 x 3-mm screw. If you must remove the battery from the computer. Removing the Card 1 Follow the procedures in the Product Information Guide. Internal Card With Bluetooth® ...Wireless Technology CAUTION: Before you begin any of the computer). NOTICE: To help prevent damage to remove the card from the battery bay before you begin working inside the computer. Doing so may cause damage to your computer, it is already installed. Do not install...
... angle into the system board connector labeled "FCM". 2 Press the other end of the FCM down into place. 3 Replace the M2 x 3-mm screw. If you must remove the battery from the computer. Removing the Card 1 Follow the procedures in the Product Information Guide. Internal Card With Bluetooth® ...Wireless Technology CAUTION: Before you begin any of the computer). NOTICE: To help prevent damage to remove the card from the battery bay before you begin working inside the computer. Doing so may cause damage to your computer, it is already installed. Do not install...

Owner's Manual
Page 152
1 2 3 1 card 3 cable 2 securing tabs (2) Replacing the Card 1 Replace the card at an angle to slide it under the securing tabs in the Product Information Guide. NOTICE: To avoid electrostatic discharge, ground yourself by ... of the procedures in this section, follow the safety instructions in the card compartment. 2 Connect the cable to the system board, you must remove the battery from the battery bay before you begin working inside the computer. 152 Adding and Replacing Parts NOTICE: To help prevent damage to the card. Coin-Cell...
1 2 3 1 card 3 cable 2 securing tabs (2) Replacing the Card 1 Replace the card at an angle to slide it under the securing tabs in the Product Information Guide. NOTICE: To avoid electrostatic discharge, ground yourself by ... of the procedures in this section, follow the safety instructions in the card compartment. 2 Connect the cable to the system board, you must remove the battery from the battery bay before you begin working inside the computer. 152 Adding and Replacing Parts NOTICE: To help prevent damage to the card. Coin-Cell...

Owner's Manual
Page 153
... antenna cables and remove the battery from the computer. Adding and Replacing Parts 153 Remove the module cover. 3 Disconnect the coin-cell battery cable from the system board. 1 2 1 coin-cell battery 2 cable connector 4 Slide the coin-cell battery from under the antenna cables. 3 Replace the module cover. Removing the Coin-Cell Battery 1 Follow the procedures in "Before...
... antenna cables and remove the battery from the computer. Adding and Replacing Parts 153 Remove the module cover. 3 Disconnect the coin-cell battery cable from the system board. 1 2 1 coin-cell battery 2 cable connector 4 Slide the coin-cell battery from under the antenna cables. 3 Replace the module cover. Removing the Coin-Cell Battery 1 Follow the procedures in "Before...

Owner's Manual
Page 195
... gauge, 51 charging, 53 checking the charge, 50 performance, 49 power meter, 51 removing, 54 replacing coin-cell battery, 152 storing, 55 blanks ExpressCards, 67, 71 removing, 69, 72 Bluetooth wireless technology card device status light, 24 installing, 151 boot sequence, ...RW drive problems, 95 drive problems, 95 Check Disk, 96 cleaning display, 40 keyboard, 40 media, 42 mouse, 41 touch pad, 41 coin-cell battery replacing, 152 computer crashes, 105-106 restore to previous operating state, 121 slow performance, 97, 107 specifications, 165 stops responding, 105 connecting Mobile Broadband network...
... gauge, 51 charging, 53 checking the charge, 50 performance, 49 power meter, 51 removing, 54 replacing coin-cell battery, 152 storing, 55 blanks ExpressCards, 67, 71 removing, 69, 72 Bluetooth wireless technology card device status light, 24 installing, 151 boot sequence, ...RW drive problems, 95 drive problems, 95 Check Disk, 96 cleaning display, 40 keyboard, 40 media, 42 mouse, 41 touch pad, 41 coin-cell battery replacing, 152 computer crashes, 105-106 restore to previous operating state, 121 slow performance, 97, 107 specifications, 165 stops responding, 105 connecting Mobile Broadband network...


