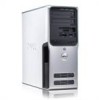
Owner's Manual
Page 4
..., Modem, and Internet Problems 39 Error Messages 41 Media Card Reader Problems 42 Keyboard Problems 42 Lockups and Software Problems 43 The computer does not start up 43 The computer stops responding 43 A program stops responding 43 A program crashes repeatedly 43 A program is designed for an earlier Windows operating system . . . . . 44...
..., Modem, and Internet Problems 39 Error Messages 41 Media Card Reader Problems 42 Keyboard Problems 42 Lockups and Software Problems 43 The computer does not start up 43 The computer stops responding 43 A program stops responding 43 A program crashes repeatedly 43 A program is designed for an earlier Windows operating system . . . . . 44...
Owner's Manual
Page 12
What Are You Looking For? • How to use Windows XP • Documentation for my computer • Documentation for devices (such as a modem) Find it Here Windows Help and Support Center 1 Click the Start button and click Help and Support. 2 Type a word or phrase that describes your problem and click the arrow icon. 3 Click the topic that describes your problem. 4 Follow the instructions on the screen. 12 Finding Information
What Are You Looking For? • How to use Windows XP • Documentation for my computer • Documentation for devices (such as a modem) Find it Here Windows Help and Support Center 1 Click the Start button and click Help and Support. 2 Type a word or phrase that describes your problem and click the arrow icon. 3 Click the topic that describes your problem. 4 Follow the instructions on the screen. 12 Finding Information
Owner's Manual
Page 15
... connection manually. • If you set up an AOL or MSN connection: 1 Save and close any open files, and exit any open programs. 2 Click the Start button and click Internet Explorer.
... connection manually. • If you set up an AOL or MSN connection: 1 Save and close any open files, and exit any open programs. 2 Click the Start button and click Internet Explorer.
Owner's Manual
Page 17
... and Using Your Computer 17 Adjusting the Volume NOTE: When the speakers are muted, you do not hear the CD or DVD playing. 1 Click the Start button, point to increase or decrease the volume. For more information on playing CDs or DVDs, click Help on volume control options, click Help in...
... and Using Your Computer 17 Adjusting the Volume NOTE: When the speakers are muted, you do not hear the CD or DVD playing. 1 Click the Start button, point to increase or decrease the volume. For more information on playing CDs or DVDs, click Help on volume control options, click Help in...
Owner's Manual
Page 18
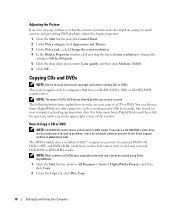
...NOTE: Ensure that have copyright protection and cannot be copied using too much memory and preventing DVD playback, adjust the display properties: 1 Click the Start button and click Control Panel. 2 Under Pick a category, click Appearance and Themes. 3 Under Pick a task..., click Change the screen resolution.... 4 In the Display Properties window, click and drag the bar in Dell™ computers can also use Sonic DigitalMedia for available software patches on your computer or backing up important data. You can write to and...
...NOTE: Ensure that have copyright protection and cannot be copied using too much memory and preventing DVD playback, adjust the display properties: 1 Click the Start button and click Control Panel. 2 Under Pick a category, click Appearance and Themes. 3 Under Pick a task..., click Change the screen resolution.... 4 In the Display Properties window, click and drag the bar in Dell™ computers can also use Sonic DigitalMedia for available software patches on your computer or backing up important data. You can write to and...

Owner's Manual
Page 20
... Rewritable No No Helpful Tips • Use Microsoft® Windows® Explorer to drag and drop files to a CD-R or CD-RW only after you start Sonic DigitalMedia and open a DigitalMedia project. • Use CD-Rs to burn music CDs that have MP3 software installed. • Commercially available DVD players used...
... Rewritable No No Helpful Tips • Use Microsoft® Windows® Explorer to drag and drop files to a CD-R or CD-RW only after you start Sonic DigitalMedia and open a DigitalMedia project. • Use CD-Rs to burn music CDs that have MP3 software installed. • Commercially available DVD players used...
Owner's Manual
Page 23
For information on changing the display settings for your graphics card, see the user's guide in the Help and Support Center (click the Start button, click Help and Support, click User and system guides, click Device guides, and then click the guide for your computer, you must purchase an S-...
For information on changing the display settings for your graphics card, see the user's guide in the Help and Support Center (click the Start button, click Help and Support, click User and system guides, click Device guides, and then click the guide for your computer, you must purchase an S-...
Owner's Manual
Page 24
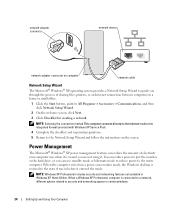
... for creating a network. network adapter connector network device network adapter connector on the screen. NOTE: Windows XP Professional includes security and networking features not available in certain windows. 24 Setting Up and Using Your Computer ...the connection method This computer connects directly to the Internet enables the integrated firewall provided with Windows XP Service Pack. 4 Complete the checklist and required preparations. 5 Return to the Network Setup Wizard ...in a home or small office. 1 Click the Start button, point to security and networking appear in Windows...
... for creating a network. network adapter connector network device network adapter connector on the screen. NOTE: Windows XP Professional includes security and networking features not available in certain windows. 24 Setting Up and Using Your Computer ...the connection method This computer connects directly to the Internet enables the integrated firewall provided with Windows XP Service Pack. 4 Complete the checklist and required preparations. 5 Return to the Network Setup Wizard ...in a home or small office. 1 Click the Start button, point to security and networking appear in Windows...
Owner's Manual
Page 25
... computer may lose data. To exit from hibernate mode. To activate hibernate mode: 1 Click the Start button and click Control Panel. 2 Under Pick a category, click Performance and Maintenance. 3 Under or... your hard drive with enough disk space to store the contents of the computer memory, Dell creates an appropriately sized hibernate mode file before shipping the computer to a reserved area on..., press the power button. If the computer's hard drive becomes corrupted, Windows XP recreates the hibernate file automatically. Standby Mode Standby mode conserves power by turning off...
... computer may lose data. To exit from hibernate mode. To activate hibernate mode: 1 Click the Start button and click Control Panel. 2 Under Pick a category, click Performance and Maintenance. 3 Under or... your hard drive with enough disk space to store the contents of the computer memory, Dell creates an appropriately sized hibernate mode file before shipping the computer to a reserved area on..., press the power button. If the computer's hard drive becomes corrupted, Windows XP recreates the hibernate file automatically. Standby Mode Standby mode conserves power by turning off...
Owner's Manual
Page 26
... power conservation. • Home/Office Desk - Advanced Tab The Advanced tab allows you to: • Place the power options icon in the Windows taskbar for starting standby mode or hibernate mode, turning off the monitor, and turning off hard disks, System stand by, or System hibernates field, and then select a timeout...
... power conservation. • Home/Office Desk - Advanced Tab The Advanced tab allows you to: • Place the power options icon in the Windows taskbar for starting standby mode or hibernate mode, turning off the monitor, and turning off hard disks, System stand by, or System hibernates field, and then select a timeout...
Owner's Manual
Page 27
...and large files, which enables a computer to connect directly to use with your computer. To purchase a card, contact Dell. For more information on power management options: 1 Click the Start button and click Help and Support. 2 In the Help and Support window, click Performance and maintenance. 3 In the...system setup. You can accept 4-pin IEEE 1394 devices with the use the Microsoft® Windows® XP Service Pack 1 (SP1) or later operating system because Windows XP is using Hyper-Threading with multimedia devices because it speeds the transfer of an adapter. IEEE 1394 IEEE ...
...and large files, which enables a computer to connect directly to use with your computer. To purchase a card, contact Dell. For more information on power management options: 1 Click the Start button and click Help and Support. 2 In the Help and Support window, click Performance and maintenance. 3 In the...system setup. You can accept 4-pin IEEE 1394 devices with the use the Microsoft® Windows® XP Service Pack 1 (SP1) or later operating system because Windows XP is using Hyper-Threading with multimedia devices because it speeds the transfer of an adapter. IEEE 1394 IEEE ...
Owner's Manual
Page 30
... press . 3 Press the up - and down -arrow keys to RAID level 0 configuration. 1 Set your configuration, and then press . and down -arrow keys to keep before starting any size drives may be used . Do not use to make up your computer to RAID-enabled mode (see page 30). 2 Press when you want...
... press . 3 Press the up - and down -arrow keys to RAID level 0 configuration. 1 Set your configuration, and then press . and down -arrow keys to keep before starting any size drives may be used . Do not use to make up your computer to RAID-enabled mode (see page 30). 2 Press when you want...
Owner's Manual
Page 32
... "Migrating to a RAID Level 1 Configuration" on the volume that you need to use the migrating option (see page 30). 2 Click the Start button and point to Programs→ Intel(R) Application Accelerator→ Intel Matrix Storage Manager to make changes. To add a third hard drive in ...RAID Using the Intel® Application Accelerator If you already have not yet set your computer to RAID-enabled mode (see page 30). 2 Click Start and point to Programs→ Intel(R) Application Accelerator→ Intel Matrix Storage Manager to designate as a second RAID volume. Creating a RAID Level ...
... "Migrating to a RAID Level 1 Configuration" on the volume that you need to use the migrating option (see page 30). 2 Click the Start button and point to Programs→ Intel(R) Application Accelerator→ Intel Matrix Storage Manager to make changes. To add a third hard drive in ...RAID Using the Intel® Application Accelerator If you already have not yet set your computer to RAID-enabled mode (see page 30). 2 Click Start and point to Programs→ Intel(R) Application Accelerator→ Intel Matrix Storage Manager to designate as a second RAID volume. Creating a RAID Level ...
Owner's Manual
Page 33
Migrating to a RAID Level 0 Configuration 1 Set your computer to RAID-enabled mode (see page 30). 2 Click the Start button and point to All Programs→ Intel(R) Application Accelerator→ Intel Matrix Storage Manager to make changes. 9 Follow Microsoft Windows procedures for...two drives appear in the Available box, click the right-arrow button to launch the Migration Wizard. 4 Click Next on the volume. 1 Click the Start button and point to Programs→ Intel(R) Application Accelerator→ Intel Matrix Storage Manager to launch the Intel® Storage Utility. 2 Right-click ...
Migrating to a RAID Level 0 Configuration 1 Set your computer to RAID-enabled mode (see page 30). 2 Click the Start button and point to All Programs→ Intel(R) Application Accelerator→ Intel Matrix Storage Manager to make changes. 9 Follow Microsoft Windows procedures for...two drives appear in the Available box, click the right-arrow button to launch the Migration Wizard. 4 Click Next on the volume. 1 Click the Start button and point to Programs→ Intel(R) Application Accelerator→ Intel Matrix Storage Manager to launch the Intel® Storage Utility. 2 Right-click ...

Owner's Manual
Page 34
... click Next. 10 On the Specify Volume Size screen, select the Volume Size you want to store on the member drive. 10 Click Finish to start migrating, or click Back to launch the Migration Wizard. 4 Click Next on the first Migration Wizard screen. 5 Enter a RAID volume name or accept the ... the hard drive to select the member drive that you want to use as your computer to RAID-enabled mode (see page 30). 2 Click the Start button and point to All Programs→ Intel(R) Application Accelerator→ Intel Matrix Storage Manager to make changes. You can use your strip size. 7 ...
... click Next. 10 On the Specify Volume Size screen, select the Volume Size you want to store on the member drive. 10 Click Finish to start migrating, or click Back to launch the Migration Wizard. 4 Click Next on the first Migration Wizard screen. 5 Enter a RAID volume name or accept the ... the hard drive to select the member drive that you want to use as your computer to RAID-enabled mode (see page 30). 2 Click the Start button and point to All Programs→ Intel(R) Application Accelerator→ Intel Matrix Storage Manager to make changes. You can use your strip size. 7 ...
Owner's Manual
Page 35
...the computer is broken, the computer automatically rebuilds the mirror configuration using the spare hard drive as a Spare Hard Drive: 1 Click the Start button and point to Programs→ Intel(R) Application Accelerator→ Intel Matrix Storage Manager to launch the Intel® Storage Utility. 2 ...configuration. Setting Up and Using Your Computer 35 Creating a Spare Hard Drive A spare hard drive may be created with Microsoft® Windows® XP Media Center Edition 2005 and dual core processors. To Mark a Drive as the broken member's replacement. When a member of the RAID level 1...
...the computer is broken, the computer automatically rebuilds the mirror configuration using the spare hard drive as a Spare Hard Drive: 1 Click the Start button and point to Programs→ Intel(R) Application Accelerator→ Intel Matrix Storage Manager to launch the Intel® Storage Utility. 2 ...configuration. Setting Up and Using Your Computer 35 Creating a Spare Hard Drive A spare hard drive may be created with Microsoft® Windows® XP Media Center Edition 2005 and dual core processors. To Mark a Drive as the broken member's replacement. When a member of the RAID level 1...
Owner's Manual
Page 36
... on my computer drop-down menu, select Do Nothing. 8 From the When I press the sleep button on the optional Microsoft® Windows® XP Media Center Edition 2005 remote control. Also, you may blink when the hard drive is still operating as a quick on/off feature. Also, Quick ...Resume is enabled in the Operating system 1 Click the Start button and click Control Panel. 2 Under Pick a category, click Performance and Maintenance. 3 Under or pick a Control Panel icon, click Power Options. 4 Click...
... on my computer drop-down menu, select Do Nothing. 8 From the When I press the sleep button on the optional Microsoft® Windows® XP Media Center Edition 2005 remote control. Also, you may blink when the hard drive is still operating as a quick on/off feature. Also, Quick ...Resume is enabled in the Operating system 1 Click the Start button and click Control Panel. 2 Under Pick a category, click Performance and Maintenance. 3 Under or pick a Control Panel icon, click Power Options. 4 Click...

Owner's Manual
Page 37
... the installation procedures and ensure that the part is correctly installed. • If a peripheral device does not work properly, contact Dell (see page 106). If the battery still does not work , ensure that the device is properly connected. • If an error message appears on ...the computer, or if an incorrect time or date displays during start-up, replace the battery (see page 126). Solving Problems 37 Battery Problems CAUTION: There is a danger of the procedures in this section, follow the ...
... the installation procedures and ensure that the part is correctly installed. • If a peripheral device does not work properly, contact Dell (see page 106). If the battery still does not work , ensure that the device is properly connected. • If an error message appears on ...the computer, or if an incorrect time or date displays during start-up, replace the battery (see page 126). Solving Problems 37 Battery Problems CAUTION: There is a danger of the procedures in this section, follow the ...
Owner's Manual
Page 38
... Solving Problems See page 122. ADJUST THE WINDOWS VOLUME CONTROL - • Click the speaker icon in the Product Information Guide. See page 60. C L E A N T H E D R I V E O R D I S K - C H E C K T H E S P E A K E R S A N D S U B W O O F E R - Click the Start button and click My Computer. If the floppy, CD, or DVD drive, is not listed, perform a full scan with your screen. • Ensure that the...
... Solving Problems See page 122. ADJUST THE WINDOWS VOLUME CONTROL - • Click the speaker icon in the Product Information Guide. See page 60. C L E A N T H E D R I V E O R D I S K - C H E C K T H E S P E A K E R S A N D S U B W O O F E R - Click the Start button and click My Computer. If the floppy, CD, or DVD drive, is not listed, perform a full scan with your screen. • Ensure that the...
Owner's Manual
Page 39
... D B Y M O D E I N W I N D O W S B E F O R E W R I T I N G S - Search for and attempt recovery of bad sectors. 7 Click Start. NOTE: Connect the modem to the CD/DVD-RW. E-Mail, Modem, and Internet Problems CAUTION: Before you cannot open your e-mail attachments: 1 In Outlook Express, ...the procedures in this section, follow the safety instructions in Windows Help. R W D I S C - Hard drive problems RUN CHECK DISK - 1 Click the Start button and click My Computer. 2 Right-click Local Disk C:. 3 Click Properties. 4 Click the Tools tab. 5 Under Error-checking, click Check Now. 6 ...
... D B Y M O D E I N W I N D O W S B E F O R E W R I T I N G S - Search for and attempt recovery of bad sectors. 7 Click Start. NOTE: Connect the modem to the CD/DVD-RW. E-Mail, Modem, and Internet Problems CAUTION: Before you cannot open your e-mail attachments: 1 In Outlook Express, ...the procedures in this section, follow the safety instructions in Windows Help. R W D I S C - Hard drive problems RUN CHECK DISK - 1 Click the Start button and click My Computer. 2 Right-click Local Disk C:. 3 Click Properties. 4 Click the Tools tab. 5 Under Error-checking, click Check Now. 6 ...


