
Owners Manual
Page 6
... 44 Procedure 45 Replacing the System Board 48 Procedure 48 Postrequisites 48 Entering the Service Tag in the BIOS 49 Removing the Keyboard 50 Prerequisites 50 Procedure 50 Replacing the Keyboard 53 Procedure 53 Postrequisites. 53 Removing the Display Assembly 54 Prerequisites 54 Procedure 55 Replacing the Display Assembly 58 Procedure 58...
... 44 Procedure 45 Replacing the System Board 48 Procedure 48 Postrequisites 48 Entering the Service Tag in the BIOS 49 Removing the Keyboard 50 Prerequisites 50 Procedure 50 Replacing the Keyboard 53 Procedure 53 Postrequisites. 53 Removing the Display Assembly 54 Prerequisites 54 Procedure 55 Replacing the Display Assembly 58 Procedure 58...
Owners Manual
Page 46
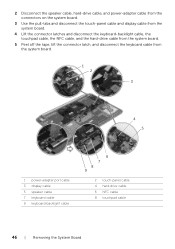
...the pull-tabs and disconnect the touch-panel cable and display cable from the system board. 4 Lift the connector latches and disconnect the keyboard-backlight cable, the touchpad cable, the NFC cable, and the hard-drive cable from the system board. 5 Peel off the tape,... lift the connector latch, and disconnect the keyboard cable from the system board. 1 2 3 4 5 1 power-adapter port cable 3 display cable 5 speaker cable 7 keyboard cable 9 keyboard-backlight cable 6 7 8 9 2 touch-panel cable 4 hard-drive cable 6 NFC cable 8 touchpad cable...
...the pull-tabs and disconnect the touch-panel cable and display cable from the system board. 4 Lift the connector latches and disconnect the keyboard-backlight cable, the touchpad cable, the NFC cable, and the hard-drive cable from the system board. 5 Peel off the tape,... lift the connector latch, and disconnect the keyboard cable from the system board. 1 2 3 4 5 1 power-adapter port cable 3 display cable 5 speaker cable 7 keyboard cable 9 keyboard-backlight cable 6 7 8 9 2 touch-panel cable 4 hard-drive cable 6 NFC cable 8 touchpad cable...

Owners Manual
Page 48
..." on page 12. 48 | Replacing the System Board Procedure CAUTION: Make sure that secure the system board to the palm-rest assembly. 5 Slide the keyboard cable in "Before Working Inside Your Computer" on page 9. See "Replacing the Base-Cover Assembly" on page 36. 4 Replace the fan. For more ...safety best practices, see the Regulatory Compliance home page at dell.com/regulatory_compliance. After working inside your computer and follow the instructions in "After Working Inside Your Computer" on page 7.
..." on page 12. 48 | Replacing the System Board Procedure CAUTION: Make sure that secure the system board to the palm-rest assembly. 5 Slide the keyboard cable in "Before Working Inside Your Computer" on page 9. See "Replacing the Base-Cover Assembly" on page 36. 4 Replace the fan. For more ...safety best practices, see the Regulatory Compliance home page at dell.com/regulatory_compliance. After working inside your computer and follow the instructions in "After Working Inside Your Computer" on page 7.

Owners Manual
Page 50
For more safety best practices, see the Regulatory Compliance home page at dell.com/regulatory_compliance. Procedure 1 Peel off the Mylar from the keyboard. 1 1 mylar 50 | Removing the Keyboard See "Removing the Battery" on page 20. 4 Remove the system board. Prerequisites 1 Remove the base-cover assembly....Hard Drive" on page 16. 3 Remove the hard drive. See "Removing the Base-Cover Assembly" on page 7. Removing the Keyboard WARNING: Before working inside your computer, read the safety information that shipped with your computer, follow the steps in "After Working Inside...
For more safety best practices, see the Regulatory Compliance home page at dell.com/regulatory_compliance. Procedure 1 Peel off the Mylar from the keyboard. 1 1 mylar 50 | Removing the Keyboard See "Removing the Battery" on page 20. 4 Remove the system board. Prerequisites 1 Remove the base-cover assembly....Hard Drive" on page 16. 3 Remove the hard drive. See "Removing the Base-Cover Assembly" on page 7. Removing the Keyboard WARNING: Before working inside your computer, read the safety information that shipped with your computer, follow the steps in "After Working Inside...

Owners Manual
Page 51
2 Using a plastic scribe peel the Mylar to access the screws. 1 2 3 1 plastic scribe 3 screw 2 mylar 3 Remove the screws that secure the keyboard to the palm-rest assembly. 1 1 screws (28) Removing the Keyboard | 51
2 Using a plastic scribe peel the Mylar to access the screws. 1 2 3 1 plastic scribe 3 screw 2 mylar 3 Remove the screws that secure the keyboard to the palm-rest assembly. 1 1 screws (28) Removing the Keyboard | 51

Owners Manual
Page 52
4 Lift and remove the keyboard from the palm-rest assembly. 2 1 1 keyboard 2 palm-rest assembly 52 | Removing the Keyboard
4 Lift and remove the keyboard from the palm-rest assembly. 2 1 1 keyboard 2 palm-rest assembly 52 | Removing the Keyboard

Owners Manual
Page 53
... drive. After working inside your computer and follow the instructions in "Before Working Inside Your Computer" on page 9. Procedure 1 Align the screw holes on the keyboard with the screw holes on the palm-rest assembly. 2 Replace the screws that shipped with your computer, follow the steps in "After Working Inside Your..." on page 7. See "Replacing the System Board" on page 23. 3 Replace the battery. For more safety best practices, see the Regulatory Compliance home page at dell.com/regulatory_compliance.
... drive. After working inside your computer and follow the instructions in "Before Working Inside Your Computer" on page 9. Procedure 1 Align the screw holes on the keyboard with the screw holes on the palm-rest assembly. 2 Replace the screws that shipped with your computer, follow the steps in "After Working Inside Your..." on page 7. See "Replacing the System Board" on page 23. 3 Replace the battery. For more safety best practices, see the Regulatory Compliance home page at dell.com/regulatory_compliance.

Owners Manual
Page 59
... the System Board" on page 42. 13 Remove the system board. See "Removing the Memory Module(s)" on page 44. 14 Remove the keyboard. See "Removing the Keyboard" on page 16. 3 Remove the hard drive. See "Removing the I /O board. See "Removing the Battery" on page 50. ...See"Removing the Wireless Card" on page 28. 7 Remove the mSATA card. Removing the Palm-Rest Assembly | 59 For more safety best practices, see the Regulatory Compliance home page at dell...
... the System Board" on page 42. 13 Remove the system board. See "Removing the Memory Module(s)" on page 44. 14 Remove the keyboard. See "Removing the Keyboard" on page 16. 3 Remove the hard drive. See "Removing the I /O board. See "Removing the Battery" on page 50. ...See"Removing the Wireless Card" on page 28. 7 Remove the mSATA card. Removing the Palm-Rest Assembly | 59 For more safety best practices, see the Regulatory Compliance home page at dell...

Owners Manual
Page 62
... the Base-Cover Assembly" on page 53. 2 Replace the system board. For more safety best practices, see the Regulatory Compliance home page at dell.com/regulatory_compliance. See "Replacing the Keyboard" on page 12. 62 | Replacing the Palm-Rest Assembly See "Replacing the Fans" on page 36. 7 Replace the fans. See "Replacing the... your computer, read the safety information that shipped with your computer, follow the steps in "After Working Inside Your Computer" on page 9. Postrequisites 1 Replace the keyboard.
... the Base-Cover Assembly" on page 53. 2 Replace the system board. For more safety best practices, see the Regulatory Compliance home page at dell.com/regulatory_compliance. See "Replacing the Keyboard" on page 12. 62 | Replacing the Palm-Rest Assembly See "Replacing the Fans" on page 36. 7 Replace the fans. See "Replacing the... your computer, read the safety information that shipped with your computer, follow the steps in "After Working Inside Your Computer" on page 9. Postrequisites 1 Replace the keyboard.

Specifications
Page 3
... • Wireless Display (WiDi) Realtek ALC3661 Realtek ALC5505 Two 2 watt 2.5 watt Digital array-microphones Program menus and keyboard shortcut keys NOTE: To learn about your computer keyboard shortcut keys, see Quick Start Guide at dell.com/support. SATA 6 Gbps One 2.5-inch drive (supports Intel Smart Response Technology) One Solid State Drive (SSD) with...
... • Wireless Display (WiDi) Realtek ALC3661 Realtek ALC5505 Two 2 watt 2.5 watt Digital array-microphones Program menus and keyboard shortcut keys NOTE: To learn about your computer keyboard shortcut keys, see Quick Start Guide at dell.com/support. SATA 6 Gbps One 2.5-inch drive (supports Intel Smart Response Technology) One Solid State Drive (SSD) with...

Specifications
Page 4
... Display Type Resolution Dimensions: Height Width Diagonal Refresh rate Operating angle Pixel pitch Controls Keyboard Type Shortcut keys One 3-in-1 slot • SD card • SD High...15.6-inch WQHD+ WLED with TrueLife FHD WQHD+ 1920 x 1080 3200 x 1800 8.51 in (216.1 mm) 8.54 in (216.91 mm) 13.91 in (353.26 mm) 13.97 in (354.78 mm) 15.6 in (396.24 mm) 15.6 in System Setup. NOTE: To learn about your keyboard... have two symbols on your computer keyboard shortcut keys, see Quick Start Guide at dell.com...
... Display Type Resolution Dimensions: Height Width Diagonal Refresh rate Operating angle Pixel pitch Controls Keyboard Type Shortcut keys One 3-in-1 slot • SD card • SD High...15.6-inch WQHD+ WLED with TrueLife FHD WQHD+ 1920 x 1080 3200 x 1800 8.51 in (216.1 mm) 8.54 in (216.91 mm) 13.91 in (353.26 mm) 13.97 in (354.78 mm) 15.6 in (396.24 mm) 15.6 in System Setup. NOTE: To learn about your keyboard... have two symbols on your computer keyboard shortcut keys, see Quick Start Guide at dell.com...


