
Re-imaging guide for Windows 10
Page 3
... driver...11 6. Intel chipset device software...10 Downloading and installing the chipset driver...10 2. Dell Thunderbolt Dock WD19TB...13 8 .NET Framework...14 9 Getting help and contacting Dell 15 Contents 3 Audio...12 Downloading and installing the Dell audio driver...12 7. Contents 1 Installation overview...4 2 Introduction...5 3 Order of reinstallation...6 4 Updating or resetting the BIOS...7 Flashing the BIOS...7 Clearing CMOS settings...7 Trusted Platform Module (TPM) security...7 5 Reinstalling the operating system 8 6 Reinstalling drivers and applications 9 Displaying drivers...
... driver...11 6. Intel chipset device software...10 Downloading and installing the chipset driver...10 2. Dell Thunderbolt Dock WD19TB...13 8 .NET Framework...14 9 Getting help and contacting Dell 15 Contents 3 Audio...12 Downloading and installing the Dell audio driver...12 7. Contents 1 Installation overview...4 2 Introduction...5 3 Order of reinstallation...6 4 Updating or resetting the BIOS...7 Flashing the BIOS...7 Clearing CMOS settings...7 Trusted Platform Module (TPM) security...7 5 Reinstalling the operating system 8 6 Reinstalling drivers and applications 9 Displaying drivers...
Re-imaging guide for Windows 10
Page 4
... a factory reset of your Dell computer using the Dell Backup and Recovery application or other factory-reset methods. This ensures that the devices function optimally. NOTE: Information provided in this guide is operating normally and there are no driver issues or updates being prompted by Windows, driver updates may create new problems. Review the importance of the procedures. Device drivers must be unnecessary. Updating drivers unnecessarily may be updated when you reinstall the operating system using either a CD, DVD, USB key, or...
... a factory reset of your Dell computer using the Dell Backup and Recovery application or other factory-reset methods. This ensures that the devices function optimally. NOTE: Information provided in this guide is operating normally and there are no driver issues or updates being prompted by Windows, driver updates may create new problems. Review the importance of the procedures. Device drivers must be unnecessary. Updating drivers unnecessarily may be updated when you reinstall the operating system using either a CD, DVD, USB key, or...

Re-imaging guide for Windows 10
Page 6
... the audio controller. 9. BIOS: Enables the operating system to be a base on which other software can operate on. 3. Media-card reader driver: Enables and enhances the media-card reader. 6. Dell applications, which include Goodix Fingerprint Sensor. 10. Intel Chipset driver: Allows Windows to be loaded into the memory and enables the initial setup process on the system board which include: • Wireless Local Area Network (WLAN) adapter driver: Enables and enhances the wireless adapter. • Bluetooth driver: Enables and enhances the Bluetooth adapter. 6 Order of...
... the audio controller. 9. BIOS: Enables the operating system to be a base on which other software can operate on. 3. Media-card reader driver: Enables and enhances the media-card reader. 6. Dell applications, which include Goodix Fingerprint Sensor. 10. Intel Chipset driver: Allows Windows to be loaded into the memory and enables the initial setup process on the system board which include: • Wireless Local Area Network (WLAN) adapter driver: Enables and enhances the wireless adapter. • Bluetooth driver: Enables and enhances the Bluetooth adapter. 6 Order of...

Re-imaging guide for Windows 10
Page 7
4 Updating or resetting the BIOS Flashing the BIOS It is recommended to boot, a BIOS reset is necessary. Click Product support, enter the Service Tag of the BIOS for your computer being unable to flash the BIOS when an update is available or when you replace the system board. Select the operating system installed on the screen. Scroll down the page and expand BIOS. 7. Clearing CMOS settings In the event that flashing your computer with the latest BIOS update results...
4 Updating or resetting the BIOS Flashing the BIOS It is recommended to boot, a BIOS reset is necessary. Click Product support, enter the Service Tag of the BIOS for your computer being unable to flash the BIOS when an update is available or when you replace the system board. Select the operating system installed on the screen. Scroll down the page and expand BIOS. 7. Clearing CMOS settings In the event that flashing your computer with the latest BIOS update results...

Re-imaging guide for Windows 10
Page 9
... sound cards require drivers to function correctly within Windows, and enable users to www.dell.com/support. 3. Reinstalling drivers and applications 9 Click Drivers & downloads > Find it myself. 5. Applications must be downloaded and installed separately. Click Product support, enter the Service Tag of the drivers and applications available on your computer 1. Windows 10 includes drivers for most devices, but device-specific drivers may have the Service Tag, use the auto-detect feature or manually browse for your computer model. 4. Turn...
... sound cards require drivers to function correctly within Windows, and enable users to www.dell.com/support. 3. Reinstalling drivers and applications 9 Click Drivers & downloads > Find it myself. 5. Applications must be downloaded and installed separately. Click Product support, enter the Service Tag of the drivers and applications available on your computer 1. Windows 10 includes drivers for most devices, but device-specific drivers may have the Service Tag, use the auto-detect feature or manually browse for your computer model. 4. Turn...
Re-imaging guide for Windows 10
Page 10
...: The Windows 10 operating system includes the webcam drivers; no other touchpad-driver installation is required. The Intel chipset device software is available on the screen. 2. Downloading and installing the chipset driver 1. Scroll down the page and expand Chipset. 6. Double-click the chipset driver file icon and follow the instructions on Dell's support site www.dell.com/support. Go to download the chipset driver for your computer. 7. Click Product support, enter the Service Tag of...
...: The Windows 10 operating system includes the webcam drivers; no other touchpad-driver installation is required. The Intel chipset device software is available on the screen. 2. Downloading and installing the chipset driver 1. Scroll down the page and expand Chipset. 6. Double-click the chipset driver file icon and follow the instructions on Dell's support site www.dell.com/support. Go to download the chipset driver for your computer. 7. Click Product support, enter the Service Tag of...
Re-imaging guide for Windows 10
Page 11
... to display a blue screen and an error code followed by default. Double-click the card reader driver file icon and follow the instructions on your computer. • Your computer has a RAID I/O controller hub (ICH). CAUTION: If a SATA hard drive is enabled by a system reboot. Turn on the screen. 5. NOTE: If you can install IRST on your computer model. 4. Click Drivers & downloads > Find it myself. 5. Go to www.dell.com/support. 3. Scroll down the...
... to display a blue screen and an error code followed by default. Double-click the card reader driver file icon and follow the instructions on your computer. • Your computer has a RAID I/O controller hub (ICH). CAUTION: If a SATA hard drive is enabled by a system reboot. Turn on the screen. 5. NOTE: If you can install IRST on your computer model. 4. Click Drivers & downloads > Find it myself. 5. Go to www.dell.com/support. 3. Scroll down the...

Re-imaging guide for Windows 10
Page 12
... cooler fan settings. • Battery Extender: Conserves battery charge by Dell. The key features are as follows: • Battery information: Displays battery-health information, adjusts battery settings or creates a custom-battery setting. • Advanced charge mode: Controls battery charging to prolong battery life. • Peak Shift: Reduces power consumption by automatically switching the computer to battery power during certain times of your computer, and then click Submit. 6. Install the HD audio driver available for Dell computers. Click Product support, enter the Service Tag...
... cooler fan settings. • Battery Extender: Conserves battery charge by Dell. The key features are as follows: • Battery information: Displays battery-health information, adjusts battery settings or creates a custom-battery setting. • Advanced charge mode: Controls battery charging to prolong battery life. • Peak Shift: Reduces power consumption by automatically switching the computer to battery power during certain times of your computer, and then click Submit. 6. Install the HD audio driver available for Dell computers. Click Product support, enter the Service Tag...

Re-imaging guide for Windows 10
Page 13
... controllers on Dell support site before using a Thunderbolt 3 (Type-C) cable interface. Wireless Local Network (WLAN) drivers and applications The Windows 10 operating system does not provide native-device driver support for drivers and applications 13 Double-click the Wi-Fi driver file icon and follow the instructions on the computer. 2. 9. CAUTION: You must update your computer model. 4. To obtain wireless network functionality, install the relevant WLAN drivers from the Dell support site. Click Drivers & downloads > Find it myself. 5. Dell...
... controllers on Dell support site before using a Thunderbolt 3 (Type-C) cable interface. Wireless Local Network (WLAN) drivers and applications The Windows 10 operating system does not provide native-device driver support for drivers and applications 13 Double-click the Wi-Fi driver file icon and follow the instructions on the computer. 2. 9. CAUTION: You must update your computer model. 4. To obtain wireless network functionality, install the relevant WLAN drivers from the Dell support site. Click Drivers & downloads > Find it myself. 5. Dell...

Service Manual
Page 5
... operating system for shut-down . While you are correctly oriented and aligned. NOTE: If you work surface is shipped with your computer. Safety instructions Use the following safety guidelines to protect your computer from all covers, panels, and screws before opening the computer cover or panels. CAUTION: You should only perform troubleshooting and repairs as keyboard, mouse, and monitor from their edges, and avoid touching...
... operating system for shut-down . While you are correctly oriented and aligned. NOTE: If you work surface is shipped with your computer. Safety instructions Use the following safety guidelines to protect your computer from all covers, panels, and screws before opening the computer cover or panels. CAUTION: You should only perform troubleshooting and repairs as keyboard, mouse, and monitor from their edges, and avoid touching...

Service Manual
Page 7
... desks or cubicles. Always place parts in your computer. 2. Keep your feet apart for safe transport. The ESD bag should be folded over and taped shut and all the same foam packing material should never be shipped and received in reverse to the load. Replace any media cards, discs, or any external devices, peripherals, or cables you lift, offsetting the...
... desks or cubicles. Always place parts in your computer. 2. Keep your feet apart for safe transport. The ESD bag should be folded over and taped shut and all the same foam packing material should never be shipped and received in reverse to the load. Replace any media cards, discs, or any external devices, peripherals, or cables you lift, offsetting the...

Service Manual
Page 39
... sink. Remove the battery. 4. Remove the right fan. 11. System-board connectors 1. Follow the procedure in Before working inside your computer is stored in the BIOS setup program after you can be removed or installed together with the heat sink attached. Remove the base cover. 3. Keyboard control-board cable The following image indicates the connectors on , it prompts for the Real Time Clock (RTC) reset. NOTE: The Service Tag...
... sink. Remove the battery. 4. Remove the right fan. 11. System-board connectors 1. Follow the procedure in Before working inside your computer is stored in the BIOS setup program after you can be removed or installed together with the heat sink attached. Remove the base cover. 3. Keyboard control-board cable The following image indicates the connectors on , it prompts for the Real Time Clock (RTC) reset. NOTE: The Service Tag...

Service Manual
Page 41
Disconnect the touch screen cable and camera cable. 5. Remove the screw (M1.6x3) that secures the wireless-card bracket to the palm-rest and keyboard assembly. 4. Open the latch, and disconnect the fingerprint reader-board cable from the palm-rest and keyboard assembly. 10. Lift the USB Type-C bracket from the system board. 8. Lift the system board off the system board. 3. NOTE: Replacing the system board removes any changes that secure the display-assembly cable holder...
Disconnect the touch screen cable and camera cable. 5. Remove the screw (M1.6x3) that secures the wireless-card bracket to the palm-rest and keyboard assembly. 4. Open the latch, and disconnect the fingerprint reader-board cable from the palm-rest and keyboard assembly. 10. Lift the USB Type-C bracket from the system board. 8. Lift the system board off the system board. 3. NOTE: Replacing the system board removes any changes that secure the display-assembly cable holder...
Service Manual
Page 48
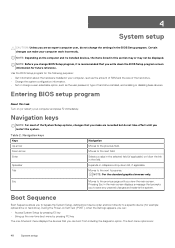
...-time boot menu by pressing F12 key The one-time boot menu displays the devices that you make your computer, such as the amount of RAM and the size of the hard drive. • Change the system configuration information. • Set or change a user-selectable option, such as the user password, type of the System Setup options, changes that you can make are : 48 System setup NOTE: Before you to bypass the System Setup-defined boot device order and boot...
...-time boot menu by pressing F12 key The one-time boot menu displays the devices that you make your computer, such as the amount of RAM and the size of the hard drive. • Change the system configuration information. • Set or change a user-selectable option, such as the user password, type of the System Setup options, changes that you can make are : 48 System setup NOTE: Before you to bypass the System Setup-defined boot device order and boot...

Service Manual
Page 52
Default: Bright. Default: Disabled Enable Non-Admin Password Changes Enables or disables the user to change the system and hard drive password without the need for the keyboard when an AC adapter is set the media card to switch all media cards On/Off or set . Keyboard Illumination Configures the operating mode of the optional Absolute Persistence Module service from entering BIOS Setup when an Admin Password is connected to the computer. Keyboard Backlight Timeout on AC power. Default: 10 seconds Keyboard Backlight Timeout on Battery Configures the timeout ...
Default: Bright. Default: Disabled Enable Non-Admin Password Changes Enables or disables the user to change the system and hard drive password without the need for the keyboard when an AC adapter is set the media card to switch all media cards On/Off or set . Keyboard Illumination Configures the operating mode of the optional Absolute Persistence Module service from entering BIOS Setup when an Admin Password is connected to the computer. Keyboard Backlight Timeout on AC power. Default: 10 seconds Keyboard Backlight Timeout on Battery Configures the timeout ...

Service Manual
Page 56
...-F12 keys scan the code for user input when warnings or errors are detected. Table 12. Setting this option is opened. Default: ON Fn Lock Enables or disables the Fn lock mode. By default, WLAN is selected. By default, Bluetooth is selected. Default: ON Lock Mode Default: Lock Mode Secondary. Default: OFF Mouse/Touchpad Defines how the computer handles mouse and touchpad input. 56 System setup System setup options-Power Management menu (continued) Power Management Intel Speed Shift Technology Enables or disables the Intel Speed Shift Technology support. Default...
...-F12 keys scan the code for user input when warnings or errors are detected. Table 12. Setting this option is opened. Default: ON Fn Lock Enables or disables the Fn lock mode. By default, WLAN is selected. By default, Bluetooth is selected. Default: ON Lock Mode Default: Lock Mode Secondary. Default: OFF Mouse/Touchpad Defines how the computer handles mouse and touchpad input. 56 System setup System setup options-Power Management menu (continued) Power Management Intel Speed Shift Technology Enables or disables the Intel Speed Shift Technology support. Default...

Service Manual
Page 57
... Displays the Service Tag of Life. In addition, this feature cannot work if the Boot Block is present. Default: OFF Controls flashing of Life. Default: System Unique MAC Address. Once set to be used by an IT administrator to the motherboard on the drive. The recovery image must exist on an unencrypted partition on the next reboot. BIOS Auto-Recovery Enables the computer to run a virtual machine monitor (VMM). Default...
... Displays the Service Tag of Life. In addition, this feature cannot work if the Boot Block is present. Default: OFF Controls flashing of Life. Default: System Unique MAC Address. Once set to be used by an IT administrator to the motherboard on the drive. The recovery image must exist on an unencrypted partition on the next reboot. BIOS Auto-Recovery Enables the computer to run a virtual machine monitor (VMM). Default...

Service Manual
Page 63
... internal failure Processor failure System board: BIOS or ROM (Read-Only Memory) failure No memory or RAM (Random-Access Memory) detected Memory or RAM (Random-Access Memory) failure Invalid memory installed System-board or chipset error Display failure Display failure - Camera is detected. Solid white - Computer is in use . Power Rail Failure Coin-cell battery failure PCI, video card/chip failure Recovery image not found Recovery image found but invalid Power-rail failure System BIOS Flash incomplete Management Engine (ME) error Camera status light: Indicates...
... internal failure Processor failure System board: BIOS or ROM (Read-Only Memory) failure No memory or RAM (Random-Access Memory) detected Memory or RAM (Random-Access Memory) failure Invalid memory installed System-board or chipset error Display failure Display failure - Camera is detected. Solid white - Computer is in use . Power Rail Failure Coin-cell battery failure PCI, video card/chip failure Recovery image not found Recovery image found but invalid Power-rail failure System BIOS Flash incomplete Management Engine (ME) error Camera status light: Indicates...
Service Manual
Page 64
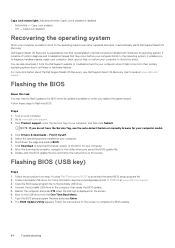
... Submit. Create a bootable USB drive. Type the BIOS setup program filename and press Enter. 8. Dell SupportAssist OS Recovery is available or when you do not have the Service Tag, use the auto-detect feature or manually browse for your computer model. 4. Scroll down the page and expand BIOS. 7. Click Download to download the latest version of tools to diagnose and troubleshoot issues that may need to software or hardware failures. Flashing BIOS (USB key) Steps...
... Submit. Create a bootable USB drive. Type the BIOS setup program filename and press Enter. 8. Dell SupportAssist OS Recovery is available or when you do not have the Service Tag, use the auto-detect feature or manually browse for your computer model. 4. Scroll down the page and expand BIOS. 7. Click Download to download the latest version of tools to diagnose and troubleshoot issues that may need to software or hardware failures. Flashing BIOS (USB key) Steps...
Setup and Specifications
Page 3
... of XPS 15 9500...6 Left...6 Right...6 Base...7 Display...8 Bottom...9 Chapter 3: Specifications of XPS 15 9500 10 Dimensions and weight...10 Processor...10 Chipset...11 Operating system...11 Memory...11 Internal slots...11 External ports...12 Wireless module...12 Audio...13 Storage...13 Media-card reader...13 Keyboard...14 Camera...14 Touchpad...15 Power adapter...15 Battery...16 Display...17 Fingerprint reader...17 GPU-Integrated...18 GPU-Discrete...18 Operating and storage environment...18 Chapter 4: Dell low blue light display 19 Chapter 5: Keyboard shortcuts of XPS 15 9500 20...
... of XPS 15 9500...6 Left...6 Right...6 Base...7 Display...8 Bottom...9 Chapter 3: Specifications of XPS 15 9500 10 Dimensions and weight...10 Processor...10 Chipset...11 Operating system...11 Memory...11 Internal slots...11 External ports...12 Wireless module...12 Audio...13 Storage...13 Media-card reader...13 Keyboard...14 Camera...14 Touchpad...15 Power adapter...15 Battery...16 Display...17 Fingerprint reader...17 GPU-Integrated...18 GPU-Discrete...18 Operating and storage environment...18 Chapter 4: Dell low blue light display 19 Chapter 5: Keyboard shortcuts of XPS 15 9500 20...


