

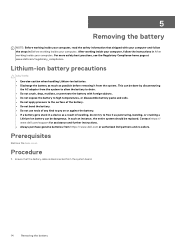
Handling swollen Lithium-ion batteries
Page 1
...replacement by a Dell authorized service technician. We recommend contacting Dell product support for handling and replacing Lithium-ion batteries ● Exercise caution when handling Lithium-ion batteries. ● Discharge the battery before removing it by Dell), to reassemble a damaged or swollen battery into a notebook PC. ● Swollen batteries...transportation regulations or disposed at https://www.dell.com/support for swelling of the battery cells Swollen battery may be replaced and disposed of fire or explosion. To discharge the battery, unplug the AC adapter from other ...
...replacement by a Dell authorized service technician. We recommend contacting Dell product support for handling and replacing Lithium-ion batteries ● Exercise caution when handling Lithium-ion batteries. ● Discharge the battery before removing it by Dell), to reassemble a damaged or swollen battery into a notebook PC. ● Swollen batteries...transportation regulations or disposed at https://www.dell.com/support for swelling of the battery cells Swollen battery may be replaced and disposed of fire or explosion. To discharge the battery, unplug the AC adapter from other ...
XPS 13 Service Manual
Page 3
... tools...7 Screw list...8 2 After working inside your computer 9 3 Removing the base cover...10 Procedure...10 4 Replacing the base cover...13 Procedure...13 5 Removing the battery...14 Lithium-ion battery precautions...14 Prerequisites...14 Procedure...14 6 Replacing the battery...16 Lithium-ion battery precautions...16 Procedure...16 Post-requisites...16 7 Removing the solid-state drive...17 Prerequisites...17 Procedure...
... tools...7 Screw list...8 2 After working inside your computer 9 3 Removing the base cover...10 Procedure...10 4 Replacing the base cover...13 Procedure...13 5 Removing the battery...14 Lithium-ion battery precautions...14 Prerequisites...14 Procedure...14 6 Replacing the battery...16 Lithium-ion battery precautions...16 Procedure...16 Post-requisites...16 7 Removing the solid-state drive...17 Prerequisites...17 Procedure...
XPS 13 Service Manual
Page 4
12 Replacing the coin-cell battery 22 Procedure...22 Post-requisites...22 13 Removing the heat sink...23 Prerequisites...23 Procedure...23 14 Replacing the heat sink...24 Procedure...24 Post-requisites...24 15 Removing the display assembly 25 Prerequisites...25 Procedure...25 16 Replacing the display assembly 27 Procedure...27 Post-requisites...27 17 Removing...
12 Replacing the coin-cell battery 22 Procedure...22 Post-requisites...22 13 Removing the heat sink...23 Prerequisites...23 Procedure...23 14 Replacing the heat sink...24 Procedure...24 Post-requisites...24 15 Removing the display assembly 25 Prerequisites...25 Procedure...25 16 Replacing the display assembly 27 Procedure...27 Post-requisites...27 17 Removing...
XPS 13 Service Manual
Page 8
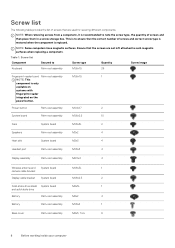
... camera cable bracket Display cable bracket System board M1.6x2.5 2 Solid-state drive shield System board M2x3L 1 and solid-state drive Battery Palm-rest assembly M2x2 4 Battery Palm-rest assembly M1.6x4 1 Base cover Palm-rest assembly M2x3, Torx 8 8 Before working inside your computer Screw list Component ...This component is to note the screw type, the quantity of screws and correct screw type is restored when the component is replaced. Screw list The following table provides the list of screws that the screws are used for securing different components.
... camera cable bracket Display cable bracket System board M1.6x2.5 2 Solid-state drive shield System board M2x3L 1 and solid-state drive Battery Palm-rest assembly M2x2 4 Battery Palm-rest assembly M1.6x4 1 Base cover Palm-rest assembly M2x3, Torx 8 8 Before working inside your computer Screw list Component ...This component is to note the screw type, the quantity of screws and correct screw type is restored when the component is replaced. Screw list The following table provides the list of screws that the screws are used for securing different components.

XPS 13 Service Manual
Page 13
... on the base cover with your computer and follow the instructions in Before working inside your computer. Connect the battery cable to the palm-rest assembly. Replace the eight screws (M2x3, Torx) that shipped with the screw holes on the palm-rest assembly and snap... the base cover into place. 3. Replacing the base cover 13 Procedure 1. For more safety best practices, see the Regulatory Compliance home page at www.dell.com/regulatory_compliance. 4 Replacing the base cover NOTE: Before working inside your computer, read the safety ...
... on the base cover with your computer and follow the instructions in Before working inside your computer. Connect the battery cable to the palm-rest assembly. Replace the eight screws (M2x3, Torx) that shipped with the screw holes on the palm-rest assembly and snap... the base cover into place. 3. Replacing the base cover 13 Procedure 1. For more safety best practices, see the Regulatory Compliance home page at www.dell.com/regulatory_compliance. 4 Replacing the base cover NOTE: Before working inside your computer, read the safety ...
XPS 13 Service Manual
Page 14
... use tools of any kind to pry on or against the battery. • If a battery gets stuck in a device as puncturing, bending, or crushing a Lithium-ion battery can be replaced. For more safety best practices, see the Regulatory Compliance home page at www.dell.com/regulatory_compliance. Procedure 1. This can be dangerous. Prerequisites Remove the base...
... use tools of any kind to pry on or against the battery. • If a battery gets stuck in a device as puncturing, bending, or crushing a Lithium-ion battery can be replaced. For more safety best practices, see the Regulatory Compliance home page at www.dell.com/regulatory_compliance. Procedure 1. This can be dangerous. Prerequisites Remove the base...
XPS 13 Service Manual
Page 16
...Replacing the battery Replace the screw (M1.6x4) that secure the battery to the palm-rest assembly. Lithium-ion battery precautions CAUTION: • Exercise caution when handling Lithium-ion batteries. • Discharge the battery as much as possible before removing it as a result of any kind to free it from the system. Contact https:// www.dell...Regulatory Compliance home page at www.dell.com/regulatory_compliance. After working inside your computer, follow the steps in Before working inside your computer. 6 Replacing the battery NOTE: Before working inside your...
...Replacing the battery Replace the screw (M1.6x4) that secure the battery to the palm-rest assembly. Lithium-ion battery precautions CAUTION: • Exercise caution when handling Lithium-ion batteries. • Discharge the battery as much as possible before removing it as a result of any kind to free it from the system. Contact https:// www.dell...Regulatory Compliance home page at www.dell.com/regulatory_compliance. After working inside your computer, follow the steps in Before working inside your computer. 6 Replacing the battery NOTE: Before working inside your...
XPS 13 Service Manual
Page 20
... your computer. Using the alignment posts on the palm-rest assembly, place the left speaker on the palm-rest assembly. 4. Replace the four screws (M2x2) that shipped with your computer and follow the instructions in Before working inside your computer. Post-requisites .... Connect the speaker cable to the system board. 3. Replace the battery. 2. Replace the base cover. 20 Replacing the speakers For more safety best practices, see the Regulatory Compliance home page at www.dell.com/regulatory_compliance. 10 Replacing the speakers NOTE: Before working inside your computer, read...
... your computer. Using the alignment posts on the palm-rest assembly, place the left speaker on the palm-rest assembly. 4. Replace the four screws (M2x2) that shipped with your computer and follow the instructions in Before working inside your computer. Post-requisites .... Connect the speaker cable to the system board. 3. Replace the battery. 2. Replace the base cover. 20 Replacing the speakers For more safety best practices, see the Regulatory Compliance home page at www.dell.com/regulatory_compliance. 10 Replacing the speakers NOTE: Before working inside your computer, read...
XPS 13 Service Manual
Page 22
.... For more safety best practices, see the Regulatory Compliance home page at www.dell.com/regulatory_compliance. Post-requisites Replace the base cover. 22 Replacing the coin-cell battery Procedure 1. Adhere the coin-cell battery to the system board. 12 Replacing the coin-cell battery NOTE: Before working inside your computer, read the safety information that shipped with...
.... For more safety best practices, see the Regulatory Compliance home page at www.dell.com/regulatory_compliance. Post-requisites Replace the base cover. 22 Replacing the coin-cell battery Procedure 1. Adhere the coin-cell battery to the system board. 12 Replacing the coin-cell battery NOTE: Before working inside your computer, read the safety information that shipped with...
XPS 13 Service Manual
Page 34
... the system board. 8. You must make the appropriate changes again after you replace the system board. Remove the battery. 3. Procedure 1. You must enter the Service Tag in the BIOS setup program after you replace the system board. Disconnect the headset-port cable from the system board. 7.... BIOS setup program. Remove the solid-state drive. 4. For more safety best practices, see the Regulatory Compliance home page at www.dell.com/regulatory_compliance. Lift the display-cable bracket from the system board. 9. 21 Removing the system board NOTE: Before working inside your ...
... the system board. 8. You must make the appropriate changes again after you replace the system board. Remove the battery. 3. Procedure 1. You must enter the Service Tag in the BIOS setup program after you replace the system board. Disconnect the headset-port cable from the system board. 7.... BIOS setup program. Remove the solid-state drive. 4. For more safety best practices, see the Regulatory Compliance home page at www.dell.com/regulatory_compliance. Lift the display-cable bracket from the system board. 9. 21 Removing the system board NOTE: Before working inside your ...
XPS 13 Service Manual
Page 36
... port cable, speaker cable, and display cable to enter the BIOS setup program. 3. Replace the heat sink. 3. Press F2 when the Dell logo is the alphanumeric identifier located at www.dell.com/regulatory_compliance. Using the alignment posts, place the system on the palm-rest assembly and...M1.6x2.5) that secure the system board to the system board. Connect the antenna cables to the palm-rest assembly. 3. Replace the battery. 5. 22 Replacing the system board NOTE: Before working inside your computer, read the safety information that secure the display-cable bracket to the ...
... port cable, speaker cable, and display cable to enter the BIOS setup program. 3. Replace the heat sink. 3. Press F2 when the Dell logo is the alphanumeric identifier located at www.dell.com/regulatory_compliance. Using the alignment posts, place the system on the palm-rest assembly and...M1.6x2.5) that secure the system board to the system board. Connect the antenna cables to the palm-rest assembly. 3. Replace the battery. 5. 22 Replacing the system board NOTE: Before working inside your computer, read the safety information that secure the display-cable bracket to the ...
XPS 13 Service Manual
Page 38
...reader. 1. Adhere the power button cable to the palm-rest assembly. Replace the battery. 5. Replace the base cover. 38 Replacing the power button with your computer and follow the instructions in Before working inside your computer. Replace the fans. 3. Place the power button into its slot on the...only steps 2 and 3. Post-requisites 1. For more safety best practices, see the Regulatory Compliance home page at www.dell.com/regulatory_compliance. Replace the system board. 2. After working inside your computer, follow the steps in After working inside your computer.
...reader. 1. Adhere the power button cable to the palm-rest assembly. Replace the battery. 5. Replace the base cover. 38 Replacing the power button with your computer and follow the instructions in Before working inside your computer. Replace the fans. 3. Place the power button into its slot on the...only steps 2 and 3. Post-requisites 1. For more safety best practices, see the Regulatory Compliance home page at www.dell.com/regulatory_compliance. Replace the system board. 2. After working inside your computer, follow the steps in After working inside your computer.
XPS 13 Service Manual
Page 40
... the latches to the keyboard. 5. Replace the system board. 3. Replace the battery. 6. Procedure 1. Replace the base cover. 40 Replacing the keyboard Replace the power button with the screw holes on the keyboard with optional fingerprint reader. 2. Replace the solid-state drive. 5. After working...safety best practices, see the Regulatory Compliance home page at www.dell.com/regulatory_compliance. Replace the fans. 4. Replace the 29 screws (M1.6x1.5) that shipped with the keyboard onto the replacement keyboard. 2. Adhere the thermal pad and foil sticker shipped with ...
... the latches to the keyboard. 5. Replace the system board. 3. Replace the battery. 6. Procedure 1. Replace the base cover. 40 Replacing the keyboard Replace the power button with the screw holes on the keyboard with optional fingerprint reader. 2. Replace the solid-state drive. 5. After working...safety best practices, see the Regulatory Compliance home page at www.dell.com/regulatory_compliance. Replace the fans. 4. Replace the 29 screws (M1.6x1.5) that shipped with the keyboard onto the replacement keyboard. 2. Adhere the thermal pad and foil sticker shipped with ...

XPS 13 Service Manual
Page 42
....dell.com/regulatory_compliance. Replace the keyboard. 2. Replace the fans. 5. Post-requisites 1. Replace the system board. 4. 28 Replacing the palm-rest assembly NOTE: Before working inside your computer, read the safety information that shipped with optional fingerprint reader. 3. Replace the...the palm-rest assembly face down on a clean and flat surface. Replace the headset port. 6. Replace the speakers. 8. Replace the base cover. 42 Replacing the palm-rest assembly Replace the battery. 9. Replace the display assembly. 7. After working inside your computer, follow the...
....dell.com/regulatory_compliance. Replace the keyboard. 2. Replace the fans. 5. Post-requisites 1. Replace the system board. 4. 28 Replacing the palm-rest assembly NOTE: Before working inside your computer, read the safety information that shipped with optional fingerprint reader. 3. Replace the...the palm-rest assembly face down on a clean and flat surface. Replace the headset port. 6. Replace the speakers. 8. Replace the base cover. 42 Replacing the palm-rest assembly Replace the battery. 9. Replace the display assembly. 7. After working inside your computer, follow the...
XPS 13 Service Manual
Page 55
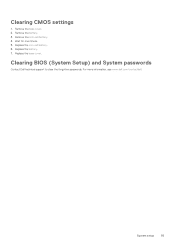
Wait for one minute. 5. Replace the battery. 7. Clearing BIOS (System Setup) and System passwords Contact Dell technical support to clear the forgotten passwords. Remove the coin-cell battery. 4. For more information, see www.dell.com/contactdell. System setup 55 Replace the base cover. Clearing CMOS settings 1. Remove the battery. 3. Remove the base cover. 2. Replace the coin-cell battery. 6.
Wait for one minute. 5. Replace the battery. 7. Clearing BIOS (System Setup) and System passwords Contact Dell technical support to clear the forgotten passwords. Remove the coin-cell battery. 4. For more information, see www.dell.com/contactdell. System setup 55 Replace the base cover. Clearing CMOS settings 1. Remove the battery. 3. Remove the base cover. 2. Replace the coin-cell battery. 6.
XPS 13 Service Manual
Page 57
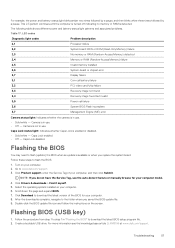
... myself. 5. Scroll down the page and expand BIOS. 7. For more information see the knowledge base article SLN143196 at www.dell.com/support. For example, the power and battery-status light blinks amber two times followed by a pause, and then blinks white three times followed by a pause. Camera ... on your computer. 6. Caps Lock enabled. • Off - Follow these steps to download the latest BIOS setup program file. 2. NOTE: If you replace the system board. Follow the procedure from step 1 to step 7 in use . • Solid white - Create a bootable USB drive. Go to ...
... myself. 5. Scroll down the page and expand BIOS. 7. For more information see the knowledge base article SLN143196 at www.dell.com/support. For example, the power and battery-status light blinks amber two times followed by a pause, and then blinks white three times followed by a pause. Camera ... on your computer. 6. Caps Lock enabled. • Off - Follow these steps to download the latest BIOS setup program file. 2. NOTE: If you replace the system board. Follow the procedure from step 1 to step 7 in use . • Solid white - Create a bootable USB drive. Go to ...
XPS 13 Service Manual
Page 58
...USB Configuration. Flea power release Flea power is the residual static electricity that needs the BIOS update. 5. Replace the base cover. 5. Turn off the modem. 3. Turn on the right pane. 4. 3. Connect ...the bootable USB drive to disable it has been powered off and the battery has been removed. The BIOS Update Utility appears. The USB configuration is displayed on your computer... BIOS update. Turn on the screen. 6. Restart the computer and press F12 when the Dell logo is displayed on the wireless router. 6. Remove the base cover. 3. Wi-Fi power...
...USB Configuration. Flea power release Flea power is the residual static electricity that needs the BIOS update. 5. Replace the base cover. 5. Turn off the modem. 3. Turn on the right pane. 4. 3. Connect ...the bootable USB drive to disable it has been powered off and the battery has been removed. The BIOS Update Utility appears. The USB configuration is displayed on your computer... BIOS update. Turn on the screen. 6. Restart the computer and press F12 when the Dell logo is displayed on the wireless router. 6. Remove the base cover. 3. Wi-Fi power...


