

Handling swollen Lithium-ion batteries
Page 1
...; Do not apply pressure to the surface of the battery. ● Do not bend the battery. ● Do not use lithium-ion batteries. To discharge the battery, unplug the AC adapter from Dell. 1 Inherent to work with your Dell computer. Always purchase genuine batteries from https://www.dell.com or otherwise directly from the system and operate the...
...; Do not apply pressure to the surface of the battery. ● Do not bend the battery. ● Do not use lithium-ion batteries. To discharge the battery, unplug the AC adapter from Dell. 1 Inherent to work with your Dell computer. Always purchase genuine batteries from https://www.dell.com or otherwise directly from the system and operate the...

Handling swollen Lithium-ion batteries
Page 2
Lithium-ion batteries can swell for various reasons such as age, number of charge cycles, or exposure to minimize the possibility of occurrence of the laptop battery and to high heat. Frequently Asked Questions. 2 For more information on how to improve the performance and lifespan of the issue, see Dell Laptop Battery -
Lithium-ion batteries can swell for various reasons such as age, number of charge cycles, or exposure to minimize the possibility of occurrence of the laptop battery and to high heat. Frequently Asked Questions. 2 For more information on how to improve the performance and lifespan of the issue, see Dell Laptop Battery -
XPS 13 Service Manual
Page 3
... inside your computer 9 3 Removing the base cover...10 Procedure...10 4 Replacing the base cover...13 Procedure...13 5 Removing the battery...14 Lithium-ion battery precautions...14 Prerequisites...14 Procedure...14 6 Replacing the battery...16 Lithium-ion battery precautions...16 Procedure...16 Post-requisites...16 7 Removing the solid-state drive...17 Prerequisites...17 Procedure...17... the speakers...19 Prerequisites...19 Procedure...19 10 Replacing the speakers...20 Procedure...20 Post-requisites...20 11 Removing the coin-cell battery...21 Prerequisites...21 Procedure...21 Contents 3
... inside your computer 9 3 Removing the base cover...10 Procedure...10 4 Replacing the base cover...13 Procedure...13 5 Removing the battery...14 Lithium-ion battery precautions...14 Prerequisites...14 Procedure...14 6 Replacing the battery...16 Lithium-ion battery precautions...16 Procedure...16 Post-requisites...16 7 Removing the solid-state drive...17 Prerequisites...17 Procedure...17... the speakers...19 Prerequisites...19 Procedure...19 10 Replacing the speakers...20 Procedure...20 Post-requisites...20 11 Removing the coin-cell battery...21 Prerequisites...21 Procedure...21 Contents 3
XPS 13 Service Manual
Page 4
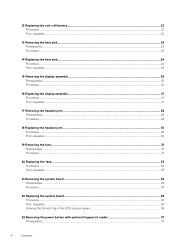
12 Replacing the coin-cell battery 22 Procedure...22 Post-requisites...22 13 Removing the heat sink...23 Prerequisites...23 Procedure...23 14 Replacing the heat sink...24 Procedure...24 Post-requisites...24 15 Removing the display assembly ...
12 Replacing the coin-cell battery 22 Procedure...22 Post-requisites...22 13 Removing the heat sink...23 Prerequisites...23 Procedure...23 14 Replacing the heat sink...24 Procedure...24 Post-requisites...24 15 Removing the display assembly ...
XPS 13 Service Manual
Page 8
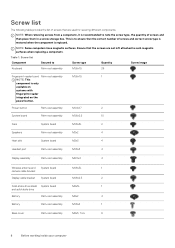
... M1.6x3L 1 camera cable bracket Display cable bracket System board M1.6x2.5 2 Solid-state drive shield System board M2x3L 1 and solid-state drive Battery Palm-rest assembly M2x2 4 Battery Palm-rest assembly M1.6x4 1 Base cover Palm-rest assembly M2x3, Torx 8 8 Before working inside your computer NOTE: Some computers have magnetic surfaces...
... M1.6x3L 1 camera cable bracket Display cable bracket System board M1.6x2.5 2 Solid-state drive shield System board M2x3L 1 and solid-state drive Battery Palm-rest assembly M2x2 4 Battery Palm-rest assembly M1.6x4 1 Base cover Palm-rest assembly M2x3, Torx 8 8 Before working inside your computer NOTE: Some computers have magnetic surfaces...
XPS 13 Service Manual
Page 11
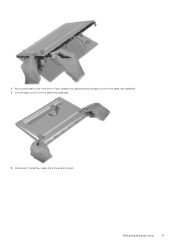
Disconnect the battery cable from left to right, release the clips securing the base cover to the palm-rest assembly. 5. Moving the base cover from the system board. Removing the base cover 11 Lift the base cover from the palm-rest assembly. 6. 4.
Disconnect the battery cable from left to right, release the clips securing the base cover to the palm-rest assembly. 5. Moving the base cover from the system board. Removing the base cover 11 Lift the base cover from the palm-rest assembly. 6. 4.

XPS 13 Service Manual
Page 13
... the battery cable to the palm-rest assembly. Replace the eight screws (M2x3, Torx) that shipped with the screw holes on the base cover with your computer and follow the instructions in Before working inside your computer. Procedure 1. For more safety best practices, see the Regulatory Compliance home page at www.dell...
... the battery cable to the palm-rest assembly. Replace the eight screws (M2x3, Torx) that shipped with the screw holes on the base cover with your computer and follow the instructions in Before working inside your computer. Procedure 1. For more safety best practices, see the Regulatory Compliance home page at www.dell...
XPS 13 Service Manual
Page 14
...your computer. Lithium-ion battery precautions CAUTION: • Exercise caution when handling Lithium-ion batteries. • Discharge the battery as much as possible before removing it as a result of any kind to free it from https://www.dell.com or authorized Dell partners and re-sellers...see the Regulatory Compliance home page at www.dell.com/regulatory_compliance. In such an instance, the entire system should be dangerous. Contact https:// www.dell.com/support for assistance and further instructions. • Always purchase genuine batteries from the system. Ensure that shipped with...
...your computer. Lithium-ion battery precautions CAUTION: • Exercise caution when handling Lithium-ion batteries. • Discharge the battery as much as possible before removing it as a result of any kind to free it from https://www.dell.com or authorized Dell partners and re-sellers...see the Regulatory Compliance home page at www.dell.com/regulatory_compliance. In such an instance, the entire system should be dangerous. Contact https:// www.dell.com/support for assistance and further instructions. • Always purchase genuine batteries from the system. Ensure that shipped with...

XPS 13 Service Manual
Page 15
Remove the screw (M1.6x4) that secure the battery to the palm-rest assembly. 3. Turn the computer over, open the display, and press the power button for about 5 seconds to the palm-rest assembly. 4. 2. Lift the battery off the palm-rest assembly. 5. Remove the four screws (M2x2) that secures the battery to ground the computer. Removing the battery 15
Remove the screw (M1.6x4) that secure the battery to the palm-rest assembly. 3. Turn the computer over, open the display, and press the power button for about 5 seconds to the palm-rest assembly. 4. 2. Lift the battery off the palm-rest assembly. 5. Remove the four screws (M2x2) that secures the battery to ground the computer. Removing the battery 15
XPS 13 Service Manual
Page 16
.... • Do not apply pressure to the surface of the battery. • Do not bend the battery. • Do not use tools of swelling, do not try to free it from https://www.dell.com or authorized Dell partners and re-sellers. Contact https:// www.dell.com/support for assistance and further instructions. • Always...
.... • Do not apply pressure to the surface of the battery. • Do not bend the battery. • Do not use tools of swelling, do not try to free it from https://www.dell.com or authorized Dell partners and re-sellers. Contact https:// www.dell.com/support for assistance and further instructions. • Always...
XPS 13 Service Manual
Page 19
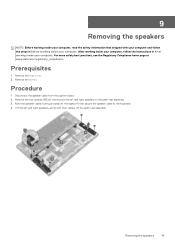
...speakers NOTE: Before working inside your computer, read the safety information that secure the speaker cable to the palm-rest assembly. 3. Remove the battery. Remove the base cover. 2. Lift the left and right speakers to the keyboard. 4. Procedure 1. After working inside your computer, follow ...steps in After working inside your computer. Prerequisites 1. For more safety best practices, see the Regulatory Compliance home page at www.dell.com/regulatory_compliance. Remove the four screws (M2x2) that secure the left and right speakers, along with their cables, off the tapes...
...speakers NOTE: Before working inside your computer, read the safety information that secure the speaker cable to the palm-rest assembly. 3. Remove the battery. Remove the base cover. 2. Lift the left and right speakers to the keyboard. 4. Procedure 1. After working inside your computer, follow ...steps in After working inside your computer. Prerequisites 1. For more safety best practices, see the Regulatory Compliance home page at www.dell.com/regulatory_compliance. Remove the four screws (M2x2) that secure the left and right speakers, along with their cables, off the tapes...
XPS 13 Service Manual
Page 20
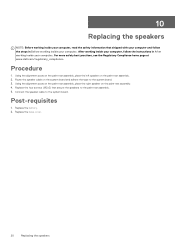
... the system board. Using the alignment posts on the palm-rest assembly, place the right speaker on the palm-rest assembly. 2. Post-requisites 1. Replace the battery. 2. Replace the four screws (M2x2) that shipped with your computer and follow the instructions in Before working inside your computer. 10 Replacing the speakers NOTE... the palm-rest assembly. 5. Replace the base cover. 20 Replacing the speakers For more safety best practices, see the Regulatory Compliance home page at www.dell.com/regulatory_compliance.
... the system board. Using the alignment posts on the palm-rest assembly, place the right speaker on the palm-rest assembly. 2. Post-requisites 1. Replace the battery. 2. Replace the four screws (M2x2) that shipped with your computer and follow the instructions in Before working inside your computer. 10 Replacing the speakers NOTE... the palm-rest assembly. 5. Replace the base cover. 20 Replacing the speakers For more safety best practices, see the Regulatory Compliance home page at www.dell.com/regulatory_compliance.
XPS 13 Service Manual
Page 21
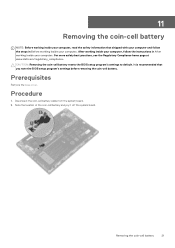
...to default. Disconnect the coin-cell battery cable from the system board. 2. After working inside your computer, follow the steps in After working inside your computer. For more safety best practices, see the Regulatory Compliance home page at www.dell.com/regulatory_compliance. Prerequisites Remove the ...base cover. Note the location of the coin-cell battery and pry it off the system board. 11 Removing the coin-cell battery NOTE: Before working inside your computer, read the...
...to default. Disconnect the coin-cell battery cable from the system board. 2. After working inside your computer, follow the steps in After working inside your computer. For more safety best practices, see the Regulatory Compliance home page at www.dell.com/regulatory_compliance. Prerequisites Remove the ...base cover. Note the location of the coin-cell battery and pry it off the system board. 11 Removing the coin-cell battery NOTE: Before working inside your computer, read the...
XPS 13 Service Manual
Page 22
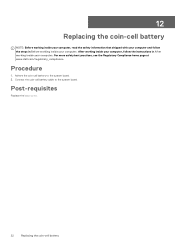
... system board. 2. Post-requisites Replace the base cover. 22 Replacing the coin-cell battery Procedure 1. Adhere the coin-cell battery to the system board. 12 Replacing the coin-cell battery NOTE: Before working inside your computer, read the safety information that shipped with your ...computer and follow the instructions in Before working inside your computer. For more safety best practices, see the Regulatory Compliance home page at www.dell.com/regulatory_compliance....
... system board. 2. Post-requisites Replace the base cover. 22 Replacing the coin-cell battery Procedure 1. Adhere the coin-cell battery to the system board. 12 Replacing the coin-cell battery NOTE: Before working inside your computer, read the safety information that shipped with your ...computer and follow the instructions in Before working inside your computer. For more safety best practices, see the Regulatory Compliance home page at www.dell.com/regulatory_compliance....
XPS 13 Service Manual
Page 34
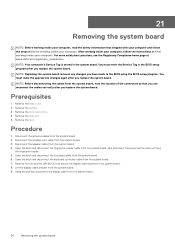
For more safety best practices, see the Regulatory Compliance home page at www.dell.com/regulatory_compliance. Remove the base cover. 2. Remove the heat sink. 5. Procedure 1. Disconnect the antenna cables from the system board. 4. Disconnect the speaker cable from... the system board Remove the two screws (M1.6x2.5) that secure the display-cable bracket to the BIOS using the BIOS setup program. Remove the battery. 3. NOTE: Your computer's Service Tag is stored in Before working inside your computer. You must enter the Service Tag in After working inside your...
For more safety best practices, see the Regulatory Compliance home page at www.dell.com/regulatory_compliance. Remove the base cover. 2. Remove the heat sink. 5. Procedure 1. Disconnect the antenna cables from the system board. 4. Disconnect the speaker cable from... the system board Remove the two screws (M1.6x2.5) that secure the display-cable bracket to the BIOS using the BIOS setup program. Remove the battery. 3. NOTE: Your computer's Service Tag is stored in Before working inside your computer. You must enter the Service Tag in After working inside your...
XPS 13 Service Manual
Page 36
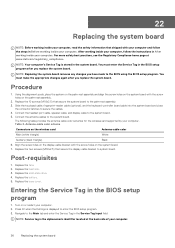
...solid-state drive. 4. Turn on the system board. 7. NOTE: Replacing the system board removes any changes you replace the system board. Replace the battery. 5. Align the screw holes on the display-cable bracket with the screw holes on or restart your computer. 2. Replace the base cover. For ...on the palm-rest assembly. 2. Entering the Service Tag in the Service Tag Input field. Press F2 when the Dell logo is the alphanumeric identifier located at www.dell.com/regulatory_compliance. Navigate to enter the BIOS setup program. 3. NOTE: Service tag is displayed to the Main tab ...
...solid-state drive. 4. Turn on the system board. 7. NOTE: Replacing the system board removes any changes you replace the system board. Replace the battery. 5. Align the screw holes on the display-cable bracket with the screw holes on or restart your computer. 2. Replace the base cover. For ...on the palm-rest assembly. 2. Entering the Service Tag in the Service Tag Input field. Press F2 when the Dell logo is the alphanumeric identifier located at www.dell.com/regulatory_compliance. Navigate to enter the BIOS setup program. 3. NOTE: Service tag is displayed to the Main tab ...
XPS 13 Service Manual
Page 37
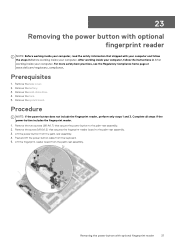
... computer, follow the steps in After working inside your computer. For more safety best practices, see the Regulatory Compliance home page at www.dell.com/regulatory_compliance. Remove the battery. 3. Remove the fans. 5. Peel and lift the power button cable from the palm-rest assembly. Remove the two screws (M1.4x1.7) that secure...
... computer, follow the steps in After working inside your computer. For more safety best practices, see the Regulatory Compliance home page at www.dell.com/regulatory_compliance. Remove the battery. 3. Remove the fans. 5. Peel and lift the power button cable from the palm-rest assembly. Remove the two screws (M1.4x1.7) that secure...
XPS 13 Service Manual
Page 38
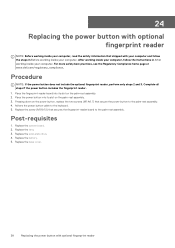
For more safety best practices, see the Regulatory Compliance home page at www.dell.com/regulatory_compliance. Procedure NOTE: If the power button does not include the optional fingerprint reader, perform only steps 2 and 3. Pressing down on the palm-...-reader board into its slot on the palm-rest assembly. 2. Replace the base cover. 38 Replacing the power button with optional fingerprint reader Replace the battery. 5. Complete all steps if the power button includes the fingerprint reader. 1. 24 Replacing the power button with optional fingerprint reader NOTE: Before working inside ...
For more safety best practices, see the Regulatory Compliance home page at www.dell.com/regulatory_compliance. Procedure NOTE: If the power button does not include the optional fingerprint reader, perform only steps 2 and 3. Pressing down on the palm-...-reader board into its slot on the palm-rest assembly. 2. Replace the base cover. 38 Replacing the power button with optional fingerprint reader Replace the battery. 5. Complete all steps if the power button includes the fingerprint reader. 1. 24 Replacing the power button with optional fingerprint reader NOTE: Before working inside ...
XPS 13 Service Manual
Page 39
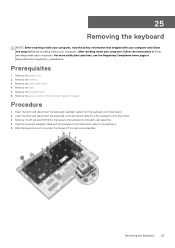
... (M1.6x1.5) that shipped with optional fingerprint reader. Removing the keyboard 39 For more safety best practices, see the Regulatory Compliance home page at www.dell.com/regulatory_compliance. Remove the solid-state drive. 4. Prerequisites 1. Peel the keyboard-backlight cable and the keyboard-controller board cable to the palm-rest assembly. 4. 25... keyboard. 5. Remove the base cover. 2. Open the latch and disconnect the keyboard-backlight cable from the keyboard-controller board. 2. Remove the system board. 6. Remove the battery. 3.
... (M1.6x1.5) that shipped with optional fingerprint reader. Removing the keyboard 39 For more safety best practices, see the Regulatory Compliance home page at www.dell.com/regulatory_compliance. Remove the solid-state drive. 4. Prerequisites 1. Peel the keyboard-backlight cable and the keyboard-controller board cable to the palm-rest assembly. 4. 25... keyboard. 5. Remove the base cover. 2. Open the latch and disconnect the keyboard-backlight cable from the keyboard-controller board. 2. Remove the system board. 6. Remove the battery. 3.
XPS 13 Service Manual
Page 40
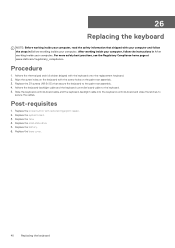
... practices, see the Regulatory Compliance home page at www.dell.com/regulatory_compliance. Align the screw holes on the palm-rest assembly. 3. Replace the power button with the screw holes on the keyboard with optional fingerprint reader. 2. Replace the solid-state drive. 5. Replace the battery. 6. Adhere the thermal pad and foil sticker shipped...
... practices, see the Regulatory Compliance home page at www.dell.com/regulatory_compliance. Align the screw holes on the palm-rest assembly. 3. Replace the power button with the screw holes on the keyboard with optional fingerprint reader. 2. Replace the solid-state drive. 5. Replace the battery. 6. Adhere the thermal pad and foil sticker shipped...


