

Handling swollen Lithium-ion batteries
Page 1
... recent years and have become standard in a device as a result of swelling, do not try to free it from Dell that is the lithium-ion polymer battery. Replace the battery only with your Dell computer. Handling swollen Lithium-ion batteries Current Release Version: A05 Release Date: 2020-06-11 Previous Release Version: A04 Like most laptops...
... recent years and have become standard in a device as a result of swelling, do not try to free it from Dell that is the lithium-ion polymer battery. Replace the battery only with your Dell computer. Handling swollen Lithium-ion batteries Current Release Version: A05 Release Date: 2020-06-11 Previous Release Version: A04 Like most laptops...
XPS 13 Service Manual
Page 3
... tools...7 Screw list...8 2 After working inside your computer 9 3 Removing the base cover...10 Procedure...10 4 Replacing the base cover...13 Procedure...13 5 Removing the battery...14 Lithium-ion battery precautions...14 Prerequisites...14 Procedure...14 6 Replacing the battery...16 Lithium-ion battery precautions...16 Procedure...16 Post-requisites...16 7 Removing the solid-state drive...17 Prerequisites...17 Procedure...
... tools...7 Screw list...8 2 After working inside your computer 9 3 Removing the base cover...10 Procedure...10 4 Replacing the base cover...13 Procedure...13 5 Removing the battery...14 Lithium-ion battery precautions...14 Prerequisites...14 Procedure...14 6 Replacing the battery...16 Lithium-ion battery precautions...16 Procedure...16 Post-requisites...16 7 Removing the solid-state drive...17 Prerequisites...17 Procedure...
XPS 13 Service Manual
Page 4
12 Replacing the coin-cell battery 22 Procedure...22 Post-requisites...22 13 Removing the heat sink...23 Prerequisites...23 Procedure...23 14 Replacing the heat sink...24 Procedure...24 Post-requisites...24 15 Removing the display assembly 25 Prerequisites...25 Procedure...25 16 Replacing the display assembly 27 Procedure...27 Post-requisites...27 17 Removing...
12 Replacing the coin-cell battery 22 Procedure...22 Post-requisites...22 13 Removing the heat sink...23 Prerequisites...23 Procedure...23 14 Replacing the heat sink...24 Procedure...24 Post-requisites...24 15 Removing the display assembly 25 Prerequisites...25 Procedure...25 16 Replacing the display assembly 27 Procedure...27 Post-requisites...27 17 Removing...
XPS 13 Service Manual
Page 8
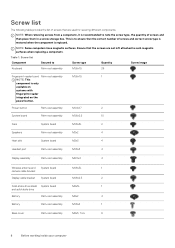
...bracket Display cable bracket System board M1.6x2.5 2 Solid-state drive shield System board M2x3L 1 and solid-state drive Battery Palm-rest assembly M2x2 4 Battery Palm-rest assembly M1.6x4 1 Base cover Palm-rest assembly M2x3, Torx 8 8 Before working inside your computer NOTE...: Some computers have magnetic surfaces. NOTE: When removing screws from a component, it is replaced. Ensure that the screws are used ...
...bracket Display cable bracket System board M1.6x2.5 2 Solid-state drive shield System board M2x3L 1 and solid-state drive Battery Palm-rest assembly M2x2 4 Battery Palm-rest assembly M1.6x4 1 Base cover Palm-rest assembly M2x3, Torx 8 8 Before working inside your computer NOTE...: Some computers have magnetic surfaces. NOTE: When removing screws from a component, it is replaced. Ensure that the screws are used ...

XPS 13 Service Manual
Page 13
...Replacing the base cover 13 For more safety best practices, see the Regulatory Compliance home page at www.dell.com/regulatory_compliance. Align the screw holes on the palm-rest assembly and snap the base cover into place. 3. After working inside your computer, follow the steps in After working inside your computer. Replace... with your computer and follow the instructions in Before working inside your computer. Connect the battery cable to the palm-rest assembly. 4 Replacing the base cover NOTE: Before working inside your computer, read the safety information that secure...
...Replacing the base cover 13 For more safety best practices, see the Regulatory Compliance home page at www.dell.com/regulatory_compliance. Align the screw holes on the palm-rest assembly and snap the base cover into place. 3. After working inside your computer, follow the steps in After working inside your computer. Replace... with your computer and follow the instructions in Before working inside your computer. Connect the battery cable to the palm-rest assembly. 4 Replacing the base cover NOTE: Before working inside your computer, read the safety information that secure...
XPS 13 Service Manual
Page 14
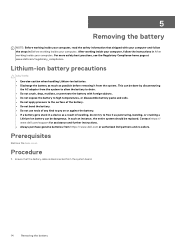
..., bending, or crushing a Lithium-ion battery can be replaced. After working inside your computer. Lithium-ion battery precautions CAUTION: • Exercise caution when handling Lithium-ion batteries. • Discharge the battery as much as possible before removing it ...as a result of swelling, do not try to free it from the system. Contact https:// www.dell...
..., bending, or crushing a Lithium-ion battery can be replaced. After working inside your computer. Lithium-ion battery precautions CAUTION: • Exercise caution when handling Lithium-ion batteries. • Discharge the battery as much as possible before removing it ...as a result of swelling, do not try to free it from the system. Contact https:// www.dell...
XPS 13 Service Manual
Page 16
This can be dangerous. Procedure 1. Post-requisites Replace the base cover. 16 Replacing the battery 6 Replacing the battery NOTE: Before working inside your computer, read the safety information that shipped with your computer and follow the instructions in After working inside your computer. Contact https:// www.dell.com/support for assistance and further instructions. • Always purchase...
This can be dangerous. Procedure 1. Post-requisites Replace the base cover. 16 Replacing the battery 6 Replacing the battery NOTE: Before working inside your computer, read the safety information that shipped with your computer and follow the instructions in After working inside your computer. Contact https:// www.dell.com/support for assistance and further instructions. • Always purchase...
XPS 13 Service Manual
Page 20
Connect the speaker cable to the palm-rest assembly. 5. For more safety best practices, see the Regulatory Compliance home page at www.dell.com/regulatory_compliance. Replace the battery. 2. Using the alignment posts on the palm-rest assembly, place the left speaker on the palm-rest assembly. 4. Using the alignment posts on the palm-...
Connect the speaker cable to the palm-rest assembly. 5. For more safety best practices, see the Regulatory Compliance home page at www.dell.com/regulatory_compliance. Replace the battery. 2. Using the alignment posts on the palm-rest assembly, place the left speaker on the palm-rest assembly. 4. Using the alignment posts on the palm-...
XPS 13 Service Manual
Page 22
For more safety best practices, see the Regulatory Compliance home page at www.dell.com/regulatory_compliance. Procedure 1. Post-requisites Replace the base cover. 22 Replacing the coin-cell battery Connect the coin-cell battery cable to the system board. 2. 12 Replacing the coin-cell battery NOTE: Before working inside your computer, read the safety information that shipped with...
For more safety best practices, see the Regulatory Compliance home page at www.dell.com/regulatory_compliance. Procedure 1. Post-requisites Replace the base cover. 22 Replacing the coin-cell battery Connect the coin-cell battery cable to the system board. 2. 12 Replacing the coin-cell battery NOTE: Before working inside your computer, read the safety information that shipped with...
XPS 13 Service Manual
Page 34
You must make the appropriate changes again after you have the fingerprint reader. 5. Remove the battery. 3. Remove the two screws (M1.6x2.5) that you can reconnect the cables correctly after you replace the system board. Using the pull tab, disconnect the display cable from the system board. 4....bracket to the BIOS using the BIOS setup program. For more safety best practices, see the Regulatory Compliance home page at www.dell.com/regulatory_compliance. Open the latch and disconnect the fingerprint-reader cable from the system board. 3. Skip this step if the ...
You must make the appropriate changes again after you have the fingerprint reader. 5. Remove the battery. 3. Remove the two screws (M1.6x2.5) that you can reconnect the cables correctly after you replace the system board. Using the pull tab, disconnect the display cable from the system board. 4....bracket to the BIOS using the BIOS setup program. For more safety best practices, see the Regulatory Compliance home page at www.dell.com/regulatory_compliance. Open the latch and disconnect the fingerprint-reader cable from the system board. 3. Skip this step if the ...
XPS 13 Service Manual
Page 36
...Replacing the system board removes any changes you replace... board. Replace the fans. 2. Replace the base...dell.com/regulatory_compliance. You must make the appropriate changes again after you replace...Replacing the system board Press F2 when the Dell logo is stored in the BIOS setup program 1. 22 Replacing... the system board NOTE: Before working inside your computer, read the safety information that shipped with the screw holes on or restart your computer. 2. Replace... Procedure 1. Replace the two ...
...Replacing the system board removes any changes you replace... board. Replace the fans. 2. Replace the base...dell.com/regulatory_compliance. You must make the appropriate changes again after you replace...Replacing the system board Press F2 when the Dell logo is stored in the BIOS setup program 1. 22 Replacing... the system board NOTE: Before working inside your computer, read the safety information that shipped with the screw holes on or restart your computer. 2. Replace... Procedure 1. Replace the two ...
XPS 13 Service Manual
Page 38
...board into its slot on the palm-rest assembly. 3. Replace the battery. 5. After working inside your computer, follow the steps in After working inside your computer. Replace the solid-state drive. 4. 24 Replacing the power button with optional fingerprint reader NOTE: Before working...fingerprint-reader board to the keyboard. 5. Replace the base cover. 38 Replacing the power button with optional fingerprint reader For more safety best practices, see the Regulatory Compliance home page at www.dell.com/regulatory_compliance. Replace the fans. 3. Place the power ...
...board into its slot on the palm-rest assembly. 3. Replace the battery. 5. After working inside your computer, follow the steps in After working inside your computer. Replace the solid-state drive. 4. 24 Replacing the power button with optional fingerprint reader NOTE: Before working...fingerprint-reader board to the keyboard. 5. Replace the base cover. 38 Replacing the power button with optional fingerprint reader For more safety best practices, see the Regulatory Compliance home page at www.dell.com/regulatory_compliance. Replace the fans. 3. Place the power ...
XPS 13 Service Manual
Page 40
...and follow the instructions in Before working inside your computer. Replace the battery. 6. Replace the system board. 3. Adhere the keyboard-backlight cable and the keyboard-controller board cable to secure the cables. 26 Replacing the keyboard NOTE: Before working inside your computer, read the... shipped with the screw holes on the keyboard with the keyboard onto the replacement keyboard. 2. Replace the fans. 4. For more safety best practices, see the Regulatory Compliance home page at www.dell.com/regulatory_compliance. Align the screw holes on the palm-rest assembly. 3....
...and follow the instructions in Before working inside your computer. Replace the battery. 6. Replace the system board. 3. Adhere the keyboard-backlight cable and the keyboard-controller board cable to secure the cables. 26 Replacing the keyboard NOTE: Before working inside your computer, read the... shipped with the screw holes on the keyboard with the keyboard onto the replacement keyboard. 2. Replace the fans. 4. For more safety best practices, see the Regulatory Compliance home page at www.dell.com/regulatory_compliance. Align the screw holes on the palm-rest assembly. 3....

XPS 13 Service Manual
Page 42
... computer. For more safety best practices, see the Regulatory Compliance home page at www.dell.com/regulatory_compliance. Replace the headset port. 6. Replace the power button with your computer and follow the instructions in Before working inside your computer. Replace the battery. 9. 28 Replacing the palm-rest assembly NOTE: Before working inside your computer, read the safety...
... computer. For more safety best practices, see the Regulatory Compliance home page at www.dell.com/regulatory_compliance. Replace the headset port. 6. Replace the power button with your computer and follow the instructions in Before working inside your computer. Replace the battery. 9. 28 Replacing the palm-rest assembly NOTE: Before working inside your computer, read the safety...
XPS 13 Service Manual
Page 55
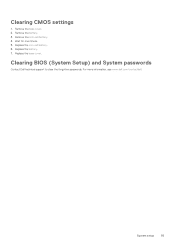
Clearing CMOS settings 1. Remove the battery. 3. Remove the coin-cell battery. 4. Replace the battery. 7. System setup 55 Clearing BIOS (System Setup) and System passwords Contact Dell technical support to clear the forgotten passwords. Replace the coin-cell battery. 6. For more information, see www.dell.com/contactdell. Replace the base cover. Wait for one minute. 5. Remove the base cover. 2.
Clearing CMOS settings 1. Remove the battery. 3. Remove the coin-cell battery. 4. Replace the battery. 7. System setup 55 Clearing BIOS (System Setup) and System passwords Contact Dell technical support to clear the forgotten passwords. Replace the coin-cell battery. 6. For more information, see www.dell.com/contactdell. Replace the base cover. Wait for one minute. 5. Remove the base cover. 2.
XPS 13 Service Manual
Page 57
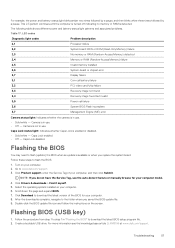
...and expand BIOS. 7. Flashing BIOS (USB key) 1. For more information see the knowledge base article SLN143196 at www.dell.com/support. For example, the power and battery-status light blinks amber two times followed by a pause, and then blinks white three times followed by a pause. Caps... on your computer. 6. Follow the procedure from step 1 to the folder where you replace the system board. Select the operating system installed on the screen. Troubleshooting 57 Follow these steps to www.dell.com/support. 3. Camera is enabled or disabled. • Solid white - Click Download...
...and expand BIOS. 7. Flashing BIOS (USB key) 1. For more information see the knowledge base article SLN143196 at www.dell.com/support. For example, the power and battery-status light blinks amber two times followed by a pause, and then blinks white three times followed by a pause. Caps... on your computer. 6. Follow the procedure from step 1 to the folder where you replace the system board. Select the operating system installed on the screen. Troubleshooting 57 Follow these steps to www.dell.com/support. 3. Camera is enabled or disabled. • Solid white - Click Download...
XPS 13 Service Manual
Page 58
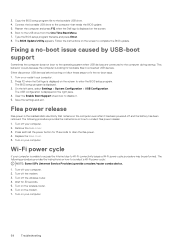
...on the screen to conduct flea power release: 1. Wait for bootable files in connected USB devices. Replace the base cover. 5. Turn on the modem. 7. Either disconnect USB devices before booting or ... ISPs (Internet Service Providers) provide a modem/router combo device. 1. 3. Press F2 when the Dell logo is unable to access the Internet due to the computer that remains on or restart your computer... static electricity that needs the BIOS update. 5. Turn off and the battery has been removed. Connect the bootable USB drive to Wi-Fi connectivity issues a Wi-Fi...
...on the screen to conduct flea power release: 1. Wait for bootable files in connected USB devices. Replace the base cover. 5. Turn on the modem. 7. Either disconnect USB devices before booting or ... ISPs (Internet Service Providers) provide a modem/router combo device. 1. 3. Press F2 when the Dell logo is unable to access the Internet due to the computer that remains on or restart your computer... static electricity that needs the BIOS update. 5. Turn off and the battery has been removed. Connect the bootable USB drive to Wi-Fi connectivity issues a Wi-Fi...


