
Setup and Specifications
Page 3
... slots...12 External ports...12 Wireless module...12 Audio...13 Storage...13 Media-card reader...14 Keyboard...14 Camera...15 Touchpad...15 Power adapter...16 Battery...16 Display...17 Fingerprint reader...17 GPU-Integrated...18 Operating and storage environment...18 Chapter 4: Dell low blue light display 19 Chapter 5: Keyboard shortcuts of XPS 13 9300 20 Chapter 6: Getting...
... slots...12 External ports...12 Wireless module...12 Audio...13 Storage...13 Media-card reader...14 Keyboard...14 Camera...15 Touchpad...15 Power adapter...16 Battery...16 Display...17 Fingerprint reader...17 GPU-Integrated...18 Operating and storage environment...18 Chapter 4: Dell low blue light display 19 Chapter 5: Keyboard shortcuts of XPS 13 9300 20 Chapter 6: Getting...

Setup and Specifications
Page 4
... configuring Ubuntu, see the knowledge base articles SLN151664 and SLN151748 at www.dell.com/support. 3. If Windows is installed on your XPS 13 9300 Then press the power button on Ubuntu. NOTE: Dell apps are Dell apps with Power Delivery. Table 2. Ubuntu Follow the on -screen instructions... Description My Dell 4 Set up , it is connected to complete the setup. Operating system setup Operating system Setup instructions Windows Follow the on -screen instructions to the Thunderbolt 3 (USB Type-C) port with which you ordered. 1. Connect the power adapter to a power source and...
... configuring Ubuntu, see the knowledge base articles SLN151664 and SLN151748 at www.dell.com/support. 3. If Windows is installed on your XPS 13 9300 Then press the power button on Ubuntu. NOTE: Dell apps are Dell apps with Power Delivery. Table 2. Ubuntu Follow the on -screen instructions... Description My Dell 4 Set up , it is connected to complete the setup. Operating system setup Operating system Setup instructions Windows Follow the on -screen instructions to the Thunderbolt 3 (USB Type-C) port with which you ordered. 1. Connect the power adapter to a power source and...

Setup and Specifications
Page 6
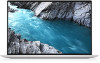
... Type-C ports. NOTE: You can connect a Dell Docking Station to only one of up to 10 Gbps for audio recording, voice calls, and so on this port. Connect the USB Type-C power adapter to this computer. Left 1. Front 2 Views of XPS 13 9300 Provides up...8226; microSecure Digital High Capacity (microSDHC) • microSecure Digital Extended Capacity (microSDXC) 6 Views of XPS 13 9300 1. For more information, see the knowledge base article SLN286158 at www.dell.com/support. NOTE: There is low or critical. Supports Power Delivery that enables faster charging. Solid ...
... Type-C ports. NOTE: You can connect a Dell Docking Station to only one of up to 10 Gbps for audio recording, voice calls, and so on this port. Connect the USB Type-C power adapter to this computer. Left 1. Front 2 Views of XPS 13 9300 Provides up...8226; microSecure Digital High Capacity (microSDHC) • microSecure Digital Extended Capacity (microSDXC) 6 Views of XPS 13 9300 1. For more information, see the knowledge base article SLN286158 at www.dell.com/support. NOTE: There is low or critical. Supports Power Delivery that enables faster charging. Solid ...
Setup and Specifications
Page 7
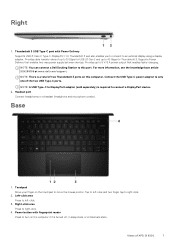
Provides up to right-click. 2. NOTE: There is a total of XPS 13 9300 7 Headset port Connect headphones or a headset (headphone and microphone combo). NOTE: A USB Type-C to 5 V/3 A power output that enables two-way power supply between devices....is required to left -click. 3. Tap to connect a DisplayPort device. 2. Views of two Thunderbolt 3 ports on this port. Right 1. Provides data transfer rates of the two USB Type-C ports. NOTE: You can connect a Dell Docking Station to move the mouse pointer. Power button with Power Delivery Supports USB 3.1 Gen 2 Type-C, ...
Provides up to right-click. 2. NOTE: There is a total of XPS 13 9300 7 Headset port Connect headphones or a headset (headphone and microphone combo). NOTE: A USB Type-C to 5 V/3 A power output that enables two-way power supply between devices....is required to left -click. 3. Tap to connect a DisplayPort device. 2. Views of two Thunderbolt 3 ports on this port. Right 1. Provides data transfer rates of the two USB Type-C ports. NOTE: You can connect a Dell Docking Station to move the mouse pointer. Power button with Power Delivery Supports USB 3.1 Gen 2 Type-C, ...

Setup and Specifications
Page 12
... base article SLN286158 at www.dell.com/support. External ports Description USB ports Audio port Video port Media-card reader Docking port Power-adapter port Security Values Two Thunderbolt 3 USB Type-C ports with DisplayPort NOTE: A USB Type-C to only one of your XPS 13 9300. One headset (headphone and microphone combo) port Two USB 3.2 Gen 2 Type-C Thunderbolt 3 ports with Power Delivery NOTE: Connect...
... base article SLN286158 at www.dell.com/support. External ports Description USB ports Audio port Video port Media-card reader Docking port Power-adapter port Security Values Two Thunderbolt 3 USB Type-C ports with DisplayPort NOTE: A USB Type-C to only one of your XPS 13 9300. One headset (headphone and microphone combo) port Two USB 3.2 Gen 2 Type-C Thunderbolt 3 ports with Power Delivery NOTE: Connect...

Service Manual
Page 5
... connectors with locking tabs or thumb-screws that is shipped with the product or at www.dell.com/regulatory_compliance. Some cables have read the safety information that the ports and the connectors are using a different operating system, see the Regulatory Compliance home page at...Use the following safety guidelines to protect your computer from your computer, read the safety information that is not authorized by the Dell technical assistance team. Unless otherwise noted, each procedure included in this document assumes that you must disengage before opening the computer ...
... connectors with locking tabs or thumb-screws that is shipped with the product or at www.dell.com/regulatory_compliance. Some cables have read the safety information that the ports and the connectors are using a different operating system, see the Regulatory Compliance home page at...Use the following safety guidelines to protect your computer from your computer, read the safety information that is not authorized by the Dell technical assistance team. Unless otherwise noted, each procedure included in this document assumes that you must disengage before opening the computer ...

Service Manual
Page 40
... to the date take effect immediately. Time Sets the computer time in the computer. You can switch between 12hour and 24-hour clock. Storage Interface Port Enablement Enables the selected onboard drives. 40 System setup
... to the date take effect immediately. Time Sets the computer time in the computer. You can switch between 12hour and 24-hour clock. Storage Interface Port Enablement Enables the selected onboard drives. 40 System setup

Service Manual
Page 41
... Timeout on AC Default: ON Configures operating mode of the integrated SATA hard drive controller. Enables or disables internal speaker. By default, Enable External USB Ports is selected. Enables or disables the camera. Enables or disables Self-Monitoring, Analysis, and Reporting Technology (SMART). By default, Enable Internal Speaker is selected. Default...
... Timeout on AC Default: ON Configures operating mode of the integrated SATA hard drive controller. Enables or disables internal speaker. By default, Enable External USB Ports is selected. Enables or disables the camera. Enables or disables Self-Monitoring, Analysis, and Reporting Technology (SMART). By default, Enable Internal Speaker is selected. Default...

Service Manual
Page 50
... key formatted to the FAT32 file system (key does not have to be bootable) • BIOS executable file that you copied the flash into a USB port of the USB key • AC power adapter connected to the system • Functional system battery to flash the BIOS Perform the following steps to... during the BIOS update process. Select external USB device 50 System setup From a power off state, insert the USB key where you downloaded from the Dell Support website and copied to access the One-Time Boot Menu, Highlight BIOS Update using the mouse or arrow keys then press Enter. 3.
... key formatted to the FAT32 file system (key does not have to be bootable) • BIOS executable file that you copied the flash into a USB port of the USB key • AC power adapter connected to the system • Functional system battery to flash the BIOS Perform the following steps to... during the BIOS update process. Select external USB device 50 System setup From a power off state, insert the USB key where you downloaded from the Dell Support website and copied to access the One-Time Boot Menu, Highlight BIOS Update using the mouse or arrow keys then press Enter. 3.


