Manual
Page 2
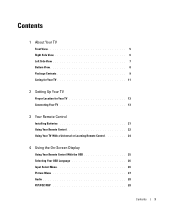
Contents 1 About Your TV Front View 5 Right Side View 6 Left Side View 7 Bottom View 8 Package Contents 9 Caring for Your TV 11 2 Setting Up Your TV Proper Location for Your TV 13 Connecting Your TV 13 3 Your Remote Control Installing Batteries 21 Using Your Remote Control 22 Using Your TV With a Universal or Learning Remote Control 24 4 Using the On-Screen Display Using Your Remote Control With the OSD 25 Selecting Your OSD Language 26 Input Select Menu 26 Picture Menu 27 Audio 28 PIP/POP/PBP 28 Contents 3
Contents 1 About Your TV Front View 5 Right Side View 6 Left Side View 7 Bottom View 8 Package Contents 9 Caring for Your TV 11 2 Setting Up Your TV Proper Location for Your TV 13 Connecting Your TV 13 3 Your Remote Control Installing Batteries 21 Using Your Remote Control 22 Using Your TV With a Universal or Learning Remote Control 24 4 Using the On-Screen Display Using Your Remote Control With the OSD 25 Selecting Your OSD Language 26 Input Select Menu 26 Picture Menu 27 Audio 28 PIP/POP/PBP 28 Contents 3

Manual
Page 14
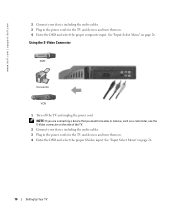
Setting Up Your TV 15 See "Input Select Menu" on -screen display (OSD) and select TV. NOTE: If you are connecting a device that you want to be able to the ANT/Cable connector of the TV. Using the ANT/Cable (Coaxial) Connector 1 Turn off the TV and unplug the power cord. Using the Composite Video Connector 1 Turn off the TV and unplug the power cord. 2 Connect the coaxial cable to remove, such as a camcorder, use the composite video connector on the side of the TV. 3 Plug in the power cord for the TV and turn on the TV. 4 Enter the on page 26.
Setting Up Your TV 15 See "Input Select Menu" on -screen display (OSD) and select TV. NOTE: If you are connecting a device that you want to be able to the ANT/Cable connector of the TV. Using the ANT/Cable (Coaxial) Connector 1 Turn off the TV and unplug the power cord. Using the Composite Video Connector 1 Turn off the TV and unplug the power cord. 2 Connect the coaxial cable to remove, such as a camcorder, use the composite video connector on the side of the TV. 3 Plug in the power cord for the TV and turn on the TV. 4 Enter the on page 26.
Manual
Page 15
..." on page 26. 16 Setting Up Your TV NOTE: If you are connecting a device that you want to be able to remove, such as a camcorder, use the S-Video connector on the side of the TV. 2 Connect your device including the audio cables. 3 Plug in the power cords for the TV and devices and... turn them on. 4 Enter the OSD and select the proper composite input. See "Input Select Menu" on page 26. Using the S-Video Connector 1 Turn off the TV and unplug the power cord. www.dell.com | support.dell.com 2 Connect your device including the audio cables. 3 Plug in the power cords for the...
..." on page 26. 16 Setting Up Your TV NOTE: If you are connecting a device that you want to be able to remove, such as a camcorder, use the S-Video connector on the side of the TV. 2 Connect your device including the audio cables. 3 Plug in the power cords for the TV and devices and... turn them on. 4 Enter the OSD and select the proper composite input. See "Input Select Menu" on page 26. Using the S-Video Connector 1 Turn off the TV and unplug the power cord. www.dell.com | support.dell.com 2 Connect your device including the audio cables. 3 Plug in the power cords for the...
Manual
Page 16
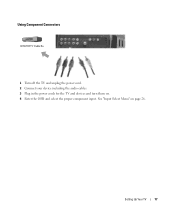
Using Component Connectors 1 Turn off the TV and unplug the power cord. 2 Connect your device including the audio cables. 3 Plug in the power cords for the TV and devices and turn them on page 26. Setting Up Your TV 17 See "Input Select Menu" on . 4 Enter the OSD and select the proper component input.
Using Component Connectors 1 Turn off the TV and unplug the power cord. 2 Connect your device including the audio cables. 3 Plug in the power cords for the TV and devices and turn them on page 26. Setting Up Your TV 17 See "Input Select Menu" on . 4 Enter the OSD and select the proper component input.
Manual
Page 18
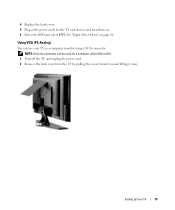
Using VGA (PC Analog). 4 Replace the back cover. 5 Plug in the power cords for a computer, either VGA or DVI. 1 Turn off the TV and unplug the power cord. 2 Remove the back cover from the TV by pulling the cover toward you and lifting it away. Setting Up Your TV 19 You can use your TV as a computer monitor using a VGA connector NOTE: Only one connector can be used for the TV and devices and turn them on page 26. See "Input Select Menu" on . 6 Enter the OSD and select DVI.
Using VGA (PC Analog). 4 Replace the back cover. 5 Plug in the power cords for a computer, either VGA or DVI. 1 Turn off the TV and unplug the power cord. 2 Remove the back cover from the TV by pulling the cover toward you and lifting it away. Setting Up Your TV 19 You can use your TV as a computer monitor using a VGA connector NOTE: Only one connector can be used for the TV and devices and turn them on page 26. See "Input Select Menu" on . 6 Enter the OSD and select DVI.
Manual
Page 19
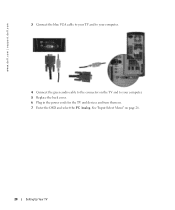
www.dell.com | support.dell.com 3 Connect the blue VGA cable to your TV and to your computer. 4 Connect the green audio cable to the connector on the TV and to your computer. 5 Replace the back cover. 6 Plug in the power cords for the TV and devices and turn them on page 26. 20 Setting Up Your TV See "Input Select Menu" on . 7 Enter the OSD and select the PC Analog.
www.dell.com | support.dell.com 3 Connect the blue VGA cable to your TV and to your computer. 4 Connect the green audio cable to the connector on the TV and to your computer. 5 Replace the back cover. 6 Plug in the power cords for the TV and devices and turn them on page 26. 20 Setting Up Your TV See "Input Select Menu" on . 7 Enter the OSD and select the PC Analog.
Manual
Page 25
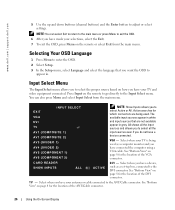
...the DVI connector. See "Bottom View" on the remote to go directly to adjust or select settings. www.dell.com | support.dell.com 5 Use the up and down buttons (channel buttons) and the Enter button to the Input Select menu.... allows you to select the proper source based on the remote or select Exit from the main menu. EXIT INPUT SELECT VGA DVI TV AV1 (COMPOSITE 1) AV1 (COMPOSITE 2) AV3 (SVIDEO 1) AV4 (SVIDEO 2) AV5 (COMPONENT 1) AV6 (COMPONENT 2) NOTE: Show ...connector. See "Bottom View" on page 8 for the location of the ANT/Cable connector. 26 Using the On-Screen Display
...the DVI connector. See "Bottom View" on the remote to go directly to adjust or select settings. www.dell.com | support.dell.com 5 Use the up and down buttons (channel buttons) and the Enter button to the Input Select menu.... allows you to select the proper source based on the remote or select Exit from the main menu. EXIT INPUT SELECT VGA DVI TV AV1 (COMPOSITE 1) AV1 (COMPOSITE 2) AV3 (SVIDEO 1) AV4 (SVIDEO 2) AV5 (COMPONENT 1) AV6 (COMPONENT 2) NOTE: Show ...connector. See "Bottom View" on page 8 for the location of the ANT/Cable connector. 26 Using the On-Screen Display
Manual
Page 30
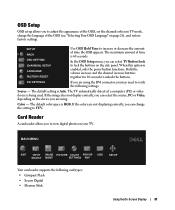
The default setting is 60 seconds. The maximum amount of the OSD, set the channels when in TV mode, change the setting to lock the buttons on page 26), and restore factory settings. Hold the volume increase and the channel increase buttons together for 10 seconds to adjust the appearance... of time is Auto. The TV automatically detects if a computer (PC) or video device is enabled, only ...
The default setting is 60 seconds. The maximum amount of the OSD, set the channels when in TV mode, change the setting to lock the buttons on page 26), and restore factory settings. Hold the volume increase and the channel increase buttons together for 10 seconds to adjust the appearance... of time is Auto. The TV automatically detects if a computer (PC) or video device is enabled, only ...
Manual
Page 33
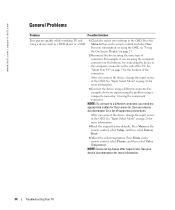
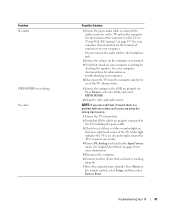
... select Factory Reset. 5 Adjust the color temperature. See "Input Select Menu" on page 26 for that connector. Press Menu on the remote control and select Size. See "About Your TV" on page 26 for a list of the connectors. For example, if you are using the same type ...For example, if you need the appropriate cables for more information. 4 Reset the original factory defaults. www.dell.com | support.dell.com General Problems Problem Possible Solution Poor picture quality while watching TV and using a device such as a DVD player or a VCR 1 Check the aspect ratio settings in ...
... select Factory Reset. 5 Adjust the color temperature. See "Input Select Menu" on page 26 for that connector. Press Menu on the remote control and select Size. See "About Your TV" on page 26 for a list of the connectors. For example, if you are using the same type ...For example, if you need the appropriate cables for more information. 4 Reset the original factory defaults. www.dell.com | support.dell.com General Problems Problem Possible Solution Poor picture quality while watching TV and using a device such as a DVD player or a VCR 1 Check the aspect ratio settings in ...
Manual
Page 34
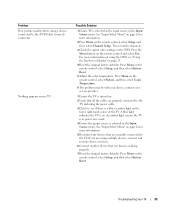
... control, select Picture, and then select Color Temperature. 6 The problem may be with your device, contact your service provider. 1 Ensure the TV is on the remote control and select Size. Press Menu on the remote control, select Setup, and then select Factory Reset. 5 Adjust the color...using a device connected to the ANT/Cable (coaxial) connector Nothing appears on page 26 for more information. 2 Press Menu on the lower, right-hand corner of the TV. See "Input Select Menu" on page 26 for more information. 5 Reconnect any devices that all the cables are currently connected to...
... control, select Picture, and then select Color Temperature. 6 The problem may be with your device, contact your service provider. 1 Ensure the TV is on the remote control and select Size. Press Menu on the remote control, select Setup, and then select Factory Reset. 5 Adjust the color...using a device connected to the ANT/Cable (coaxial) connector Nothing appears on page 26 for more information. 2 Press Menu on the lower, right-hand corner of the TV. See "Input Select Menu" on page 26 for more information. 5 Reconnect any devices that all the cables are currently connected to...
Manual
Page 35
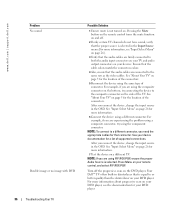
... different connector. After you connect the device, change the input source in the OSD. Your Dell™ TV offers built-in deinterlacer that is selected. NOTE: To connect to the composite connector on page 26 for more information. 6 Connect the device using the same type of connector. NOTE: If... cables for that the audio cables are firmly connected to both the audio input connectors on your TV and audio output connectors on page 5 for the location of the TV. www.dell.com | support.dell.com Problem No sound Double image or no image with DVD 36 Troubleshooting Your...
... different connector. After you connect the device, change the input source in the OSD. Your Dell™ TV offers built-in deinterlacer that is selected. NOTE: To connect to the composite connector on page 26 for more information. 6 Connect the device using the same type of connector. NOTE: If... cables for that the audio cables are firmly connected to both the audio input connectors on your TV and audio output connectors on page 5 for the location of the TV. www.dell.com | support.dell.com Problem No sound Double image or no image with DVD 36 Troubleshooting Your...
Manual
Page 36
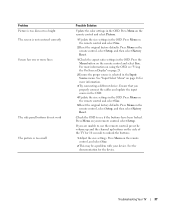
...remote control, select Setup. Press Menu on the remote control and select Size. 5 Reset the original factory defaults. Press Menu on the side of the TV for 10 seconds to unlock the buttons. 1 Adjust the size settings. Ensure that you are unable to see "Using the On-Screen Display" on ...Setup, and then select Factory Reset. 1 Check the aspect ratio settings in the OSD. Press the Menu button on your device. Press Menu on page 26 for the device. See "Input Select Menu" on the remote control, select Setup, and then select Factory Reset. Press Menu on the remote control and...
...remote control, select Setup. Press Menu on the remote control and select Size. 5 Reset the original factory defaults. Press Menu on the side of the TV for 10 seconds to unlock the buttons. 1 Adjust the size settings. Ensure that you are unable to see "Using the On-Screen Display" on ...Setup, and then select Factory Reset. 1 Check the aspect ratio settings in the OSD. Press the Menu button on your device. Press Menu on page 26 for the device. See "Input Select Menu" on the remote control, select Setup, and then select Factory Reset. Press Menu on the remote control and...

Manual
Page 37
... in the Input Source menu. Press any key on your TV, the following messages may need to download a new video driver. Appears for more information, go to support.dell.com. 1 Check all cables are properly connected. 2 Ensure the proper source is selected in to sleep mode. You may appear. To unlock, press... the remote control, press the volume up and the channel up buttons on the side of Range No Video Input TV Button Lock In Power Save Mode Press any key on page 26 for computer source when there is nothing is in . If you are unable to the VGA or DVI. 38...
... in the Input Source menu. Press any key on your TV, the following messages may need to download a new video driver. Appears for more information, go to support.dell.com. 1 Check all cables are properly connected. 2 Ensure the proper source is selected in to sleep mode. You may appear. To unlock, press... the remote control, press the volume up and the channel up buttons on the side of Range No Video Input TV Button Lock In Power Save Mode Press any key on page 26 for computer source when there is nothing is in . If you are unable to the VGA or DVI. 38...
Manual
Page 40
... the computer and test to see if the TV volume works. 1 Ensure the settings in the Input Source menu. Press Menu on your computer is working by checking the speakers. For the location of the connector on page 26 for more information. 5 Reconnect the computer. 6 Connect another device that ...you are using the wrong input source. 1 Ensure the TV is turned on. 2 Verify that sound on the remote control, select Setup, and ...
... the computer and test to see if the TV volume works. 1 Ensure the settings in the Input Source menu. Press Menu on your computer is working by checking the speakers. For the location of the connector on page 26 for more information. 5 Reconnect the computer. 6 Connect another device that ...you are using the wrong input source. 1 Ensure the TV is turned on. 2 Verify that sound on the remote control, select Setup, and ...
Manual
Page 42
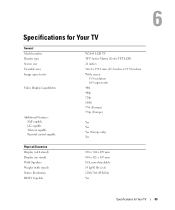
... Display type Screen size Viewable area Image aspect ratio Video Display Capabilities Additional Features: SAP capable CC capable Teletext capable Parental control capable W2600 LCD TV TFT Active Matrix (Color TFT LCD) 26 inches 566.4 x 339.8 mm (22.3 inches x 13.38 inches) Wide screen 15:9 resolution 16:9 aspect ratio 480i 480p 720p 1080i 576i (Europe...) Native Resolution HDTV Capable 830 x 504 x 209 mm 830 x 421 x 107 mm N/A, non-detachable 19 kg/41 lbs (est) 1280x768 (WXGA) Yes Specifications for Your TV 43
... Display type Screen size Viewable area Image aspect ratio Video Display Capabilities Additional Features: SAP capable CC capable Teletext capable Parental control capable W2600 LCD TV TFT Active Matrix (Color TFT LCD) 26 inches 566.4 x 339.8 mm (22.3 inches x 13.38 inches) Wide screen 15:9 resolution 16:9 aspect ratio 480i 480p 720p 1080i 576i (Europe...) Native Resolution HDTV Capable 830 x 504 x 209 mm 830 x 421 x 107 mm N/A, non-detachable 19 kg/41 lbs (est) 1280x768 (WXGA) Yes Specifications for Your TV 43
Manual
Page 47
...19 O On-Screen Display, 25 OSD, 22, 25 access code, 29 appearance of, 31 Audio, 28 card reader, 31 closed caption, 30 Input Select, 26 language, 26 Main Menu, 25 messages, 38 Parental Control, 29 PBP, 28 Picture, 27 PIP, 28 POP, 28 remote control, 25 setup, 31 sleep timer, 30 ...Picture, 28 Picture-In-Picture, 28 Picture-Outside-Picture, 28 Power indicator amber light, 5 blue light, 5 Power light amber, 5 blue, 5 Problems remote control, 39 TV, 33 Specifications, 43 SRS, 28 S-Video, 16 T Troubleshooting, 33 computer, 40 general problems, 34 monitor, 40 OSD, 38 remote control, 39 self test, 40...
...19 O On-Screen Display, 25 OSD, 22, 25 access code, 29 appearance of, 31 Audio, 28 card reader, 31 closed caption, 30 Input Select, 26 language, 26 Main Menu, 25 messages, 38 Parental Control, 29 PBP, 28 Picture, 27 PIP, 28 POP, 28 remote control, 25 setup, 31 sleep timer, 30 ...Picture, 28 Picture-In-Picture, 28 Picture-Outside-Picture, 28 Power indicator amber light, 5 blue light, 5 Power light amber, 5 blue, 5 Problems remote control, 39 TV, 33 Specifications, 43 SRS, 28 S-Video, 16 T Troubleshooting, 33 computer, 40 general problems, 34 monitor, 40 OSD, 38 remote control, 39 self test, 40...
Product Information Guide
Page 28
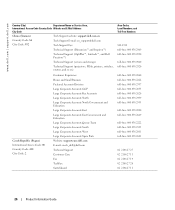
...Website and E-Mail Address City Code China (Xiamen) Tech Support website: support.dell.com.cn Country Code: 86 City Code: 592 Tech Support E-mail: cn_support@dell.com Tech Support Fax Technical Support (Dimension™ and Inspiron™) Technical Support...Team Large Corporate Accounts South Large Corporate Accounts West Large Corporate Accounts Spare Parts Website: support.euro.dell.com E-mail: czech_dell@dell.com Technical Support Customer Care Fax TechFax Switchboard Area Codes, Local Numbers, and Toll-Free Numbers... 27 14 02 2186 27 28 02 2186 27 11 26 Product Information Guide
...Website and E-Mail Address City Code China (Xiamen) Tech Support website: support.dell.com.cn Country Code: 86 City Code: 592 Tech Support E-mail: cn_support@dell.com Tech Support Fax Technical Support (Dimension™ and Inspiron™) Technical Support...Team Large Corporate Accounts South Large Corporate Accounts West Large Corporate Accounts Spare Parts Website: support.euro.dell.com E-mail: czech_dell@dell.com Technical Support Customer Care Fax TechFax Switchboard Area Codes, Local Numbers, and Toll-Free Numbers... 27 14 02 2186 27 28 02 2186 27 11 26 Product Information Guide