

User Manual
Page 6
Do not attempt to remove or replace the microSD card. Important information WARNING: The microSD card and the built-in memory on your phone unusable. Removing the microSD card will render your phone act as a single storage system.
Do not attempt to remove or replace the microSD card. Important information WARNING: The microSD card and the built-in memory on your phone unusable. Removing the microSD card will render your phone act as a single storage system.
User Manual
Page 10
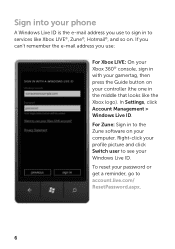
In Settings, click Account Management > Windows Live ID. To reset your password or get a reminder, go to see your Windows Live ID. Sign into your phone A Windows Live ID is the e-mail address you use to sign in to services like Xbox LIVE®, Zune®, Hotmail®, and so on ...
In Settings, click Account Management > Windows Live ID. To reset your password or get a reminder, go to see your Windows Live ID. Sign into your phone A Windows Live ID is the e-mail address you use to sign in to services like Xbox LIVE®, Zune®, Hotmail®, and so on ...
User Manual
Page 11
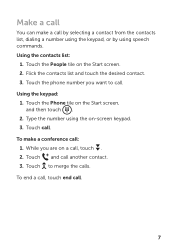
Make a call You can make a conference call . Touch the phone number you are on -screen keypad. 3. Touch call : 1. Flick the contacts list and touch the desired contact. 3. Using the keypad: 1. To make a call . To end a ...call, touch end call another contact. 3. Touch the People tile on the Start screen, and then touch . 2. Touch the Phone tile on the Start screen. 2. Using the contacts list: 1. Type the number using speech commands. Touch and call . 7 Touch to call by selecting a contact from...
Make a call You can make a conference call . Touch the phone number you are on -screen keypad. 3. Touch call : 1. Flick the contacts list and touch the desired contact. 3. Using the keypad: 1. To make a call . To end a ...call, touch end call another contact. 3. Touch the People tile on the Start screen, and then touch . 2. Touch the Phone tile on the Start screen. 2. Using the contacts list: 1. Type the number using speech commands. Touch and call . 7 Touch to call by selecting a contact from...
User Manual
Page 12
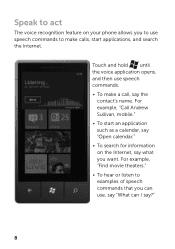
..., and then use speech commands. • To make calls, start an application such as a calendar, say "Open calendar." • To search for information on your phone allows you can use speech commands to use , say "What can I say the contact's name. For example, "Call Andrew Sullivan, mobile." • To start applications...
..., and then use speech commands. • To make calls, start an application such as a calendar, say "Open calendar." • To search for information on your phone allows you can use speech commands to use , say "What can I say the contact's name. For example, "Call Andrew Sullivan, mobile." • To start applications...

User Manual
Page 14
... show up in your pictures hub, and your own feeds pop up your e-mail or Facebook account, your contacts are imported automatically into your new phone, then go to your people hub. Getting your contacts from your Me tile. Touch Settings > email & accounts. Put your old SIM card into your Applications... e-mail) account: 1. Touch the arrow on Start to go to applications, touch people, then touch import SIM contacts. 10 To set up in your old phone is also easy.
... show up in your pictures hub, and your own feeds pop up your e-mail or Facebook account, your contacts are imported automatically into your new phone, then go to your people hub. Getting your contacts from your Me tile. Touch Settings > email & accounts. Put your old SIM card into your Applications... e-mail) account: 1. Touch the arrow on Start to go to applications, touch people, then touch import SIM contacts. 10 To set up in your old phone is also easy.
User Manual
Page 15
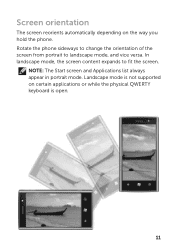
NOTE: The Start screen and Applications list always appear in portrait mode. In landscape mode, the screen content expands to landscape mode, and vice versa. Landscape mode is not supported on the way you hold the phone. Rotate the phone sideways to change the orientation of the screen from portrait to fit the screen. Screen orientation The screen reorients automatically depending on certain applications or while the physical QWERTY keyboard is open. 11
NOTE: The Start screen and Applications list always appear in portrait mode. In landscape mode, the screen content expands to landscape mode, and vice versa. Landscape mode is not supported on the way you hold the phone. Rotate the phone sideways to change the orientation of the screen from portrait to fit the screen. Screen orientation The screen reorients automatically depending on certain applications or while the physical QWERTY keyboard is open. 11
User Manual
Page 16
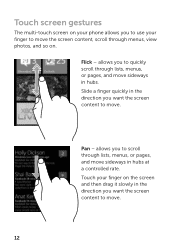
Touch your finger on the screen and then drag it slowly in the direction you want the screen content to move the screen content, scroll through menus, view photos, and so on your phone allows you want the screen content to scroll through lists, menus, or pages, and move . Pan - Flick - Touch screen gestures The multi-touch screen on . Slide a finger quickly in the direction you to use your finger to move sideways in hubs. allows you to quickly scroll through lists, menus, or pages, and move . 12 allows you to move sideways in hubs at a controlled rate.
Touch your finger on the screen and then drag it slowly in the direction you want the screen content to move the screen content, scroll through menus, view photos, and so on your phone allows you want the screen content to scroll through lists, menus, or pages, and move . Pan - Flick - Touch screen gestures The multi-touch screen on . Slide a finger quickly in the direction you to use your finger to move sideways in hubs. allows you to quickly scroll through lists, menus, or pages, and move . 12 allows you to move sideways in hubs at a controlled rate.
User Manual
Page 20
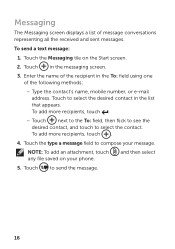
... address. NOTE: To add an attachment, touch any file saved on the Start screen. 2. Touch the Messaging tile on your message. Touch to compose your phone. Touch next to the To: field, then flick to see the desired contact, and touch to send the message. 16 Touch to select the contact...
... address. NOTE: To add an attachment, touch any file saved on the Start screen. 2. Touch the Messaging tile on your message. Touch to compose your phone. Touch next to the To: field, then flick to see the desired contact, and touch to send the message. 16 Touch to select the contact...
User Manual
Page 21
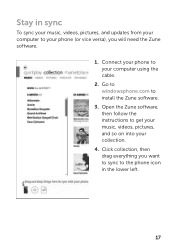
Click collection, then drag everything you will need the Zune software. 1. Go to windowsphone.com to the phone icon in sync To sync your music, videos, pictures, and updates from your computer to your phone (or vice versa), you want to sync to install the Zune software. 3. Open the Zune software, then follow the instructions to your collection. 4. Connect your phone to get your music, videos, pictures, and so on into your computer using the cable. 2. Stay in the lower left. 17
Click collection, then drag everything you will need the Zune software. 1. Go to windowsphone.com to the phone icon in sync To sync your music, videos, pictures, and updates from your computer to your phone (or vice versa), you want to sync to install the Zune software. 3. Open the Zune software, then follow the instructions to your collection. 4. Connect your phone to get your music, videos, pictures, and so on into your computer using the cable. 2. Stay in the lower left. 17
User Manual
Page 22
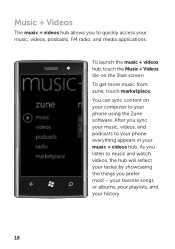
... sync content on the Start screen. After you listen to quickly access your music + videos hub. your favorite songs or albums, your playlists, and your phone using the Zune software. To launch the music + videos hub, touch the Music + Videos tile on your computer to your...
... sync content on the Start screen. After you listen to quickly access your music + videos hub. your favorite songs or albums, your playlists, and your phone using the Zune software. To launch the music + videos hub, touch the Music + Videos tile on your computer to your...
User Manual
Page 23
is subject to change without the written permission of Dell Inc. More information For more information about using your phone, see the User's Manual available at support.dell.com/manuals. Information in any manner whatsoever without notice. © 2010 Dell Inc. Reproduction of Windows Phone software. © 2010 Microsoft Corporation 19 Some features and services may vary by area, phone, carrier, plan, and version of these materials in this document is strictly forbidden. All rights reserved.
is subject to change without the written permission of Dell Inc. More information For more information about using your phone, see the User's Manual available at support.dell.com/manuals. Information in any manner whatsoever without notice. © 2010 Dell Inc. Reproduction of Windows Phone software. © 2010 Microsoft Corporation 19 Some features and services may vary by area, phone, carrier, plan, and version of these materials in this document is strictly forbidden. All rights reserved.
User's Guide
Page 2
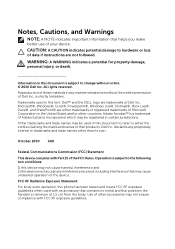
...device. Reproduction of these materials in any proprietary interest in this document is subject to change without the written permission of Dell Inc. Other trademarks and trade names may not ensure compliance with FCC RF exposure guidelines. October 2010 A00 Federal Communications Commission...of 1.5 cm from the body. Adobe Acrobat™ is strictly forbidden. FCC RF Radiation Exposure Statement: For body worn operation, this phone has been tested and meets FCC RF exposure guidelines when used in certain jurisdictions. WARNING: A WARNING indicates a potential for property damage, ...
...device. Reproduction of these materials in any proprietary interest in this document is subject to change without the written permission of Dell Inc. Other trademarks and trade names may not ensure compliance with FCC RF exposure guidelines. October 2010 A00 Federal Communications Commission...of 1.5 cm from the body. Adobe Acrobat™ is strictly forbidden. FCC RF Radiation Exposure Statement: For body worn operation, this phone has been tested and meets FCC RF exposure guidelines when used in certain jurisdictions. WARNING: A WARNING indicates a potential for property damage, ...
User's Guide
Page 3
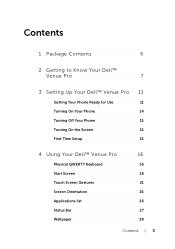
Contents 1 Package Contents 6 2 Getting to Know Your Dell™ Venue Pro 7 3 Setting Up Your Dell™ Venue Pro . . 11 Getting Your Phone Ready for Use 11 Turning On Your Phone 14 Turning Off Your Phone 15 Turning On the Screen 15 First-Time Setup 15 4 Using Your Dell™ Venue Pro 16 Physical QWERTY Keyboard 16 Start Screen 18 Touch Screen Gestures 21 Screen Orientation 25 Applications list 26 Status Bar 27 Wallpaper 28 Contents 3
Contents 1 Package Contents 6 2 Getting to Know Your Dell™ Venue Pro 7 3 Setting Up Your Dell™ Venue Pro . . 11 Getting Your Phone Ready for Use 11 Turning On Your Phone 14 Turning Off Your Phone 15 Turning On the Screen 15 First-Time Setup 15 4 Using Your Dell™ Venue Pro 16 Physical QWERTY Keyboard 16 Start Screen 18 Touch Screen Gestures 21 Screen Orientation 25 Applications list 26 Status Bar 27 Wallpaper 28 Contents 3
User's Guide
Page 6
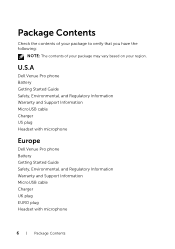
U.S.A Dell Venue Pro phone Battery Getting Started Guide Safety, Environmental, and Regulatory Information Warranty and Support Information MicroUSB cable Charger US plug Headset with microphone Europe Dell Venue Pro phone Battery Getting Started Guide Safety, Environmental, and Regulatory Information Warranty and Support Information MicroUSB cable Charger UK plug EURO plug Headset with microphone 6 Package Contents Package Contents Check the contents of your package to verify that you have the following: NOTE: The contents of your package may vary based on your region.
U.S.A Dell Venue Pro phone Battery Getting Started Guide Safety, Environmental, and Regulatory Information Warranty and Support Information MicroUSB cable Charger US plug Headset with microphone Europe Dell Venue Pro phone Battery Getting Started Guide Safety, Environmental, and Regulatory Information Warranty and Support Information MicroUSB cable Charger UK plug EURO plug Headset with microphone 6 Package Contents Package Contents Check the contents of your package to verify that you have the following: NOTE: The contents of your package may vary based on your region.
User's Guide
Page 7
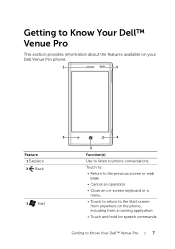
Touch to: • Return to the previous screen or web page. • Cancel an operation. • Close an on-screen keyboard or a menu. • Touch to return to the Start screen from anywhere on your Dell Venue Pro phone. 1 5 Feature 1 Earpiece 2 Back 3 Start 2 4 3 Function(s) Use to listen to phone conversations. Getting to Know Your Dell™ Venue Pro 7 Getting to Know Your Dell™ Venue Pro This section provides information about the features available on the phone, including from a running application. • Touch and hold for speech commands.
Touch to: • Return to the previous screen or web page. • Cancel an operation. • Close an on-screen keyboard or a menu. • Touch to return to the Start screen from anywhere on your Dell Venue Pro phone. 1 5 Feature 1 Earpiece 2 Back 3 Start 2 4 3 Function(s) Use to listen to phone conversations. Getting to Know Your Dell™ Venue Pro 7 Getting to Know Your Dell™ Venue Pro This section provides information about the features available on the phone, including from a running application. • Touch and hold for speech commands.
User's Guide
Page 8
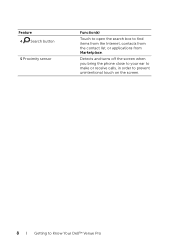
Detects and turns off the screen when you bring the phone close to your ear to make or receive calls, in order to prevent unintentional touch on the screen. 8 Getting to find items from the Internet, contacts from the contact list, or applications from Marketplace. Feature 4 Search button 5 Proximity sensor Function(s) Touch to open the search box to Know Your Dell™ Venue Pro
Detects and turns off the screen when you bring the phone close to your ear to make or receive calls, in order to prevent unintentional touch on the screen. 8 Getting to find items from the Internet, contacts from the contact list, or applications from Marketplace. Feature 4 Search button 5 Proximity sensor Function(s) Touch to open the search box to Know Your Dell™ Venue Pro
User's Guide
Page 9
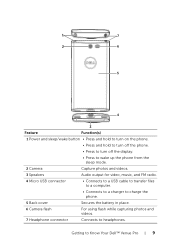
... 1 Power and sleep/wake button • Press and hold to turn on the phone. • Press and hold to turn off the phone. • Press to turn off the display. • Press to wake up the phone from the sleep mode. 2 Camera Capture photos and videos. 3 Speakers Audio output for...to a USB cable to transfer files to a computer. • Connects to a charger to charge the phone. 5 Back cover Secures the battery in place. 6 Camera flash For using flash while capturing photos and videos. 7 Headphone connector Connects to Know Your Dell™ Venue Pro 9 Getting to headphones.
... 1 Power and sleep/wake button • Press and hold to turn on the phone. • Press and hold to turn off the phone. • Press to turn off the display. • Press to wake up the phone from the sleep mode. 2 Camera Capture photos and videos. 3 Speakers Audio output for...to a USB cable to transfer files to a computer. • Connects to a charger to charge the phone. 5 Back cover Secures the battery in place. 6 Camera flash For using flash while capturing photos and videos. 7 Headphone connector Connects to Know Your Dell™ Venue Pro 9 Getting to headphones.

User's Guide
Page 10
1 Feature 1 Volume control buttons 2 Camera button 2 Function(s) During a phone call or while playing media such as music, FM radio, and video: • Press to increase or decrease the volume by one level. • Press and hold continuously to increase or decrease volume level. • Press to start the camera. • Press to capture a photo or video. • A half press of the button enables auto-focus. • When recording a video, press to stop. 10 Getting to Know Your Dell™ Venue Pro
1 Feature 1 Volume control buttons 2 Camera button 2 Function(s) During a phone call or while playing media such as music, FM radio, and video: • Press to increase or decrease the volume by one level. • Press and hold continuously to increase or decrease volume level. • Press to start the camera. • Press to capture a photo or video. • A half press of the button enables auto-focus. • When recording a video, press to stop. 10 Getting to Know Your Dell™ Venue Pro
User's Guide
Page 11
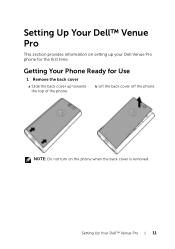
NOTE: Do not turn on setting up towards the top of the phone. Setting Up Your Dell™ Venue Pro 11 Getting Your Phone Ready for Use 1 Remove the back cover a Slide the back cover up your Dell Venue Pro phone for the first time. b Lift the back cover off the phone. Setting Up Your Dell™ Venue Pro This section provides information on the phone when the back cover is removed.
NOTE: Do not turn on setting up towards the top of the phone. Setting Up Your Dell™ Venue Pro 11 Getting Your Phone Ready for Use 1 Remove the back cover a Slide the back cover up your Dell Venue Pro phone for the first time. b Lift the back cover off the phone. Setting Up Your Dell™ Venue Pro This section provides information on the phone when the back cover is removed.
User's Guide
Page 13
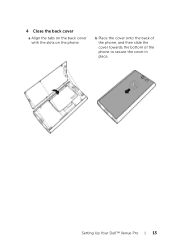
Setting Up Your Dell™ Venue Pro 13 b Place the cover onto the back of the phone, and then slide the cover towards the bottom of the phone to secure the cover in place. 4 Close the back cover a Align the tabs on the back cover with the slots on the phone.
Setting Up Your Dell™ Venue Pro 13 b Place the cover onto the back of the phone, and then slide the cover towards the bottom of the phone to secure the cover in place. 4 Close the back cover a Align the tabs on the back cover with the slots on the phone.


