User Manual
Page 8
.... • Reduce the margins of documents to print multiple pages on one side of a sheet of paper. • Print on both sides of the paper manually or automatically (depending on your printer model). • Preview print jobs before printing. The Pages per Sheet feature allows you check the latest updates on...
.... • Reduce the margins of documents to print multiple pages on one side of a sheet of paper. • Print on both sides of the paper manually or automatically (depending on your printer model). • Preview print jobs before printing. The Pages per Sheet feature allows you check the latest updates on...
User Manual
Page 21
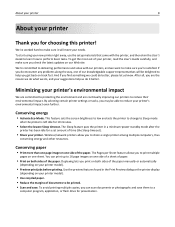
.... Using the printer control panel buttons and menus 21 Use 8 Redial 9 Pause 10 Dial Tone To Display the last number dialed. Dial the telephone number manually using the keypad before sending the fax. 11 Address Book Access fax numbers from a saved list of your printer. Insert a three-second pause in progress...
.... Using the printer control panel buttons and menus 21 Use 8 Redial 9 Pause 10 Dial Tone To Display the last number dialed. Dial the telephone number manually using the keypad before sending the fax. 11 Address Book Access fax numbers from a saved list of your printer. Insert a three-second pause in progress...

User Manual
Page 28
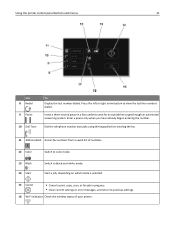
For Windows users 1 Close all open applications. 2 Insert the installation software CD. If the installation dialog does not appear after a minute, then launch the CD manually: a Click , or click Start and then click Run. Using the printer software 28 For Macintosh users 1 Close all open applications. 2 From the Finder, navigate to: ... click OK. 3 Click Install, and then follow the instructions on the computer screen. Using the Internet Updated printer software may be available at http://support.dell.com.
For Windows users 1 Close all open applications. 2 Insert the installation software CD. If the installation dialog does not appear after a minute, then launch the CD manually: a Click , or click Start and then click Run. Using the printer software 28 For Macintosh users 1 Close all open applications. 2 From the Finder, navigate to: ... click OK. 3 Click Install, and then follow the instructions on the computer screen. Using the Internet Updated printer software may be available at http://support.dell.com.
User Manual
Page 45
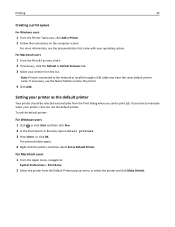
... 2 Select the printer from the list. If you send a print job. Note: Printers connected to the network or locally through a USB cable may have to manually select your printer from the Default Printer pop‑up menu, or select the printer and click Make Default. For Macintosh users 1 From the Print...
... 2 Select the printer from the list. If you send a print job. Note: Printers connected to the network or locally through a USB cable may have to manually select your printer from the Default Printer pop‑up menu, or select the printer and click Make Default. For Macintosh users 1 From the Print...
User Manual
Page 53
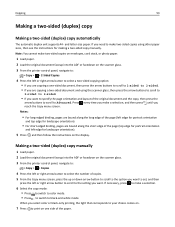
... navigate to: > Copy > > Copies 4 Press the left or right arrow button to select the number of the paper. Making a two‑sided (duplex) copy manually 1 Load paper. 2 Load the original document faceup into the ADF or facedown on the scanner glass. 3 From the printer control panel, navigate to: > Copy >...8209;sided. • If you want to specify the page orientation and layout of the page (left edge for making a two‑sided copy manually. When you reach the Copy menu screen. Copying 53 Making a two-sided (duplex) copy Making a two‑sided (duplex) copy automatically The ...
... navigate to: > Copy > > Copies 4 Press the left or right arrow button to select the number of the paper. Making a two‑sided (duplex) copy manually 1 Load paper. 2 Load the original document faceup into the ADF or facedown on the scanner glass. 3 From the printer control panel, navigate to: > Copy >...8209;sided. • If you want to specify the page orientation and layout of the page (left edge for making a two‑sided copy manually. When you reach the Copy menu screen. Copying 53 Making a two-sided (duplex) copy Making a two‑sided (duplex) copy automatically The ...
User Manual
Page 56
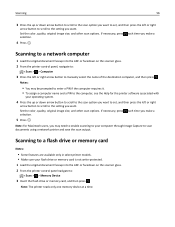
... not write‑protected. 1 Load the original document faceup into the ADF or facedown on the scanner glass. 2 From the printer control panel navigate to manually select the name of the destination computer, and then press . If necessary, press each time you make a selection. 4 Press . Notes: • You may need to...
... not write‑protected. 1 Load the original document faceup into the ADF or facedown on the scanner glass. 2 From the printer control panel navigate to manually select the name of the destination computer, and then press . If necessary, press each time you make a selection. 4 Press . Notes: • You may need to...
User Manual
Page 58
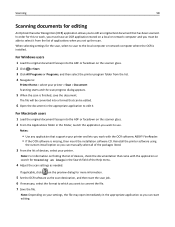
... menu. 4 Adjust the scan settings as the scan destination, and then start editing. Reinstall the printer software using the custom install option so you can manually select all of the packages listed. 3 From the list of devices, check the documentation that has been scanned. For Macintosh users 1 Load the original document...
... menu. 4 Adjust the scan settings as the scan destination, and then start editing. Reinstall the printer software using the custom install option so you can manually select all of the packages listed. 3 From the list of devices, check the documentation that has been scanned. For Macintosh users 1 Load the original document...
User Manual
Page 65
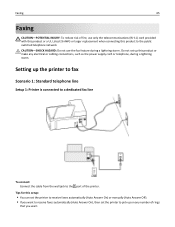
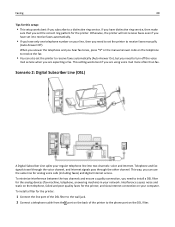
... a UL Listed 26 AWG or larger replacement when connecting this setup: • You can set the printer to receive faxes automatically (Auto Answer On) or manually (Auto Answer Off). • If you want to receive faxes automatically (Auto Answer On), then set up the printer to fax Scenario 1: Standard telephone line...
... a UL Listed 26 AWG or larger replacement when connecting this setup: • You can set the printer to receive faxes automatically (Auto Answer On) or manually (Auto Answer Off). • If you want to receive faxes automatically (Auto Answer On), then set up the printer to fax Scenario 1: Standard telephone line...
User Manual
Page 68
... if you can also set the correct ring pattern for this setup: • This setup works best if you hear fax tones, press *9* or the manual answer code on the telephone, failed and poor quality faxes for the analog devices (fax machine, telephone, answering machine) in your regular telephone line into... line port of the DSL filter to the wall jack. 2 Connect a telephone cable from the port on the back of the printer to receive faxes manually (Auto Answer Off). Otherwise, the printer will not receive faxes even if you are using voice mail more often than fax. If you have distinctive...
... if you can also set the correct ring pattern for this setup: • This setup works best if you hear fax tones, press *9* or the manual answer code on the telephone, failed and poor quality faxes for the analog devices (fax machine, telephone, answering machine) in your regular telephone line into... line port of the DSL filter to the wall jack. 2 Connect a telephone cable from the port on the back of the printer to receive faxes manually (Auto Answer Off). Otherwise, the printer will not receive faxes even if you are using voice mail more often than fax. If you have distinctive...
User Manual
Page 76
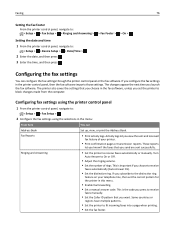
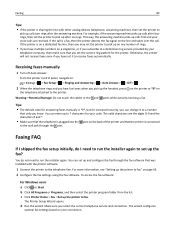
... If you launch the fax software. Configuring fax settings using the printer control panel 1 From the printer control panel, navigate to receive faxes automatically or manually. Ringing and Answering • Set the printer to : > Setup > > Fax Setup > 2 Configure the fax settings using the selections in the .... These reports let you know if the faxes that you choose in this menu. • Enable fax forwarding. • Set a manual answer code. This is important if you set the correct pattern for the printer in the fax software, unless you choose to the distinctive...
... If you launch the fax software. Configuring fax settings using the printer control panel 1 From the printer control panel, navigate to receive faxes automatically or manually. Ringing and Answering • Set the printer to : > Setup > > Fax Setup > 2 Configure the fax settings using the selections in the .... These reports let you know if the faxes that you choose in this menu. • Enable fax forwarding. • Set a manual answer code. This is important if you set the correct pattern for the printer in the fax software, unless you choose to the distinctive...
User Manual
Page 78
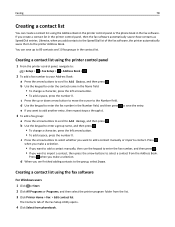
d Use the keypad to enter the fax number in the Number field, and then press e If you want to add a contact manually or import a contact. The Contacts tab of the fax software, the printer automatically saves them to the printer Address Book. Creating a contact list using the ... Address Book: a Press the arrow buttons to scroll to Add Entry, and then press . If you make a selection. • If you want to add a contact manually, then use the keypad to enter the fax number, and then press . • If you want to add another entry, then repeat steps a through d. b Use...
d Use the keypad to enter the fax number in the Number field, and then press e If you want to add a contact manually or import a contact. The Contacts tab of the fax software, the printer automatically saves them to the printer Address Book. Creating a contact list using the ... Address Book: a Press the arrow buttons to scroll to Add Entry, and then press . If you make a selection. • If you want to add a contact manually, then use the keypad to enter the fax number, and then press . • If you want to add another entry, then repeat steps a through d. b Use...
User Manual
Page 80
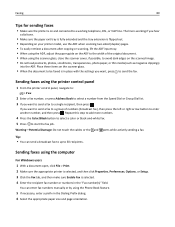
... 30 recipients. Warning-Potential Damage: Do not touch the cables or the and ports while actively sending a fax. Tip: • You can enter fax numbers manually or by using the Phone Book feature. 5 If necessary, enter a prefix in the Dialing Prefix dialog. 6 Select the appropriate paper size and page orientation. Repeat...
... 30 recipients. Warning-Potential Damage: Do not touch the cables or the and ports while actively sending a fax. Tip: • You can enter fax numbers manually or by using the Phone Book feature. 5 If necessary, enter a prefix in the Dialing Prefix dialog. 6 Select the appropriate paper size and page orientation. Repeat...
User Manual
Page 81
... appropriate information if you set is on and connected to a working if you hear a dial tone. • If you set the printer to receive faxes manually (Auto Answer Off), then make sure that you have set the printer to receive faxes automatically (Auto Answer On), then load paper in the printer...
... appropriate information if you set is on and connected to a working if you hear a dial tone. • If you set the printer to receive faxes manually (Auto Answer Off), then make sure that you have set the printer to receive faxes automatically (Auto Answer On), then load paper in the printer...
User Manual
Page 82
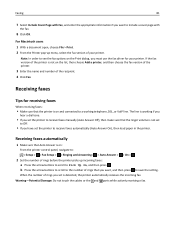
Tips: • The default code for answering faxes manually is *9*, but for increased security, you may set the printer to pick up on any number of the printer and that the printer is connected ... a fax. To access the fax software: For Windows users a Click or Start. This way, the answering machine picks up calls after six rings. Receiving faxes manually 1 Turn off Auto Answer: From the printer control panel, navigate to: > Setup > > Fax Setup > > Ringing and Answering > > Auto Answer > > Off > 2 When the telephone rings and...
Tips: • The default code for answering faxes manually is *9*, but for increased security, you may set the printer to pick up on any number of the printer and that the printer is connected ... a fax. To access the fax software: For Windows users a Click or Start. This way, the answering machine picks up calls after six rings. Receiving faxes manually 1 Turn off Auto Answer: From the printer control panel, navigate to: > Setup > > Fax Setup > > Ringing and Answering > > Auto Answer > > Off > 2 When the telephone rings and...

User Manual
Page 85
...fax calls, but the automatic conversion may result in your fax. Adjusting the ringer volume 1 From the printer control panel, navigate to receive faxes manually (Auto Answer Off). What settings work best with voice mail service? The receiving fax machine may not support high resolutions and may affect fax ... machine? To make sure the printer picks up incoming faxes, set Auto Answer to On, and then set the printer to receive faxes manually, then make sure that best suits the capacity of the receiving fax machine and the quality of the documents that you set the printer ...
...fax calls, but the automatic conversion may result in your fax. Adjusting the ringer volume 1 From the printer control panel, navigate to receive faxes manually (Auto Answer Off). What settings work best with voice mail service? The receiving fax machine may not support high resolutions and may affect fax ... machine? To make sure the printer picks up incoming faxes, set Auto Answer to On, and then set the printer to receive faxes manually, then make sure that best suits the capacity of the receiving fax machine and the quality of the documents that you set the printer ...
User Manual
Page 91
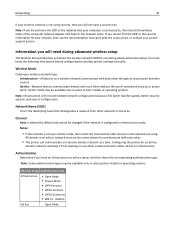
Note: If you do not know the following information before configuring the wireless printer settings manually: Wireless Mode Check your wireless network type: Infrastructure-All devices on a wireless network communicate with the access point, or contact your system support person. Information ...
Note: If you do not know the following information before configuring the wireless printer settings manually: Wireless Mode Check your wireless network type: Infrastructure-All devices on a wireless network communicate with the access point, or contact your system support person. Information ...
User Manual
Page 92
... to the same wireless network where you want to select a connection type. If the installation dialog does not appear after a minute, then launch the CD manually: a Click , or click Start and then click Run. Note: Select Wireless connection when prompted to set up the printer. Note: Some authentication types may be...
... to the same wireless network where you want to select a connection type. If the installation dialog does not appear after a minute, then launch the CD manually: a Click , or click Start and then click Run. Note: Select Wireless connection when prompted to set up the printer. Note: Some authentication types may be...
User Manual
Page 93
... . Notes: • The network indicator light is the letter of the printer. If the installation dialog does not appear after a minute, then launch the CD manually: a Click , or click Start and then click Run. I am installing it on a new computer. 5 Click Continue, and then follow the instructions on every computer that...
... . Notes: • The network indicator light is the letter of the printer. If the installation dialog does not appear after a minute, then launch the CD manually: a Click , or click Start and then click Run. I am installing it on a new computer. 5 Click Continue, and then follow the instructions on every computer that...
User Manual
Page 97
Networking 97 Configuring Wi‑Fi Protected Setup manually Note: Make sure your organization in requesting a certificate for network access. For more certificates and an authentication server. More‑advanced wireless network security can ...
Networking 97 Configuring Wi‑Fi Protected Setup manually Note: Make sure your organization in requesting a certificate for network access. For more certificates and an authentication server. More‑advanced wireless network security can ...
User Manual
Page 104
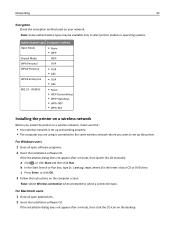
... WPA/WPA2 preshared key/passphrase allows printers and computers to join your system support person. - All devices on the network must enter the network information manually in this situation. You must know the SSID of the wireless network, or they provided. • See the documentation that identifies a wireless network. The password...
... WPA/WPA2 preshared key/passphrase allows printers and computers to join your system support person. - All devices on the network must enter the network information manually in this situation. You must know the SSID of the wireless network, or they provided. • See the documentation that identifies a wireless network. The password...


