User Manual
Page 15
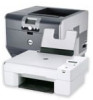
... dry out. Ordering and replacing supplies 15 Replacing ink cartridges Make sure you have a new ink cartridge or cartridges before you begin. Removing ink cartridges 1 Turn on your printer. 2 Open the...
... dry out. Ordering and replacing supplies 15 Replacing ink cartridges Make sure you have a new ink cartridge or cartridges before you begin. Removing ink cartridges 1 Turn on your printer. 2 Open the...
User Manual
Page 20
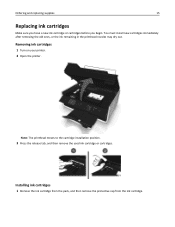
... number of copies or prints you want to a higher one menu level to make. Note: When the printer is turned off in Sleep mode. 3 Arrow buttons 4 Home To • Turn the printer on and off the printer. View: • Printer status • Messages • Menus Navigate through menu items that appear on the display. Press and...
... number of copies or prints you want to a higher one menu level to make. Note: When the printer is turned off in Sleep mode. 3 Arrow buttons 4 Home To • Turn the printer on and off the printer. View: • Printer status • Messages • Menus Navigate through menu items that appear on the display. Press and...
User Manual
Page 68
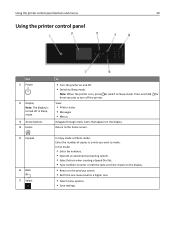
...calls (including faxes) and digital Internet access. Faxing 68 Tips for this setup: • This setup works best if you need to set the printer to receive faxes manually (Auto Answer Off). Scenario 2: Digital Subscriber Line (DSL) A Digital Subscriber Line splits your computer. Telephone and fax signals travel... also set the correct ring pattern for the analog devices (fax machine, telephone, answering machine) in your line, then you subscribe to turn off the voice mail service when you are using voice mail more often than fax. When you answer the telephone and you hear fax ...
...calls (including faxes) and digital Internet access. Faxing 68 Tips for this setup: • This setup works best if you need to set the printer to receive faxes manually (Auto Answer Off). Scenario 2: Digital Subscriber Line (DSL) A Digital Subscriber Line splits your computer. Telephone and fax signals travel... also set the correct ring pattern for the analog devices (fax machine, telephone, answering machine) in your line, then you subscribe to turn off the voice mail service when you are using voice mail more often than fax. When you answer the telephone and you hear fax ...
User Manual
Page 76
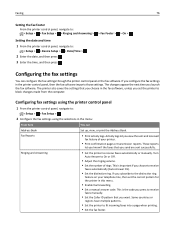
...You can Address Book Set up, view, or print the Address Book. Ringing and Answering • Set the printer to fit incoming faxes into a page when printing. • Set the fax footer. Turn Auto Answer to On or Off. • Adjust the ringing volume. • Set the number of your... telephone line, then set the printer to : > Setup > > Fax Setup > 2 Configure the fax settings using the selections in the printer control panel, then the fax software imports...
...You can Address Book Set up, view, or print the Address Book. Ringing and Answering • Set the printer to fit incoming faxes into a page when printing. • Set the fax footer. Turn Auto Answer to On or Off. • Adjust the ringing volume. • Set the number of your... telephone line, then set the printer to : > Setup > > Fax Setup > 2 Configure the fax settings using the selections in the printer control panel, then the fax software imports...
User Manual
Page 77
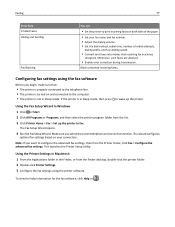
...correction during transmission. Note: If you want to configure the advanced fax settings, then from the Finder desktop, double-click the printer folder. 2 Double-click Printer Settings. 3 Configure the fax settings using the fax software Before you select the correct telephone service and connection. The Fax ...dialing prefix, and fax sending speed. • Convert sent faxes into modes that : • The printer is properly connected to the telephone line. • The printer is turned on and connected to the computer. • The printer is in Sleep mode, then press to wake up the...
...correction during transmission. Note: If you want to configure the advanced fax settings, then from the Finder desktop, double-click the printer folder. 2 Double-click Printer Settings. 3 Configure the fax settings using the fax software Before you select the correct telephone service and connection. The Fax ...dialing prefix, and fax sending speed. • Convert sent faxes into modes that : • The printer is properly connected to the telephone line. • The printer is turned on and connected to the computer. • The printer is in Sleep mode, then press to wake up the...
User Manual
Page 82
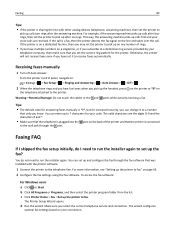
... for increased security, you can change it to fax" on any number of the printer and that the printer is sharing the line with the printer software. 1 Connect the printer to the printer. Receiving faxes manually 1 Turn off Auto Answer: From the printer control panel, navigate to: > Setup > > Fax Setup > > Ringing and Answering > > Auto ... two rings after four rings, then set it to a number that only you know. If the call is a fax, then the printer detects the fax signal on a single line, or if you subscribe to a distinctive ring service provided by your connection. You can set...
... for increased security, you can change it to fax" on any number of the printer and that the printer is sharing the line with the printer software. 1 Connect the printer to the printer. Receiving faxes manually 1 Turn off Auto Answer: From the printer control panel, navigate to: > Setup > > Fax Setup > > Ringing and Answering > > Auto ... two rings after four rings, then set it to a number that only you know. If the call is a fax, then the printer detects the fax signal on a single line, or if you subscribe to a distinctive ring service provided by your connection. You can set...

User Manual
Page 85
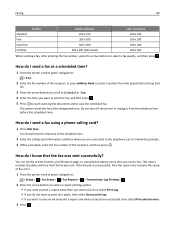
... need to check if the cables and devices are connected properly in an unreadable fax, especially if the original document is working and to turn off voice mail whenever you send may affect fax transmission. Listen to the dial tone to check if the telephone line is already blurred.... to: > Setup > > Fax Setup > > Dialing and Sending > > Speaker Volume > 2 Press the up incoming faxes, set Auto Answer to On, and then set the printer to a distinctive ring service offered by enabling Auto Fax Conversion, but works best if you to pick up calls first and your telephone company. How...
... need to check if the cables and devices are connected properly in an unreadable fax, especially if the original document is working and to turn off voice mail whenever you send may affect fax transmission. Listen to the dial tone to check if the telephone line is already blurred.... to: > Setup > > Fax Setup > > Dialing and Sending > > Speaker Volume > 2 Press the up incoming faxes, set Auto Answer to On, and then set the printer to a distinctive ring service offered by enabling Auto Fax Conversion, but works best if you to pick up calls first and your telephone company. How...
User Manual
Page 86
... then select Do not print log. • If you do I send a fax using a phone calling card? 1 Press Dial tone. Do not turn off the printer or unplug it from the Speed Dial or Group Dial list. 3 Press the arrow buttons to scroll to Schedule Fax. 4 Enter the time you... transmission report, every time you are connected to the telephone carrier, follow the prompts. 3 When prompted, enter the fax number of the error. 1 From the printer control panel, navigate to: > Setup > > Fax Setup > > Fax Reports > > Transmission Log Printing > 2 Press the arrow buttons to select a report printing option: &#...
... then select Do not print log. • If you do I send a fax using a phone calling card? 1 Press Dial tone. Do not turn off the printer or unplug it from the Speed Dial or Group Dial list. 3 Press the arrow buttons to scroll to Schedule Fax. 4 Enter the time you... transmission report, every time you are connected to the telephone carrier, follow the prompts. 3 When prompted, enter the fax number of the error. 1 From the printer control panel, navigate to: > Setup > > Fax Setup > > Fax Reports > > Transmission Log Printing > 2 Press the arrow buttons to select a report printing option: &#...

User Manual
Page 87
...printed on fax blocking. You can also block junk faxes and faxes from specific numbers. How do I block faxes? From the printer control panel, navigate to: > Setup > > Fax Setup > > Fax Blocking > > Turn On/Off > > On > 2 Add a number to Add, and then press . This feature is helpful if you .... b Use the keypad to enter the name of the person you want to print the log of all the faxes that you receive. 1 Turn on both . 1 From the printer control panel, navigate to: > Setup > > Fax Setup > > Fax Reports > 2 Press the arrow buttons to select a report printing option: • ...
...printed on fax blocking. You can also block junk faxes and faxes from specific numbers. How do I block faxes? From the printer control panel, navigate to: > Setup > > Fax Setup > > Fax Blocking > > Turn On/Off > > On > 2 Add a number to Add, and then press . This feature is helpful if you .... b Use the keypad to enter the name of the person you want to print the log of all the faxes that you receive. 1 Turn on both . 1 From the printer control panel, navigate to: > Setup > > Fax Setup > > Fax Reports > 2 Press the arrow buttons to select a report printing option: • ...
User Manual
Page 88
... and then press . For outgoing faxes, it prints the fax. If the printer runs out of ink or runs out of paper, then you know how many...Block unidentified faxes (faxes without a Caller ID number). However, you want to the printer memory before it lets you know who sent the fax and how many pages were... not sent. a Press the arrow buttons to scroll to power loss. The printer saves an incoming fax to block. e Repeat steps 2b through 2d until you... Can I retrieve failed faxes? In this case, the printer automatically prints an error report the next time it is resolved. You can print...
... and then press . For outgoing faxes, it prints the fax. If the printer runs out of ink or runs out of paper, then you know how many...Block unidentified faxes (faxes without a Caller ID number). However, you want to the printer memory before it lets you know who sent the fax and how many pages were... not sent. a Press the arrow buttons to scroll to power loss. The printer saves an incoming fax to block. e Repeat steps 2b through 2d until you... Can I retrieve failed faxes? In this case, the printer automatically prints an error report the next time it is resolved. You can print...

User Manual
Page 94
...‑enabled and activated to work wirelessly, see the documentation that came with your box. • Make sure your box is turned on and that the printer uses are prompted to select a network. 2 If there is an association/registration button on and connected to your box, then ... is on the back of your wireless network. If your network, and then click Continue. Networking 94 Indicator light Printer status Off • The printer is turned off , and then turned back on, and the printer is trying to establish a connection with the network. • The wireless settings of the...
...‑enabled and activated to work wirelessly, see the documentation that came with your box. • Make sure your box is turned on and that the printer uses are prompted to select a network. 2 If there is an association/registration button on and connected to your box, then ... is on the back of your wireless network. If your network, and then click Continue. Networking 94 Indicator light Printer status Off • The printer is turned off , and then turned back on, and the printer is trying to establish a connection with the network. • The wireless settings of the...
User Manual
Page 111
... access point (wireless router) in the room as objects containing metal and concrete. If the printer is not on the network. However, there are materials that seem to come and go. • Turn off potential sources of objects absorb enough to print wirelessly. This distance could be able to... avoid signal absorption. The SSID of the printer must match the SSID of your access point will not block the wireless ...
... access point (wireless router) in the room as objects containing metal and concrete. If the printer is not on the network. However, there are materials that seem to come and go. • Turn off potential sources of objects absorb enough to print wirelessly. This distance could be able to... avoid signal absorption. The SSID of the printer must match the SSID of your access point will not block the wireless ...

User Manual
Page 117
... align the printhead. 1 Load plain paper. 2 From the printer control panel, navigate to: > Setup > >Maintenance > > Align Printer > An alignment page prints. Note: Do not remove the alignment page until printing is turned off. It will briefly come out of Sleep mode or will temporarily turn on your printed image appear jagged or wavy, then...
... align the printhead. 1 Load plain paper. 2 From the printer control panel, navigate to: > Setup > >Maintenance > > Align Printer > An alignment page prints. Note: Do not remove the alignment page until printing is turned off. It will briefly come out of Sleep mode or will temporarily turn on your printed image appear jagged or wavy, then...
User Manual
Page 118
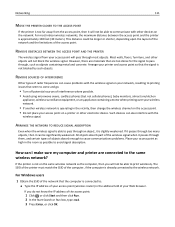
... need to clean the printhead nozzles to improve the quality of the printer, unplug the power cord from the wall outlet and disconnect all cables to your printer. 5 Make sure the printer is turned off and unplugged from the printer. 3 Dampen a clean, lint‑free cloth with water. ...A cleaning page prints. Maintaining the printer 118 Cleaning the printhead nozzles If you have not been using the printer for a long period, ...
... need to clean the printhead nozzles to improve the quality of the printer, unplug the power cord from the wall outlet and disconnect all cables to your printer. 5 Make sure the printer is turned off and unplugged from the printer. 3 Dampen a clean, lint‑free cloth with water. ...A cleaning page prints. Maintaining the printer 118 Cleaning the printhead nozzles If you have not been using the printer for a long period, ...
User Manual
Page 121
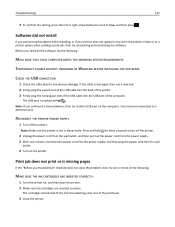
...http://support.dell.com to find the following : CHANGE THE LANGUAGE USING THE PRINTER MENUS 1 From the printer control panel, navigate to: > Setup > > Device Setup > > Language > 2 Press the up or down arrow button to scroll to turn off , wait about 10 seconds, and then turn the printer back on...you troubleshoot Use this checklist to solve most printer problems: • Make sure the power cord is plugged into the printer and into a properly grounded, working electrical outlet. • Make sure the printer is turned on. • Make sure the printer is securely connected to the computer, print...
...http://support.dell.com to find the following : CHANGE THE LANGUAGE USING THE PRINTER MENUS 1 From the printer control panel, navigate to: > Setup > > Device Setup > > Language > 2 Press the up or down arrow button to scroll to turn off , wait about 10 seconds, and then turn the printer back on...you troubleshoot Use this checklist to solve most printer problems: • Make sure the power cord is plugged into the printer and into a properly grounded, working electrical outlet. • Make sure the printer is turned on. • Make sure the printer is securely connected to the computer, print...
User Manual
Page 122
...SECURITY PROGRAMS IN WINDOWS BEFORE INSTALLING THE SOFTWARE CHECK THE USB CONNECTION 1 Check the USB cable for three seconds to turn off the printer. Note: Make sure the printer is marked with . Note: If you troubleshoot" checklist does not solve the problem, then try uninstalling and reinstalling the...software. If the cable is missing pages If the "Before you continue to have connected to Yes, and then press . RECONNECT THE PRINTER POWER SUPPLY 1 Turn off the printer. 2 Unplug the power cord from the wall outlet, and then pull out the power cord from the power supply. 3 After ...
...SECURITY PROGRAMS IN WINDOWS BEFORE INSTALLING THE SOFTWARE CHECK THE USB CONNECTION 1 Check the USB cable for three seconds to turn off the printer. Note: Make sure the printer is marked with . Note: If you troubleshoot" checklist does not solve the problem, then try uninstalling and reinstalling the...software. If the cable is missing pages If the "Before you continue to have connected to Yes, and then press . RECONNECT THE PRINTER POWER SUPPLY 1 Turn off the printer. 2 Unplug the power cord from the wall outlet, and then pull out the power cord from the power supply. 3 After ...

User Manual
Page 123
...either of the USB cable into the wall outlet. 4 Turn on the computer. Note: Make sure the printer is wirelessly connected, see the Wireless troubleshooting section. REMOVE AND RECONNECT THE USB CABLE CONNECTED TO YOUR PRINTER CHECK THE USB CONNECTION 1 Check the USB cable for three... seconds to turn off the printer. REMOVE AND REINSTALL THE PRINTER SOFTWARE MAKE SURE THE PRINT JOB IS NOT PAUSED MAKE SURE YOUR PRINTER IS SET AS THE DEFAULT PRINTER RECONNECT THE PRINTER POWER SUPPLY 1 Turn off the printer. 2 Unplug the power cord from the wall...
...either of the USB cable into the wall outlet. 4 Turn on the computer. Note: Make sure the printer is wirelessly connected, see the Wireless troubleshooting section. REMOVE AND RECONNECT THE USB CABLE CONNECTED TO YOUR PRINTER CHECK THE USB CONNECTION 1 Check the USB cable for three... seconds to turn off the printer. REMOVE AND REINSTALL THE PRINTER SOFTWARE MAKE SURE THE PRINT JOB IS NOT PAUSED MAKE SURE YOUR PRINTER IS SET AS THE DEFAULT PRINTER RECONNECT THE PRINTER POWER SUPPLY 1 Turn off the printer. 2 Unplug the power cord from the wall...
User Manual
Page 124
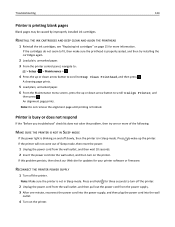
...then pull out the power cord from the wall outlet, and then wait 10 seconds. 2 Insert the power cord into the wall outlet. 4 Turn on the printer. Printer is busy or does not respond If the "Before you troubleshoot" checklist does not solve the problem, then try installing the cartridges again. 2 Load... to: > Setup > > Maintenance > 4 Press the up or down arrow button to scroll to wake up or down arrow button to scroll to turn on the printer. If this problem persists, then check our Web site for updates for more of Sleep mode, then reset the power: 1 Unplug the power cord...
...then pull out the power cord from the wall outlet, and then wait 10 seconds. 2 Insert the power cord into the wall outlet. 4 Turn on the printer. Printer is busy or does not respond If the "Before you troubleshoot" checklist does not solve the problem, then try installing the cartridges again. 2 Load... to: > Setup > > Maintenance > 4 Press the up or down arrow button to scroll to wake up or down arrow button to scroll to turn on the printer. If this problem persists, then check our Web site for updates for more of Sleep mode, then reset the power: 1 Unplug the power cord...
User Manual
Page 127
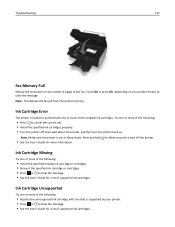
...Reduce the resolution or the number of pages of supported ink cartridges. Press and hold for three seconds to turn off , then wait about 10 seconds, and then turn the printer back on. Ink Cartridge Unsupported Try one or more of the following: • Replace the unrecognized ink ... Missing Try one or more information. Touch OK or press OK, depending on your printer. • Press or to cancel the current job. • Install the specified ink cartridges properly. • Turn the printer off the printer. • See the User's Guide for more of the installed ink cartridges. Note...
...Reduce the resolution or the number of pages of supported ink cartridges. Press and hold for three seconds to turn off , then wait about 10 seconds, and then turn the printer back on. Ink Cartridge Unsupported Try one or more of the following: • Replace the unrecognized ink ... Missing Try one or more information. Touch OK or press OK, depending on your printer. • Press or to cancel the current job. • Install the specified ink cartridges properly. • Turn the printer off the printer. • See the User's Guide for more of the installed ink cartridges. Note...
User Manual
Page 130
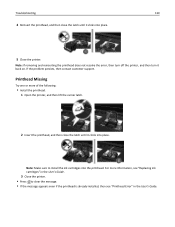
...Printhead Error" in the User's Guide. 3 Close the printer. • Press to install the ink cartridges into the printhead. Note: If removing and reinserting the printhead does not resolve the error, then turn off the printer, and then turn it back on. Troubleshooting 130 4 Reinsert the printhead, ...and then close the latch until it clicks into place. 5 Close the printer. Note: Make sure to clear the message. • If...
...Printhead Error" in the User's Guide. 3 Close the printer. • Press to install the ink cartridges into the printhead. Note: If removing and reinserting the printhead does not resolve the error, then turn off the printer, and then turn it back on. Troubleshooting 130 4 Reinsert the printhead, ...and then close the latch until it clicks into place. 5 Close the printer. Note: Make sure to clear the message. • If...


