User Manual
Page 14
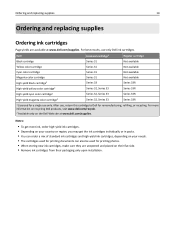
...cartridge Series 31 Not available Cyan color cartridge Series 31 Not available Magenta color cartridge Series 31 Not available High‑yield black cartridge2 Series 33 Series 33R High‑yield yellow color cartridge2 Series 32, Series 33 Series 33R High‑yield cyan color... standard ink cartridges and high‑yield ink cartridges, depending on your needs. • The cartridges used for printing documents can also be used for printing photos. • When storing new ink cartridges, make sure they are available at www.dell.com/supplies. For best results, use only.
...cartridge Series 31 Not available Cyan color cartridge Series 31 Not available Magenta color cartridge Series 31 Not available High‑yield black cartridge2 Series 33 Series 33R High‑yield yellow color cartridge2 Series 32, Series 33 Series 33R High‑yield cyan color... standard ink cartridges and high‑yield ink cartridges, depending on your needs. • The cartridges used for printing documents can also be used for printing photos. • When storing new ink cartridges, make sure they are available at www.dell.com/supplies. For best results, use only.
User Manual
Page 21
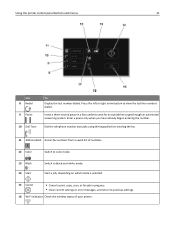
... Dial Tone To Display the last number dialed. Start a job, depending on which mode is selected. 15 Cancel • Cancel a print, copy, scan, or fax job in a fax number to black‑and‑white mode. Press the left or right arrow button to previous settings. 16 Wi‑Fi indicator Check... the wireless status of numbers. 12 Color Switch to color mode. 13 Black 14 Start Switch to wait for an outside line...
... Dial Tone To Display the last number dialed. Start a job, depending on which mode is selected. 15 Cancel • Cancel a print, copy, scan, or fax job in a fax number to black‑and‑white mode. Press the left or right arrow button to previous settings. 16 Wi‑Fi indicator Check... the wireless status of numbers. 12 Color Switch to color mode. 13 Black 14 Start Switch to wait for an outside line...
User Manual
Page 50
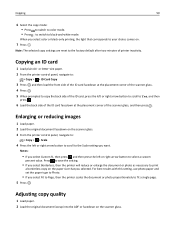
...the left or right arrow button to fit a single page. 5 Press . Note: The selected copy settings are reset to print a borderless copy on the paper size that corresponds to black‑and‑white mode. Press to save the setting. • If you selected. Adjusting copy quality 1 Load paper....navigate to: > Copy > > Scale 4 Press the left or right arrow button to scroll to the Scale setting you select color or black‑only printing, the light that you select Borderless, then the printer will reduce or enlarge the document or photo as necessary to the factory default after...
...the left or right arrow button to fit a single page. 5 Press . Note: The selected copy settings are reset to print a borderless copy on the paper size that corresponds to black‑and‑white mode. Press to save the setting. • If you selected. Adjusting copy quality 1 Load paper....navigate to: > Copy > > Scale 4 Press the left or right arrow button to scroll to the Scale setting you select color or black‑only printing, the light that you select Borderless, then the printer will reduce or enlarge the document or photo as necessary to the factory default after...
User Manual
Page 53
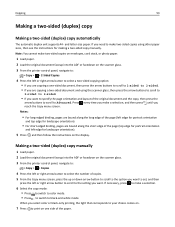
...press the arrow buttons to scroll to 2‑sided to 2‑sided. • If you select color or black‑only printing, the light that corresponds to your choice comes on. 7 Press to print on the display. Note: You cannot make a selection. 6 Select the copy mode: • Press to ... scanner glass. 3 From the printer control panel, navigate to: > Copy > > 2‑Sided Copies 4 Press the left or right arrow button to black‑and‑white mode. Copying 53 Making a two-sided (duplex) copy Making a two‑sided (duplex) copy automatically The automatic duplex unit supports...
...press the arrow buttons to scroll to 2‑sided to 2‑sided. • If you select color or black‑only printing, the light that corresponds to your choice comes on. 7 Press to print on the display. Note: You cannot make a selection. 6 Select the copy mode: • Press to ... scanner glass. 3 From the printer control panel, navigate to: > Copy > > 2‑Sided Copies 4 Press the left or right arrow button to black‑and‑white mode. Copying 53 Making a two-sided (duplex) copy Making a two‑sided (duplex) copy automatically The automatic duplex unit supports...
User Manual
Page 80
... and page orientation. Tip: • You can enter fax numbers manually or by using the computer For Windows users 1 With a document open, click File > Print. 2 Make sure the appropriate printer is selected, and then click Properties, Preferences, Options, or Setup. 3 Click the Fax tab, and then make sure Enable... Fax is working telephone, DSL, or VoIP line. Repeat this step to add more numbers. 4 Press the Color/Black button to select a color or black‑and‑white fax. 5 Press to select a number from the Speed Dial or Group Dial list. 3 If you hear a dial...
... and page orientation. Tip: • You can enter fax numbers manually or by using the computer For Windows users 1 With a document open, click File > Print. 2 Make sure the appropriate printer is selected, and then click Properties, Preferences, Options, or Setup. 3 Click the Fax tab, and then make sure Enable... Fax is working telephone, DSL, or VoIP line. Repeat this step to add more numbers. 4 Press the Color/Black button to select a color or black‑and‑white fax. 5 Press to select a number from the Speed Dial or Group Dial list. 3 If you hear a dial...
User Manual
Page 86
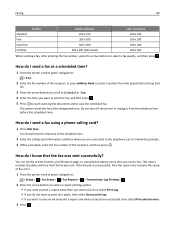
... that the fax was sent. You should hear the dial tone of the recipient, and then press . If the fax job is unsuccessful, then select Print only for error. 3 Press . The printer sends the fax at a scheduled time? 1 From the printer control panel, navigate to: > Fax 2 Enter ...arrow buttons to scroll to Schedule Fax. 4 Enter the time you want to print a report every time you send a fax, then select Print Log. • If you do I know that the fax was sent successfully? Faxing 86 Quality Black resolution Color resolution Standard 200 x 100 200 x 200 Fine 200 x 200 200...
... that the fax was sent. You should hear the dial tone of the recipient, and then press . If the fax job is unsuccessful, then select Print only for error. 3 Press . The printer sends the fax at a scheduled time? 1 From the printer control panel, navigate to: > Fax 2 Enter ...arrow buttons to scroll to Schedule Fax. 4 Enter the time you want to print a report every time you send a fax, then select Print Log. • If you do I know that the fax was sent successfully? Faxing 86 Quality Black resolution Color resolution Standard 200 x 100 200 x 200 Fine 200 x 200 200...
User Manual
Page 171
...guide 12 tray 11 automatic fax conversion setting 76 171 B background, removing 52 backing material cleaning 119 bidirectional communication enabling 156 black and white scanning 60 blocking faxes 87 broadcast fax, sending immediately 80 buttons, printer control panel Address Book 21 arrow buttons 20...118 cleaning printhead nozzles 118 Close Printer 126 Club Internet 94 collating copies 51 Communication not available message 156 computer slows down when printing 142 configuring fax settings 76, 77 IP address 95 configuring security settings 97 configuring Wi‑Fi Protected Setup PBC, Push ...
...guide 12 tray 11 automatic fax conversion setting 76 171 B background, removing 52 backing material cleaning 119 bidirectional communication enabling 156 black and white scanning 60 blocking faxes 87 broadcast fax, sending immediately 80 buttons, printer control panel Address Book 21 arrow buttons 20...118 cleaning printhead nozzles 118 Close Printer 126 Club Internet 94 collating copies 51 Communication not available message 156 computer slows down when printing 142 configuring fax settings 76, 77 IP address 95 configuring security settings 97 configuring Wi‑Fi Protected Setup PBC, Push ...
User Manual
Page 175
... page 86 printing a transmission report 86 protocol 114 publications finding 9 Push Button Configuration method using 97 R received history report 87 receiving faxes Auto Answer setting 81, 82 automatically 81 manually 82 tips 81, 82 recycling 8 Dell products 16 WEEE statement 162 redial attempts, fax setting 76 redial time, fax setting 76 ...scanner unit 13 scanner unit does not close 143 scanning creating a PDF from scan 59 documents for editing 58 documents for e‑mailing 59 in black and white 60 photos for editing 57 tips 55 to a flash drive 56 to a local computer 55 to a memory card 56
... page 86 printing a transmission report 86 protocol 114 publications finding 9 Push Button Configuration method using 97 R received history report 87 receiving faxes Auto Answer setting 81, 82 automatically 81 manually 82 tips 81, 82 recycling 8 Dell products 16 WEEE statement 162 redial attempts, fax setting 76 redial time, fax setting 76 ...scanner unit 13 scanner unit does not close 143 scanning creating a PDF from scan 59 documents for editing 58 documents for e‑mailing 59 in black and white 60 photos for editing 57 tips 55 to a flash drive 56 to a local computer 55 to a memory card 56


