User Guide
Page 3
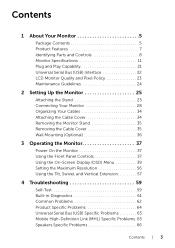
... Universal Serial Bus (USB) Interface 22 LCD Monitor Quality and Pixel Policy 23 Maintenance Guidelines 24 2 Setting Up the Monitor 25 Attaching the Stand 25 Connecting Your Monitor 28 Organizing Your Cables 34 Attaching the Cable Cover 34 Removing the Monitor Stand 35 Removing the Cable Cover 35 Wall Mounting (Optional 36 3 Operating the Monitor 37 Power On the Monitor 37 Using the Front Panel Controls 37 Using the On-Screen Display (OSD) Menu 39 Setting the Maximum Resolution 56 Using the Tilt, Swivel, and Vertical Extension 57 4 Troubleshooting 59...
... Universal Serial Bus (USB) Interface 22 LCD Monitor Quality and Pixel Policy 23 Maintenance Guidelines 24 2 Setting Up the Monitor 25 Attaching the Stand 25 Connecting Your Monitor 28 Organizing Your Cables 34 Attaching the Cable Cover 34 Removing the Monitor Stand 35 Removing the Cable Cover 35 Wall Mounting (Optional 36 3 Operating the Monitor 37 Power On the Monitor 37 Using the Front Panel Controls 37 Using the On-Screen Display (OSD) Menu 39 Setting the Maximum Resolution 56 Using the Tilt, Swivel, and Vertical Extension 57 4 Troubleshooting 59...
User Guide
Page 7
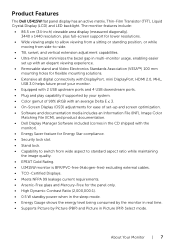
Product Features The Dell U3415W flat panel display has an active matrix, Thin-Film Transistor (TFT), Liquid Crystal Display (LCD) and LED backlight. The monitor features include: • 86.5 cm (34-inch) viewable area display (measured diagonally). 3440 x 1440 resolution, plus full-screen support for lower resolutions. • Wide viewing angle to allow viewing from a sitting or standing position, or while moving from side-to-side. • Tilt, swivel, and vertical extension adjustment capabilities. • Ultra...
Product Features The Dell U3415W flat panel display has an active matrix, Thin-Film Transistor (TFT), Liquid Crystal Display (LCD) and LED backlight. The monitor features include: • 86.5 cm (34-inch) viewable area display (measured diagonally). 3440 x 1440 resolution, plus full-screen support for lower resolutions. • Wide viewing angle to allow viewing from a sitting or standing position, or while moving from side-to-side. • Tilt, swivel, and vertical extension adjustment capabilities. • Ultra...
User Guide
Page 11
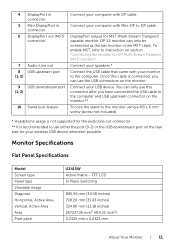
Monitor Specifications Flat Panel Specifications Model Screen type Panel type Viewable image Diagonal Horizontal, Active Area Vertical, Active Area Area Pixel pitch U3415W Active matrix - To enable MST, refer to use the USB connectors on the monitor. Connect your wireless USB device whenever possible. Connect your computer with Mini-DP to the computer. Once this connector after you have connected the USB cable to the computer and USB upstream connector on the monitor.** To lock the stand to the...
Monitor Specifications Flat Panel Specifications Model Screen type Panel type Viewable image Diagonal Horizontal, Active Area Vertical, Active Area Area Pixel pitch U3415W Active matrix - To enable MST, refer to use the USB connectors on the monitor. Connect your wireless USB device whenever possible. Connect your computer with Mini-DP to the computer. Once this connector after you have connected the USB cable to the computer and USB upstream connector on the monitor.** To lock the stand to the...
User Guide
Page 14
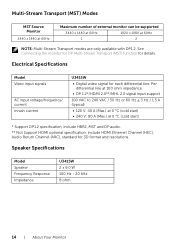
...;C (cold start ) * Support DP1.2 specification, include HBR2, MST and DP audio. ** Not Support HDMI optional specification, include HDMI Ethernet Channel (HEC), Audio Return Channel (ARC), standard for 3D format and resolutions. Speaker Specifications Model Speaker Frequency Response Impedance U3415W 2 x 9.0 W 100 Hz - 20 kHz 8 ohm 14 | About Your Monitor See Connecting the monitor for DP Multi-Stream Transport (MST) function for each differential line. Electrical Specifications Model Video input signals AC input voltage/frequency/ current Inrush...
...;C (cold start ) * Support DP1.2 specification, include HBR2, MST and DP audio. ** Not Support HDMI optional specification, include HDMI Ethernet Channel (HEC), Audio Return Channel (ARC), standard for 3D format and resolutions. Speaker Specifications Model Speaker Frequency Response Impedance U3415W 2 x 9.0 W 100 Hz - 20 kHz 8 ohm 14 | About Your Monitor See Connecting the monitor for DP Multi-Stream Transport (MST) function for each differential line. Electrical Specifications Model Video input signals AC input voltage/frequency/ current Inrush...

User Guide
Page 32
... use the OSD menu to select between the two USB upstream sources and input sources. After you have completed connecting the Mini-DP to DP/DP/HDMI cable, follow the procedures below to connect the USB 3.0 cable to the computer and complete your computer(s) and monitor into a nearby outlet. a. Connect one computer: connect the upstream USB 3.0 port (cable supplied) to appropriate USB 3.0 ports on the monitor. 3 Plug the power cables for your monitor setup: 1 a. Connect two computers*: connect the upstream USB 3.0 ports...
... use the OSD menu to select between the two USB upstream sources and input sources. After you have completed connecting the Mini-DP to DP/DP/HDMI cable, follow the procedures below to connect the USB 3.0 cable to the computer and complete your computer(s) and monitor into a nearby outlet. a. Connect one computer: connect the upstream USB 3.0 port (cable supplied) to appropriate USB 3.0 ports on the monitor. 3 Plug the power cables for your monitor setup: 1 a. Connect two computers*: connect the upstream USB 3.0 ports...

User Guide
Page 33
... mode, the monitor will display black screen or show the message below steps: 1 Plug the power cable on your monitor displays an image, installation is MHL certified. If your monitor into a AC outlet. 2 Connect the (micro) USB port on you MHL source device to MHL port on the monitor with a MHL certified cable (See Bottom View for details.) 5 If it does not display an image, see Mobile High-Definition Link (MHL) Specific Problems. Setting Up the Monitor...
... mode, the monitor will display black screen or show the message below steps: 1 Plug the power cable on your monitor displays an image, installation is MHL certified. If your monitor into a AC outlet. 2 Connect the (micro) USB port on you MHL source device to MHL port on the monitor with a MHL certified cable (See Bottom View for details.) 5 If it does not display an image, see Mobile High-Definition Link (MHL) Specific Problems. Setting Up the Monitor...

User Guide
Page 38
... Monitor A glowing white light indicates the power save mode. Front Panel Button Use the buttons on the front of the monitor to adjust (increase ranges) items in the OSD menu. The white light indicates the monitor is On and fully functional. Front Panel Button Description 1 Use the Up button to adjust the image settings. Use the MENU button to turn the monitor On and Off. Use the Power button to launch the On-Screen Display (OSD) and select the OSD Menu. Front Panel Button 1 Shortcut key/ Volume 2 Shortcut key/ Input Source 3 Menu 4 Exit 5 Power (with power light...
... Monitor A glowing white light indicates the power save mode. Front Panel Button Use the buttons on the front of the monitor to adjust (increase ranges) items in the OSD menu. The white light indicates the monitor is On and fully functional. Front Panel Button Description 1 Use the Up button to adjust the image settings. Use the MENU button to turn the monitor On and Off. Use the Power button to launch the On-Screen Display (OSD) and select the OSD Menu. Front Panel Button 1 Shortcut key/ Volume 2 Shortcut key/ Input Source 3 Menu 4 Exit 5 Power (with power light...
User Guide
Page 44
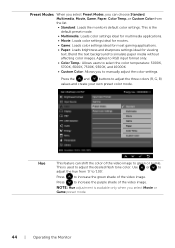
...: Loads brightness and sharpness settings ideal for viewing text. Blend the text background to manually adjust the color settings. This is used to '100'. Use or to adjust the hue from the list. • Standard: Loads the monitor's default color settings. Press to adjust the three colors (R, G, B) values and create your own preset color mode. Preset Modes When you select Preset Modes, you can shift the color of the video image to green or...
...: Loads brightness and sharpness settings ideal for viewing text. Blend the text background to manually adjust the color settings. This is used to '100'. Use or to adjust the hue from the list. • Standard: Loads the monitor's default color settings. Press to adjust the three colors (R, G, B) values and create your own preset color mode. Preset Modes When you select Preset Modes, you can shift the color of the video image to green or...
User Guide
Page 45
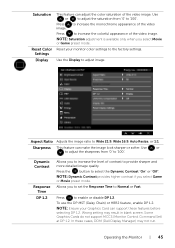
... the factory settings. Wrong setting may not run. Saturation Reset Color Settings Display This feature can make the image look sharper or softer. NOTE: Ensure your monitor color settings to select the Dynamic Contrast "On" or "Off". In these features before selecting DP 1.2. Reset your Graphics Card can support these cases, DDM (Dell Display Manager) may result in blank screen. Sharpness This feature can adjust the color saturation of the video image. Dynamic Contrast...
... the factory settings. Wrong setting may not run. Saturation Reset Color Settings Display This feature can make the image look sharper or softer. NOTE: Ensure your monitor color settings to select the Dynamic Contrast "On" or "Off". In these features before selecting DP 1.2. Reset your Graphics Card can support these cases, DDM (Dell Display Manager) may result in blank screen. Sharpness This feature can adjust the color saturation of the video image. Dynamic Contrast...

User Guide
Page 46
... full screen. NOTE: User is advised to use the PBP/PIP feature, the DP MST (Daisy Chain) function is turned on the Factory Calibration Report. For optimal screen performance, Brightness and Contrast for some preset modes (Standard, Color Temp.) will be disabled when Uniformity Compensation is factory Compensation calibrated setting by default. For other brightness level setting, the uniformity performance may deviate from another input source. Settings PBP This function brings up a window displaying image...
... full screen. NOTE: User is advised to use the PBP/PIP feature, the DP MST (Daisy Chain) function is turned on the Factory Calibration Report. For optimal screen performance, Brightness and Contrast for some preset modes (Standard, Color Temp.) will be disabled when Uniformity Compensation is factory Compensation calibrated setting by default. For other brightness level setting, the uniformity performance may deviate from another input source. Settings PBP This function brings up a window displaying image...

User Guide
Page 51
... eight languages (English, Spanish, French, German, Brazilian Portuguese, Russian, Simplified Chinese or Japanese). Timer Lock Reset Menu Settings OSD Hold Time: sets the length of time the menu remains on screen, and so on. When Lock is selected, no user adjustments are locked. Operating the Monitor | 51 Language Language options set the OSD display to the factory preset values. Use or to adjust the slider in 1 second increments, from 5 to adjustments. Lock function - All buttons are...
... eight languages (English, Spanish, French, German, Brazilian Portuguese, Russian, Simplified Chinese or Japanese). Timer Lock Reset Menu Settings OSD Hold Time: sets the length of time the menu remains on screen, and so on. When Lock is selected, no user adjustments are locked. Operating the Monitor | 51 Language Language options set the OSD display to the factory preset values. Use or to adjust the slider in 1 second increments, from 5 to adjustments. Lock function - All buttons are...
User Guide
Page 57
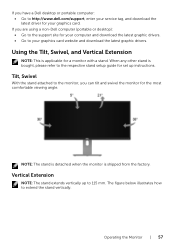
... the support site for your computer and download the latest graphic drivers. • Go to your graphics card. Using the Tilt, Swivel, and Vertical Extension NOTE: This is bought, please refer to the respective stand setup guide for set up to 115 mm. Tilt, Swivel With the stand attached to extend the stand vertically. When any other stand is applicable for a monitor with a stand. If you have a Dell desktop...
... the support site for your computer and download the latest graphic drivers. • Go to your graphics card. Using the Tilt, Swivel, and Vertical Extension NOTE: This is bought, please refer to the respective stand setup guide for set up to 115 mm. Tilt, Swivel With the stand attached to extend the stand vertically. When any other stand is applicable for a monitor with a stand. If you have a Dell desktop...

User Guide
Page 59
... mode, the power LED remains white. To ensure proper Self-Test operation, remove all digital cables from the back of the computer. Troubleshooting WARNING: Before you to check whether your computer and the monitor. 2 Unplug the video cable from the back of computer. 3 Turn on -screen (against a black background), if the monitor cannot sense a video signal and is functioning properly. If your monitor and computer are properly connected but the monitor screen...
... mode, the power LED remains white. To ensure proper Self-Test operation, remove all digital cables from the back of the computer. Troubleshooting WARNING: Before you to check whether your computer and the monitor. 2 Unplug the video cable from the back of computer. 3 Turn on -screen (against a black background), if the monitor cannot sense a video signal and is functioning properly. If your monitor and computer are properly connected but the monitor screen...
User Guide
Page 62
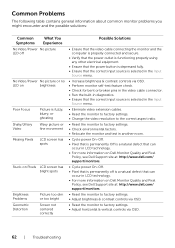
... power button is depressed fully. • Ensure that the correct input source is selected in the Input Source menu. • Increase brightness & contrast controls via OSD. • Perform monitor self-test feature check. • Check for bent or broken pins in the video cable connector. • Run the built-in diagnostics. • Ensure that the correct input source is selected in the Input Source menu. • Eliminate video extension cables. • Reset the monitor to factory settings. • Change...
... power button is depressed fully. • Ensure that the correct input source is selected in the Input Source menu. • Increase brightness & contrast controls via OSD. • Perform monitor self-test feature check. • Check for bent or broken pins in the video cable connector. • Run the built-in diagnostics. • Ensure that the correct input source is selected in the Input Source menu. • Eliminate video extension cables. • Reset the monitor to factory settings. • Change...

User Guide
Page 63
... Preset Modes in use (for more information, see Power Management Modes). • Alternatively, use a dynamically changing screensaver. Troubleshooting | 63 Color in Color menu OSD. • Change the Input Color Format to PC RGB or YPbPr in the Color menu OSD. • Run the built-in diagnostics. • Use the Power Management feature to turn off Missing Color Picture missing color Wrong Color Picture color not good Image retention Faint shadow from a static from the static image left on image displayed the monitor...
... Preset Modes in use (for more information, see Power Management Modes). • Alternatively, use a dynamically changing screensaver. Troubleshooting | 63 Color in Color menu OSD. • Change the Input Color Format to PC RGB or YPbPr in the Color menu OSD. • Run the built-in diagnostics. • Use the Power Management feature to turn off Missing Color Picture missing color Wrong Color Picture color not good Image retention Faint shadow from a static from the static image left on image displayed the monitor...

User Guide
Page 64
... button beside the Power button for more information, see Lock). • Check the signal source. Ensure the computer is not in the power saving mode by moving the mouse or pressing any key on the screen No Input Signal No picture, the when user LED light is white controls are pressed The picture The picture does not fill the cannot fill the entire screen height or width of DVDs, the monitor may display in full screen...
... button beside the Power button for more information, see Lock). • Check the signal source. Ensure the computer is not in the power saving mode by moving the mouse or pressing any key on the screen No Input Signal No picture, the when user LED light is white controls are pressed The picture The picture does not fill the cannot fill the entire screen height or width of DVDs, the monitor may display in full screen...
User Guide
Page 68
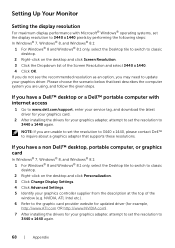
... updated driver (for example, http://www.ATI.com OR http://www.NVIDIA.com). 7 After installing the drivers for your graphics adapter, attempt to set the resolution to 3440 x 1440 again. Setting Up Your Monitor Setting the display resolution For maximum display performance with internet access 1 Go to www.dell.com/support, enter your service tag, and download the latest driver for your graphics card. 2 After installing the drivers for your graphics adapter...
... updated driver (for example, http://www.ATI.com OR http://www.NVIDIA.com). 7 After installing the drivers for your graphics adapter, attempt to set the resolution to 3440 x 1440 again. Setting Up Your Monitor Setting the display resolution For maximum display performance with internet access 1 Go to www.dell.com/support, enter your service tag, and download the latest driver for your graphics card. 2 After installing the drivers for your graphics adapter...
Dell Display Manager Users Guide
Page 1
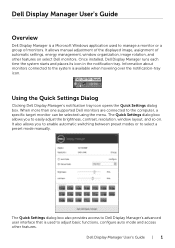
... auto mode and access other features on . It also allows you to select a preset mode manually. Once installed, Dell Display Manager runs each time the system starts and places its icon in the notification tray. The Quick Settings dialog box allows you to enable automatic switching between preset modes or to easily adjust the brightness, contrast, resolution, window layout, and so on select Dell monitors. Dell Display Manager User's Guide | 1 Dell Display Manager User's Guide Overview Dell Display Manager...
... auto mode and access other features on . It also allows you to select a preset mode manually. Once installed, Dell Display Manager runs each time the system starts and places its icon in the notification tray. The Quick Settings dialog box allows you to enable automatic switching between preset modes or to easily adjust the brightness, contrast, resolution, window layout, and so on select Dell monitors. Dell Display Manager User's Guide | 1 Dell Display Manager User's Guide Overview Dell Display Manager...
Dell Display Manager Users Guide
Page 2
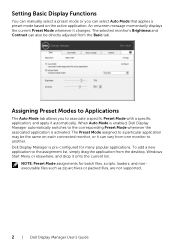
... files, are not supported. 2 | Dell Display Manager User's Guide Assigning Preset Modes to Applications The Auto Mode tab allows you can also be the same on the active application. The selected monitor's Brightness and Contrast can select Auto Mode that applies a preset mode based on each connected monitor, or it can vary from the desktop, Windows Start Menu or elsewhere, and drop it changes. An onscreen message momentarily displays the current Preset...
... files, are not supported. 2 | Dell Display Manager User's Guide Assigning Preset Modes to Applications The Auto Mode tab allows you can also be the same on the active application. The selected monitor's Brightness and Contrast can select Auto Mode that applies a preset mode based on each connected monitor, or it can vary from the desktop, Windows Start Menu or elsewhere, and drop it changes. An onscreen message momentarily displays the current Preset...
DP1.2 Multi-Stream Transport (MST) Techsheet
Page 1
.../50279_AMD_FirePro_DisplayPort_1-2_WP.pdf. Using daisy-chainable displays or MST extends the number of monitor configurations, displaying up to the graphic card's capability and resolution of the monitor. Setting DP1.1a and DP1.2 on the UltraSharp Monitor The default setting of the monitor is subject to twice the bandwidth of bandwidth, or up to change the setting to DP1.2 on MST, please refer to the Dell UltraSharp monitors. High Bit-rate 2 (HBR2...
.../50279_AMD_FirePro_DisplayPort_1-2_WP.pdf. Using daisy-chainable displays or MST extends the number of monitor configurations, displaying up to the graphic card's capability and resolution of the monitor. Setting DP1.1a and DP1.2 on the UltraSharp Monitor The default setting of the monitor is subject to twice the bandwidth of bandwidth, or up to change the setting to DP1.2 on MST, please refer to the Dell UltraSharp monitors. High Bit-rate 2 (HBR2...


