Users Guide
Page 3
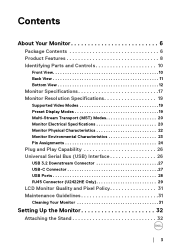
... Features 8 Identifying Parts and Controls 10 Front View 10 Back View 11 Bottom View 12 Monitor Specifications 17 Monitor Resolution Specifications 19 Supported Video Modes 19 Preset Display Modes 19 Multi-Stream Transport (MST) Modes 20 Monitor Electrical Specifications 20 Monitor Physical Characteristics 22 Monitor Environmental Characteristics 23 Pin Assignments 24 Plug and Play Capability 26 Universal Serial Bus (USB) Interface 26 USB 3.2 Downstream Connector 27 USB-C Connector 27 USB Ports 28 RJ45 Connector (U2422HE Only 29 LCD Monitor Quality and Pixel Policy 31...
... Features 8 Identifying Parts and Controls 10 Front View 10 Back View 11 Bottom View 12 Monitor Specifications 17 Monitor Resolution Specifications 19 Supported Video Modes 19 Preset Display Modes 19 Multi-Stream Transport (MST) Modes 20 Monitor Electrical Specifications 20 Monitor Physical Characteristics 22 Monitor Environmental Characteristics 23 Pin Assignments 24 Plug and Play Capability 26 Universal Serial Bus (USB) Interface 26 USB 3.2 Downstream Connector 27 USB-C Connector 27 USB Ports 28 RJ45 Connector (U2422HE Only 29 LCD Monitor Quality and Pixel Policy 31...
Users Guide
Page 4
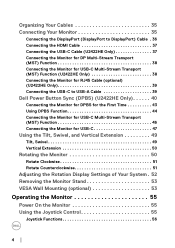
... Dell Power Button Sync (DPBS) (U2422HE Only 40 Connecting the Monitor for DPBS for the First Time 43 Using DPBS Function 44 Connecting the Monitor for USB-C Multi-Stream Transport (MST) Function 46 Connecting the Monitor for USB-C 47 Using the Tilt, Swivel, and Vertical Extension 49 Tilt, Swivel 49 Vertical Extension 50 Rotating the Monitor 50 Rotate Clockwise 51 Rotate Counterclockwise 51 Adjusting the Rotation Display Settings of Your System . 52 Removing the Monitor Stand...
... Dell Power Button Sync (DPBS) (U2422HE Only 40 Connecting the Monitor for DPBS for the First Time 43 Using DPBS Function 44 Connecting the Monitor for USB-C Multi-Stream Transport (MST) Function 46 Connecting the Monitor for USB-C 47 Using the Tilt, Swivel, and Vertical Extension 49 Tilt, Swivel 49 Vertical Extension 50 Rotating the Monitor 50 Rotate Clockwise 51 Rotate Counterclockwise 51 Adjusting the Rotation Display Settings of Your System . 52 Removing the Monitor Stand...
Users Guide
Page 8
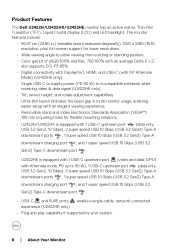
...) Type-C downstream port . • USB-C and RJ45 ports enable a single-cable, network-connected experience (U2422HE only). • Plug and play capability if supported by your system. 8 │ About Your Monitor also supports DCI-P3 85%. • Digital connectivity with DisplayPort, HDMI, and USB-C (with DP Alternate Mode) (U2422HE only). • Single USB-C to supply power (PD 90 W) to a compatible notebook while receiving video & data signal (U2422HE only). • Tilt, swivel, height, and rotate adjustment capabilities. •...
...) Type-C downstream port . • USB-C and RJ45 ports enable a single-cable, network-connected experience (U2422HE only). • Plug and play capability if supported by your system. 8 │ About Your Monitor also supports DCI-P3 85%. • Digital connectivity with DisplayPort, HDMI, and USB-C (with DP Alternate Mode) (U2422HE only). • Single USB-C to supply power (PD 90 W) to a compatible notebook while receiving video & data signal (U2422HE only). • Tilt, swivel, height, and rotate adjustment capabilities. •...

Users Guide
Page 9
... is in Standby Mode. • Optimize eye comfort with TÜV Rheinland at factory reset/default setting mode (Brightness: 75%, Contrast: 75%, CCT: 6500K, Preset mode: Standard) About Your Monitor │ 9 WARNING: The possible long-term effects of blue light emission from the monitor to reduce the amount of set-up and screen optimization. • Power and OSD buttons lock. • Security lock slot. • Stand lock. • < 0.3 W in compliance with a flicker-free screen. The monitor uses low blue light panel and is...
... is in Standby Mode. • Optimize eye comfort with TÜV Rheinland at factory reset/default setting mode (Brightness: 75%, Contrast: 75%, CCT: 6500K, Preset mode: Standard) About Your Monitor │ 9 WARNING: The possible long-term effects of blue light emission from the monitor to reduce the amount of set-up and screen optimization. • Power and OSD buttons lock. • Security lock slot. • Stand lock. • < 0.3 W in compliance with a flicker-free screen. The monitor uses low blue light panel and is...

Users Guide
Page 10
Blinking white light indicates that the monitor is in Standby Mode. 10 │ About Your Monitor Identifying Parts and Controls Front View Front View with Monitor Stand No. Description 1 Power LED indicator Use Solid white light indicates that the monitor is turned on and functioning normally.
Blinking white light indicates that the monitor is in Standby Mode. 10 │ About Your Monitor Identifying Parts and Controls Front View Front View with Monitor Stand No. Description 1 Power LED indicator Use Solid white light indicates that the monitor is turned on and functioning normally.

Users Guide
Page 11
... Dell for technical support. 5 Power On/Off button To turn the monitor on or off. 6 Joystick Use to control the OSD menu. (For more Information, see Operating the Monitor) 7 Cable-management slot Use to organize cables by inserting them through the slot. Back View Back View with Monitor Stand No. behind the attached compatible wall mount kit (100 mm x VESA Cover) 100 mm). 2 Regulatory label Lists the regulatory approvals. 3 Stand release button Releases stand from the monitor...
... Dell for technical support. 5 Power On/Off button To turn the monitor on or off. 6 Joystick Use to control the OSD menu. (For more Information, see Operating the Monitor) 7 Cable-management slot Use to organize cables by inserting them through the slot. Back View Back View with Monitor Stand No. behind the attached compatible wall mount kit (100 mm x VESA Cover) 100 mm). 2 Regulatory label Lists the regulatory approvals. 3 Stand release button Releases stand from the monitor...

Users Guide
Page 13
... supported for the audio line out connector. NOTE: USB-C is not supported on versions of Windows prior to Windows 10. 8 Super speed USB 10 Connect your USB device.** Gbps (USB 3.2 Gen2) NOTE: To use this port, you must connect Type-A downstream the USB-A to USB-C cable (shipped with port (2) your monitor) to the USB-C upstream port (data only) on the monitor and to your computer. 9 Audio line-out port Connect external speakers.* 10 Super speed USB 10 Connect...
... supported for the audio line out connector. NOTE: USB-C is not supported on versions of Windows prior to Windows 10. 8 Super speed USB 10 Connect your USB device.** Gbps (USB 3.2 Gen2) NOTE: To use this port, you must connect Type-A downstream the USB-A to USB-C cable (shipped with port (2) your monitor) to the USB-C upstream port (data only) on the monitor and to your computer. 9 Audio line-out port Connect external speakers.* 10 Super speed USB 10 Connect...

Users Guide
Page 17
... (Fast) 16.7 million colors sRGB 100%, Rec. 709 100%, DCI-P3 85% sRGB & Rec. 709: Delta E < 2 (average) About Your Monitor │ 17 Monitor Specifications Model Screen type Panel technology Aspect ratio Viewable Image Diagonal Width (active area) Height (active area) Total area Pixel pitch Pixel per inch (PPI) Viewing angle Luminance output Contrast ratio Faceplate coating Backlight Response time Color depth Color gamut Calibration accuracy U2422H/U2422HX/U2422HE Active matrix -
... (Fast) 16.7 million colors sRGB 100%, Rec. 709 100%, DCI-P3 85% sRGB & Rec. 709: Delta E < 2 (average) About Your Monitor │ 17 Monitor Specifications Model Screen type Panel technology Aspect ratio Viewable Image Diagonal Width (active area) Height (active area) Total area Pixel pitch Pixel per inch (PPI) Viewing angle Luminance output Contrast ratio Faceplate coating Backlight Response time Color depth Color gamut Calibration accuracy U2422H/U2422HX/U2422HE Active matrix -
Users Guide
Page 21
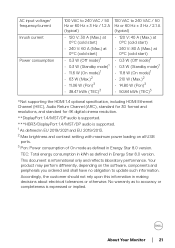
... (TEC)3 *Not supporting the HDMI 1.4 optional specification, including HDMI Ethernet Channel (HEC), Audio Return Channel (ARC), standard for 3D format and resolutions, and standard for 4K digital cinema resolution. **DisplayPort 1.4/MST/DP audio is supported. ***HBR3/DisplayPort 1.4/MST/DP audio is supported. 1 As defined in EU 2019/2021 and EU 2019/2013. 2 Max brightness and contrast setting with maximum power loading on the software, components and peripherals...
... (TEC)3 *Not supporting the HDMI 1.4 optional specification, including HDMI Ethernet Channel (HEC), Audio Return Channel (ARC), standard for 3D format and resolutions, and standard for 4K digital cinema resolution. **DisplayPort 1.4/MST/DP audio is supported. ***HBR3/DisplayPort 1.4/MST/DP audio is supported. 1 As defined in EU 2019/2021 and EU 2019/2013. 2 Max brightness and contrast setting with maximum power loading on the software, components and peripherals...
Users Guide
Page 32
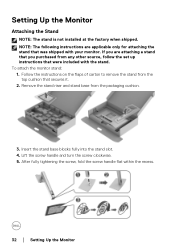
... remove the stand from the packaging cushion. 3. Insert the stand base blocks fully into the stand slot. 4. If you purchased from any other source, follow the set up instructions that were included with your monitor. After fully tightening the screw, fold the screw handle flat within the recess. 32 │ Setting Up the Monitor Setting Up the Monitor Attaching the Stand NOTE: The stand is not installed at the factory...
... remove the stand from the packaging cushion. 3. Insert the stand base blocks fully into the stand slot. 4. If you purchased from any other source, follow the set up instructions that were included with your monitor. After fully tightening the screw, fold the screw handle flat within the recess. 32 │ Setting Up the Monitor Setting Up the Monitor Attaching the Stand NOTE: The stand is not installed at the factory...
Users Guide
Page 40
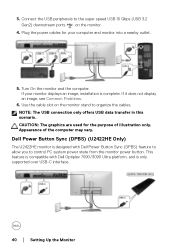
Turn On the monitor and the computer. CAUTION: The graphics are used for your monitor displays an image, installation is only supported over USB-C interface. 40 │ Setting Up the Monitor This feature is compatible with Dell Power Button Sync (DPBS) feature to allow you to organize the cables. If it does not display an image, see Common Problems. 6. NOTE: The USB connection only offers USB data transfer in this scenario. If your computer...
Turn On the monitor and the computer. CAUTION: The graphics are used for your monitor displays an image, installation is only supported over USB-C interface. 40 │ Setting Up the Monitor This feature is compatible with Dell Power Button Sync (DPBS) feature to allow you to organize the cables. If it does not display an image, see Common Problems. 6. NOTE: The USB connection only offers USB data transfer in this scenario. If your computer...

Users Guide
Page 53
... flat table. 2. Remove the stand. (See Removing the Monitor Stand) Setting Up the Monitor │ 53 To remove the stand: 1. VESA Wall Mounting (optional) (Screw dimension: M4 x 10 mm). Press and hold the stand release button. 3. Removing the Monitor Stand NOTE: To prevent scratches on the LCD screen when removing the stand, ensure that come with the VESA-compatible wall mounting kit. 1. Place the monitor panel on a soft cloth or cushion on a soft cloth or cushion. 2. Lift the stand up instructions...
... flat table. 2. Remove the stand. (See Removing the Monitor Stand) Setting Up the Monitor │ 53 To remove the stand: 1. VESA Wall Mounting (optional) (Screw dimension: M4 x 10 mm). Press and hold the stand release button. 3. Removing the Monitor Stand NOTE: To prevent scratches on the LCD screen when removing the stand, ensure that come with the VESA-compatible wall mounting kit. 1. Place the monitor panel on a soft cloth or cushion on a soft cloth or cushion. 2. Lift the stand up instructions...

Users Guide
Page 60
... to reset all settings under the Source Input Source menu to confirm the selection. USB-C 90W Select the USB-C 90W input when you are PC, PC 1, PC 2, Laptop, Laptop 1, and Laptop 2. Color Adjusts the color setting mode. 60 │ Operating the Monitor Press the Joystick to the factory preset values. Auto Select Allows you to USB-C video input when the USB-C cable is On. The default is connected. NOTE: Auto Select for available input sources. NOTE: Input names...
... to reset all settings under the Source Input Source menu to confirm the selection. USB-C 90W Select the USB-C 90W input when you are PC, PC 1, PC 2, Laptop, Laptop 1, and Laptop 2. Color Adjusts the color setting mode. 60 │ Operating the Monitor Press the Joystick to the factory preset values. Auto Select Allows you to USB-C video input when the USB-C cable is On. The default is connected. NOTE: Auto Select for available input sources. NOTE: Input names...
Users Guide
Page 61
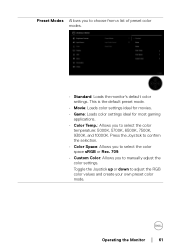
... manually adjust the color settings. Press the Joystick to confirm the selection. • Color Space: Allows you to select the color space sRGB or Rec. 709. • Custom Color: Allows you to adjust the RGB color values and create your own preset color mode. Preset Modes Allows you to select the color temperature: 5000K, 5700K, 6500K, 7500K, 9300K, and 10000K. This is the default preset mode...
... manually adjust the color settings. Press the Joystick to confirm the selection. • Color Space: Allows you to select the color space sRGB or Rec. 709. • Custom Color: Allows you to adjust the RGB color values and create your own preset color mode. Preset Modes Allows you to select the color temperature: 5000K, 5700K, 6500K, 7500K, 9300K, and 10000K. This is the default preset mode...

Users Guide
Page 66
... to set the lock options. The default setting is locked and not accessible by the user. • Menu + Power Buttons: Both the Joystick & the Power Button are locked and not accessible by the user. • Power Button: Only the Power Button is Disable. Lock With the control buttons on the monitor locked, you can also press and hold the Joystick to the up or down or left or right for 4 seconds. Reset Menu • Menu Buttons: All...
... to set the lock options. The default setting is locked and not accessible by the user. • Menu + Power Buttons: Both the Joystick & the Power Button are locked and not accessible by the user. • Power Button: Only the Power Button is Disable. Lock With the control buttons on the monitor locked, you can also press and hold the Joystick to the up or down or left or right for 4 seconds. Reset Menu • Menu Buttons: All...
Users Guide
Page 71
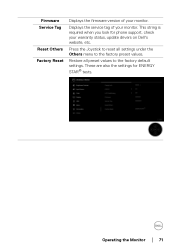
Firmware Service Tag Reset Others Factory Reset Displays the firmware version of your monitor. This string is required when you look for ENERGY STAR® tests. Operating the Monitor │ 71 Press the Joystick to reset all preset values to the factory preset values. Restore all settings under the Others menu to the factory default settings. Displays the service tag of your warranty status, update drivers on Dell's website, etc. These are also the settings for phone support, check your monitor.
Firmware Service Tag Reset Others Factory Reset Displays the firmware version of your monitor. This string is required when you look for ENERGY STAR® tests. Operating the Monitor │ 71 Press the Joystick to reset all preset values to the factory preset values. Restore all settings under the Others menu to the factory default settings. Displays the service tag of your warranty status, update drivers on Dell's website, etc. These are also the settings for phone support, check your monitor.

Users Guide
Page 83
... monitor. 2. Turn on -screen (against a black background), if the monitor cannot sense a video signal and is working correctly. Sel f-test Your monitor provides a self-test feature that allows you to the connected input signal. 4. Turn off both your monitor and reconnect the video cable; The floating dialog box should appear on the monitor. Also, depending upon the selected input, one of the procedures in self-test mode, the power LED remains white. Troubleshooting...
... monitor. 2. Turn on -screen (against a black background), if the monitor cannot sense a video signal and is working correctly. Sel f-test Your monitor provides a self-test feature that allows you to the connected input signal. 4. Turn off both your monitor and reconnect the video cable; The floating dialog box should appear on the monitor. Also, depending upon the selected input, one of the procedures in self-test mode, the power LED remains white. Troubleshooting...

Users Guide
Page 84
... Diagnostics Locking the Power and Joystick Buttons You can lock the Joystick and Power buttons to prevent access to unlock the button(s). 84 │ Troubleshooting To lock the buttons: 1. Select one of the following options: • Menu Buttons: All Joystick functions are locked and not accessible by the user. • Power Buttons: Only the Power Button is locked and not accessible by the user. • Menu + Power Buttons: Both the Joystick & the Power Button are locked and...
... Diagnostics Locking the Power and Joystick Buttons You can lock the Joystick and Power buttons to prevent access to unlock the button(s). 84 │ Troubleshooting To lock the buttons: 1. Select one of the following options: • Menu Buttons: All Joystick functions are locked and not accessible by the user. • Power Buttons: Only the Power Button is locked and not accessible by the user. • Menu + Power Buttons: Both the Joystick & the Power Button are locked and...

Users Guide
Page 89
... • Adjust brightness & contrast controls via OSD. Monitor • Ensure that the video cable malfunctions on & connecting the monitor to the off computer is connected properly and is scrambled or appears torn • Reset the monitor to factory settings. • Perform monitor self-test feature check to determine if the intermittent problem occurs in diagnostics. Screen not • Reset the monitor to factory settings. Brightness Problems Geometric Distortion Horizontal/ Vertical Lines Synchronization Problems Safety Related Issues Intermittent Problems Picture too...
... • Adjust brightness & contrast controls via OSD. Monitor • Ensure that the video cable malfunctions on & connecting the monitor to the off computer is connected properly and is scrambled or appears torn • Reset the monitor to factory settings. • Perform monitor self-test feature check to determine if the intermittent problem occurs in diagnostics. Screen not • Reset the monitor to factory settings. Brightness Problems Geometric Distortion Horizontal/ Vertical Lines Synchronization Problems Safety Related Issues Intermittent Problems Picture too...

Users Guide
Page 91
...; Check whether the signal cable is locked. Product Specific Problems Common Symptoms What You Experience Possible Solutions Screen image is too Image is white are pressed • Check the signal source. No Input Signal No picture, the LED when user controls light is centered on the screen power cord, plug it back, and then turn On the monitor. • Check whether the OSD menu is plugged in diagnostics. fill entire viewing area • Reset the monitor to unlock (for more information, see Lock). Cannot adjust the monitor...
...; Check whether the signal cable is locked. Product Specific Problems Common Symptoms What You Experience Possible Solutions Screen image is too Image is white are pressed • Check the signal source. No Input Signal No picture, the LED when user controls light is centered on the screen power cord, plug it back, and then turn On the monitor. • Check whether the OSD menu is plugged in diagnostics. fill entire viewing area • Reset the monitor to unlock (for more information, see Lock). Cannot adjust the monitor...


