User Guide
Page 9
... of inventoried cartridges: Lower Left Magazine of the rail 4-8 2U library side screws to remove . . . . 4-8 2U library rack anchors and mounting brackets 4-9 Sliding the 2U library into the rack 4-9 Sliding the 4U library into the rack 4-10 Securing the 2U library to the rack 4-10 Securing the 4U library to the rack 4-11 Attaching a SCSI host interface...
... of inventoried cartridges: Lower Left Magazine of the rail 4-8 2U library side screws to remove . . . . 4-8 2U library rack anchors and mounting brackets 4-9 Sliding the 2U library into the rack 4-9 Sliding the 4U library into the rack 4-10 Securing the 2U library to the rack 4-10 Securing the 4U library to the rack 4-11 Attaching a SCSI host interface...
User Guide
Page 62
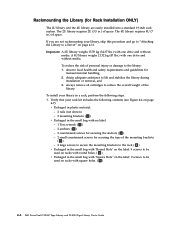
...remove all cartridges to reduce the overall weight of personal injury or damage to the library: 1. To install your library in a rack, perform the following contents (see Figure 4-4 on page 4-7): v Packaged in plastic material: - 2 rails (not shown) - 2 mounting brackets ( 1 ) v Packaged in the ...Library (for Rack Installation ONLY) The 2U library and the 4U library are not rackmounting your library, skip this procedure and go to "Attaching the Library to a Server" on racks with square holes. ( 3 ) 4-6 Dell PowerVault TL2000 Tape Library and TL4000 Tape Library User's Guide The 4U library...
...remove all cartridges to reduce the overall weight of personal injury or damage to the library: 1. To install your library in a rack, perform the following contents (see Figure 4-4 on page 4-7): v Packaged in plastic material: - 2 rails (not shown) - 2 mounting brackets ( 1 ) v Packaged in the ...Library (for Rack Installation ONLY) The 2U library and the 4U library are not rackmounting your library, skip this procedure and go to "Attaching the Library to a Server" on racks with square holes. ( 3 ) 4-6 Dell PowerVault TL2000 Tape Library and TL4000 Tape Library User's Guide The 4U library...
User Guide
Page 63
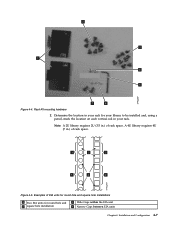
Examples of EIA units for round hole and square hole installations 1 Two EIA units for your library to be installed and, using a pencil, mark the location on each vertical rail in .) of rack space. 1 3 2 1 4 2 a77ug133 Figure 4-5. Note: A 2U library requires 2U (3.5 in your rack for round hole and 2 square hole installation 3 Wide Gaps within the EIA unit 4 Narrow Gaps between EIA units Chapter 4. Determine the location in your rack. Installation and Configuration 4-7 A 4U library requires 4U (7 in.) of rack space. Figure 4-4. Rack Kit mounting hardware 2.
Examples of EIA units for round hole and square hole installations 1 Two EIA units for your library to be installed and, using a pencil, mark the location on each vertical rail in .) of rack space. 1 3 2 1 4 2 a77ug133 Figure 4-5. Note: A 2U library requires 2U (3.5 in your rack for round hole and 2 square hole installation 3 Wide Gaps within the EIA unit 4 Narrow Gaps between EIA units Chapter 4. Determine the location in your rack. Installation and Configuration 4-7 A 4U library requires 4U (7 in.) of rack space. Figure 4-4. Rack Kit mounting hardware 2.
User Guide
Page 64
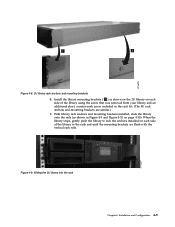
... 2U of the rack. Using the Torx wrench included in your library using the longest counter-sunk screws included in the rack kit. 4-8 Dell PowerVault TL2000 Tape Library and TL4000 Tape Library User's Guide a77ug011 Install the library rack anchors ( 2 ) as shown in Figure 4-8 on page 4-9 on each rail to the rear of rack space ( 1 in your rack type (round...
... 2U of the rack. Using the Torx wrench included in your library using the longest counter-sunk screws included in the rack kit. 4-8 Dell PowerVault TL2000 Tape Library and TL4000 Tape Library User's Guide a77ug011 Install the library rack anchors ( 2 ) as shown in Figure 4-8 on page 4-9 on each rail to the rear of rack space ( 1 in your rack type (round...
User Guide
Page 65
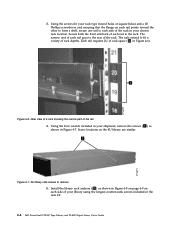
... with the vertical rack rails. Sliding the 2U library into the rack Chapter 4. When the library stops, gently push the library to lock the anchors installed on page 4-10). With library rack anchors and mounting brackets installed, slide the library onto the rails (as shown on the 2U library on each side of the library using the screw that...
... with the vertical rack rails. Sliding the 2U library into the rack Chapter 4. When the library stops, gently push the library to lock the anchors installed on page 4-10). With library rack anchors and mounting brackets installed, slide the library onto the rails (as shown on the 2U library on each side of the library using the screw that...
User Guide
Page 217
... 10-16) and install them in the same positions in the library. Tighten the captive thumbscrews until it from the library. 5. a77ug027 Remove all drives from the defective library (see Figure 10-16), apply conductive tape as it was positioned in the drive slot rails. Ensure that the black pull-out tab remains extended when...
... 10-16) and install them in the same positions in the library. Tighten the captive thumbscrews until it from the library. 5. a77ug027 Remove all drives from the defective library (see Figure 10-16), apply conductive tape as it was positioned in the drive slot rails. Ensure that the black pull-out tab remains extended when...
User Guide
Page 218
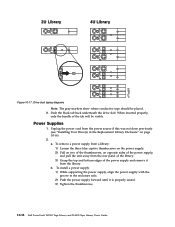
... is properly seated. 3) Tighten the thumbscrews. 10-18 Dell PowerVault TL2000 Tape Library and TL4000 Tape Library User's Guide a. Unplug the power cord from the power source if this was not done previously (see "Installing Your Drive(s) in the enclosure rails. 2) Push the power supply forward until it from the library. To install a power supply: 1) While supporting the power...
... is properly seated. 3) Tighten the thumbscrews. 10-18 Dell PowerVault TL2000 Tape Library and TL4000 Tape Library User's Guide a. Unplug the power cord from the power source if this was not done previously (see "Installing Your Drive(s) in the enclosure rails. 2) Push the power supply forward until it from the library. To install a power supply: 1) While supporting the power...
User Guide
Page 219
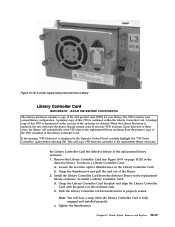
... blue captive thumbscrews on page 10-20) in the enclosure rails. Note: You will hear a snap when the Library Controller Card is properly seated. Tighten the thumbscrews. Install the Library Controller Card from a library Library Controller Card IMPORTANT - To install a Library Controller Card: a. Push the Library Controller Card forward until it is fully engaged and installed properly...
... blue captive thumbscrews on page 10-20) in the enclosure rails. Note: You will hear a snap when the Library Controller Card is properly seated. Tighten the thumbscrews. Install the Library Controller Card from a library Library Controller Card IMPORTANT - To install a Library Controller Card: a. Push the Library Controller Card forward until it is fully engaged and installed properly...
User Guide
Page 223
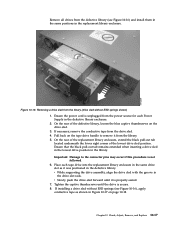
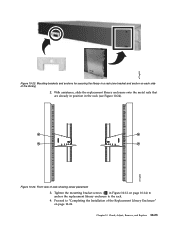
... the rack (see Figure 10-24). Front view of the Replacement Library Enclosure" on page 10-24. Chapter 10. Proceed to the rack. 4. With assistance, slide the replacement library enclosure onto the metal rails that are already in position in a rack (one bracket and anchor on page... 10-14) to anchor the replacement library enclosure to "Completing the Installation of rack showing screw placement 3. a77ug252 Figure...
... the rack (see Figure 10-24). Front view of the Replacement Library Enclosure" on page 10-24. Chapter 10. Proceed to the rack. 4. With assistance, slide the replacement library enclosure onto the metal rails that are already in position in a rack (one bracket and anchor on page... 10-14) to anchor the replacement library enclosure to "Completing the Installation of rack showing screw placement 3. a77ug252 Figure...