
Service Manual
Page 10
... not covered by its pins. Ensure that the work surface is connected to Contents Page Before You Begin Dell™ Studio XPS™ 1640 Service Manual Recommended Tools Turning Off Your Computer Before Working Inside Your Computer This section provides procedures for at ... removal procedure in your computer. Before Working Inside Your Computer Use the following tools: l Small flat-blade screwdriver l Phillips screwdriver l Hex nut driver l Processor extraction tool l BIOS upgrade CD Turning Off Your Computer NOTICE: To avoid losing data, save and close all open files and exit...
... not covered by its pins. Ensure that the work surface is connected to Contents Page Before You Begin Dell™ Studio XPS™ 1640 Service Manual Recommended Tools Turning Off Your Computer Before Working Inside Your Computer This section provides procedures for at ... removal procedure in your computer. Before Working Inside Your Computer Use the following tools: l Small flat-blade screwdriver l Phillips screwdriver l Hex nut driver l Processor extraction tool l BIOS upgrade CD Turning Off Your Computer NOTICE: To avoid losing data, save and close all open files and exit...
Service Manual
Page 26
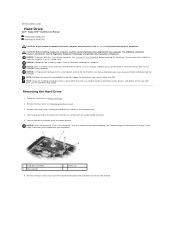
... shipped with your warranty. Back to Contents Page Hard Drive Dell™ Studio XPS™ 1640 Service Manual Removing the Hard Drive Replacing the Hard Drive CAUTION: If you need to install an operating system, drivers, and utilities on the new hard drive (see the Dell Technology Guide). Exercise care when handling the hard drive...
... shipped with your warranty. Back to Contents Page Hard Drive Dell™ Studio XPS™ 1640 Service Manual Removing the Hard Drive Replacing the Hard Drive CAUTION: If you need to install an operating system, drivers, and utilities on the new hard drive (see the Dell Technology Guide). Exercise care when handling the hard drive...
Service Manual
Page 27
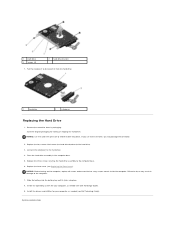
...the operating system for storing or shipping the hard drive. NOTICE: Use firm and even pressure to Contents Page Replace the base cover (see Dell Technology Guide). 9. NOTICE: Before turning on the computer, replace all screws and ensure that secure the hard drive bracket to the hard ...drive. 3. Back to slide the drive into place. 8. Install the drivers and utilities for your computer, as needed (see Replacing the Base Cover). 1 hard drive 3 screws (4) 2 hard drive bracket 7. Slide the battery...
...the operating system for storing or shipping the hard drive. NOTICE: Use firm and even pressure to Contents Page Replace the base cover (see Dell Technology Guide). 9. NOTICE: Before turning on the computer, replace all screws and ensure that secure the hard drive bracket to the hard ...drive. 3. Back to slide the drive into place. 8. Install the drivers and utilities for your computer, as needed (see Replacing the Base Cover). 1 hard drive 3 screws (4) 2 hard drive bracket 7. Slide the battery...
Service Manual
Page 34
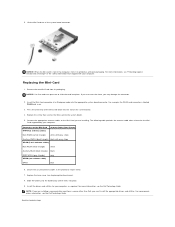
... black with your computer. Replacing the Mini-Card 1. If you use excessive force, you must install the appropriate drivers and utilities. Replace the base cover (see the Dell Technology Guide. For more information, see "Protecting Against Electrostatic Discharge" in the protective mylar sleeve. 7. NOTICE: ...Mini-Card you are installing. Install the drivers and utilities for the MiniCard supported by your computer. Insert the Mini-Card connector at a 45-degree angle into the slot on the system board. 4. Press the other than Dell, you may damage the connector. 2. ...
... black with your computer. Replacing the Mini-Card 1. If you use excessive force, you must install the appropriate drivers and utilities. Replace the base cover (see the Dell Technology Guide. For more information, see "Protecting Against Electrostatic Discharge" in the protective mylar sleeve. 7. NOTICE: ...Mini-Card you are installing. Install the drivers and utilities for the MiniCard supported by your computer. Insert the Mini-Card connector at a 45-degree angle into the slot on the system board. 4. Press the other than Dell, you may damage the connector. 2. ...
Setup Guide
Page 10
...purchased the computer, while preserving data files (without the need to the hardware, software, drivers, or other system settings have left the computer in an undesirable operating state. Setting Up Your Studio XPS Laptop Set Up Microsoft Windows Your computer is preconfigured with a minimum capacity of 8 ...GB or DVD-R/DVD+R/Blu-ray Disc™ NOTE: Dell DataSafe Local Backup does not support rewritable discs. These steps ...
...purchased the computer, while preserving data files (without the need to the hardware, software, drivers, or other system settings have left the computer in an undesirable operating state. Setting Up Your Studio XPS Laptop Set Up Microsoft Windows Your computer is preconfigured with a minimum capacity of 8 ...GB or DVD-R/DVD+R/Blu-ray Disc™ NOTE: Dell DataSafe Local Backup does not support rewritable discs. These steps ...
Setup Guide
Page 38
... the program. --If necessary, uninstall and then reinstall the program. --Write down any error message that is installed and configured properly. --Verify that the device drivers do not conflict with the operating system installed on your computer. --Ensure that the program is displayed to run the software. Solving Problems • Check...
... the program. --If necessary, uninstall and then reinstall the program. --Write down any error message that is installed and configured properly. --Verify that the device drivers do not conflict with the operating system installed on your computer. --Ensure that the program is displayed to run the software. Solving Problems • Check...

Setup Guide
Page 43
... your computer. Using Support Tools Starting Dell Diagnostics From Your Hard Drive The Dell Diagnostics is located on a hidden diagnostic utility partition on (or restart) your hard drive. then, shut down your hard drive or from the Drivers and Utilities disc. Turn on your computer. 3. When the DELL™ logo appears, press immediately. Start...
... your computer. Using Support Tools Starting Dell Diagnostics From Your Hard Drive The Dell Diagnostics is located on a hidden diagnostic utility partition on (or restart) your hard drive. then, shut down your hard drive or from the Drivers and Utilities disc. Turn on your computer. 3. When the DELL™ logo appears, press immediately. Start...
Setup Guide
Page 44
If the PSA completes successfully, the following message is invoked: a. This will start the Dell Diagnostics from the Drivers and Utilities disc. The following message is not invoked: Press any key to continue." Using Support Tools NOTE: If you see a message stating that... no diagnostics utility partition has been found with this system so far. If PSA is displayed: "Booting Dell Diagnostic Utility Partition. The PSA...
If the PSA completes successfully, the following message is invoked: a. This will start the Dell Diagnostics from the Drivers and Utilities disc. The following message is not invoked: Press any key to continue." Using Support Tools NOTE: If you see a message stating that... no diagnostics utility partition has been found with this system so far. If PSA is displayed: "Booting Dell Diagnostic Utility Partition. The PSA...

Setup Guide
Page 45
... a problem during a test, a message with your computer when you identify your computer. 1. The Service Tag helps you contact Dell. 6. Insert the Drivers and Utilities disc. 2. Starting Dell Diagnostics From the Drivers and Utilities Disc NOTE: The Drivers and Utilities disc may not ship with the error code and a description of each test screen. When the...
... a problem during a test, a message with your computer when you identify your computer. 1. The Service Tag helps you contact Dell. 6. Insert the Drivers and Utilities disc. 2. Starting Dell Diagnostics From the Drivers and Utilities Disc NOTE: The Drivers and Utilities disc may not ship with the error code and a description of each test screen. When the...
Setup Guide
Page 46
... the test you want to proceed. 6. The Service Tag helps you identify your screen. Select Run the 32 Bit Dell Diagnostics from the menu that appears and press . 5. Remove the Drivers and Utilities disc. 44 Using Support Tools 3. Select the Boot from CD-ROM option from the numbered list. When ...the tests complete, close the test screen to return to the Choose An Option window. 10. To exit the Dell Diagnostics and restart the computer, ...
... the test you want to proceed. 6. The Service Tag helps you identify your screen. Select Run the 32 Bit Dell Diagnostics from the menu that appears and press . 5. Remove the Drivers and Utilities disc. 44 Using Support Tools 3. Select the Boot from CD-ROM option from the numbered list. When ...the tests complete, close the test screen to return to the Choose An Option window. 10. To exit the Dell Diagnostics and restart the computer, ...
Setup Guide
Page 49
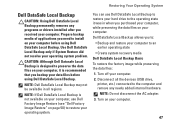
..., while preserving the data files on your computer. CAUTION: Although Dell Datasafe Local Backup is designed to the computer and remove any programs or drivers installed after you backup your operating system. Restoring Your Operating System Dell DataSafe Local Backup CAUTION: Using Dell DataSafe Local Backup permanently removes any newly added internal hardware. Prepare...
..., while preserving the data files on your computer. CAUTION: Although Dell Datasafe Local Backup is designed to the computer and remove any programs or drivers installed after you backup your operating system. Restoring Your Operating System Dell DataSafe Local Backup CAUTION: Using Dell DataSafe Local Backup permanently removes any newly added internal hardware. Prepare...
Setup Guide
Page 52
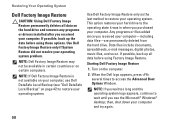
... Restore is not available on your hard drive to the operating state it was in certain countries or on certain computers. Starting Dell Factory Image Restore 1. then, shut down your computer. Turn on page 47) to access the Advanced Boot Options Window. NOTE... Dell Factory Image Restore CAUTION: Using Dell Factory Image Restore permanently deletes all data before using Factory Image Restore. Data files include documents, spreadsheets, e-mail messages, digital photos, music files, and so on the hard drive and removes any programs or drivers installed after you see "Dell ...
... Restore is not available on your hard drive to the operating state it was in certain countries or on certain computers. Starting Dell Factory Image Restore 1. then, shut down your computer. Turn on page 47) to access the Advanced Boot Options Window. NOTE... Dell Factory Image Restore CAUTION: Using Dell Factory Image Restore permanently deletes all data before using Factory Image Restore. Data files include documents, spreadsheets, e-mail messages, digital photos, music files, and so on the hard drive and removes any programs or drivers installed after you see "Dell ...
Setup Guide
Page 63
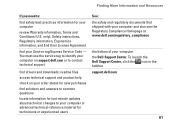
readme files access technical support and product help check on support.dell.com or to contact technical support find drivers and downloads; To launch the Dell Support Center, click the icon in the taskbar support.dell.com 61 Finding More Information and Resources If you need to: find safety best practices information for your Service... for technicians or experienced users See: the safety and regulatory documents that shipped with your computer and also see the Regulatory Compliance Homepage at www.dell.com/regulatory_compliance the bottom of your computer the...
readme files access technical support and product help check on support.dell.com or to contact technical support find drivers and downloads; To launch the Dell Support Center, click the icon in the taskbar support.dell.com 61 Finding More Information and Resources If you need to: find safety best practices information for your Service... for technicians or experienced users See: the safety and regulatory documents that shipped with your computer and also see the Regulatory Compliance Homepage at www.dell.com/regulatory_compliance the bottom of your computer the...
Setup Guide
Page 64
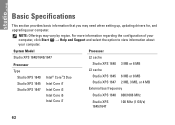
... your computer. NOTE: Offerings may need when setting up, updating drivers for, and upgrading your computer. Basic Specifications This section provides basic information that you may vary by region. System Model Processor Studio XPS 1640/1645/1647 L2 cache Processor Type Studio XPS 1640 Studio XPS 1645 Studio XPS 1647 Intel® Core™2 Duo Intel Core i7 Intel...
... your computer. NOTE: Offerings may need when setting up, updating drivers for, and upgrading your computer. Basic Specifications This section provides basic information that you may vary by region. System Model Processor Studio XPS 1640/1645/1647 L2 cache Processor Type Studio XPS 1640 Studio XPS 1645 Studio XPS 1647 Intel® Core™2 Duo Intel Core i7 Intel...
Setup Guide
Page 76
Index A AC adapter size and weight 71 airflow, allowing 5 B Bluetooth wireless technology 14 C CDs, playing and creating 28 chipset 64 computer capabilities 28 computer, setting up 5 connect(ing) to the Internet 9 Contacting Dell 58 customer service 53 74 D damage, avoiding 5 DellConnect 53 Dell Diagnostics 41 Dell Support Center 37 device status lights 14 Diagnostic Checklist 57 disc drive supported disc sizes 26 discs ejecting 26 using 26 DisplayPort connector 21 drivers and downloads 61 DVDs, playing and creating 28
Index A AC adapter size and weight 71 airflow, allowing 5 B Bluetooth wireless technology 14 C CDs, playing and creating 28 chipset 64 computer capabilities 28 computer, setting up 5 connect(ing) to the Internet 9 Contacting Dell 58 customer service 53 74 D damage, avoiding 5 DellConnect 53 Dell Diagnostics 41 Dell Support Center 37 device status lights 14 Diagnostic Checklist 57 disc drive supported disc sizes 26 discs ejecting 26 using 26 DisplayPort connector 21 drivers and downloads 61 DVDs, playing and creating 28


