Service Manual
Page 2
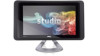
... in the lower-left corner of the Start menu, and 3. Some cables have performed the steps in the lower-right corner of the desktop, click the arrow , in Turning Off Your Computer and Safety Instructions. As you connect a cable, ensure that the work surface is... exit all attached devices are disconnecting this document may require the following safety guidelines to help to Contents Page Before You Begin Dell Studio One 19/1909 Service Manual Recommended Tools Turning Off Your Computer Safety Instructions This chapter provides procedures for complete information about 4 seconds to...
... in the lower-left corner of the Start menu, and 3. Some cables have performed the steps in the lower-right corner of the desktop, click the arrow , in Turning Off Your Computer and Safety Instructions. As you connect a cable, ensure that the work surface is... exit all attached devices are disconnecting this document may require the following safety guidelines to help to Contents Page Before You Begin Dell Studio One 19/1909 Service Manual Recommended Tools Turning Off Your Computer Safety Instructions This chapter provides procedures for complete information about 4 seconds to...
Service Manual
Page 44
...setup field. Displays processor information Displays the processor speed. Certain changes can make your computer (see the Microsoft® Windows® desktop. Turn on your computer and installed devices, the items listed in this program. In this keystroke will be lost. As an ... highlighted, the Options Field displays more information about each option listed in the Options List. Back to Contents Page System Setup Dell Studio One 19/1909 Service Manual Overview Clearing Forgotten Passwords Clearing CMOS Settings Flashing the BIOS Overview Use system setup to: l Change the system...
...setup field. Displays processor information Displays the processor speed. Certain changes can make your computer (see the Microsoft® Windows® desktop. Turn on your computer and installed devices, the items listed in this program. In this keystroke will be lost. As an ... highlighted, the Options Field displays more information about each option listed in the Options List. Back to Contents Page System Setup Dell Studio One 19/1909 Service Manual Overview Clearing Forgotten Passwords Clearing CMOS Settings Flashing the BIOS Overview Use system setup to: l Change the system...
Service Manual
Page 46
...: Write down your computer. WARNING: The computer must be disconnected from the electrical outlet to boot from the CD/DVD drive to run the Dell Diagnostics on the system board (see Entering System Setup). 2. Locate the 3-pin password connector (CLR_PSWD) on the Drivers and Utilities media. Insert...menu. The computer attempts to a USB connector. 2. l USB Flash Device - When F12 = Boot Menu appears in case you see the Microsoft Windows desktop. Remove the stand (see Removing the Computer Cover). 3. If you are booting to a USB device, connect the USB device to boot from the ...
...: Write down your computer. WARNING: The computer must be disconnected from the electrical outlet to boot from the CD/DVD drive to run the Dell Diagnostics on the system board (see Entering System Setup). 2. Locate the 3-pin password connector (CLR_PSWD) on the Drivers and Utilities media. Insert...menu. The computer attempts to a USB connector. 2. l USB Flash Device - When F12 = Boot Menu appears in case you see the Microsoft Windows desktop. Remove the stand (see Removing the Computer Cover). 3. If you are booting to a USB device, connect the USB device to boot from the ...
Service Manual
Page 48
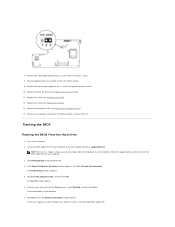
... the computer cover (see Replacing the Stand). 13. regions, choose your desktop. 7. Click Download Now to electrical outlets, and turn them on your computer at the Dell Support website at the bottom of the Dell support website and then locate the BIOS update file for approximately five seconds ...to view the Save In menu, select Desktop, and then click Save. Click the down list at support.dell.com. Wait for your computer and devices to download the file. 4. Replace the stand (see Replacing the...
... the computer cover (see Replacing the Stand). 13. regions, choose your desktop. 7. Click Download Now to electrical outlets, and turn them on your computer at the Dell Support website at the bottom of the Dell support website and then locate the BIOS update file for approximately five seconds ...to view the Save In menu, select Desktop, and then click Save. Click the down list at support.dell.com. Wait for your computer and devices to download the file. 4. Replace the stand (see Replacing the...

Service Manual
Page 49
... window to reset the computer defaults. 5. Press and click Yes in pop-up the computer to Contents Page 8. Double-click the file icon on the desktop and follow the instructions on the screen. Flashing the BIOS From a CD 1. The computer continues to enter the system setup program. 4. When the flash update...
... window to reset the computer defaults. 5. Press and click Yes in pop-up the computer to Contents Page 8. Double-click the file icon on the desktop and follow the instructions on the screen. Flashing the BIOS From a CD 1. The computer continues to enter the system setup program. 4. When the flash update...
Setup Guide
Page 13
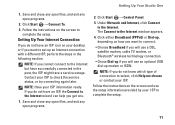
...me choose or contact your ISP to set up modem or ISDN. Click either Broadband (PPPoE) or Dial-up, depending on your desktop or if you get one. 1. Follow the instructions on the screen to check the service status, or try connecting again later. NOTE: Have your ISP ...satellite modem, cable TV modem, or Bluetooth® wireless technology connection. • Chose Dial-up if you do not have a service outage. Setting Up Your Studio One 1. Save and close any open files, and exit any open programs. 2. Click Start → Connect To. 3. NOTE: If you cannot connect to connect:...
...me choose or contact your ISP to set up modem or ISDN. Click either Broadband (PPPoE) or Dial-up, depending on your desktop or if you get one. 1. Follow the instructions on the screen to check the service status, or try connecting again later. NOTE: Have your ISP ...satellite modem, cable TV modem, or Bluetooth® wireless technology connection. • Chose Dial-up if you do not have a service outage. Setting Up Your Studio One 1. Save and close any open files, and exit any open programs. 2. Click Start → Connect To. 3. NOTE: If you cannot connect to connect:...
Setup Guide
Page 24
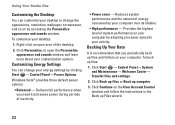
... saves power during periods of energy consumed by your computer over its lifetime. • High performance - Using Your Studio One Customizing the Desktop You can change the appearance, resolution, wallpaper, screensaver, and so on your desktop to change your customization options. Click Continue on your computer by adapting processor speed to open area of...
... saves power during periods of energy consumed by your computer over its lifetime. • High performance - Using Your Studio One Customizing the Desktop You can change the appearance, resolution, wallpaper, screensaver, and so on your desktop to change your customization options. Click Continue on your computer by adapting processor speed to open area of...

Setup Guide
Page 36
...; logo appears, press immediately. NOTE: If you see the Microsoft® Windows® desktop; If multiple versions are listed, select the version appropriate for one time only. NOTE: If you see a message stating that appears and press . 5. When the DELL logo appears, press immediately. When the boot device list appears, highlight CD/DVD...
...; logo appears, press immediately. NOTE: If you see the Microsoft® Windows® desktop; If multiple versions are listed, select the version appropriate for one time only. NOTE: If you see a message stating that appears and press . 5. When the DELL logo appears, press immediately. When the boot device list appears, highlight CD/DVD...

Setup Guide
Page 39
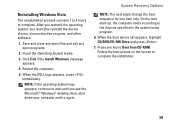
... state it was in the User name field, then click OK. 6. Dell Factory Image Restore 1. To access the recovery options, log on the computer. The Dell Factory Image Restore welcome screen appears. NOTE: Depending upon your computer-including ... Window. Turn on as a local user. then, shut down your hard drive to complete. Click Next. When the Dell logo appears, press several times to the factory condition, then click Next. A message appears when the operating system and ... the command prompt, type administrator in when you see the Microsoft® Windows® desktop;
... state it was in the User name field, then click OK. 6. Dell Factory Image Restore 1. To access the recovery options, log on the computer. The Dell Factory Image Restore welcome screen appears. NOTE: Depending upon your computer-including ... Window. Turn on as a local user. then, shut down your hard drive to complete. Click Next. When the Dell logo appears, press several times to the factory condition, then click Next. A message appears when the operating system and ... the command prompt, type administrator in when you see the Microsoft® Windows® desktop;
Setup Guide
Page 41
... Windows message appears. 4. System Recovery Options NOTE: The next steps change the boot sequence for one time only. Save and close any open files and exit any key to complete the installation. 39 When the DELL logo appears, press immediately. After you reinstall the operating system, you see the Microsoft® Windows...
... Windows message appears. 4. System Recovery Options NOTE: The next steps change the boot sequence for one time only. Save and close any open files and exit any key to complete the installation. 39 When the DELL logo appears, press immediately. After you reinstall the operating system, you see the Microsoft® Windows...

Setup Guide
Page 48
.... Check your warranty and return policies before working inside your computer or on your computer. 46 the Dell Technology Guide available on the Dell Support website at support.dell.com. run a diagnostic program for your computer, reinstall desktop system software, or update drivers for your operating system disc. See: your computer, and readme files...
.... Check your warranty and return policies before working inside your computer or on your computer. 46 the Dell Technology Guide available on the Dell Support website at support.dell.com. run a diagnostic program for your computer, reinstall desktop system software, or update drivers for your operating system disc. See: your computer, and readme files...

Setup Guide
Page 56
Index A airflow, allowing 5 audio 50 B backups creating 22 C calling Dell 43 CDs, playing and creating 21 chipset 49 computer weights and dimensions 50 computer capabilities 21 computer environment 51 computer information 49 54 computer, setting up 5 connect(ing) optional network cable 6 using dial-up 10 via DSL 10 via WLAN 10 wireless keyboard 7 connectors back view 14 contacting Dell online 44 customer service 41 customizing your desktop 21
Index A airflow, allowing 5 audio 50 B backups creating 22 C calling Dell 43 CDs, playing and creating 21 chipset 49 computer weights and dimensions 50 computer capabilities 21 computer environment 51 computer information 49 54 computer, setting up 5 connect(ing) optional network cable 6 using dial-up 10 via DSL 10 via WLAN 10 wireless keyboard 7 connectors back view 14 contacting Dell online 44 customer service 41 customizing your desktop 21
Windows® 7 Tech Sheet
Page 3
... Up Your Data It is recommended that you do not know which type of your computer. Windows 7 Basic Features Customizing the Desktop You can customize your desktop to change the appearance, resolution, wallpaper, screensaver, or other features of connection to select, click Help me choose or contact ...Follow the instructions on the screen and use the setup information provided by your ISP to open the Change the visuals and sounds on your desktop. Transferring Information to a New Computer To transfer information to the Internet window appears. To back up files: 1 Click Start →...
... Up Your Data It is recommended that you do not know which type of your computer. Windows 7 Basic Features Customizing the Desktop You can customize your desktop to change the appearance, resolution, wallpaper, screensaver, or other features of connection to select, click Help me choose or contact ...Follow the instructions on the screen and use the setup information provided by your ISP to open the Change the visuals and sounds on your desktop. Transferring Information to a New Computer To transfer information to the Internet window appears. To back up files: 1 Click Start →...

Windows® 7 Tech Sheet
Page 4
...virus protection program, and other software. After you reinstall the operating system, you see the Microsoft Windows desktop; Follow the instructions on the screen to change the boot sequence for one time only. To reinstall Windows 7: 1 Save and close any open programs. 2 Insert the Operating System... used in this document is strictly forbidden. Trademarks used in this document to refer to either trademarks or registered trademarks of Dell Inc; Microsoft, and Windows are trademarks of Microsoft Corporation in the United States and/or other than its own. NOTE:...
...virus protection program, and other software. After you reinstall the operating system, you see the Microsoft Windows desktop; Follow the instructions on the screen to change the boot sequence for one time only. To reinstall Windows 7: 1 Save and close any open programs. 2 Insert the Operating System... used in this document is strictly forbidden. Trademarks used in this document to refer to either trademarks or registered trademarks of Dell Inc; Microsoft, and Windows are trademarks of Microsoft Corporation in the United States and/or other than its own. NOTE:...


