
User's Guide
Page 1
... change without the written permission of the U.S. disclaims any proprietary interest in any manner whatsoever without notice. © 2009 Dell Inc. Dell™ SX2210T Flat Panel Monitor User's Guide About Your Monitor Setting Up the Monitor Operating the Monitor Troubleshooting Appendix Notes, Notices, and Cautions NOTE: A NOTE indicates important information that this product meets the ENERGY STAR...
... change without the written permission of the U.S. disclaims any proprietary interest in any manner whatsoever without notice. © 2009 Dell Inc. Dell™ SX2210T Flat Panel Monitor User's Guide About Your Monitor Setting Up the Monitor Operating the Monitor Troubleshooting Appendix Notes, Notices, and Cautions NOTE: A NOTE indicates important information that this product meets the ENERGY STAR...
User's Guide
Page 2
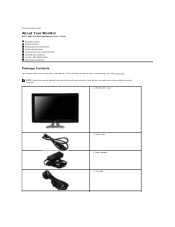
Back to Contents Page About Your Monitor Dell™ SX2210T Flat Panel Monitor User's Guide Package Contents Product Features Identifying Parts and Controls Monitor Specifications Universal Serial Bus (USB) Interface Plug and Play Capability Camera - MIC Specifications Maintenance Guidelines Package Contents Your monitor comes with your monitor. NOTE: Some items may not ship with all the items. If...
Back to Contents Page About Your Monitor Dell™ SX2210T Flat Panel Monitor User's Guide Package Contents Product Features Identifying Parts and Controls Monitor Specifications Universal Serial Bus (USB) Interface Plug and Play Capability Camera - MIC Specifications Maintenance Guidelines Package Contents Your monitor comes with your monitor. NOTE: Some items may not ship with all the items. If...
User's Guide
Page 3
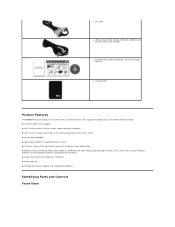
The monitor features include: ■ 21.5 inches (546.8 mm) diagonal. ■ 1920 X 1080 resolution, plus full-screen support for lower resolutions. ■ Touch sensitive-detects your finger ...; Energy Saver feature for ease of set-up stream cable (enables USB ports, Webcam and touch function on the monitor) l Documentation (Safety Information, Quick Start Guide, and CD) l Cleaning cloth Product Features The SX2210T flat panel display has an active matrix, thin-film transistor (TFT), liquid crystal display (LCD). Identifying Parts and...
The monitor features include: ■ 21.5 inches (546.8 mm) diagonal. ■ 1920 X 1080 resolution, plus full-screen support for lower resolutions. ■ Touch sensitive-detects your finger ...; Energy Saver feature for ease of set-up stream cable (enables USB ports, Webcam and touch function on the monitor) l Documentation (Safety Information, Quick Start Guide, and CD) l Cleaning cloth Product Features The SX2210T flat panel display has an active matrix, thin-film transistor (TFT), liquid crystal display (LCD). Identifying Parts and...
User's Guide
Page 4
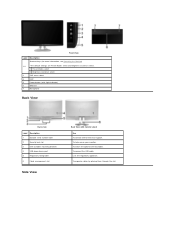
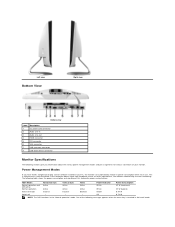
... connect the USB cable. Lists the regulatory approvals. Front View Label Description Shortcut keys (for more information, see Operating the Monitor) *The default settings are Preset Modes select and Brightness/Contrast select. 1-2 1 Preset Modes select 2 Brightness/Contrast select ... number label 2 Security lock slot 3 Dell soundbar mounting brackets 4 USB downstream port 5 Regulatory rating label 6 Cable management slot Side View Back View with monitor stand Use To contact Dell for technical support. To attach the optional Dell Soundbar. To organize cables by placing them...
... connect the USB cable. Lists the regulatory approvals. Front View Label Description Shortcut keys (for more information, see Operating the Monitor) *The default settings are Preset Modes select and Brightness/Contrast select. 1-2 1 Preset Modes select 2 Brightness/Contrast select ... number label 2 Security lock slot 3 Dell soundbar mounting brackets 4 USB downstream port 5 Regulatory rating label 6 Cable management slot Side View Back View with monitor stand Use To contact Dell for technical support. To attach the optional Dell Soundbar. To organize cables by placing them...
User's Guide
Page 5
... key is referred to as Power Save Mode. If the computer detects input from keyboard, mouse, or other input devices, the monitor automatically resumes functioning. The following table shows the power consumption and signaling of this automatic power saving feature: VESA Modes Normal operation ...Switch off mode. Power Management Modes If you information about the various power management modes and pin assignments for various connectors of your PC, the monitor can automatically reduce its power consumption when not in use. This is touched in Active-off - - - Off 0.74 W NOTE: The ...
... key is referred to as Power Save Mode. If the computer detects input from keyboard, mouse, or other input devices, the monitor automatically resumes functioning. The following table shows the power consumption and signaling of this automatic power saving feature: VESA Modes Normal operation ...Switch off mode. Power Management Modes If you information about the various power management modes and pin assignments for various connectors of your PC, the monitor can automatically reduce its power consumption when not in use. This is touched in Active-off - - - Off 0.74 W NOTE: The ...
User's Guide
Page 6
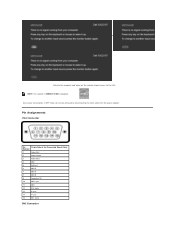
or Activate the computer and 'wake up' the monitor to gain access to the OSD. NOTE: This monitor is ENERGY STAR®-compliant. Zero power consumption in OFF mode can only be achieved by disconnecting the main cable from the power adapter. Pin Assignments VGA Connector Pin 15-pin Side of the Connected Signal Cable Number 1 Video-Red 2 Video-Green 3 Video-Blue 4 GND 5 Self-test 6 GND-R 7 GND-G 8 GND-B 9 Computer 5V 10 GND-sync 11 GND 12 DDC data 13 H-sync 14 V-sync 15 DDC clock DVI Connector
or Activate the computer and 'wake up' the monitor to gain access to the OSD. NOTE: This monitor is ENERGY STAR®-compliant. Zero power consumption in OFF mode can only be achieved by disconnecting the main cable from the power adapter. Pin Assignments VGA Connector Pin 15-pin Side of the Connected Signal Cable Number 1 Video-Red 2 Video-Green 3 Video-Blue 4 GND 5 Self-test 6 GND-R 7 GND-G 8 GND-B 9 Computer 5V 10 GND-sync 11 GND 12 DDC data 13 H-sync 14 V-sync 15 DDC clock DVI Connector
User's Guide
Page 8
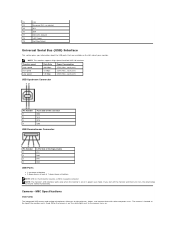
...power save mode. 13 CEC 14 Reserved (N.C. Camera - MIC Specifications Overview The integrated USB camera and analog microphones allow you turn off the monitor and then turn it on, the attached peripherals may take pictures, videos, and communicate with other computer users. The camera is located at...4 4-Pin Side of the Signal Cable VCC DMD DPD GND USB Ports l 1 upstream at bottom l 2 downstream at back & 1 downstream at the top of your monitor. When the camera is fixed. on device) 15 SCL 16 SDA 17 DDC/CEC Ground 18 +5V Power 19 Hot Plug Detect Universal Serial Bus...
...power save mode. 13 CEC 14 Reserved (N.C. Camera - MIC Specifications Overview The integrated USB camera and analog microphones allow you turn off the monitor and then turn it on, the attached peripherals may take pictures, videos, and communicate with other computer users. The camera is located at...4 4-Pin Side of the Signal Cable VCC DMD DPD GND USB Ports l 1 upstream at bottom l 2 downstream at back & 1 downstream at the top of your monitor. When the camera is fixed. on device) 15 SCL 16 SDA 17 DDC/CEC Ground 18 +5V Power 19 Hot Plug Detect Universal Serial Bus...
User's Guide
Page 9
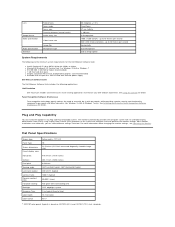
...port or a USB 2.0 hub with external power supply Dell Webcam Software Suite The Dell Webcam Software Suite includes the following applications: Dell TouchCam Dell TouchCam enables convenient access to all exciting applications to Grey) 16.7 mil colors 83%* * SX2210T color gamut (typical) is based on CIE1976 (83%)...system with hard-coating (3H) CCFL edgelight system 2 ms typical (Grey to enhance your Dell webcam experience. Flat Panel Specifications Screen type Active matrix - Most monitor installations are the minimum system requirements for Windows Vista® or Windows 7 only). up...
...port or a USB 2.0 hub with external power supply Dell Webcam Software Suite The Dell Webcam Software Suite includes the following applications: Dell TouchCam Dell TouchCam enables convenient access to all exciting applications to Grey) 16.7 mil colors 83%* * SX2210T color gamut (typical) is based on CIE1976 (83%)...system with hard-coating (3H) CCFL edgelight system 2 ms typical (Grey to enhance your Dell webcam experience. Flat Panel Specifications Screen type Active matrix - Most monitor installations are the minimum system requirements for Windows Vista® or Windows 7 only). up...
User's Guide
Page 11
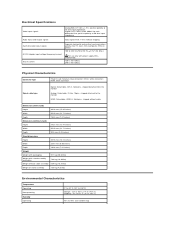
HDMI, Black connector Signal cable type Digital: Detachable, DVI-D, Solid pins, shipped detached from the monitor Analog: Detachable, D-Sub, 15pins, shipped attached to the monitor HDMI: Detachable, HDMI-A, Solid pins, shipped without cable Dimensions (with stand) Height 401.8 mm (15.82 inches) Width ...Width 228.7 mm (9.00 inches) Depth 193.4 mm (7.61 inches) Weight Weight with packaging 9.11 kg (20.04 lbs) Weight with power supply DELL, DA65NS4-00. 120 V: 30 A (Max.) 240 V: 60 A (Max.) Physical Characteristics Connector type 15-pin D-sub miniature, blue connector; Electrical...
HDMI, Black connector Signal cable type Digital: Detachable, DVI-D, Solid pins, shipped detached from the monitor Analog: Detachable, D-Sub, 15pins, shipped attached to the monitor HDMI: Detachable, HDMI-A, Solid pins, shipped without cable Dimensions (with stand) Height 401.8 mm (15.82 inches) Width ...Width 228.7 mm (9.00 inches) Depth 193.4 mm (7.61 inches) Weight Weight with packaging 9.11 kg (20.04 lbs) Weight with power supply DELL, DA65NS4-00. 120 V: 30 A (Max.) 240 V: 60 A (Max.) Physical Characteristics Connector type 15-pin D-sub miniature, blue connector; Electrical...

User's Guide
Page 12
...Thermal dissipation Storage: 20% to 80% (non-condensing) Shipping: 20% to Contents Page Avoid wiping the top corners of any scratch on the monitor will show scuff marks. Do not use the supplied soft, clean cloth. For best practices, follow the safety instructions before cleaning the... monitor. Avoid using detergent of the monitor where the optics are located. Back to 80% (non-condensing) 3,657.60 m (12,000 ft) max 12,192 m (40,000 ft) max...
...Thermal dissipation Storage: 20% to 80% (non-condensing) Shipping: 20% to Contents Page Avoid wiping the top corners of any scratch on the monitor will show scuff marks. Do not use the supplied soft, clean cloth. For best practices, follow the safety instructions before cleaning the... monitor. Avoid using detergent of the monitor where the optics are located. Back to 80% (non-condensing) 3,657.60 m (12,000 ft) max 12,192 m (40,000 ft) max...
User's Guide
Page 13
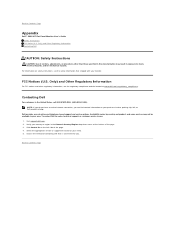
...FCC Notices (U.S. NOTE: If you do not have an active Internet connection, you . Choose the method of contacting Dell that shipped with your monitor. Visit support.dell.com. 2. Select the appropriate service or support link based on the left side of the page. 3. Back ... compliance website located at the bottom of the page. 4. Dell provides several online and telephone-based support and service options. For information on your need. 5. Back to Contents Page Appendix Dell™ SX2210T Flat Panel Monitor User's Guide Safety Instructions FCC Notice (U.S. Click Contact Us ...
...FCC Notices (U.S. NOTE: If you do not have an active Internet connection, you . Choose the method of contacting Dell that shipped with your monitor. Visit support.dell.com. 2. Select the appropriate service or support link based on the left side of the page. 3. Back ... compliance website located at the bottom of the page. 4. Dell provides several online and telephone-based support and service options. For information on your need. 5. Back to Contents Page Appendix Dell™ SX2210T Flat Panel Monitor User's Guide Safety Instructions FCC Notice (U.S. Click Contact Us ...

User's Guide
Page 14
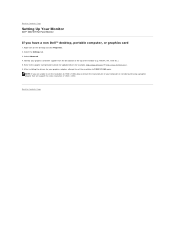
NOTE: If you have a Dell™ desktop or a Dell™ portable computer with internet access 1. Go to http://support.dell.com, enter your service tag, and download the latest driver for your graphics card. 2. Back to Contents Page After installing the drivers for your graphics Adapter, attempt to set the resolution to 1920 x 1080, please contact Dell™ to inquire about a graphics Adapter that supports these resolutions. Back to Contents Page Setting Up Your Monitor Dell™ SX2210T Flat Panel Monitor If you are unable to set the resolution to 1920 X 1080 again.
NOTE: If you have a Dell™ desktop or a Dell™ portable computer with internet access 1. Go to http://support.dell.com, enter your service tag, and download the latest driver for your graphics card. 2. Back to Contents Page After installing the drivers for your graphics Adapter, attempt to set the resolution to 1920 x 1080, please contact Dell™ to inquire about a graphics Adapter that supports these resolutions. Back to Contents Page Setting Up Your Monitor Dell™ SX2210T Flat Panel Monitor If you are unable to set the resolution to 1920 X 1080 again.
User's Guide
Page 15
... computer, or graphics card 1. Identify your graphics adapter, attempt to set the resolution to Contents Page Refer to Contents Page Setting Up Your Monitor Dell™ SX2210T Flat Panel Monitor If you are unable to set the resolution to 1920 X 1080 again. After installing the drivers for example, http://www.ATI.com OR http...
... computer, or graphics card 1. Identify your graphics adapter, attempt to set the resolution to Contents Page Refer to Contents Page Setting Up Your Monitor Dell™ SX2210T Flat Panel Monitor If you are unable to set the resolution to 1920 X 1080 again. After installing the drivers for example, http://www.ATI.com OR http...
User's Guide
Page 16
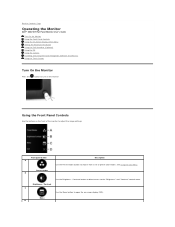
.... Front panel button A Preset modes B Description Use the Preset modes button to the "Brightness" and "Contrast" control menu. Back to Contents Page Operating the Monitor Dell™ SX2210T Flat Panel Monitor User's Guide Turn On the Monitor Using the Front Panel Controls Using the On-Screen Display (OSD) Menu Setting the Maximum Resolution Using the...
.... Front panel button A Preset modes B Description Use the Preset modes button to the "Brightness" and "Contrast" control menu. Back to Contents Page Operating the Monitor Dell™ SX2210T Flat Panel Monitor User's Guide Turn On the Monitor Using the Front Panel Controls Using the On-Screen Display (OSD) Menu Setting the Maximum Resolution Using the...

User's Guide
Page 17
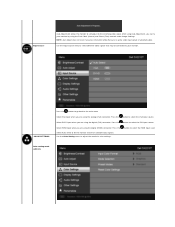
The changes are also saved if you change the settings and then wait for the OSD menu to exit on the side of the monitor to adjust (increase ranges) items in the OSD menu. Use the OK button to the main menu. Using the On-Screen Display (OSD) Menu Accessing ...the Menu System NOTE: If you change the settings and then either proceed to another menu or exit the OSD menu, the monitor automatically saves the changes. Use the back button to go back to confirm your selection. Exit Front panel button Use the buttons on -screen display...
The changes are also saved if you change the settings and then wait for the OSD menu to exit on the side of the monitor to adjust (increase ranges) items in the OSD menu. Use the OK button to the main menu. Using the On-Screen Display (OSD) Menu Accessing ...the Menu System NOTE: If you change the settings and then either proceed to another menu or exit the OSD menu, the monitor automatically saves the changes. Use the back button to go back to confirm your selection. Exit Front panel button Use the buttons on -screen display...

User's Guide
Page 18
... activate automatic setup and adjust menu. Use this button to decrease brightness (min 0 ~ max 100). To select the highlighted item on a black screen as the monitor self adjusts to another, the option name is highlighted. 3. Select the to return to previous menu without accepting current settings or to accept and return.../CONTRAST Use the Brightness and Contrast menu to previous menu. Press the button to increase contrast and press the button to the indicators on the monitor screen.
... activate automatic setup and adjust menu. Use this button to decrease brightness (min 0 ~ max 100). To select the highlighted item on a black screen as the monitor self adjusts to another, the option name is highlighted. 3. Select the to return to previous menu without accepting current settings or to accept and return.../CONTRAST Use the Brightness and Contrast menu to previous menu. Press the button to increase contrast and press the button to the indicators on the monitor screen.
User's Guide
Page 19
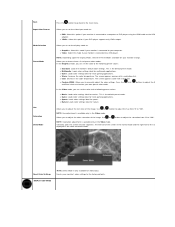
Input Source Auto Adjustment allows the monitor to self-adjust to select the HDMI input source. Select HDMI input when you are using the analog (...signal. Select Auto select to select the VGA input source. Press the button to let the monitor search for available input signals. Press the button to adjust the monitor's color settings. Use the Color Setting menu to select the DVI input source. Use the Input... while there are using the digital (DVI) connector. Select DVI-D input when you can further tune your monitor. COLOR SETTINGS Press the button to go back to your...
Input Source Auto Adjustment allows the monitor to self-adjust to select the HDMI input source. Select HDMI input when you are using the analog (...signal. Select Auto select to select the VGA input source. Press the button to let the monitor search for available input signals. Press the button to adjust the monitor's color settings. Use the Color Setting menu to select the DVI input source. Use the Input... while there are using the digital (DVI) connector. Select DVI-D input when you can further tune your monitor. COLOR SETTINGS Press the button to go back to your...
User's Guide
Page 20
... settings. DISPLAY SETTINGS NOTE: Depending upon the Display Mode, select the Preset Modes available for multimedia applications. l Video: Select this option if your monitor change. Use or button to a DVD player. Use or button to adjust the hue from '0' to the main menu. This is connected to adjust... Mode Selection Preset Mode Hue Saturation Demo Mode Press the button to go back to '100'. l YPbPr: Select this mode if your monitor is connected to a computer or DVD player using the HDMI cable or the HDMI to adjust the color saturation of preset color modes.
... settings. DISPLAY SETTINGS NOTE: Depending upon the Display Mode, select the Preset Modes available for multimedia applications. l Video: Select this option if your monitor change. Use or button to a DVD player. Use or button to adjust the hue from '0' to the main menu. This is connected to adjust... Mode Selection Preset Mode Hue Saturation Demo Mode Press the button to go back to '100'. l YPbPr: Select this mode if your monitor is connected to a computer or DVD player using the HDMI cable or the HDMI to adjust the color saturation of preset color modes.
User's Guide
Page 21
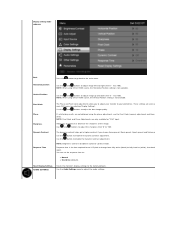
... and buttons to your preference. Pixel Clock Phase Sharpness Dynamic Contrast Response Time The Phase and Pixel Clock adjustments allow you to adjust your monitor to adjust image left and right (min 0 ~ max 100). If satisfactory results are accessed through the main OSD menu, by selecting ...'Display Settings'. Reset Display Settings AUDIO SETTINGS Resets the monitor's display settings to the main menu. NOTE: When using DVI or HDMI source, the Vertical Position setting is the time required for an ...
... and buttons to your preference. Pixel Clock Phase Sharpness Dynamic Contrast Response Time The Phase and Pixel Clock adjustments allow you to adjust your monitor to adjust image left and right (min 0 ~ max 100). If satisfactory results are accessed through the main OSD menu, by selecting ...'Display Settings'. Reset Display Settings AUDIO SETTINGS Resets the monitor's display settings to the main menu. NOTE: When using DVI or HDMI source, the Vertical Position setting is the time required for an ...
User's Guide
Page 22
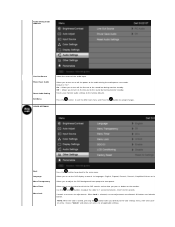
...Exit Menu OTHER SETTINGS Select the source of six languages: English, Espanol, Francais, Deutsch, Simplified Chinese or Japanese. Off - Resets your monitor audio settings to all applicable settings. Use the and buttons to adjust the slider in 1 second increments, from opaque to the sound bar during... monitor standby. Allows you to adjust the OSD background from 5 to accept changes. On - Press the button to exit the OSD main ...
...Exit Menu OTHER SETTINGS Select the source of six languages: English, Espanol, Francais, Deutsch, Simplified Chinese or Japanese. Off - Resets your monitor audio settings to all applicable settings. Use the and buttons to adjust the slider in 1 second increments, from opaque to the sound bar during... monitor standby. Allows you to adjust the OSD background from 5 to accept changes. On - Press the button to exit the OSD main ...


