

Users Guide
Page 3
... Parts and Controls 9 Front View 9 Back View 10 Side View 11 Bottom View 12 Monitor Specifications 13 Resolution Specifications 14 Supported Video Modes 14 Preset Display Modes 15 Electrical Specifications 15 Physical Characteristics 16 Environmental Characteristics 17 Power Management Modes 18 Pin Assignments 20 Plug and Play Capability 23 Universal Serial Bus (USB) Interface 23 USB 3.0 Upstream Connector 24 USB 3.0 Downstream Connector 24 USB 2.0 Downstream Connector 25 USB Ports 25 LCD Monitor Quality and Pixel Policy 26 Maintenance Guidelines 26 Cleaning Your Monitor...
... Parts and Controls 9 Front View 9 Back View 10 Side View 11 Bottom View 12 Monitor Specifications 13 Resolution Specifications 14 Supported Video Modes 14 Preset Display Modes 15 Electrical Specifications 15 Physical Characteristics 16 Environmental Characteristics 17 Power Management Modes 18 Pin Assignments 20 Plug and Play Capability 23 Universal Serial Bus (USB) Interface 23 USB 3.0 Upstream Connector 24 USB 3.0 Downstream Connector 24 USB 2.0 Downstream Connector 25 USB Ports 25 LCD Monitor Quality and Pixel Policy 26 Maintenance Guidelines 26 Cleaning Your Monitor...

Users Guide
Page 4
... Stand 27 Connecting Your Monitor 29 Connecting the VGA cable 29 Connecting the HDMI cable 29 Connecting the DisplayPort (DP to DP) cable (optional 30 Connecting the USB 3.0 cable 30 Organizing Your Cables 31 Removing the Monitor Stand 32 Wall Mounting (Optional 33 Operating the Monitor 34 Power On the Monitor 34 Using the Front-Panel Controls 34 Front-Panel Button 35 Using the On-Screen Display (OSD) Menu 36 Accessing the Menu System 36 OSD Warning Message 49 Setting the Maximum Resolution 51 Using the Tilt, Swivel, and Vertical...
... Stand 27 Connecting Your Monitor 29 Connecting the VGA cable 29 Connecting the HDMI cable 29 Connecting the DisplayPort (DP to DP) cable (optional 30 Connecting the USB 3.0 cable 30 Organizing Your Cables 31 Removing the Monitor Stand 32 Wall Mounting (Optional 33 Operating the Monitor 34 Power On the Monitor 34 Using the Front-Panel Controls 34 Front-Panel Button 35 Using the On-Screen Display (OSD) Menu 36 Accessing the Menu System 36 OSD Warning Message 49 Setting the Maximum Resolution 51 Using the Tilt, Swivel, and Vertical...

Users Guide
Page 8
... lower resolutions. • Color gamut of 72% NTSC. • Tilt, swivel, height, and rotate adjustment capabilities. • Removable stand and Video Electronics Standards Association (VESA™) 100 mm mounting holes for flexible mounting solutions. • Digital connectivity with DisplayPort and HDMI. • Equipped with 1 USB upstream port and 4 USB downstream ports. • Plug and play capability if supported by your system. • On-Screen Display (OSD) adjustments for ease of set-up and screen optimization. • Security lock...
... lower resolutions. • Color gamut of 72% NTSC. • Tilt, swivel, height, and rotate adjustment capabilities. • Removable stand and Video Electronics Standards Association (VESA™) 100 mm mounting holes for flexible mounting solutions. • Digital connectivity with DisplayPort and HDMI. • Equipped with 1 USB upstream port and 4 USB downstream ports. • Plug and play capability if supported by your system. • On-Screen Display (OSD) adjustments for ease of set-up and screen optimization. • Security lock...

Users Guide
Page 12
...the USB ports on the monitor and to the monitor using a M3 x 6 mm screw (screw not included). Connect the USB cable (shipped with your monitor) to this port, you must connect the USB cable (shipped with your monitor) to the USB-upstream port on your computer with DP cable. (cable not included) To lock the stand to your computer with VGA cable. Connect USB device. Bottom View Bottom view without monitor stand Label 1 2 Description Power cable connector HDMI port 3 DisplayPort 4 Stand lock feature 5 VGA connector 6 USB upstream port 7 USB downstream port Use Connect the power...
...the USB ports on the monitor and to the monitor using a M3 x 6 mm screw (screw not included). Connect the USB cable (shipped with your monitor) to this port, you must connect the USB cable (shipped with your monitor) to the USB-upstream port on your computer with DP cable. (cable not included) To lock the stand to your computer with VGA cable. Connect USB device. Bottom View Bottom view without monitor stand Label 1 2 Description Power cable connector HDMI port 3 DisplayPort 4 Stand lock feature 5 VGA connector 6 USB upstream port 7 USB downstream port Use Connect the power...
Users Guide
Page 14
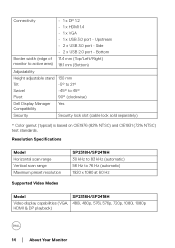
...playback) 14 │ About Your Monitor Connectivity • 1 x DP 1.2 • 1 x HDMI 1.4 • 1 x VGA • 1 x USB 3.0 port - Upstream • 2 x USB 3.0 port - Side • 2 x USB 2.0 port - Resolution Specifications Model Horizontal scan range Vertical scan range Maximum preset resolution Supported Video Modes SP2318H/SP2418H 30 kHz to 83 kHz (automatic) 56 Hz to 45° Pivot 90° (clockwise) Dell Display Manager Yes Compatibility Security Security lock slot (cable lock sold separately) * Color gamut (typical) is based on CIE1976 (82% NTSC) and CIE1931...
...playback) 14 │ About Your Monitor Connectivity • 1 x DP 1.2 • 1 x HDMI 1.4 • 1 x VGA • 1 x USB 3.0 port - Upstream • 2 x USB 3.0 port - Side • 2 x USB 2.0 port - Resolution Specifications Model Horizontal scan range Vertical scan range Maximum preset resolution Supported Video Modes SP2318H/SP2418H 30 kHz to 83 kHz (automatic) 56 Hz to 45° Pivot 90° (clockwise) Dell Display Manager Yes Compatibility Security Security lock slot (cable lock sold separately) * Color gamut (typical) is based on CIE1976 (82% NTSC) and CIE1931...

Users Guide
Page 18
... Power Save Mode*. SP2318H VESA Horizontal Vertical Modes Sync Sync Video Power Power Indicator Consumption Normal Active operation Active Active White 38 W (maximum)** 18 W (typical) Active-off Inactive mode Inactive Blanked White Less than (blinking) 0.3 W Switch off Inactive - Power Management Modes If you have VESA's DPM™ compliance display card or software installed in your PC, the monitor can automatically reduce its power consumption when not in use. The following table shows the power consumption and signaling of this automatic power saving...
... Power Save Mode*. SP2318H VESA Horizontal Vertical Modes Sync Sync Video Power Power Indicator Consumption Normal Active operation Active Active White 38 W (maximum)** 18 W (typical) Active-off Inactive mode Inactive Blanked White Less than (blinking) 0.3 W Switch off Inactive - Power Management Modes If you have VESA's DPM™ compliance display card or software installed in your PC, the monitor can automatically reduce its power consumption when not in use. The following table shows the power consumption and signaling of this automatic power saving...
Users Guide
Page 30
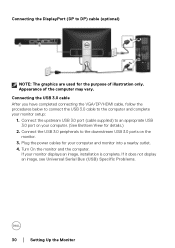
... downstream USB 3.0 ports on your computer. (See Bottom View for details.) 2. If it does not display an image, see Universal Serial Bus (USB) Specific Problems. 30 │ Setting Up the Monitor Connecting the DisplayPort (DP to DP) cable (optional) NOTE: The graphics are used for your computer and monitor into a nearby outlet. 4. Connect the upstream USB 3.0 port (cable supplied) to the computer and complete your monitor displays an image, installation is complete. If your monitor setup: 1.
... downstream USB 3.0 ports on your computer. (See Bottom View for details.) 2. If it does not display an image, see Universal Serial Bus (USB) Specific Problems. 30 │ Setting Up the Monitor Connecting the DisplayPort (DP to DP) cable (optional) NOTE: The graphics are used for your computer and monitor into a nearby outlet. 4. Connect the upstream USB 3.0 port (cable supplied) to the computer and complete your monitor displays an image, installation is complete. If your monitor setup: 1.

Users Guide
Page 35
... the Monitor │ 35 Shortcut key/ Input Source 3 Use the MENU button to the previous menu. Use the Back button to go back to the main menu or exit the OSD main menu. Use the Down button to adjust the image settings. See Menu Accessing the Menu System. 4 Use this button to choose from a list of the monitor to adjust (decrease ranges) items in the OSD menu. A blinking white light indicates the power save mode. Front-Panel Button Use the buttons on the front of video signals that...
... the Monitor │ 35 Shortcut key/ Input Source 3 Use the MENU button to the previous menu. Use the Back button to go back to the main menu or exit the OSD main menu. Use the Down button to adjust the image settings. See Menu Accessing the Menu System. 4 Use this button to choose from a list of the monitor to adjust (decrease ranges) items in the OSD menu. A blinking white light indicates the power save mode. Front-Panel Button Use the buttons on the front of video signals that...
Users Guide
Page 41
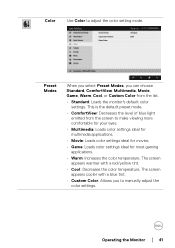
...; Standard: Loads the monitor's default color settings. The screen appears warmer with a blue tint. • Custom Color: Allows you can choose Standard, ComfortView, Multimedia, Movie, Game, Warm, Cool, or Custom Color from the screen to adjust the color setting mode. The screen appears cooler with a red/yellow tint. • Cool: Decreases the color temperature. Color Use Color to make viewing more comfortable for your eyes. • Multimedia: Loads color settings ideal for multimedia...
...; Standard: Loads the monitor's default color settings. The screen appears warmer with a blue tint. • Custom Color: Allows you can choose Standard, ComfortView, Multimedia, Movie, Game, Warm, Cool, or Custom Color from the screen to adjust the color setting mode. The screen appears cooler with a red/yellow tint. • Cool: Decreases the color temperature. Color Use Color to make viewing more comfortable for your eyes. • Multimedia: Loads color settings ideal for multimedia...

Users Guide
Page 44
... best image quality. NOTE: Dynamic Contrast provides higher contrast if you to set the Response Time to adjust for "VGA" input. Minimum is '0' (-). Allows you select Game or Movie preset mode. Sharpness This feature can make the image look sharper or softer. Pixel Clock Use or to adjust the sharpness from '0' to adjust the image left or right. Horizontal Use or to '100'. Vertical Position Use or to Wide 16:9, 4:3, or 5:4. NOTE: Horizontal Position...
... best image quality. NOTE: Dynamic Contrast provides higher contrast if you to set the Response Time to adjust for "VGA" input. Minimum is '0' (-). Allows you select Game or Movie preset mode. Sharpness This feature can make the image look sharper or softer. Pixel Clock Use or to adjust the sharpness from '0' to adjust the image left or right. Horizontal Use or to '100'. Vertical Position Use or to Wide 16:9, 4:3, or 5:4. NOTE: Horizontal Position...

Users Guide
Page 46
... Display Rotation. Transparency Select this option to one of the eight languages (English, Spanish, French, German, Brazilian Portuguese, Russian, Simplified Chinese, or Japanese). Only hard unlock (press and hold the button beside the power button for which the OSD remains active after you press a button on the monitor. Reset Menu Reset all OSD settings to adjustments. Lock Controls user access to the factory preset values. 46 │ Operating the Monitor All buttons...
... Display Rotation. Transparency Select this option to one of the eight languages (English, Spanish, French, German, Brazilian Portuguese, Russian, Simplified Chinese, or Japanese). Only hard unlock (press and hold the button beside the power button for which the OSD remains active after you press a button on the monitor. Reset Menu Reset all OSD settings to adjustments. Lock Controls user access to the factory preset values. 46 │ Operating the Monitor All buttons...
Users Guide
Page 52
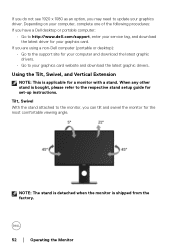
Tilt, Swivel With the stand attached to update your graphics driver. Using the Tilt, Swivel, and Vertical Extension NOTE: This is applicable for your service tag, and download the latest driver for a monitor with a stand. If you do not see 1920 x 1080 as an option, you may need to the monitor, you can tilt and swivel the monitor for the most comfortable viewing angle. If you have a Dell desktop...
Tilt, Swivel With the stand attached to update your graphics driver. Using the Tilt, Swivel, and Vertical Extension NOTE: This is applicable for your service tag, and download the latest driver for a monitor with a stand. If you do not see 1920 x 1080 as an option, you may need to the monitor, you can tilt and swivel the monitor for the most comfortable viewing angle. If you have a Dell desktop...

Users Guide
Page 56
... your computer and the monitor. 2. Troubleshooting WARNING: Before you to check whether your monitor is working correctly. Sel f-Test Your monitor provides a self-test feature that allows you begin any of the procedures in self-test mode, the power LED remains white. Turn off both your monitor and computer are properly connected but the monitor screen remains dark, run the monitor self-test by performing the...
... your computer and the monitor. 2. Troubleshooting WARNING: Before you to check whether your monitor is working correctly. Sel f-Test Your monitor provides a self-test feature that allows you begin any of the procedures in self-test mode, the power LED remains white. Turn off both your monitor and computer are properly connected but the monitor screen remains dark, run the monitor self-test by performing the...

Users Guide
Page 57
... the monitor. To run the built-in diagnostics only when the video cable is unplugged and the monitor is functioning properly. then turn On both your monitor and reconnect the video cable; Unplug the video cable(s) from the back of the screen). 2. Ensure that helps you determine if the screen abnormality you use the previous procedure, check your video controller and computer, because your computer and video card. Troubleshooting │...
... the monitor. To run the built-in diagnostics only when the video cable is unplugged and the monitor is functioning properly. then turn On both your monitor and reconnect the video cable; Unplug the video cable(s) from the back of the screen). 2. Ensure that helps you determine if the screen abnormality you use the previous procedure, check your video controller and computer, because your computer and video card. Troubleshooting │...

Users Guide
Page 58
...; Ensure that the power button is pressed fully. • Ensure that the power outlet is functioning properly using the built-in green, blue, black, white, and text screens. The test is selected in the Input Source menu. 58 │ Troubleshooting Check the video card and computer. Repeat steps 5 and 6 to red. 6. To exit, press Button 1 again. Press and hold Button 1 on the front panel again. Inspect the display for 5 seconds. If...
...; Ensure that the power button is pressed fully. • Ensure that the power outlet is functioning properly using the built-in green, blue, black, white, and text screens. The test is selected in the Input Source menu. 58 │ Troubleshooting Check the video card and computer. Repeat steps 5 and 6 to red. 6. To exit, press Button 1 again. Press and hold Button 1 on the front panel again. Inspect the display for 5 seconds. If...
Users Guide
Page 59
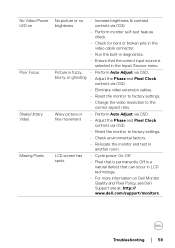
... Video Missing Pixels No picture or no • Increase brightness & contrast brightness controls via OSD. No Video/Power LED on Dell Monitor Quality and Pixel Policy, see Dell Support site at: http:// www.de l l.com/support/monitors. Troubleshooting │ 59 Picture is fuzzy, • Perform Auto Adjust via OSD. • Perform monitor self-test feature check. • Check for bent or broken pins in the video cable connector. • Run the built-in diagnostics. • Ensure that the correct input source...
... Video Missing Pixels No picture or no • Increase brightness & contrast brightness controls via OSD. No Video/Power LED on Dell Monitor Quality and Pixel Policy, see Dell Support site at: http:// www.de l l.com/support/monitors. Troubleshooting │ 59 Picture is fuzzy, • Perform Auto Adjust via OSD. • Perform monitor self-test feature check. • Check for bent or broken pins in the video cable connector. • Run the built-in diagnostics. • Ensure that the correct input source...
Users Guide
Page 60
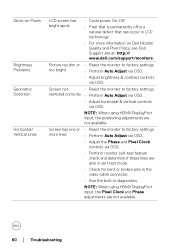
... Picture too dim or • Reset the monitor to factory settings. centered correctly • Perform Auto Adjust via OSD. • Adjust horizontal & vertical controls via OSD. too bright • Perform Auto Adjust via OSD. • Adjust brightness & contrast controls via OSD. Screen has one or • Reset the monitor to factory settings. Screen not • Reset the monitor to factory settings. NOTE: When using HDMI/DisplayPort input, the Pixel Clock and Phase adjustments are also in self-test mode. • Check for bent or broken pins in the video cable connector...
... Picture too dim or • Reset the monitor to factory settings. centered correctly • Perform Auto Adjust via OSD. • Adjust horizontal & vertical controls via OSD. too bright • Perform Auto Adjust via OSD. • Adjust brightness & contrast controls via OSD. Screen has one or • Reset the monitor to factory settings. Screen not • Reset the monitor to factory settings. NOTE: When using HDMI/DisplayPort input, the Pixel Clock and Phase adjustments are also in self-test mode. • Check for bent or broken pins in the video cable connector...

Users Guide
Page 61
... mode. Monitor • Ensure that the video cable connecting the monitor to the computer is connected properly and is secure. • Check for bent or broken pins in the video cable connector. • Restart the computer in the safe mode. Synchronization Problems Safety Related Issues Intermittent Problems Missing Color Screen is scrambled or appears torn • Reset the monitor to factory settings. • Perform Auto Adjust via OSD. • Adjust the Phase and Pixel Clock controls...
... mode. Monitor • Ensure that the video cable connecting the monitor to the computer is connected properly and is secure. • Check for bent or broken pins in the video cable connector. • Restart the computer in the safe mode. Synchronization Problems Safety Related Issues Intermittent Problems Missing Color Screen is scrambled or appears torn • Reset the monitor to factory settings. • Perform Auto Adjust via OSD. • Adjust the Phase and Pixel Clock controls...

Users Guide
Page 62
...; Troubleshooting Cannot adjust the monitor with the buttons on the front panel OSD does not appear on the screen • Turn Off the monitor, unplug the power cord, plug it back, and then turn off the monitor at all times when not in the Display menu OSD. • Reset the monitor to factory settings. Wrong Color Picture color not good Image retention from a static image left on the monitor for more information, see Power Management Modes). • Alternatively, use (for...
...; Troubleshooting Cannot adjust the monitor with the buttons on the front panel OSD does not appear on the screen • Turn Off the monitor, unplug the power cord, plug it back, and then turn off the monitor at all times when not in the Display menu OSD. • Reset the monitor to factory settings. Wrong Color Picture color not good Image retention from a static image left on the monitor for more information, see Power Management Modes). • Alternatively, use (for...

Users Guide
Page 63
... Experience USB peripherals are pressed • Check the signal source. NOTE: When choosing HDMI/DP mode, the Auto Adjust function will not be available. Re-plug the signal cable if necessary. • Reset the computer or video player. Universal Serial Bus (USB) Specific Problems Specific Symptoms USB interface is plugged in diagnostics. Troubleshooting │ 63 The picture does not fill the entire screen The picture cannot • Due to your monitor is white are not working Possible...
... Experience USB peripherals are pressed • Check the signal source. NOTE: When choosing HDMI/DP mode, the Auto Adjust function will not be available. Re-plug the signal cable if necessary. • Reset the computer or video player. Universal Serial Bus (USB) Specific Problems Specific Symptoms USB interface is plugged in diagnostics. Troubleshooting │ 63 The picture does not fill the entire screen The picture cannot • Due to your monitor is white are not working Possible...


