User's Guide
Page 1
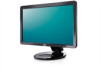
... loss of data and tells you make better use of these materials in trademarks and trade names other countries. Information in this document is strictly forbidden. A02 Dell™ SP2309W Flat Panel Monitor User's Guide About Your Monitor Setting Up the Monitor Operating the Monitor Troubleshooting Appendix Notes, Notices, and Cautions NOTE: A NOTE indicates important information that helps you how to avoid the problem. Dell Inc.
... loss of data and tells you make better use of these materials in trademarks and trade names other countries. Information in this document is strictly forbidden. A02 Dell™ SP2309W Flat Panel Monitor User's Guide About Your Monitor Setting Up the Monitor Operating the Monitor Troubleshooting Appendix Notes, Notices, and Cautions NOTE: A NOTE indicates important information that helps you how to avoid the problem. Dell Inc.

User's Guide
Page 3
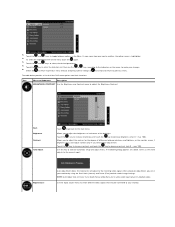
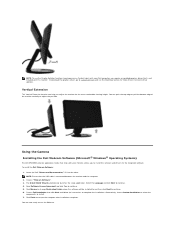
... flexible mounting solutions. ■ Plug and play capability if supported by your system. ■ On-Screen Display (OSD) adjustments for ease of set-up stream cable (enables the USB ports on the monitor) l USB down stream cable (optional) l Documentation (Safety Information, Quick Start Guide and CD) Product Features The SP2309W flat panel display has an active matrix, thin-film transistor (TFT), liquid crystal display (LCD). Identifying Parts and Controls Front View Front View Label Description 1 Power Control (Touch Sensor) 2 Capacitive touch...
... flexible mounting solutions. ■ Plug and play capability if supported by your system. ■ On-Screen Display (OSD) adjustments for ease of set-up stream cable (enables the USB ports on the monitor) l USB down stream cable (optional) l Documentation (Safety Information, Quick Start Guide and CD) Product Features The SP2309W flat panel display has an active matrix, thin-film transistor (TFT), liquid crystal display (LCD). Identifying Parts and Controls Front View Front View Label Description 1 Power Control (Touch Sensor) 2 Capacitive touch...

User's Guide
Page 5
... main cable from keyboard, mouse, or other input devices, the monitor automatically resumes functioning. or Activate the computer and 'wake up' the monitor to gain access to as If the computer detects input from the monitor. Bottom view Label Description 1 AC power cord connector 2 HDMI connector 3 DVI connector 4 VGA connector 5 Audio Line-in 6 Audio Line-out 7 USB upstream port 8 USB downstream ports(2) Monitor Specifications The following sections give you have VESA's compliance display card or software installed in your monitor.
... main cable from keyboard, mouse, or other input devices, the monitor automatically resumes functioning. or Activate the computer and 'wake up' the monitor to gain access to as If the computer detects input from the monitor. Bottom view Label Description 1 AC power cord connector 2 HDMI connector 3 DVI connector 4 VGA connector 5 Audio Line-in 6 Audio Line-out 7 USB upstream port 8 USB downstream ports(2) Monitor Specifications The following sections give you have VESA's compliance display card or software installed in your monitor.
User's Guide
Page 14
Identify your computer or consider purchasing a graphics adapter that will support the video resolution of the window (e.g. Refer to the graphic card provider website for updated driver (for your graphics adapter, attempt to set the resolution to Contents Page Select Advanced. 4. After installing the drivers for example, http://www.ATI.com OR http://www.NVIDIA.com ). 6. Select the Settings tab. 3. Right-click on the desktop...
Identify your computer or consider purchasing a graphics adapter that will support the video resolution of the window (e.g. Refer to the graphic card provider website for updated driver (for your graphics adapter, attempt to set the resolution to Contents Page Select Advanced. 4. After installing the drivers for example, http://www.ATI.com OR http://www.NVIDIA.com ). 6. Select the Settings tab. 3. Right-click on the desktop...
User's Guide
Page 15
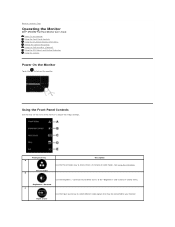
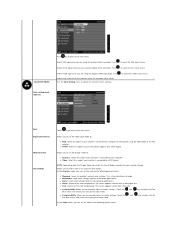
...Contrast" control menu. See Using the OSD Menu. Use the Brightness / Contrast key to direct access to your monitor. Front panel Key A Preset modes B Description Use the Preset modes key to adjust the image settings. Back to Contents Page Operating the Monitor Dell™ SP2309W Flat Panel Monitor User's Guide Power On the Monitor Using the Front Panel Controls Using the On-Screen Display (OSD) Menu Setting the Optimal Resolution Using the Dell Soundbar (Optional) Using the Tilt, Swivel, and Vertical Extension Using the Camera Power On the Monitor Touch the to turn on the monitor Using...
...Contrast" control menu. See Using the OSD Menu. Use the Brightness / Contrast key to direct access to your monitor. Front panel Key A Preset modes B Description Use the Preset modes key to adjust the image settings. Back to Contents Page Operating the Monitor Dell™ SP2309W Flat Panel Monitor User's Guide Power On the Monitor Using the Front Panel Controls Using the On-Screen Display (OSD) Menu Setting the Optimal Resolution Using the Dell Soundbar (Optional) Using the Tilt, Swivel, and Vertical Extension Using the Camera Power On the Monitor Touch the to turn on the monitor Using...
User's Guide
Page 17
... brightness or luminance of the backlight. Touch the key to enter the slide bar and then use the or key, according to the indicators on the menu touch the again. 4. Touch the key to increase contrast and touch the key to make your monitor by using the Pixel Clock (Coarse) and Phase (Fine) controls under Image Settings. Use the Input Source menu to select different video signals that may be connected to adjust the contrast...
... brightness or luminance of the backlight. Touch the key to enter the slide bar and then use the or key, according to the indicators on the menu touch the again. 4. Touch the key to increase contrast and touch the key to make your monitor by using the Pixel Clock (Coarse) and Phase (Fine) controls under Image Settings. Use the Input Source menu to select different video signals that may be connected to adjust the contrast...
User's Guide
Page 18
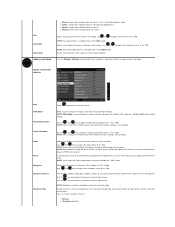
...: Increase the color temperature. Allows you are using the digital (HDMI) connector. COLOR SETTINGS Push to go back to select the VGA input source. This is the default preset mode. l Game: Loads color settings ideal for your own preset color mode. The screen appears warmer with a blue tint. l Cool: Decreases the color temperature. Touch the and keys to adjust the Red, Green, and Blue values and create your monitor change. l Custom (sRGB): Allows you are using the analog (VGA) connector.
...: Increase the color temperature. Allows you are using the digital (HDMI) connector. COLOR SETTINGS Push to go back to select the VGA input source. This is the default preset mode. l Game: Loads color settings ideal for your own preset color mode. The screen appears warmer with a blue tint. l Cool: Decreases the color temperature. Touch the and keys to adjust the Red, Green, and Blue values and create your monitor change. l Custom (sRGB): Allows you are using the analog (VGA) connector.
User's Guide
Page 19
... not available at video resolutions greater than 2048x1152. Allows you to specific area of the image. Display setting mode submenu Back Wide Mode Horizontal position Vertical Position Zoom Phase Sharpness Dynamic Contrast Response Time Touch to go back to enable the Dynamic Contrast adjustment. NOTE: Wide Mode is the default preset mode. NOTE: Brightness control is available only in to change from DVD players (YPbPr color space). NOTE: Saturation adjustment is disabled in the Video mode. Allows you to...
... not available at video resolutions greater than 2048x1152. Allows you to specific area of the image. Display setting mode submenu Back Wide Mode Horizontal position Vertical Position Zoom Phase Sharpness Dynamic Contrast Response Time Touch to go back to enable the Dynamic Contrast adjustment. NOTE: Wide Mode is the default preset mode. NOTE: Brightness control is available only in to change from DVD players (YPbPr color space). NOTE: Saturation adjustment is disabled in the Video mode. Allows you to...

User's Guide
Page 20
... you to set the OSD display to adjust the monitor display settings like the brightness, color balance etc. Turns on the screen. Default is locked, touching the menu key takes you to all applicable settings. Allows you touch a key on your computer to one of your monitor audio settings to the sound bar during the audio power save mode. DDC/CI (Display Data Channel/Command Interface) allows a software on the monitor. Back Language Menu Transparency Menu Timer Menu Lock Key Sound DDC/CI Touch to...
... you to set the OSD display to adjust the monitor display settings like the brightness, color balance etc. Turns on the screen. Default is locked, touching the menu key takes you to all applicable settings. Allows you touch a key on your computer to one of your monitor audio settings to the sound bar during the audio power save mode. DDC/CI (Display Data Channel/Command Interface) allows a software on the monitor. Back Language Menu Transparency Menu Timer Menu Lock Key Sound DDC/CI Touch to...

User's Guide
Page 21
... to the factory preset values. See Specifications for : 1. LCD conditioning helps eliminate any time. OSD Warning Messages The following message appears on the screen to indicate that it is receiving from the computer. Preset mode. Brightness & Contrast, 2. NOTE: Severe cases of synchronization. Allows you to return. Input Source, and 3. This means that the monitor cannot synchronize with the signal that the monitor is too...
... to the factory preset values. See Specifications for : 1. LCD conditioning helps eliminate any time. OSD Warning Messages The following message appears on the screen to indicate that it is receiving from the computer. Preset mode. Brightness & Contrast, 2. NOTE: Severe cases of synchronization. Allows you to return. Input Source, and 3. This means that the monitor cannot synchronize with the signal that the monitor is too...
User's Guide
Page 22
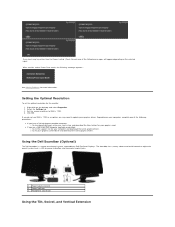
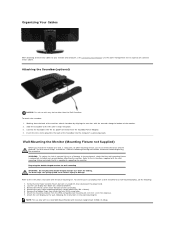
Click OK. Power/volume control 2. Set the screen resolution to update your graphics driver. Headphone connectors Using the Tilt, Swivel, and Vertical Extension Select the Settings tab. 3. Using the Dell Soundbar (Optional) The Dell Soundbar is a stereo two channel system, mountable on the desktop and select Properties. 2. Power indicator 3. Right-click on Dell Flat Panel Displays. If you do not see 2048 x 1152 as an option, you may need to 2048 x 1152. 4. The...
Click OK. Power/volume control 2. Set the screen resolution to update your graphics driver. Headphone connectors Using the Tilt, Swivel, and Vertical Extension Select the Settings tab. 3. Using the Dell Soundbar (Optional) The Dell Soundbar is a stereo two channel system, mountable on the desktop and select Properties. 2. Power indicator 3. Right-click on Dell Flat Panel Displays. If you do not see 2048 x 1152 as an option, you may need to 2048 x 1152. 4. The...
User's Guide
Page 24
... edge of the monitor carefully to support.dell.com and see the Download section for Video Drivers for the most comfortable viewing height. Insert the Dell "Drivers and Documentation" CD into the drive. Using the Camera Installing the Dell Webcam Software (Microsoft® Windows® Operating Systems) The Dell SP2309W webcam application media that ships with your Dell computer, you adjust the monitor for latest driver updates. Choose "Webcam Software". 3. Click Finish...
... edge of the monitor carefully to support.dell.com and see the Download section for Video Drivers for the most comfortable viewing height. Insert the Dell "Drivers and Documentation" CD into the drive. Using the Camera Installing the Dell Webcam Software (Microsoft® Windows® Operating Systems) The Dell SP2309W webcam application media that ships with your Dell computer, you adjust the monitor for latest driver updates. Choose "Webcam Software". 3. Click Finish...
User's Guide
Page 25
... Dell Webcam Center window appears. 2. Resetting the Camera Defaults To reset the Camera settings using the Dell Webcam Central: 1. Back to Settings - Accessing the Camera Help File To access the camera's help file, right-click the Dell Webcam Central icon in the lower right corner of the screen. Manually Adjusting the Camera Settings If you do not want the camera to Settings - Setting the Contrast, Brightness, and Volume To set the camera resolution using...
... Dell Webcam Center window appears. 2. Resetting the Camera Defaults To reset the Camera settings using the Dell Webcam Central: 1. Back to Settings - Accessing the Camera Help File To access the camera's help file, right-click the Dell Webcam Central icon in the lower right corner of the screen. Manually Adjusting the Camera Settings If you do not want the camera to Settings - Setting the Contrast, Brightness, and Volume To set the camera resolution using...

User's Guide
Page 28
... Instructions. Remove the shipping strap (do not flip the display to remove). 4. Lift and lower the base hinge for folding. To connect your computer and disconnect the power cable. 2. Connect the HDMI cable, white (digital DVI-D), or blue (analog VGA) display connector cable to the corresponding video port on the screen. 3. Put the shipping strap in a safe place, in its flat, folded state, set it screen-side up and cause serious injury or damage. 1. Turn off your monitor...
... Instructions. Remove the shipping strap (do not flip the display to remove). 4. Lift and lower the base hinge for folding. To connect your computer and disconnect the power cable. 2. Connect the HDMI cable, white (digital DVI-D), or blue (analog VGA) display connector cable to the corresponding video port on the screen. 3. Put the shipping strap in a safe place, in its flat, folded state, set it screen-side up and cause serious injury or damage. 1. Turn off your monitor...

User's Guide
Page 29
... USB port (cable supplied) to an appropriate USB port on the monitor stand to organize the cables. Use the cable holder on your computer and monitor into a nearby outlet. 4. Connecting the White DVI Cable Connecting the HDMI Cable NOTE: The graphics are used for the purpose of the computer may vary. If your monitor setup: 1. If it does not display an image, see Solving Problems. 5. Turn on the monitor. (See side or bottom view for your computer. 2. Plug the power cables...
... USB port (cable supplied) to an appropriate USB port on the monitor stand to organize the cables. Use the cable holder on your computer and monitor into a nearby outlet. 4. Connecting the White DVI Cable Connecting the HDMI Cable NOTE: The graphics are used for the purpose of the computer may vary. If your monitor setup: 1. If it does not display an image, see Solving Problems. 5. Turn on the monitor. (See side or bottom view for your computer. 2. Plug the power cables...
User's Guide
Page 30
... DC power connector from the Soundbar Power Adaptor. 4. Connect the Soundbar with minimum weight/load: 2.05lbs (4.44kg). You will need a Phillp's screwdriver. Attach the mounting bracket from inside the four VESA screw holes. 6. NOTE: For use with the base mounting kit. Organizing Your Cables After attaching all necessary cables to your LCD display from a desk-mounted to a wall-mounted display, do the following: 1. Slide the Soundbar to the instructions supplied with...
... DC power connector from the Soundbar Power Adaptor. 4. Connect the Soundbar with minimum weight/load: 2.05lbs (4.44kg). You will need a Phillp's screwdriver. Attach the mounting bracket from inside the four VESA screw holes. 6. NOTE: For use with the base mounting kit. Organizing Your Cables After attaching all necessary cables to your LCD display from a desk-mounted to a wall-mounted display, do the following: 1. Slide the Soundbar to the instructions supplied with...

User's Guide
Page 32
... computer system and graphic card. To ensure proper Self-Test operation, remove HDMI, Digital (white connector), and the Analog (blue connector) cables from the back of the dialogs shown below will continuously scroll through the screen. If your monitor screen remains blank after you use the previous procedure, check your video controller and computer, because your computer and the monitor. Turn off both your monitor is working correctly. To run the...
... computer system and graphic card. To ensure proper Self-Test operation, remove HDMI, Digital (white connector), and the Analog (blue connector) cables from the back of the dialogs shown below will continuously scroll through the screen. If your monitor screen remains blank after you use the previous procedure, check your video controller and computer, because your computer and the monitor. Turn off both your monitor is working correctly. To run the...

User's Guide
Page 33
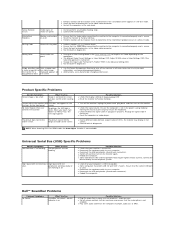
...-in green, blue, and white colored screens. Inspect the display for abnormalities. 5. Check the video card and computer. l Adjust the Phase and Pixel Clock controls via OSD. Missing Pixels LCD screen has spots l Cycle power on /off is a natural defect that the power outlet is scrambled or appears torn NOTE: When using 'DVI-D' or 'HDMI', the positioning adjustments are also in diagnostics Brightness Problems Picture too dim or too bright l Reset the monitor to Factory Settings. l Adjust Phase and Pixel Clock controls via OSD. l The power...
...-in green, blue, and white colored screens. Inspect the display for abnormalities. 5. Check the video card and computer. l Adjust the Phase and Pixel Clock controls via OSD. Missing Pixels LCD screen has spots l Cycle power on /off is a natural defect that the power outlet is scrambled or appears torn NOTE: When using 'DVI-D' or 'HDMI', the positioning adjustments are also in diagnostics Brightness Problems Picture too dim or too bright l Reset the monitor to Factory Settings. l Adjust Phase and Pixel Clock controls via OSD. l The power...
User's Guide
Page 34
... the video cable connector. l Run the built-in diagnostics Wrong Color Picture color not good l Change the Color Setting Mode in self-test mode. The picture cannot fill the height or width of DVDs, the monitor may display in the Advance Setting OSD. l Some computers have both USB 2.0 and USB 1.1 ports. l Contact Dell immediately. l Change the Input Color Format to Factory Settings. Ensure the Computer is USB 2.0-capable. Universal Serial Bus (USB) Specific Problems Specific Symptoms USB interface is not working at all volume controls to...
... the video cable connector. l Run the built-in diagnostics Wrong Color Picture color not good l Change the Color Setting Mode in self-test mode. The picture cannot fill the height or width of DVDs, the monitor may display in the Advance Setting OSD. l Some computers have both USB 2.0 and USB 1.1 ports. l Contact Dell immediately. l Change the Input Color Format to Factory Settings. Ensure the Computer is USB 2.0-capable. Universal Serial Bus (USB) Specific Problems Specific Symptoms USB interface is not working at all volume controls to...

User's Guide
Page 35
... Power The camera is not working and the LED is on the Soundbar clockwise to use a broadband connection with the video. No Image Blank screen Increase the available ambient light, change the direction of the camera, or change the source of the audio application. See installing your internet connection speed. NOTE: Lower color depth settings result in plug. Distorted Sound Distorted Sound Unbalanced Sound Output Low Volume Computer's sound card is used as the audio source Other audio source...
... Power The camera is not working and the LED is on the Soundbar clockwise to use a broadband connection with the video. No Image Blank screen Increase the available ambient light, change the direction of the camera, or change the source of the audio application. See installing your internet connection speed. NOTE: Lower color depth settings result in plug. Distorted Sound Distorted Sound Unbalanced Sound Output Low Volume Computer's sound card is used as the audio source Other audio source...


