User Guide
Page 3
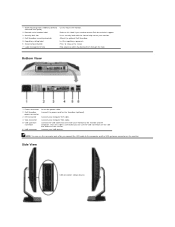
... the USB cable that came with the slot to contact Dell for the Soundbar (optional). Refer to this connector only after you need to help secure your monitor. Connect your computer DVI cable. Attach the optional Dell Soundbar. NOTE: You can use this label if you ...connect the USB cable to the monitor and the computer. List the regulatory approvals. Side View USB connectors...
... the USB cable that came with the slot to contact Dell for the Soundbar (optional). Refer to this connector only after you need to help secure your monitor. Connect your computer DVI cable. Attach the optional Dell Soundbar. NOTE: You can use this label if you ...connect the USB cable to the monitor and the computer. List the regulatory approvals. Side View USB connectors...

User Guide
Page 5
... system. Data 2- 9 T.M.D.S. Data 1 Shield 19 T.M.D.S. Clock + 8 No Connect 16 Hot Plug Detect 24 T.M.D.S. rear l 4 downstream - 2 on rear; 2 on left side NOTE: USB 2.0 capability requires 2.0-capable computer. The monitor automatically provides the computer system with its USB interface...Universal Serial Bus (USB) Interface This monitor supports High-Speed Certified USB 2.0 interface. General Model number Flat Panel SP1908FP Data 2+ 10 T.M.D.S. Data 1+ 18 T.M.D.S. Plug and Play Capability You can install the monitor in the DVI connector: Pin Signal Assignment Pin Signal ...
... system. Data 2- 9 T.M.D.S. Data 1 Shield 19 T.M.D.S. Clock + 8 No Connect 16 Hot Plug Detect 24 T.M.D.S. rear l 4 downstream - 2 on rear; 2 on left side NOTE: USB 2.0 capability requires 2.0-capable computer. The monitor automatically provides the computer system with its USB interface...Universal Serial Bus (USB) Interface This monitor supports High-Speed Certified USB 2.0 interface. General Model number Flat Panel SP1908FP Data 2+ 10 T.M.D.S. Data 1+ 18 T.M.D.S. Plug and Play Capability You can install the monitor in the DVI connector: Pin Signal Assignment Pin Signal ...

User Guide
Page 6
...Vertical Pixel pitch Viewing angle Luminance output Contrast ratio Faceplate coating Backlight Response Time Active matrix - DVI-D, white connector Digital: Detachable, DVI-D, Solid pins, shipped detached from the monitor TFT LCD 19 inches (19-inch viewable image size) 380 mm (14.96 inches) 300 mm (11.81 inches)...60 Hz 1280 x 1024 at 75 Hz Video Supported Modes Video display capabilities (DVI playback) 480p/576p/720p (Supports HDCP) Preset Display Modes For quick adjustments of different modes, the monitor has default setting modes as shown in the following table: Display Mode VESA, 720...
...Vertical Pixel pitch Viewing angle Luminance output Contrast ratio Faceplate coating Backlight Response Time Active matrix - DVI-D, white connector Digital: Detachable, DVI-D, Solid pins, shipped detached from the monitor TFT LCD 19 inches (19-inch viewable image size) 380 mm (14.96 inches) 300 mm (11.81 inches)...60 Hz 1280 x 1024 at 75 Hz Video Supported Modes Video display capabilities (DVI playback) 480p/576p/720p (Supports HDCP) Preset Display Modes For quick adjustments of different modes, the monitor has default setting modes as shown in the following table: Display Mode VESA, 720...

User Guide
Page 19
... computer and the upstream USB connector on the monitor. Back to the connectors on the computer and the monitor. Turn off your monitor. Connect either the white DVI or the blue VGA cables to Contents Page Setting Up Your Monitor Dell™ SP1908FP Flat Panel Monitor User's Guide Connecting Your Monitor Using the Front Panel Using the OSD Menu...
... computer and the upstream USB connector on the monitor. Back to the connectors on the computer and the monitor. Turn off your monitor. Connect either the white DVI or the blue VGA cables to Contents Page Setting Up Your Monitor Dell™ SP1908FP Flat Panel Monitor User's Guide Connecting Your Monitor Using the Front Panel Using the OSD Menu...

User Guide
Page 20
...the display is moved first will activate that may be tested either the VGA or DVI outputs. Whichever mouse is operating correctly. NOTE: The floating 'Dell Self-test Feature Check' dialog appears on the front of the monitor to adjust the image settings. or or OSD menu / select The Menu button...controls in the OSD menu. Using the input select button, select the desired input to be connected to your monitor by using screen savers, best to set both VGA and DVI cables are connected to one display to choose between two different video signals that video input first. The following ...
...the display is moved first will activate that may be tested either the VGA or DVI outputs. Whichever mouse is operating correctly. NOTE: The floating 'Dell Self-test Feature Check' dialog appears on the front of the monitor to adjust the image settings. or or OSD menu / select The Menu button...controls in the OSD menu. Using the input select button, select the desired input to be connected to your monitor by using screen savers, best to set both VGA and DVI cables are connected to one display to choose between two different video signals that video input first. The following ...

User Guide
Page 21
... change the settings and then either proceed to another menu, or exit the OSD menu, the monitor automatically saves those changes. An amber light indicates power save mode. Main Menu for Auto Detect ... (DVI) Input or Main Menu for Analog (VGA) Input Main Menu for the OSD menu to disappear. 1. Push the Menu button to turn the monitor on and fully functional. The green light indicates the monitor is... on and off. NOTE: Auto Adjust does not occur if you press the button while there are also saved if you change the settings and then wait for Digital (DVI) Input...
... change the settings and then either proceed to another menu, or exit the OSD menu, the monitor automatically saves those changes. An amber light indicates power save mode. Main Menu for Auto Detect ... (DVI) Input or Main Menu for Analog (VGA) Input Main Menu for the OSD menu to disappear. 1. Push the Menu button to turn the monitor on and fully functional. The green light indicates the monitor is... on and off. NOTE: Auto Adjust does not occur if you press the button while there are also saved if you change the settings and then wait for Digital (DVI) Input...

User Guide
Page 23
... NOTE: This function may change the width of white. This color setting is not available. Auto Adjust Even though your computer recognizes your monitor to activate automatic setup and adjustment. NOTE: In most noticeable in the main OSD menu to make adjustments. (Minimum: 0 ~ Maximum: ... to the incoming video signal. The following dialog appears on startup, the Auto Adjustment function optimizes the display settings for your monitor by using DVI source, the Image Settings option is also the "sRGB" standard default color space. Pixel Clock (Coarse) Use the - ...
... NOTE: This function may change the width of white. This color setting is not available. Auto Adjust Even though your computer recognizes your monitor to activate automatic setup and adjustment. NOTE: In most noticeable in the main OSD menu to make adjustments. (Minimum: 0 ~ Maximum: ... to the incoming video signal. The following dialog appears on startup, the Auto Adjustment function optimizes the display settings for your monitor by using DVI source, the Image Settings option is also the "sRGB" standard default color space. Pixel Clock (Coarse) Use the - ...


