
Monitor Users Guide
Page 3
Contents Safety instructions 6 About your monitor 7 Package contents 7 Product features 9 Identifying parts and controls 10 Front view 10 Back view 11 Side view 12 Bottom view 13 Monitor specifications 14 Resolution specifications 16 Supported video modes 16 Preset display modes 17 Electrical specifications 21 Physical characteristics 22 Environmental characteristics 23 Pin assignments 24 DisplayPort connector (in 24 HDMI connector 25 Plug-and-Play capability 26 LCD monitor quality and pixel policy 26 Ergonomics 27 │ 3
Contents Safety instructions 6 About your monitor 7 Package contents 7 Product features 9 Identifying parts and controls 10 Front view 10 Back view 11 Side view 12 Bottom view 13 Monitor specifications 14 Resolution specifications 16 Supported video modes 16 Preset display modes 17 Electrical specifications 21 Physical characteristics 22 Environmental characteristics 23 Pin assignments 24 DisplayPort connector (in 24 HDMI connector 25 Plug-and-Play capability 26 LCD monitor quality and pixel policy 26 Ergonomics 27 │ 3

Monitor Users Guide
Page 4
... 30 Cleaning your monitor 30 Setting up the monitor 31 Attaching the stand 31 Using the tilt 34 Connecting your monitor 34 Connecting the HDMI cable 35 Connecting the DisplayPort cable (optional 35 Organizing cables 36 Turn on the Monitor 36 Securing your monitor using Kensington lock (optional) . 37 Removing the monitor stand 38 VESA wall mounting (optional 39 Operating your monitor 40 Power on the monitor 40 Using the control buttons 40 Control buttons 41 Using the On-Screen Display (OSD) menu 42 Accessing the OSD menu 42 Menu and Power button lock 55 Setting...
... 30 Cleaning your monitor 30 Setting up the monitor 31 Attaching the stand 31 Using the tilt 34 Connecting your monitor 34 Connecting the HDMI cable 35 Connecting the DisplayPort cable (optional 35 Organizing cables 36 Turn on the Monitor 36 Securing your monitor using Kensington lock (optional) . 37 Removing the monitor stand 38 VESA wall mounting (optional 39 Operating your monitor 40 Power on the monitor 40 Using the control buttons 40 Control buttons 41 Using the On-Screen Display (OSD) menu 42 Accessing the OSD menu 42 Menu and Power button lock 55 Setting...

Monitor Users Guide
Page 6
... effect on monitor that support it) may result in exposure to remove any cover or touch the inside a car trunk. • Unplug the monitor when it carefully. WARNING: Use of the display. • Connect the power cable from potential damage and to a wall outlet that is near water. • Do not subject the monitor to operate with your monitor. For information on safety instructions, see...
... effect on monitor that support it) may result in exposure to remove any cover or touch the inside a car trunk. • Unplug the monitor when it carefully. WARNING: Use of the display. • Connect the power cable from potential damage and to a wall outlet that is near water. • Do not subject the monitor to operate with your monitor. For information on safety instructions, see...
Monitor Users Guide
Page 9
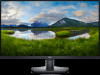
... of blue light emitted from the monitor to optimize eye comfort. TÜV-certified ComfortView feature is not limited to connect an external speaker. • Color gamut of setup and screen optimization. • Removable stand and Video Electronics Standards Association (VESA) 100 mm mounting holes for flexible mounting solutions. • Tilt capabilities. • Power and OSD buttons lock. • Security-lock slot (for Kensington locks, sold separately). • Stand lock. • ≤0.3 W in Picture (PIP) modes. • Supports audio line...
... of blue light emitted from the monitor to optimize eye comfort. TÜV-certified ComfortView feature is not limited to connect an external speaker. • Color gamut of setup and screen optimization. • Removable stand and Video Electronics Standards Association (VESA) 100 mm mounting holes for flexible mounting solutions. • Tilt capabilities. • Power and OSD buttons lock. • Security-lock slot (for Kensington locks, sold separately). • Stand lock. • ≤0.3 W in Picture (PIP) modes. • Supports audio line...
Monitor Users Guide
Page 11
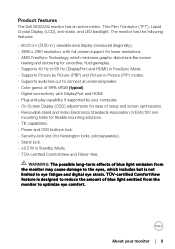
... regulatory approvals. 3 Stand release button 4 Regulatory label (including Barcode serial number and Service Tag label) Releases the stand from the monitor. About your monitor and is not shipped with part 15 of Mfg Jan. 2022 SVC Tag: 1234567 Express Service Code: 123 456 789 0 S/N: CN-0T1NHM -TV200-11J-001V -A00 Q40G032N-700-20A Label Description Use 1 Four (04) VESA mounting holes Wall-mount the monitor using VESA- (100 mm...
... regulatory approvals. 3 Stand release button 4 Regulatory label (including Barcode serial number and Service Tag label) Releases the stand from the monitor. About your monitor and is not shipped with part 15 of Mfg Jan. 2022 SVC Tag: 1234567 Express Service Code: 123 456 789 0 S/N: CN-0T1NHM -TV200-11J-001V -A00 Q40G032N-700-20A Label Description Use 1 Four (04) VESA mounting holes Wall-mount the monitor using VESA- (100 mm...

Monitor Users Guide
Page 13
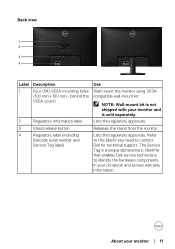
... computer or external device 4 HDMI 2.0 port (HDMI 2) using a DisplayPort cable (purchased separately). 6 Audio line-out port Connect to your monitor │ 13 Bottom view 12 3 4 56 Label Description Use 1 Security-lock slot (based Secure your monitor using a security lock on Kensington Security (purchased separately) to prevent unauthorized Slot) movement of your monitor. 2 Power connector Connect the power cable (shipped with your monitor). 5 DisplayPort 1.2 Connect to an external speaker (purchased separately).* *Audio line-out port does not support headsets.
... computer or external device 4 HDMI 2.0 port (HDMI 2) using a DisplayPort cable (purchased separately). 6 Audio line-out port Connect to your monitor │ 13 Bottom view 12 3 4 56 Label Description Use 1 Security-lock slot (based Secure your monitor using a security lock on Kensington Security (purchased separately) to prevent unauthorized Slot) movement of your monitor. 2 Power connector Connect the power cable (shipped with your monitor). 5 DisplayPort 1.2 Connect to an external speaker (purchased separately).* *Audio line-out port does not support headsets.
Monitor Users Guide
Page 15
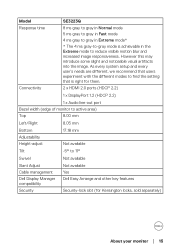
... the image. Model Response time Connectivity SE3223Q 8 ms gray to gray in Normal mode 5 ms gray to gray in Fast mode 4 ms gray to gray in the Extreme mode to 11° Swivel Not available Slant Adjust Cable management Dell Display Manager compatibility Security Not available Yes Dell Easy Arrange and other key features Security-lock slot (for Kensington locks, sold separately) About your monitor │...
... the image. Model Response time Connectivity SE3223Q 8 ms gray to gray in Normal mode 5 ms gray to gray in Fast mode 4 ms gray to gray in the Extreme mode to 11° Swivel Not available Slant Adjust Cable management Dell Display Manager compatibility Security Not available Yes Dell Easy Arrange and other key features Security-lock slot (for Kensington locks, sold separately) About your monitor │...

Monitor Users Guide
Page 30
... a light-colored monitor. • To help maintain the best image quality on your monitor, use a dynamically changing screen saver and turn off with a cloth. • Handle your monitor with care as color fading, milky film on the surface of the display panel and corrode the electronics resulting in permanent damage. Doing so will lead to a soft cloth and then clean the monitor. CAUTION: Read and follow the instructions...
... a light-colored monitor. • To help maintain the best image quality on your monitor, use a dynamically changing screen saver and turn off with a cloth. • Handle your monitor with care as color fading, milky film on the surface of the display panel and corrode the electronics resulting in permanent damage. Doing so will lead to a soft cloth and then clean the monitor. CAUTION: Read and follow the instructions...
Monitor Users Guide
Page 31
... protective cover on the monitor. NOTE: The following instructions are attaching a stand that you are applicable only for the stand that was shipped with the stand. Connect the stand base to access the slot on the monitor to the stand riser. 1 2 3. Remove the stand riser and the stand base from any other source, follow the setup instructions that secures it. 2. Setting up the monitor Attaching the stand NOTE: The stand is not installed...
... protective cover on the monitor. NOTE: The following instructions are attaching a stand that you are applicable only for the stand that was shipped with the stand. Connect the stand base to access the slot on the monitor to the stand riser. 1 2 3. Remove the stand riser and the stand base from any other source, follow the setup instructions that secures it. 2. Setting up the monitor Attaching the stand NOTE: The stand is not installed...

Monitor Users Guide
Page 43
... DP input source. Dell 32 Monitor Brightness / Contrast Input Source Color Display PIP/PBP Menu Personalize Others Preset Modes Input Color Format Hue Saturation Reset Color Standard RGB 50 50 Operating your monitor. Press the button to restore default Input Source. Selects HDMI 1 input when you are using the DP connector. Use Color to select the HDMI 2 input source. Selects HDMI 2 input when you are using the HDMI 2 connector. Icon Menu and Submenus Input Source Description Uses the Input Source menu to select between the different video signals that may be connected...
... DP input source. Dell 32 Monitor Brightness / Contrast Input Source Color Display PIP/PBP Menu Personalize Others Preset Modes Input Color Format Hue Saturation Reset Color Standard RGB 50 50 Operating your monitor. Press the button to restore default Input Source. Selects HDMI 1 input when you are using the DP connector. Use Color to select the HDMI 2 input source. Selects HDMI 2 input when you are using the HDMI 2 connector. Icon Menu and Submenus Input Source Description Uses the Input Source menu to select between the different video signals that may be connected...
Monitor Users Guide
Page 44
... a blue tint. • Custom Color: Allows you can choose Standard, ComfortView, Movie, FPS, RTS, RPG, sRGB, Warm, Cool, or Custom Color from the screen to make viewing more comfortable for your monitor Press the and buttons to manually adjust the color settings. The screen appears cooler with a red/yellow tint. • Cool: Decreases the color temperature. Dell 32 Monitor Brightness / Contrast Input Source Color Display PIP/PBP Menu Personalize Others Preset Modes Input Color Format Hue Saturation Reset Color...
... a blue tint. • Custom Color: Allows you can choose Standard, ComfortView, Movie, FPS, RTS, RPG, sRGB, Warm, Cool, or Custom Color from the screen to make viewing more comfortable for your monitor Press the and buttons to manually adjust the color settings. The screen appears cooler with a red/yellow tint. • Cool: Decreases the color temperature. Dell 32 Monitor Brightness / Contrast Input Source Color Display PIP/PBP Menu Personalize Others Preset Modes Input Color Format Hue Saturation Reset Color...

Monitor Users Guide
Page 45
... supports only YCbCr output. Use the or button to adjust the hue from 0 to 100. Adjusts the color saturation of the video image to green or purple. Resets your monitor │ 45 Operating your monitor's color settings to the factory default. Icon Menu and Submenus Input Color Format Description Allows you to set the video input mode to: • RGB: Select this option if your monitor is used to adjust the desired skin tone color. Dell 32 Monitor Brightness / Contrast Input Source Color Display PIP/PBP Menu...
... supports only YCbCr output. Use the or button to adjust the hue from 0 to 100. Adjusts the color saturation of the video image to green or purple. Resets your monitor │ 45 Operating your monitor's color settings to the factory default. Icon Menu and Submenus Input Color Format Description Allows you to set the video input mode to: • RGB: Select this option if your monitor is used to adjust the desired skin tone color. Dell 32 Monitor Brightness / Contrast Input Source Color Display PIP/PBP Menu...

Monitor Users Guide
Page 49
.... Resets all OSD settings to adjustments. Dell 32 Monitor Brightness / Contrast Input Source Color Display PIP/PBP Menu Personalize Others Language Transparency Timer Lock Reset Menu English 20 20 s Disable Language Transparency Sets the OSD display to one of time the menu remains on screen, and so on. Use the or button to adjust the slider in 1 second increments, from 0 to 100. Lock Reset Menu Controls user access to the factory preset values. Operating your monitor │ 49 Select this option to adjust the settings of the OSD...
.... Resets all OSD settings to adjustments. Dell 32 Monitor Brightness / Contrast Input Source Color Display PIP/PBP Menu Personalize Others Language Transparency Timer Lock Reset Menu English 20 20 s Disable Language Transparency Sets the OSD display to one of time the menu remains on screen, and so on. Use the or button to adjust the slider in 1 second increments, from 0 to 100. Lock Reset Menu Controls user access to the factory preset values. Operating your monitor │ 49 Select this option to adjust the settings of the OSD...
Monitor Users Guide
Page 52
.../CI LCD Conditioning Firmware Service Tag Self-Diagnostic Reset Others Factory Reset Model: Dell SE3223Q Input Source: HDMI 1 Current: 3840x2160, 60Hz PBP Status: O PIP Status: O DP Status: DP 1.2 HDMI: 2.0 DDC/CI DDC/CI (display data channel/command interface) allows your monitor parameters (brightness, color balance, and so on) to adjust the OSD settings, such as the DDC/CI, LCD conditioning, and so on your computer. Disables this feature by selecting On for best user...
.../CI LCD Conditioning Firmware Service Tag Self-Diagnostic Reset Others Factory Reset Model: Dell SE3223Q Input Source: HDMI 1 Current: 3840x2160, 60Hz PBP Status: O PIP Status: O DP Status: DP 1.2 HDMI: 2.0 DDC/CI DDC/CI (display data channel/command interface) allows your monitor parameters (brightness, color balance, and so on) to adjust the OSD settings, such as the DDC/CI, LCD conditioning, and so on your computer. Disables this feature by selecting On for best user...
Monitor Users Guide
Page 58
...://www.dell.com/support, enter your service tag, and download the latest driver for your graphics card. If you have . Click the Display Resolution dropdown list and select 3840 x 2160. 4. If you do not see 3840 x 2160 as an option, you are using a non-Dell computer (laptop or desktop): • Go to the support site for the monitor: In Windows 8.1: 1. To set the maximum resolution...
...://www.dell.com/support, enter your service tag, and download the latest driver for your graphics card. If you have . Click the Display Resolution dropdown list and select 3840 x 2160. 4. If you do not see 3840 x 2160 as an option, you are using a non-Dell computer (laptop or desktop): • Go to the support site for the monitor: In Windows 8.1: 1. To set the maximum resolution...

Monitor Users Guide
Page 60
Then, turn on the surface of the screen). 2. If your monitor remains dark after you reconnect the cables, check your video controller and computer, as your computer and the monitor. Press the button (button 3) to initiate the self-diagnostic process. 60 │ Troubleshooting No DP Cable The display will go into Standby mode in diagnostics: 1. www.dell.com/SE3223Q SE3223Q NOTE: This dialog box appears even during normal...
Then, turn on the surface of the screen). 2. If your monitor remains dark after you reconnect the cables, check your video controller and computer, as your computer and the monitor. Press the button (button 3) to initiate the self-diagnostic process. 60 │ Troubleshooting No DP Cable The display will go into Standby mode in diagnostics: 1. www.dell.com/SE3223Q SE3223Q NOTE: This dialog box appears even during normal...

Monitor Users Guide
Page 65
.... Troubleshooting │ 65 Adjust R/G/B value in Custom Color in Color settings OSD. • Change the Input Color Format to factory settings (Factory Reset). These can image left on the displayed appears be adjusted in Color settings OSD. Cannot adjust the OSD does not appear monitor with the on the screen buttons on the bottom of screen idle time. Product specific problems Specific Symptoms What you experience Possible Solutions Wrong color Picture color not good • Try different Preset Modes in Windows Power Options monitor for...
.... Troubleshooting │ 65 Adjust R/G/B value in Custom Color in Color settings OSD. • Change the Input Color Format to factory settings (Factory Reset). These can image left on the displayed appears be adjusted in Color settings OSD. Cannot adjust the OSD does not appear monitor with the on the screen buttons on the bottom of screen idle time. Product specific problems Specific Symptoms What you experience Possible Solutions Wrong color Picture color not good • Try different Preset Modes in Windows Power Options monitor for...

Monitor Users Guide
Page 66
... │ Troubleshooting Ensure the computer is not in Standby Mode by moving the mouse or pressing any key on the keyboard. • Check if the video cable is white are pressed • Check the signal source. Disconnect and reconnect the video cable if necessary. • Reset the computer or video player. Specific Symptoms What you experience Possible Solutions No input signal No picture, the LED when user controls light is plugged in...
... │ Troubleshooting Ensure the computer is not in Standby Mode by moving the mouse or pressing any key on the keyboard. • Check if the video cable is white are pressed • Check the signal source. Disconnect and reconnect the video cable if necessary. • Reset the computer or video player. Specific Symptoms What you experience Possible Solutions No input signal No picture, the LED when user controls light is plugged in...
Monitor Display Manager Users Guide
Page 4
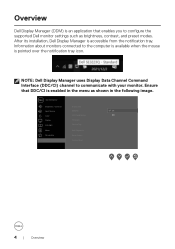
... monitors connected to communicate with your monitor. After its installation, Dell Display Manager is accessible from the notification tray. Overview Dell Display Manager (DDM) is an application that DDC/CI is enabled in the following image. Ensure that enables you to configure the supported Dell monitor settings such as shown in the menu as brightness, contrast, and preset modes. Dell 32 Monitor Brightness / Contrast Display Info Input Source DDC/CI On Color LCD Conditioning Display Firmware PIP/PBP Service...
... monitors connected to communicate with your monitor. After its installation, Dell Display Manager is accessible from the notification tray. Overview Dell Display Manager (DDM) is an application that DDC/CI is enabled in the following image. Ensure that enables you to configure the supported Dell monitor settings such as shown in the menu as brightness, contrast, and preset modes. Dell 32 Monitor Brightness / Contrast Display Info Input Source DDC/CI On Color LCD Conditioning Display Firmware PIP/PBP Service...
Monitor Display Manager Users Guide
Page 5
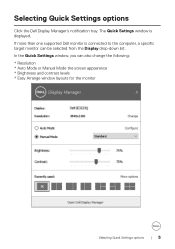
If more than one supported Dell monitor is displayed. The Quick Setings window is connected to the computer, a specific target monitor can also change the following: * Resolution * Auto Mode or Manual Mode the screen appearance * Brightness and contrast levels * Easy Arrange window layouts for the monitor Selecting Quick Settings options | 5 In the Quick Settings window, you can be selected from the Display drop-down list. Selecting Quick Settings options Click the Dell Display Manager's notification tray.
If more than one supported Dell monitor is displayed. The Quick Setings window is connected to the computer, a specific target monitor can also change the following: * Resolution * Auto Mode or Manual Mode the screen appearance * Brightness and contrast levels * Easy Arrange window layouts for the monitor Selecting Quick Settings options | 5 In the Quick Settings window, you can be selected from the Display drop-down list. Selecting Quick Settings options Click the Dell Display Manager's notification tray.


