X Monitor Users Guide
Page 3
Contents About your monitor 5 Package contents 5 Product features 6 Identifying features and controls 7 Monitor specifications 10 Plug and play capability 17 LCD monitor quality and pixel policy 17 Maintenance guidelines 17 Setting up the monitor 18 Connecting the stand 18 Connecting your monitor 20 Organizing cables 21 Removing the stand 21 Operating your monitor 23 Turning on the monitor 23 Using the front panel controls 23 Using the On-Screen Display (OSD) menu 25 Setting up your monitor 47 Using tilt 49 Contents | 3
Contents About your monitor 5 Package contents 5 Product features 6 Identifying features and controls 7 Monitor specifications 10 Plug and play capability 17 LCD monitor quality and pixel policy 17 Maintenance guidelines 17 Setting up the monitor 18 Connecting the stand 18 Connecting your monitor 20 Organizing cables 21 Removing the stand 21 Operating your monitor 23 Turning on the monitor 23 Using the front panel controls 23 Using the On-Screen Display (OSD) menu 25 Setting up your monitor 47 Using tilt 49 Contents | 3

X Monitor Users Guide
Page 5
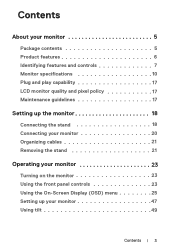
Some features may not be optional and may be available in the table. Ensure that shipped with your monitor. NOTE: To set up with the components indicated in certain countries. About your monitor | 5 NOTE: Some items may not ship with the stand. Monitor Stand riser Stand base Power cable (varies by country) VGA cable (SE2419H and SE2719H) About your monitor Package contents Your monitor ships with any other stand, see the documentation that you have received all the components and see Contacting Dell if anything is missing.
Some features may not be optional and may be available in the table. Ensure that shipped with your monitor. NOTE: To set up with the components indicated in certain countries. About your monitor | 5 NOTE: Some items may not ship with the stand. Monitor Stand riser Stand base Power cable (varies by country) VGA cable (SE2419H and SE2719H) About your monitor Package contents Your monitor ships with any other stand, see the documentation that you have received all the components and see Contacting Dell if anything is missing.
X Monitor Users Guide
Page 6
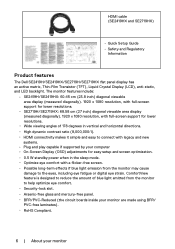
...Security-lock slot. BFR/PVC-Reduced (the circuit boards inside your monitor RoHS Compliant. 6 | About your monitor are made using BFR/ PVC-free laminates). Wide viewing angles of blue light emitted from the monitor may cause damage to reduce the amount of 178 degrees in ...power when in vertical and horizontal directions. HDMI cable (SE2419HX and SE2719HX) Quick Setup Guide Safety and Regulatory Information Product features The Dell SE2419H/SE2419HX/SE2719H/SE2719HX at panel display has an active matrix, Thin-Film Transistor (TFT), Liquid Crystal Display (LCD), anti-static, and LED ...
...Security-lock slot. BFR/PVC-Reduced (the circuit boards inside your monitor RoHS Compliant. 6 | About your monitor are made using BFR/ PVC-free laminates). Wide viewing angles of blue light emitted from the monitor may cause damage to reduce the amount of 178 degrees in ...power when in vertical and horizontal directions. HDMI cable (SE2419HX and SE2719HX) Quick Setup Guide Safety and Regulatory Information Product features The Dell SE2419H/SE2419HX/SE2719H/SE2719HX at panel display has an active matrix, Thin-Film Transistor (TFT), Liquid Crystal Display (LCD), anti-static, and LED ...

X Monitor Users Guide
Page 7
About your monitor | 7 Identifying features and controls Front view 1 2 Label Description 1 Function buttons 2 Power On/Off button (with LED indicator) Use To access the OSD menu and change the settings if required. (For more information, see Using the front panel controls) To turn the monitor On or Off.
About your monitor | 7 Identifying features and controls Front view 1 2 Label Description 1 Function buttons 2 Power On/Off button (with LED indicator) Use To access the OSD menu and change the settings if required. (For more information, see Using the front panel controls) To turn the monitor On or Off.

X Monitor Users Guide
Page 8
The Service Tag is a enables Dell service technicians to contact Dell for technical support. See this label if you need to identify the hardware components in your monitor management slot 5 Stand release button To organize the cables. Release stand from monitor. Side view 8 | About your computer and access warranty information. 3 Regulatory information (engraved) List the...
The Service Tag is a enables Dell service technicians to contact Dell for technical support. See this label if you need to identify the hardware components in your monitor management slot 5 Stand release button To organize the cables. Release stand from monitor. Side view 8 | About your computer and access warranty information. 3 Regulatory information (engraved) List the...

X Monitor Users Guide
Page 9
About your computer using VGA cable. For connection to your computer using HDMI cable. For connection to your monitor | 9 Bottom view, without monitor stand 1 2 3 SE2419H/SE2419HX/SE2719H/SE2719HX Label Description 1 Power port 2 HDMI port 3 VGA port Use To connect the monitor power cable.
About your computer using VGA cable. For connection to your computer using HDMI cable. For connection to your monitor | 9 Bottom view, without monitor stand 1 2 3 SE2419H/SE2419HX/SE2719H/SE2719HX Label Description 1 Power port 2 HDMI port 3 VGA port Use To connect the monitor power cable.

X Monitor Users Guide
Page 10
... 8 ms Fast mode 5 ms Color depth 16.7 million colors Color gamut CIE 1931 (72%) Dell display manager compatibility Connectivity Yes One VGA port and one HDMI 1.4 (HDCP 1.4) port with SE2419H/SE2419HX/SE2719H/SE2719HX monitors. Monitor speci cations Model SE2419H/SE2419HX SE2719H/SE2719HX Screen type Active matrix-TFT LCD Panel type In-Plane Switching Viewable area...
... 8 ms Fast mode 5 ms Color depth 16.7 million colors Color gamut CIE 1931 (72%) Dell display manager compatibility Connectivity Yes One VGA port and one HDMI 1.4 (HDCP 1.4) port with SE2419H/SE2419HX/SE2719H/SE2719HX monitors. Monitor speci cations Model SE2419H/SE2419HX SE2719H/SE2719HX Screen type Active matrix-TFT LCD Panel type In-Plane Switching Viewable area...

X Monitor Users Guide
Page 11
... 30 kHz to 83 kHz (automatic) 56 Hz to 76 Hz (automatic) 1920 x 1080 at 60 Hz Preset display modes SE2419H/SE2419HX/SE2719H/SE2719HX Display Mode VESA, 720 x 400 VESA, 640 x 480 VESA, 640 x 480 VESA, 800 x 600 VESA, 800 x 600 VESA, 1024 x 768 VESA, 1024 x 768 VESA, ....0 60.0 75.0 60.0 60.0 Pixel Clock (MHz) 28.3 25.2 31.5 40.0 49.5 65.0 78.8 108.0 108.0 135.0 108.0 148.5 Sync Polarity (Horizontal / Vertical About your monitor | 11
... 30 kHz to 83 kHz (automatic) 56 Hz to 76 Hz (automatic) 1920 x 1080 at 60 Hz Preset display modes SE2419H/SE2419HX/SE2719H/SE2719HX Display Mode VESA, 720 x 400 VESA, 640 x 480 VESA, 640 x 480 VESA, 800 x 600 VESA, 800 x 600 VESA, 1024 x 768 VESA, 1024 x 768 VESA, ....0 60.0 75.0 60.0 60.0 Pixel Clock (MHz) 28.3 25.2 31.5 40.0 49.5 65.0 78.8 108.0 108.0 135.0 108.0 148.5 Sync Polarity (Horizontal / Vertical About your monitor | 11

X Monitor Users Guide
Page 12
... input signals Synchronization input signals AC input voltage/ frequency/current Inrush current SE2419H/SE2419HX SE2719H/SE2719HX Analog RGB: 0.7 Volts ± 5 %, 75 ohm input impedance HDMI...(120V AC Input) 60A (240V AC Input) Physical characteristics Model Signal cable type: Analog Digital SE2419H/SE2419HX SE2719H/SE2719HX D-Sub (VGA), 15 pins; HDMI, 19 pins Dimensions (with stand): Height Width Depth Dimensions (... mm (21.24 in. ) 46.4 mm (1.83 in. ) SE2719H/SE2719HX 454.2 mm (17.88 in. ) 611.5 mm (24.07 in. ) 186.8 mm (7.35 in.) SE2719H/SE2719HX 364.2 mm (14.34 in.) 611.5 mm (24.07 ...
... input signals Synchronization input signals AC input voltage/ frequency/current Inrush current SE2419H/SE2419HX SE2719H/SE2719HX Analog RGB: 0.7 Volts ± 5 %, 75 ohm input impedance HDMI...(120V AC Input) 60A (240V AC Input) Physical characteristics Model Signal cable type: Analog Digital SE2419H/SE2419HX SE2719H/SE2719HX D-Sub (VGA), 15 pins; HDMI, 19 pins Dimensions (with stand): Height Width Depth Dimensions (... mm (21.24 in. ) 46.4 mm (1.83 in. ) SE2719H/SE2719HX 454.2 mm (17.88 in. ) 611.5 mm (24.07 in. ) 186.8 mm (7.35 in.) SE2719H/SE2719HX 364.2 mm (14.34 in.) 611.5 mm (24.07 ...

X Monitor Users Guide
Page 13
...) Environmental characteristics Model Temperature: Operating Non-operating: Storage Shipping Humidity: Operating Non-operating: Storage Shipping Altitude: Operating (maximum) Non-operating (maximum) Thermal dissipation SE2419H/SE2419HX SE2719H/SE2719HX 0°C to 40°C (32°F to 104°F) -20°C to 60°C (-4°F to 140°F) -20°C to 60°C (-4°...,400 ft) 12,192 m (40,000 ft) 75.1 BTU/hour (maximum) 99.0 BTU/hour (maximum) 58.0 BTU/hour (typical) 78.5 BTU/hour (typical) About your monitor | 13
...) Environmental characteristics Model Temperature: Operating Non-operating: Storage Shipping Humidity: Operating Non-operating: Storage Shipping Altitude: Operating (maximum) Non-operating (maximum) Thermal dissipation SE2419H/SE2419HX SE2719H/SE2719HX 0°C to 40°C (32°F to 104°F) -20°C to 60°C (-4°F to 140°F) -20°C to 60°C (-4°...,400 ft) 12,192 m (40,000 ft) 75.1 BTU/hour (maximum) 99.0 BTU/hour (maximum) 58.0 BTU/hour (typical) 78.5 BTU/hour (typical) About your monitor | 13
X Monitor Users Guide
Page 14
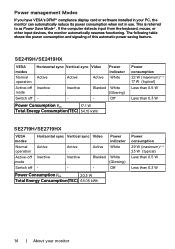
... mouse, or other input devices, the monitor automatically resumes functioning. Blanked White (Glowing) Power Consumption Pon 20.3 W Total Energy Consumption(TEC) 64.05 kWh Power consumption 29 W (maximum)** 23 W (typical) Less than 0.5 W SE2719H/SE2719HX VESA modes Normal operation mode Horizontal ...This is referred to as Power Save Mode*. Power management Modes If you have VESA's DPMTM compliance display card or software installed in your monitor Blanked White (Glowing) Power Consumption Pon 17.1 W Total Energy Consumption(TEC) 54.15 kWh Power consumption 22 W (maximum)** 17 W...
... mouse, or other input devices, the monitor automatically resumes functioning. Blanked White (Glowing) Power Consumption Pon 20.3 W Total Energy Consumption(TEC) 64.05 kWh Power consumption 29 W (maximum)** 23 W (typical) Less than 0.5 W SE2719H/SE2719HX VESA modes Normal operation mode Horizontal ...This is referred to as Power Save Mode*. Power management Modes If you have VESA's DPMTM compliance display card or software installed in your monitor Blanked White (Glowing) Power Consumption Pon 17.1 W Total Energy Consumption(TEC) 54.15 kWh Power consumption 22 W (maximum)** 17 W...

X Monitor Users Guide
Page 15
No VGA Cable The display will go into Power Save Mode in 4 minutes. www.dell.com/SE2419H SE2419HX Dell 24 Monitor ? The OSD functions only in making decisions about electrical tolerances or otherwise. No HDMI Cable The display will go into Power ...: Power consumption of the following messages will be achieved by disconnecting the power cable from the monitor. ** Maximum power consumption with max luminance and contrast. www.dell.com/SE2419HX SE2419H SE2419HX About your monitor | 15 This document is expressed or implied. Accordingly, the customer should not rely upon this...
No VGA Cable The display will go into Power Save Mode in 4 minutes. www.dell.com/SE2419H SE2419HX Dell 24 Monitor ? The OSD functions only in making decisions about electrical tolerances or otherwise. No HDMI Cable The display will go into Power ...: Power consumption of the following messages will be achieved by disconnecting the power cable from the monitor. ** Maximum power consumption with max luminance and contrast. www.dell.com/SE2419HX SE2419H SE2419HX About your monitor | 15 This document is expressed or implied. Accordingly, the customer should not rely upon this...
X Monitor Users Guide
Page 16
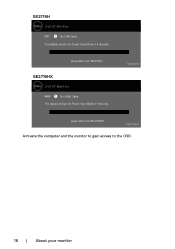
No HDMI Cable The display will go into Power Save Mode in 4 minutes. SE2719H www.dell.com/SE2719HX SE2719HX Activate the computer and the monitor to gain access to the OSD. 16 | About your monitor No VGA Cable The display will go into Power Save Mode in 4 minutes. www.dell.com/SE2719H SE2719HX Dell 27 Monitor ? SE2719H Dell 27 Monitor ?
No HDMI Cable The display will go into Power Save Mode in 4 minutes. SE2719H www.dell.com/SE2719HX SE2719HX Activate the computer and the monitor to gain access to the OSD. 16 | About your monitor No VGA Cable The display will go into Power Save Mode in 4 minutes. www.dell.com/SE2719H SE2719HX Dell 27 Monitor ? SE2719H Dell 27 Monitor ?
X Monitor Users Guide
Page 17
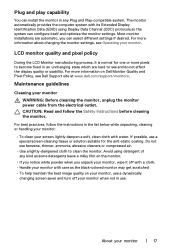
... the system can select different settings if desired. Handle your monitor with care as some detergents leave a milky film on Dell Monitor Quality and Pixel Policy, see Dell Support site at www.dell.com/support/monitors. Most monitor installations are hard to clean the monitor. For more information on the monitor. Use a lightly-dampened cloth to see Operating your...
... the system can select different settings if desired. Handle your monitor with care as some detergents leave a milky film on Dell Monitor Quality and Pixel Policy, see Dell Support site at www.dell.com/support/monitors. Most monitor installations are hard to clean the monitor. For more information on the monitor. Use a lightly-dampened cloth to see Operating your...

X Monitor Users Guide
Page 18
To attach the monitor stand: 1. Align the stand-riser bracket with the grooves at the back of the monitor. 18 | Setting up the monitor Connecting the stand NOTE: The stand is not attached when the monitor is applicable for the stand that shipped with your monitor. NOTE: The following procedure is shipped from the factory. Connect the stand riser to the stand base, and then tighten the screw on the stand base. 2. Setting up the monitor
To attach the monitor stand: 1. Align the stand-riser bracket with the grooves at the back of the monitor. 18 | Setting up the monitor Connecting the stand NOTE: The stand is not attached when the monitor is applicable for the stand that shipped with your monitor. NOTE: The following procedure is shipped from the factory. Connect the stand riser to the stand base, and then tighten the screw on the stand base. 2. Setting up the monitor

X Monitor Users Guide
Page 19
Setting up the monitor | 19 Slide the stand assembly until it snaps into place. 3.
Setting up the monitor | 19 Slide the stand assembly until it snaps into place. 3.

X Monitor Users Guide
Page 20
It is recommended to route the cables through the cable-management slot before you begin any of the procedures in this section, follow the Safety Instructions. Turn o your monitor to the computer: 1. To connect your computer and disconnect the power cable. 2. Connecting VGA cable Connecting HDMI cable 20 | Setting up the monitor Connect VGA or HDMI cable from your monitor WARNING: Before you connect them to the monitor. Connecting your monitor to the computer. NOTE: Do not connect all cables to the computer at the same time.
It is recommended to route the cables through the cable-management slot before you begin any of the procedures in this section, follow the Safety Instructions. Turn o your monitor to the computer: 1. To connect your computer and disconnect the power cable. 2. Connecting VGA cable Connecting HDMI cable 20 | Setting up the monitor Connect VGA or HDMI cable from your monitor WARNING: Before you connect them to the monitor. Connecting your monitor to the computer. NOTE: Do not connect all cables to the computer at the same time.

X Monitor Users Guide
Page 21
Setting up the monitor | 21 Removing the stand NOTE: To prevent scratches on the screen when removing the stand, ensure that the monitor is applicable for the stand that shipped with your monitor. Tilt the stand downwards to access to your monitor. Organizing cables Use the cable-management slot to the cables connected to the release button. NOTE: The following procedure is placed on a soft cloth or cushion along the desk. 2. To remove the stand: 1. Place the monitor on a soft and clean surface.
Setting up the monitor | 21 Removing the stand NOTE: To prevent scratches on the screen when removing the stand, ensure that the monitor is applicable for the stand that shipped with your monitor. Tilt the stand downwards to access to your monitor. Organizing cables Use the cable-management slot to the cables connected to the release button. NOTE: The following procedure is placed on a soft cloth or cushion along the desk. 2. To remove the stand: 1. Place the monitor on a soft and clean surface.

X Monitor Users Guide
Page 22
While keeping the release button pressed, pull the stand out. 22 | Setting up the monitor 3. Using a long screwdriver press the release button. 4.
While keeping the release button pressed, pull the stand out. 22 | Setting up the monitor 3. Using a long screwdriver press the release button. 4.

X Monitor Users Guide
Page 23
Operating your monitor | 23 Preset mode Operating your monitor Turning on the monitor. Using the front panel controls Use the control buttons at the bottom edge of the monitor to adjust the image being displayed. 1 234 5 The following table describes the control buttons: Control Buttons Description 1 Use this button to turn on the monitor Press the button to choose from a list of preset modes.
Operating your monitor | 23 Preset mode Operating your monitor Turning on the monitor. Using the front panel controls Use the control buttons at the bottom edge of the monitor to adjust the image being displayed. 1 234 5 The following table describes the control buttons: Control Buttons Description 1 Use this button to turn on the monitor Press the button to choose from a list of preset modes.


