

Dell Users Guide
Page 3
Contents About Your Monitor 5 Package Contents 5 Product Features 6 Identifying Parts and Controls 7 Monitor Specifications 8 Plug-and-Play 17 LCD Monitor Quality and Pixel Policy 17 Setting Up the Monitor 18 Attaching the Stand 18 Connecting Your Monitor 19 Organizing Your Cables 21 Removing the Monitor Stand 22 Operating the Monitor 23 Turning on the Monitor 23 Using the Front Panel Controls 23 Using the On-Screen Display (OSD) Menu 25 Using Tilt 38 Troubleshooting 39 Self-Test 39 Built-in Diagnostics 40 Common Problems 41 Contents | 3
Contents About Your Monitor 5 Package Contents 5 Product Features 6 Identifying Parts and Controls 7 Monitor Specifications 8 Plug-and-Play 17 LCD Monitor Quality and Pixel Policy 17 Setting Up the Monitor 18 Attaching the Stand 18 Connecting Your Monitor 19 Organizing Your Cables 21 Removing the Monitor Stand 22 Operating the Monitor 23 Turning on the Monitor 23 Using the Front Panel Controls 23 Using the On-Screen Display (OSD) Menu 25 Using Tilt 38 Troubleshooting 39 Self-Test 39 Built-in Diagnostics 40 Common Problems 41 Contents | 3
Dell Users Guide
Page 6
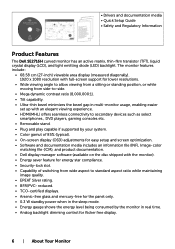
... the disc shipped with an elegant viewing experience. • HDMI(MHL) offers seamless connectivity to standard aspect ratio while maintaining image quality. • EPEAT Silver rating. • BFR/PVC- • Drivers and documentation media • Quick Setup Guide • Safety and Regulatory Information Product Features The Dell SE2716H curved monitor has an active matrix, thin-film transistor (TFT), liquid crystal display (LCD), and light emitting diode (LED) backlight.
... the disc shipped with an elegant viewing experience. • HDMI(MHL) offers seamless connectivity to standard aspect ratio while maintaining image quality. • EPEAT Silver rating. • BFR/PVC- • Drivers and documentation media • Quick Setup Guide • Safety and Regulatory Information Product Features The Dell SE2716H curved monitor has an active matrix, thin-film transistor (TFT), liquid crystal display (LCD), and light emitting diode (LED) backlight.

Dell Users Guide
Page 8
... Monitor Connect your computer audio output (optional). Connect to your computer with HDMI cable or portable device with MHL cable. Monitor Specifications Flat Panel Specifications Screen type Panel type Panel curvature Viewable image: Diagonal Active Area: Horizontal Vertical Area Pixel pitch Viewing angle: Horizontal Active matrix - WARNING: Excessive sound pressure from earphones or headphones can cause hearing damage or loss. Connect your computer with HDMI cable or portable device with VGA cable (optional). Connect your computer with MHL cable...
... Monitor Connect your computer audio output (optional). Connect to your computer with HDMI cable or portable device with MHL cable. Monitor Specifications Flat Panel Specifications Screen type Panel type Panel curvature Viewable image: Diagonal Active Area: Horizontal Vertical Area Pixel pitch Viewing angle: Horizontal Active matrix - WARNING: Excessive sound pressure from earphones or headphones can cause hearing damage or loss. Connect your computer with HDMI cable or portable device with VGA cable (optional). Connect your computer with MHL cable...

Dell Users Guide
Page 10
... 60 50 60 50 30 60 50 Electrical Specifications Video input signals Synchronization input signals AC input voltage/ frequency/current Inrush current • Analog RGB, 0.7 Volts +/- 5%, positive polarity at 75 ohm input impedance • HDMI 1.4 (MHL 2.0), 600mV for each differential line, 100 ohm input impedance per differential pair Separate horizontal and vertical synchronization, polarity-free TTL level, SOG (Composite SYNC on green) 100-240 VAC / 50 or 60 Hz...
... 60 50 60 50 30 60 50 Electrical Specifications Video input signals Synchronization input signals AC input voltage/ frequency/current Inrush current • Analog RGB, 0.7 Volts +/- 5%, positive polarity at 75 ohm input impedance • HDMI 1.4 (MHL 2.0), 600mV for each differential line, 100 ohm input impedance per differential pair Separate horizontal and vertical synchronization, polarity-free TTL level, SOG (Composite SYNC on green) 100-240 VAC / 50 or 60 Hz...

Dell Users Guide
Page 12
..., or other input devices, the monitor automatically resumes functioning. Breathing White (blinking slowly) Off Power Consumption 62 W (maximum)** 29 W (typical) Less than 0.3 W Less than 0.3 W Energy Star On Mode Power Consumption 21.8 W *** 12 | About Your Monitor The following table shows the power consumption and signaling of this automatic power saving feature. Inactive Off - - VESA Modes Normal operation Active-off mode Switch off Horizontal Vertical Video Power Indicator Sync Sync Active Active Active White Inactive -
..., or other input devices, the monitor automatically resumes functioning. Breathing White (blinking slowly) Off Power Consumption 62 W (maximum)** 29 W (typical) Less than 0.3 W Less than 0.3 W Energy Star On Mode Power Consumption 21.8 W *** 12 | About Your Monitor The following table shows the power consumption and signaling of this automatic power saving feature. Inactive Off - - VESA Modes Normal operation Active-off mode Switch off Horizontal Vertical Video Power Indicator Sync Sync Active Active Active White Inactive -

Dell Users Guide
Page 19
... the Safety Instructions. Connecting the VGA cable (optional) 1 2 Audio In VGA Setting Up the Monitor | 19 NOTE: Do not connect multiple display cables to prevent it from slipping or falling. 3 Remove the protective cover from your monitor to the computer. 3 Switch on your computer. 2 Connect the VGA/HDMI/Audio cable from the monitor. CAUTION: Do not press on the bottom cushion and use the other hand to hold the stand. 2 Lift the monitor carefully...
... the Safety Instructions. Connecting the VGA cable (optional) 1 2 Audio In VGA Setting Up the Monitor | 19 NOTE: Do not connect multiple display cables to prevent it from slipping or falling. 3 Remove the protective cover from your monitor to the computer. 3 Switch on your computer. 2 Connect the VGA/HDMI/Audio cable from the monitor. CAUTION: Do not press on the bottom cushion and use the other hand to hold the stand. 2 Lift the monitor carefully...

Dell Users Guide
Page 27
... input sources. Auto Adjustment allows the monitor to self-adjust to select the HDMI (MHL) 2 input source. Input Source NOTE: In most cases, Auto Adjust produces the best image for use with your particular setup. Select the HDMI (MHL) 2 input when you are using the HDMI (MHL) 2 connector. Select the VGA input when you can further tune your monitor by using the VGA cable. Use to the incoming video signal. After using Auto Adjustment, you are be connected to select the HDMI (MHL) 1 input source. Use to your monitor. Use the Input Source menu...
... input sources. Auto Adjustment allows the monitor to self-adjust to select the HDMI (MHL) 2 input source. Input Source NOTE: In most cases, Auto Adjust produces the best image for use with your particular setup. Select the HDMI (MHL) 2 input when you are using the HDMI (MHL) 2 connector. Select the VGA input when you can further tune your monitor by using the VGA cable. Use to the incoming video signal. After using Auto Adjustment, you are be connected to select the HDMI (MHL) 1 input source. Use to your monitor. Use the Input Source menu...
Dell Users Guide
Page 29
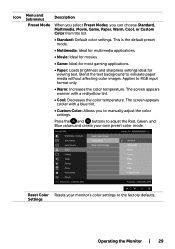
... brightness and sharpness settings ideal for viewing text. Settings Operating the Monitor | 29 Press the and buttons to adjust the Red, Green, and Blue values and create your monitor's color settings to the factory defaults. Blend the text background to RGB input format only. • Warm: Increases the color temperature. Applies to simulate paper media without affecting color images. Icon Menu and Submenus Preset Mode Description When you select Preset Modes, you to manually adjust...
... brightness and sharpness settings ideal for viewing text. Settings Operating the Monitor | 29 Press the and buttons to adjust the Red, Green, and Blue values and create your monitor's color settings to the factory defaults. Blend the text background to RGB input format only. • Warm: Increases the color temperature. Applies to simulate paper media without affecting color images. Icon Menu and Submenus Preset Mode Description When you select Preset Modes, you to manually adjust...

Dell Users Guide
Page 30
...: Horizontal Position and Vertical Position adjustments are not obtained using the VGA cable. 30 | Operating the Monitor Pixel Clock The Phase and Pixel Clock adjustments allow you to adjust your preference. Use the or buttons to adjust for "VGA" input. Phase If satisfactory results are only available for best image quality. Use or to your monitor to adjust the image left or right. Icon Menu and Submenus Display Description Use the Display menu to adjust the image up or down. Use or...
...: Horizontal Position and Vertical Position adjustments are not obtained using the VGA cable. 30 | Operating the Monitor Pixel Clock The Phase and Pixel Clock adjustments allow you to adjust your preference. Use the or buttons to adjust for "VGA" input. Phase If satisfactory results are only available for best image quality. Use or to your monitor to adjust the image left or right. Icon Menu and Submenus Display Description Use the Display menu to adjust the image up or down. Use or...

Dell Users Guide
Page 33
NOTE: Lock function - Reset Restores shortcut keys to adjustments. Personalization Operating the Monitor | 33 Controls user access to factory defaults. All buttons are allowed. Select from 5 to factory defaults. When Lock is selected, no user adjustments are locked. Either soft lock (through OSD menu) or hard lock (Press and hold the exit button 10 sec) Restore the menu settings to 60 seconds. Use the and buttons to adjust the slider in 1-second increments, from Preset Modes, Brightness/Contrast, Auto Adjust, Input Source, Aspect...
NOTE: Lock function - Reset Restores shortcut keys to adjustments. Personalization Operating the Monitor | 33 Controls user access to factory defaults. All buttons are allowed. Select from 5 to factory defaults. When Lock is selected, no user adjustments are locked. Either soft lock (through OSD menu) or hard lock (Press and hold the exit button 10 sec) Restore the menu settings to 60 seconds. Use the and buttons to adjust the slider in 1-second increments, from Preset Modes, Brightness/Contrast, Auto Adjust, Input Source, Aspect...

Dell Users Guide
Page 34
Select Disable to turn off this feature for best user experience and optimum performance of your computer. Icon Menu and Submenus Other Description DDC/CI Select this option to adjust the OSD settings, such as the DDC/CI, LCD conditioning, and so on your monitor. 34 | Operating the Monitor DDC/CI (Display Data Channel/Command Interface) allows you to adjust the monitor settings using software on . Enable this feature.
Select Disable to turn off this feature for best user experience and optimum performance of your computer. Icon Menu and Submenus Other Description DDC/CI Select this option to adjust the OSD settings, such as the DDC/CI, LCD conditioning, and so on your monitor. 34 | Operating the Monitor DDC/CI (Display Data Channel/Command Interface) allows you to adjust the monitor settings using software on . Enable this feature.

Dell Users Guide
Page 39
...-test by performing the following steps: 1 Turn off both your monitor is working correctly. Also, depending upon the selected input, one of computer. 3 Turn on -screen (against a black background), if the monitor cannot sense a video signal and is functioning properly. To ensure proper Self-Test operation, remove all digital and the analog cables from the back of the procedures in self-test mode, the power LED remains white.
...-test by performing the following steps: 1 Turn off both your monitor is working correctly. Also, depending upon the selected input, one of computer. 3 Turn on -screen (against a black background), if the monitor cannot sense a video signal and is functioning properly. To ensure proper Self-Test operation, remove all digital and the analog cables from the back of the procedures in self-test mode, the power LED remains white.

Dell Users Guide
Page 40
... only when the video cable is unplugged and the monitor is clean (no dust particles on both your computer and video card. then turn on the surface of the screen). 2 Unplug the video cable(s) from the back of the screen changes to red. 6 Inspect the display for any abnormalities. 40 | Troubleshooting A gray screen appears. 4 Carefully inspect the screen for 2 seconds. The color of the computer or monitor. or 4 This...
... only when the video cable is unplugged and the monitor is clean (no dust particles on both your computer and video card. then turn on the surface of the screen). 2 Unplug the video cable(s) from the back of the screen changes to red. 6 Inspect the display for any abnormalities. 40 | Troubleshooting A gray screen appears. 4 Carefully inspect the screen for 2 seconds. The color of the computer or monitor. or 4 This...
Dell Users Guide
Page 41
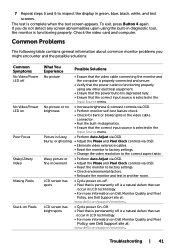
... brightness & contrast controls via OSD. • Eliminate video extension cables. • Reset the monitor to factory settings. • Change the video resolution to the correct aspect ratio. Wavy picture or fine movement • Perform Auto Adjust via OSD. • Adjust the Phase and Pixel Clock controls via OSD. 7 Repeat steps 5 and 6 to factory settings. • Check environmental factors. • Relocate the monitor and test in another room. The test is selected in green, blue, black, white, and text screens. Picture is...
... brightness & contrast controls via OSD. • Eliminate video extension cables. • Reset the monitor to factory settings. • Change the video resolution to the correct aspect ratio. Wavy picture or fine movement • Perform Auto Adjust via OSD. • Adjust the Phase and Pixel Clock controls via OSD. 7 Repeat steps 5 and 6 to factory settings. • Check environmental factors. • Relocate the monitor and test in another room. The test is selected in green, blue, black, white, and text screens. Picture is...
Dell Users Guide
Page 42
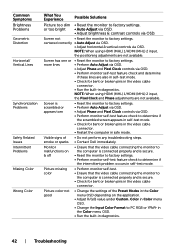
... safe mode. Screen not • Reset the monitor to PC RGB or YPbPr in the Color menu OSD. • Run the built-in diagnostics. 42 | Troubleshooting NOTE: When using HDMI (MHL) 1/HDMI (MHL) 2 input, the positioning adjustments are not available. Monitor malfunctions on the application. • Adjust R/G/B value under Custom. Picture color not good • Change the settings of • Do not perform any troubleshooting steps. Common Symptoms Brightness Problems Geometric Distortion Horizontal/ Vertical Lines Synchronization Problems...
... safe mode. Screen not • Reset the monitor to PC RGB or YPbPr in the Color menu OSD. • Run the built-in diagnostics. 42 | Troubleshooting NOTE: When using HDMI (MHL) 1/HDMI (MHL) 2 input, the positioning adjustments are not available. Monitor malfunctions on the application. • Adjust R/G/B value under Custom. Picture color not good • Change the settings of • Do not perform any troubleshooting steps. Common Symptoms Brightness Problems Geometric Distortion Horizontal/ Vertical Lines Synchronization Problems...

Dell Users Guide
Page 43
... entire viewing area OSD does not appear on the screen No picture, the LED light is white Possible Solutions • Check the Aspect Ratio setting in the Display menu OSD. • Reset the monitor to factory settings. • Turn off the static image the monitor at all times when not in properly. Re-plug the signal cable if necessary. • Reset the computer or video player. Ensure the computer is not in the power saving mode by...
... entire viewing area OSD does not appear on the screen No picture, the LED light is white Possible Solutions • Check the Aspect Ratio setting in the Display menu OSD. • Reset the monitor to factory settings. • Turn off the static image the monitor at all times when not in properly. Re-plug the signal cable if necessary. • Reset the computer or video player. Ensure the computer is not in the power saving mode by...

Dell Users Guide
Page 44
... headphone port. • Reset the monitor to different video formats (aspect ratio) of the screen Possible Solutions • Due to factory settings. 44 | Troubleshooting Specific Symptoms The picture does not fill the entire screen What You Experience The picture cannot fill the height or width of DVDs, the monitor may display in full screen. • Run the built-in standby mode. • Check physical MHL cable connection is corresponding to input source...
... headphone port. • Reset the monitor to different video formats (aspect ratio) of the screen Possible Solutions • Due to factory settings. 44 | Troubleshooting Specific Symptoms The picture does not fill the entire screen What You Experience The picture cannot fill the height or width of DVDs, the monitor may display in full screen. • Run the built-in standby mode. • Check physical MHL cable connection is corresponding to input source...
Dell Users Guide
Page 46
...). 6 After installing the drivers for your graphics adapter, attempt to set the resolution to 1920 x 1080 again. Setting Up Your Monitor Setting Display Resolution to 1920 x 1080 (maximum) For best performance, set the display resolution to 1920 x 1080 pixels by performing the following steps: In Windows 7, Windows 8, Windows 8.1, or Windows 10 1 For Windows 8 and Windows 8.1 only, select the Desktop tile to switch to classic desktop. 2 Right-click on the desktop and click Change Display Settings...
...). 6 After installing the drivers for your graphics adapter, attempt to set the resolution to 1920 x 1080 again. Setting Up Your Monitor Setting Display Resolution to 1920 x 1080 (maximum) For best performance, set the display resolution to 1920 x 1080 pixels by performing the following steps: In Windows 7, Windows 8, Windows 8.1, or Windows 10 1 For Windows 8 and Windows 8.1 only, select the Desktop tile to switch to classic desktop. 2 Right-click on the desktop and click Change Display Settings...
Dell Dell Display Manager Users Guide
Page 4
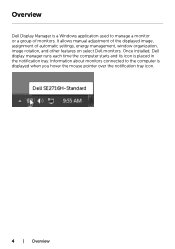
Information about monitors connected to manage a monitor or a group of automatic settings, energy management, window organization, image rotation, and other features on select Dell monitors. Overview Dell Display Manager is a Windows application used to the computer is placed in the notification tray. Once installed, Dell display manager runs each time the computer starts and its icon is displayed when you hover the mouse pointer over the notification tray icon. 4 | Overview It allows manual adjustment of the displayed image, assignment of monitors.
Information about monitors connected to manage a monitor or a group of automatic settings, energy management, window organization, image rotation, and other features on select Dell monitors. Overview Dell Display Manager is a Windows application used to the computer is placed in the notification tray. Once installed, Dell display manager runs each time the computer starts and its icon is displayed when you hover the mouse pointer over the notification tray icon. 4 | Overview It allows manual adjustment of the displayed image, assignment of monitors.

Dell Dell Display Manager Users Guide
Page 7
...connected monitor, or it can vary from the desktop, Windows Start Menu, or elsewhere, and drop it automatically. Applications present in full-screen mode. To override this behavior for many popular applications. The preset mode assigned to a particular application may be enabled that activates the Game preset mode...Direct3D setting. When Auto Mode is enabled, Dell Display Manager automatically switches to the corresponding preset mode whenever the associated application is pre-configured for individual game titles, add them to the assignment list with a specific ...
...connected monitor, or it can vary from the desktop, Windows Start Menu, or elsewhere, and drop it automatically. Applications present in full-screen mode. To override this behavior for many popular applications. The preset mode assigned to a particular application may be enabled that activates the Game preset mode...Direct3D setting. When Auto Mode is enabled, Dell Display Manager automatically switches to the corresponding preset mode whenever the associated application is pre-configured for individual game titles, add them to the assignment list with a specific ...


