User Guide
Page 5
... 54 AUDIO INPUT 54 ADVANCED SETTINGS 54 LANGUAGE 72 HELP 72 Wireless Networking Installation 73 Enable Wireless on the Projector 74 Install the Wireless Application Software on Your Computer 75 S500 or S500wi Wireless Application Software . . 78 Presentation to Go (PtG) Installation 82 PtG Viewer 83 Photo Viewer 83 PtG/Photo Function Introduction 84...
... 54 AUDIO INPUT 54 ADVANCED SETTINGS 54 LANGUAGE 72 HELP 72 Wireless Networking Installation 73 Enable Wireless on the Projector 74 Install the Wireless Application Software on Your Computer 75 S500 or S500wi Wireless Application Software . . 78 Presentation to Go (PtG) Installation 82 PtG Viewer 83 Photo Viewer 83 PtG/Photo Function Introduction 84...
User Guide
Page 6
Lite Application Software . . . . . 86 Managing the Projector From Web Management . . . 88 Configuring the Network Setting 88 Accessing Web Management 88 Make Application Token 107 4 Troubleshooting Your Projector 108 Troubleshooting your Interactive Pen 112 Guiding Signals 114 Interactive Pen LED Guiding Signals 115 Changing the Lamp 116 5 Specifications 118 6 Contacting Dell 125 Contacting eInstruction 126 7 Appendix: Glossary 127 6 Contents Lite 86 PtG Converter - Set up PtG Converter -
Lite Application Software . . . . . 86 Managing the Projector From Web Management . . . 88 Configuring the Network Setting 88 Accessing Web Management 88 Make Application Token 107 4 Troubleshooting Your Projector 108 Troubleshooting your Interactive Pen 112 Guiding Signals 114 Interactive Pen LED Guiding Signals 115 Changing the Lamp 116 5 Specifications 118 6 Contacting Dell 125 Contacting eInstruction 126 7 Appendix: Glossary 127 6 Contents Lite 86 PtG Converter - Set up PtG Converter -
User Guide
Page 17
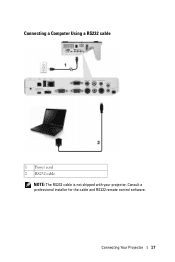
Connecting Your Projector 17 Consult a professional installer for the cable and RS232 remote control software. Connecting a Computer Using a RS232 cable 1 Power cord 2 RS232 cable NOTE: The RS232 cable is not shipped with your projector.
Connecting Your Projector 17 Consult a professional installer for the cable and RS232 remote control software. Connecting a Computer Using a RS232 cable 1 Power cord 2 RS232 cable NOTE: The RS232 cable is not shipped with your projector.
User Guide
Page 28
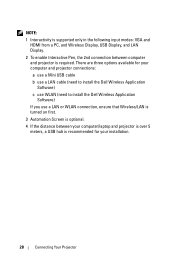
There are three options available for your computer and projector connections: a use a Mini USB cable b use a LAN cable (need to install the Dell Wireless Application Software) c use WLAN (need to install the Dell Wireless Application Software) If you use a LAN or WLAN connection, ensure that Wireless/LAN is turned on first. 3 Automation Screen is optional. 4 If...
There are three options available for your computer and projector connections: a use a Mini USB cable b use a LAN cable (need to install the Dell Wireless Application Software) c use WLAN (need to install the Dell Wireless Application Software) If you use a LAN or WLAN connection, ensure that Wireless/LAN is turned on first. 3 Automation Screen is optional. 4 If...
User Guide
Page 40
...on the screen. At this condition, the pen can still work about 1~2 hours. • The pen will act as Undo, if supported by the software. Allow you use Function to charge. low battery • The Low Battery warning message pops up /down and use Mini USB cable to enter/apply.... 40 Using Your Projector OSD warning messages - Two LED indicators are listed in the OSD Menu "Set function" (see on "Interactive Pen LED Guiding Signals" on page 44....
...on the screen. At this condition, the pen can still work about 1~2 hours. • The pen will act as Undo, if supported by the software. Allow you use Function to charge. low battery • The Low Battery warning message pops up /down and use Mini USB cable to enter/apply.... 40 Using Your Projector OSD warning messages - Two LED indicators are listed in the OSD Menu "Set function" (see on "Interactive Pen LED Guiding Signals" on page 44....

User Guide
Page 75
.... You will be automatically switched to wireless screen when wireless option is disabled, then follow these information to use your wireless projector, you must install the software on your system. Using Your Projector 75 The Wireless Guide Screen shown below appears: NOTE: If wireless connection is selected in later. The image input source...
.... You will be automatically switched to wireless screen when wireless option is disabled, then follow these information to use your wireless projector, you must install the software on your system. Using Your Projector 75 The Wireless Guide Screen shown below appears: NOTE: If wireless connection is selected in later. The image input source...
User Guide
Page 78
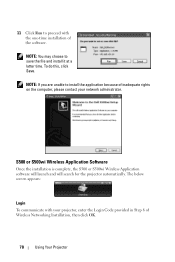
NOTE: If you are unable to install the application because of the software. S500 or S500wi Wireless Application Software Once the installation is complete, the S500 or S500wi Wireless Application software will launch and will search for the projector automatically. 11 Click Run to proceed with your network administrator. NOTE: You ...The below screen appears: Login To communicate with the one-time installation of inadequate rights on the computer, please contact your projector, enter the Login Code provided in Step 6 of Wireless Networking Installation, then click OK. 78 Using Your...
NOTE: If you are unable to install the application because of the software. S500 or S500wi Wireless Application Software Once the installation is complete, the S500 or S500wi Wireless Application software will launch and will search for the projector automatically. 11 Click Run to proceed with your network administrator. NOTE: You ...The below screen appears: Login To communicate with the one-time installation of inadequate rights on the computer, please contact your projector, enter the Login Code provided in Step 6 of Wireless Networking Installation, then click OK. 78 Using Your...
User Guide
Page 82
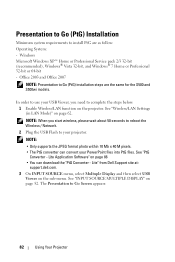
...USB Flash to Go Screen appears: 82 Using Your Projector NOTE: When you need to Go (PtG) installation steps are as follow: Operating System: - See "PtG Converter - Lite Application Software" on page 52. Lite" from Dell Support site at: support.dell.com. 3 On INPUT SOURCE menu, select Multuple ... 2007 NOTE: Presentation to complete the steps below: 1 Enable Wireless/LAN function on the projector. Presentation to Go (PtG) Installation Minimum system requirements to install PtG are the same for the S500 and S500wi models. See "Wireless/LAN Settings (in LAN Mode)" on the sub-menu.
...USB Flash to Go Screen appears: 82 Using Your Projector NOTE: When you need to Go (PtG) installation steps are as follow: Operating System: - See "PtG Converter - Lite Application Software" on page 52. Lite" from Dell Support site at: support.dell.com. 3 On INPUT SOURCE menu, select Multuple ... 2007 NOTE: Presentation to complete the steps below: 1 Enable Wireless/LAN function on the projector. Presentation to Go (PtG) Installation Minimum system requirements to install PtG are the same for the S500 and S500wi models. See "Wireless/LAN Settings (in LAN Mode)" on the sub-menu.

User Guide
Page 86
PtG Converter - The below screen appears: 1 Click to start conversion. 2 Select the PowerPoint file you want to complete the setup. Lite Please follow the on-screen instructions to convert. 86 Using Your Projector Lite". Set up PtG Converter - Lite Application Software Please launch the "PtG Converter -
PtG Converter - The below screen appears: 1 Click to start conversion. 2 Select the PowerPoint file you want to complete the setup. Lite Please follow the on-screen instructions to convert. 86 Using Your Projector Lite". Set up PtG Converter - Lite Application Software Please launch the "PtG Converter -

User Guide
Page 89
Using Your Projector 89 Download the Wireless Application Software See also "Wireless Networking Installation" on page 73. Click the Download button of the corresponding operating system of your computer.
Using Your Projector 89 Download the Wireless Application Software See also "Wireless Networking Installation" on page 73. Click the Download button of the corresponding operating system of your computer.

User Guide
Page 107
Using Your Projector 107 Select the drive from the list, then click Next. 4 Click Finish to close the wizard. Click Next. 3 Plug a flash drive into any of the USB ports on your computer. Make Application Token The Application Token lets you perform Plug and Show using a USB token. 1 From the application software, click > Make Application Token. 2 The following screen appears.
Using Your Projector 107 Select the drive from the list, then click Next. 4 Click Finish to close the wizard. Click Next. 3 Plug a flash drive into any of the USB ports on your computer. Make Application Token The Application Token lets you perform Plug and Show using a USB token. 1 From the application software, click > Make Application Token. 2 The following screen appears.
User Guide
Page 112
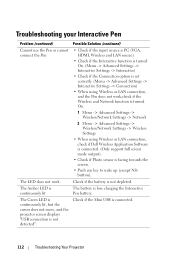
.../Network Settings -> Network 2 Menu -> Advanced Settings -> Wireless/Network Settings -> Wireless Settings • When using Wireless or LAN connection, check if Dell Wireless Application Software is connected. (Only support full screen mode output). • Check if Photo sensor is not detected". Check if the Mini USB is low, ...not work . The Amber LED is continuously lit The Green LED is continuously lit, but the cursor does not move, and the projector screen displays "USB connection is facing towards the screen. • Push any key to wake up (except Nib button). Check ...
.../Network Settings -> Network 2 Menu -> Advanced Settings -> Wireless/Network Settings -> Wireless Settings • When using Wireless or LAN connection, check if Dell Wireless Application Software is connected. (Only support full screen mode output). • Check if Photo sensor is not detected". Check if the Mini USB is low, ...not work . The Amber LED is continuously lit The Green LED is continuously lit, but the cursor does not move, and the projector screen displays "USB connection is facing towards the screen. • Push any key to wake up (except Nib button). Check ...


