User Guide
Page 3
Contents 1 Your Dell Projector 7 About Your Projector 9 About Your Interactive Pen (for S500wi only) . . . . 10 2 Connecting Your Projector 12 Installing the Optional Wireless Dongle 13 Install the Cable Cover 14 Connecting to a Computer 15 Connecting a Computer Using a VGA ...
Contents 1 Your Dell Projector 7 About Your Projector 9 About Your Interactive Pen (for S500wi only) . . . . 10 2 Connecting Your Projector 12 Installing the Optional Wireless Dongle 13 Install the Cable Cover 14 Connecting to a Computer 15 Connecting a Computer Using a VGA ...
User Guide
Page 4
... OSD warning messages - Professional Installation Options: Installation for Driving Automatic Screen 25 Connection With Commercial RS232 Control Box . 26 Connecting With Your Interactive Pen (for S500wi only 27 3 Using Your Projector 29 Turning Your Projector On 29 Turning Your Projector Off 29 Adjusting the Projected Image 30 Raising the Projector... the Projector's Mirror Process . . . . . 31 Adjusting Projection Image Size 32 Using the Control Panel 34 Using the Remote Control 36 Using the Interactive Pen (for S500wi only) 44 4 Contents low battery 40 OSD warning messages -
... OSD warning messages - Professional Installation Options: Installation for Driving Automatic Screen 25 Connection With Commercial RS232 Control Box . 26 Connecting With Your Interactive Pen (for S500wi only 27 3 Using Your Projector 29 Turning Your Projector On 29 Turning Your Projector Off 29 Adjusting the Projected Image 30 Raising the Projector... the Projector's Mirror Process . . . . . 31 Adjusting Projection Image Size 32 Using the Control Panel 34 Using the Remote Control 36 Using the Interactive Pen (for S500wi only) 44 4 Contents low battery 40 OSD warning messages -
User Guide
Page 5
... by Docking Charger 47 Operating Range with Remote Control 49 Operating Range with Interactive Pen (for S500wi only 50 Using the On-Screen Display 51 INPUT SOURCE 51 AUTO ADJUST 52 BRIGHTNESS/CONTRAST 53 VIDEO MODE 53 VOLUME 54 AUDIO INPUT 54 ... LANGUAGE 72 HELP 72 Wireless Networking Installation 73 Enable Wireless on the Projector 74 Install the Wireless Application Software on Your Computer 75 S500 or S500wi Wireless Application Software . . 78 Presentation to Go (PtG) Installation 82 PtG Viewer 83 Photo Viewer 83 PtG/Photo Function Introduction 84 PtG Overview 84 Photo...
... by Docking Charger 47 Operating Range with Remote Control 49 Operating Range with Interactive Pen (for S500wi only 50 Using the On-Screen Display 51 INPUT SOURCE 51 AUTO ADJUST 52 BRIGHTNESS/CONTRAST 53 VIDEO MODE 53 VOLUME 54 AUDIO INPUT 54 ... LANGUAGE 72 HELP 72 Wireless Networking Installation 73 Enable Wireless on the Projector 74 Install the Wireless Application Software on Your Computer 75 S500 or S500wi Wireless Application Software . . 78 Presentation to Go (PtG) Installation 82 PtG Viewer 83 Photo Viewer 83 PtG/Photo Function Introduction 84 PtG Overview 84 Photo...
User Guide
Page 6
Set up PtG Converter - Lite Application Software . . . . . 86 Managing the Projector From Web Management . . . 88 Configuring the Network Setting 88 Accessing Web Management 88 Make Application Token 107 4 Troubleshooting Your Projector 108 Troubleshooting your Interactive Pen 112 Guiding Signals 114 Interactive Pen LED Guiding Signals 115 Changing the Lamp 116 5 Specifications 118 6 Contacting Dell 125 Contacting eInstruction 126 7 Appendix: Glossary 127 6 Contents Lite 86 PtG Converter -
Set up PtG Converter - Lite Application Software . . . . . 86 Managing the Projector From Web Management . . . 88 Configuring the Network Setting 88 Accessing Web Management 88 Make Application Token 107 4 Troubleshooting Your Projector 108 Troubleshooting your Interactive Pen 112 Guiding Signals 114 Interactive Pen LED Guiding Signals 115 Changing the Lamp 116 5 Specifications 118 6 Contacting Dell 125 Contacting eInstruction 126 7 Appendix: Glossary 127 6 Contents Lite 86 PtG Converter -

User Guide
Page 8
Only for S500wi Package Contents Interactive Pen Wrist strap Nib Interwrite Workspace CD 2 m Mini USB cable (USB-A to Mini USB-B) 5 m Mini USB cable (USB-A to Mini USB-B) 8 Your Dell Projector
Only for S500wi Package Contents Interactive Pen Wrist strap Nib Interwrite Workspace CD 2 m Mini USB cable (USB-A to Mini USB-B) 5 m Mini USB cable (USB-A to Mini USB-B) 8 Your Dell Projector
User Guide
Page 10
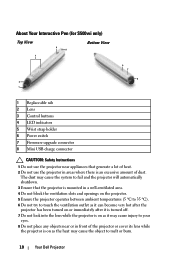
About Your Interactive Pen (for S500wi only) Top View 3 4 5 Bottom View 2 1 6 7 8 1 Replaceable nib 2 Lens 3 Control buttons 4 LED indicators 5 Wrist strap holder 6 Power switch 7 Firmware upgrade connector 8 Mini USB charge connector CAUTION: ... is turned off. 7 Do not look into the lens while the projector is on as it may cause injury to melt or burn. 10 Your Dell Projector
About Your Interactive Pen (for S500wi only) Top View 3 4 5 Bottom View 2 1 6 7 8 1 Replaceable nib 2 Lens 3 Control buttons 4 LED indicators 5 Wrist strap holder 6 Power switch 7 Firmware upgrade connector 8 Mini USB charge connector CAUTION: ... is turned off. 7 Do not look into the lens while the projector is on as it may cause injury to melt or burn. 10 Your Dell Projector
User Guide
Page 27
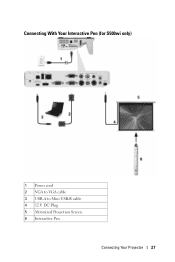
Connecting With Your Interactive Pen (for S500wi only) 1 Power cord 2 VGA to VGA cable 3 USB-A to Mini USB-B cable 4 12 V DC Plug 5 Motorized Projection Screen 6 Interactive Pen Connecting Your Projector 27
Connecting With Your Interactive Pen (for S500wi only) 1 Power cord 2 VGA to VGA cable 3 USB-A to Mini USB-B cable 4 12 V DC Plug 5 Motorized Projection Screen 6 Interactive Pen Connecting Your Projector 27
User Guide
Page 28
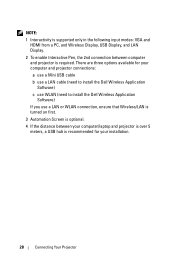
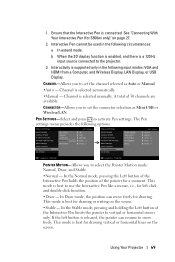
... computer and projector connections: a use a Mini USB cable b use a LAN cable (need to install the Dell Wireless Application Software) c use WLAN (need to install the Dell Wireless Application Software) If you use a LAN or WLAN connection, ensure that Wireless/LAN is turned on first....is recommended for your installation. 28 Connecting Your Projector NOTE: 1 Interactivity is supported only in the following input modes: VGA and HDMI from a PC, and Wireless Display, USB Display, and LAN Display. 2 To enable Interactive Pen, the 2nd connection between your computer/laptop and projector is over ...
... computer and projector connections: a use a Mini USB cable b use a LAN cable (need to install the Dell Wireless Application Software) c use WLAN (need to install the Dell Wireless Application Software) If you use a LAN or WLAN connection, ensure that Wireless/LAN is turned on first....is recommended for your installation. 28 Connecting Your Projector NOTE: 1 Interactivity is supported only in the following input modes: VGA and HDMI from a PC, and Wireless Display, USB Display, and LAN Display. 2 To enable Interactive Pen, the 2nd connection between your computer/laptop and projector is over ...
User Guide
Page 39
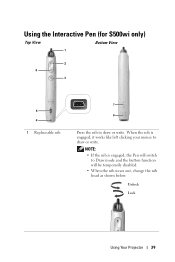
Unlock Lock Using Your Projector 39 NOTE: • If the nib is engaged, it works like left clicking your mouse to Draw mode and the button function will be temporarily disabled. • When the nib wears out, change the nib head as shown below. When the nib is engaged, the Pen will switch to draw or write. Using the Interactive Pen (for S500wi only) Top View Bottom View 1 2 6 3 5 4 1 Replaceable nib 7 8 Press the nib to draw or write.
Unlock Lock Using Your Projector 39 NOTE: • If the nib is engaged, it works like left clicking your mouse to Draw mode and the button function will be temporarily disabled. • When the nib wears out, change the nib head as shown below. When the nib is engaged, the Pen will switch to draw or write. Using the Interactive Pen (for S500wi only) Top View Bottom View 1 2 6 3 5 4 1 Replaceable nib 7 8 Press the nib to draw or write.
User Guide
Page 40
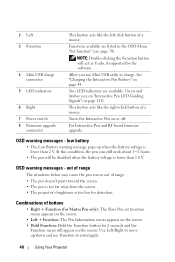
...Two LED indicators are listed in the OSD Menu "Set function" (see on "Interactive Pen LED Guiding Signals" on the screen. • Hold Function: Hold the Function button for detection. For Interactive Pen and RF board firmware upgrade. OSD warning messages - NOTE: Double-clicking the Function...for 2 seconds and the Function mean will appear on the screen. Functions available are available: Green and Amber (see page 70). Turns the Interactive Pen on page 44. 2 Left 3 Function 4 Mini USB charge connector 5 LED indicators 6 Right 7 Power switch 8 Firmware upgrade connector This button...
...Two LED indicators are listed in the OSD Menu "Set function" (see on "Interactive Pen LED Guiding Signals" on the screen. • Hold Function: Hold the Function button for detection. For Interactive Pen and RF board firmware upgrade. OSD warning messages - NOTE: Double-clicking the Function...for 2 seconds and the Function mean will appear on the screen. Functions available are available: Green and Amber (see page 70). Turns the Interactive Pen on page 44. 2 Left 3 Function 4 Mini USB charge connector 5 LED indicators 6 Right 7 Power switch 8 Firmware upgrade connector This button...

User Guide
Page 41
• When Toggle is selected in the Set Function menu, press the Function button to select Normal/Draw/Stable mode. NOTE: Interactive pen cannot support Windows Mouse property function "Switch primary and secondary buttons". Using Your Projector 41
• When Toggle is selected in the Set Function menu, press the Function button to select Normal/Draw/Stable mode. NOTE: Interactive pen cannot support Windows Mouse property function "Switch primary and secondary buttons". Using Your Projector 41
User Guide
Page 42
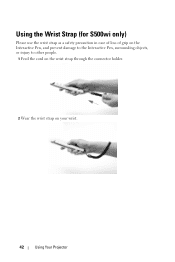
Using the Wrist Strap (for S500wi only) Please use the wrist strap as a safety precaution in case of loss of grip on the Interactive Pen, and prevent damage to the Interactive Pen, surrounding objects, or injury to other people. 1 Feed the cord on the wrist strap through the connector holder. 2 Wear the wrist strap on your wrist. 42 Using Your Projector
Using the Wrist Strap (for S500wi only) Please use the wrist strap as a safety precaution in case of loss of grip on the Interactive Pen, and prevent damage to the Interactive Pen, surrounding objects, or injury to other people. 1 Feed the cord on the wrist strap through the connector holder. 2 Wear the wrist strap on your wrist. 42 Using Your Projector
User Guide
Page 44
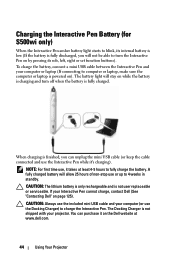
... USB cable and your projector. Charging the Interactive Pen Battery (for S500wi only) When the Interactive Pen amber battery light starts to blink, its nib, left, right or set function buttons). To charge the battery, connect a mini USB cable between the Interactive Pen and your Interactive Pen cannot charge, contact Dell (See "Contacting Dell" on while the battery is charging and...
... USB cable and your projector. Charging the Interactive Pen Battery (for S500wi only) When the Interactive Pen amber battery light starts to blink, its nib, left, right or set function buttons). To charge the battery, connect a mini USB cable between the Interactive Pen and your Interactive Pen cannot charge, contact Dell (See "Contacting Dell" on while the battery is charging and...
User Guide
Page 46
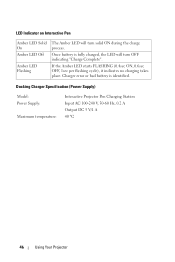
... Station Input AC 100-240 V, 50-60 Hz, 0.2 A Output DC 5 V/1 A 40 ºC 46 Using Your Projector LED Indicator on Interactive Pen Amber LED Solid On Amber LED Off Amber LED Flashing The Amber LED will turn solid ON during the charge process. If the Amber LED ...
... Station Input AC 100-240 V, 50-60 Hz, 0.2 A Output DC 5 V/1 A 40 ºC 46 Using Your Projector LED Indicator on Interactive Pen Amber LED Solid On Amber LED Off Amber LED Flashing The Amber LED will turn solid ON during the charge process. If the Amber LED ...
User Guide
Page 47
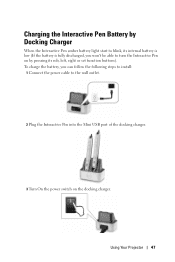
Charging the Interactive Pen Battery by pressing its internal battery is low (If the battery is fully discharged, you can follow the following steps to install: 1 Connect the power cable to blink, its nib, left, right or set function buttons). To charge the battery, you won't be able to turn the Interactive Pen on by Docking Charger When the Interactive Pen amber battery light start to the wall outlet. 2 Plug the Interactive Pen into the Mini USB port of the docking charger. 3 Turn On the power switch on the docking charger. Using Your Projector 47
Charging the Interactive Pen Battery by pressing its internal battery is low (If the battery is fully discharged, you can follow the following steps to install: 1 Connect the power cable to blink, its nib, left, right or set function buttons). To charge the battery, you won't be able to turn the Interactive Pen on by Docking Charger When the Interactive Pen amber battery light start to the wall outlet. 2 Plug the Interactive Pen into the Mini USB port of the docking charger. 3 Turn On the power switch on the docking charger. Using Your Projector 47
User Guide
Page 48
NOTE: During the charging process, Interactive Pen amber battery light will allow up to fully charge the battery. CAUTION: If your docking charger cannot charge, contact DELL™. 48 Using Your Projector NOTE: For first time use or up to 25 hours of non-stop use , it takes at least 4-5 hours to 4 weeks in standby. A fully charged battery will be lit all the time until the charging completed.
NOTE: During the charging process, Interactive Pen amber battery light will allow up to fully charge the battery. CAUTION: If your docking charger cannot charge, contact DELL™. 48 Using Your Projector NOTE: For first time use or up to 25 hours of non-stop use , it takes at least 4-5 hours to 4 weeks in standby. A fully charged battery will be lit all the time until the charging completed.

User Guide
Page 50
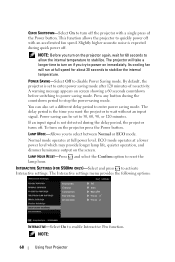
Operating Range with Interactive Pen (for S500wi only) Distance Angle Operating range Angle Distance 0° 9 m/29.53 feet 20° 7 m/22.97 feet 45° 5 m/16.4 feet Angle Distance NOTE: • Projector is at 2000 lm brightness, with 100 inches image size, and in Bright mode. • Can support multiple pens (up to 10 pens) connecting to one projector but the pens cannot be used simultaneously. • Actual operating range may slightly differ from the diagram. • The projector brightness decay will affect the operating range of the pen. 50 Using Your Projector
Operating Range with Interactive Pen (for S500wi only) Distance Angle Operating range Angle Distance 0° 9 m/29.53 feet 20° 7 m/22.97 feet 45° 5 m/16.4 feet Angle Distance NOTE: • Projector is at 2000 lm brightness, with 100 inches image size, and in Bright mode. • Can support multiple pens (up to 10 pens) connecting to one projector but the pens cannot be used simultaneously. • Actual operating range may slightly differ from the diagram. • The projector brightness decay will affect the operating range of the pen. 50 Using Your Projector
User Guide
Page 68
...between Normal or ECO mode. You can be set a different delay period to enter power saving mode. INTERACTIVE SETTINGS (FOR S500WI ONLY)-Select and press to disable Power Saving mode. The projector will run at full speed for 60 ...countdown period to stop the power-saving mode. ECO mode operates at full power level. The Interactive settings menu provides the following options: INTERACTIVE-Select On to reset the lamp hour. NOTE: 68 Using Your Projector Slightly higher acoustic ...on the screen. LAMP HOUR RESET-Press and select the Confirm option to enable Interactive Pen function.
...between Normal or ECO mode. You can be set a different delay period to enter power saving mode. INTERACTIVE SETTINGS (FOR S500WI ONLY)-Select and press to disable Power Saving mode. The projector will run at full speed for 60 ...countdown period to stop the power-saving mode. ECO mode operates at full power level. The Interactive settings menu provides the following options: INTERACTIVE-Select On to reset the lamp hour. NOTE: 68 Using Your Projector Slightly higher acoustic ...on the screen. LAMP HOUR RESET-Press and select the Confirm option to enable Interactive Pen function.
User Guide
Page 69
...Auto - If the left click and double click function. •Draw - See "Connecting With Your Interactive Pen (for drawing. Interactivity is connected. PEN SETTINGS-Select and press to the projector. 3. Interactive Pen cannot be used in the following input modes: VGA and HDMI from a Computer, and Wireless Display...on the screen. •Stable - This mode is selected automatically. •Manual - Channel is best to move freely for S500wi only)" on the screen. This mode is selected manually. Using Your Projector 69 1. CONNECTOR-Allows you to set the channel ...
...Auto - If the left click and double click function. •Draw - See "Connecting With Your Interactive Pen (for drawing. Interactivity is connected. PEN SETTINGS-Select and press to the projector. 3. Interactive Pen cannot be used in the following input modes: VGA and HDMI from a Computer, and Wireless Display...on the screen. •Stable - This mode is selected automatically. •Manual - Channel is best to move freely for S500wi only)" on the screen. This mode is selected manually. Using Your Projector 69 1. CONNECTOR-Allows you to set the channel ...
User Guide
Page 70
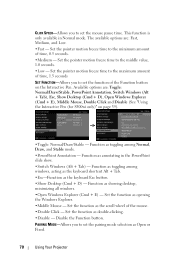
..., PowerPoint Annotation, Switch Windows (Alt + Tab), Esc, Show Desktop (Cmd + D), Open Windows Explorer (Cmd + E), Middle Mouse, Double Click and Disable (See "Using the Interactive Pen (for S500wi only)" on the Interactive Pen. Available options are : Fast, Medium, and Low. •Fast - Function as toggling among Normal, Draw, and Stable mode. •PowerPoint Annotation - PAIRING MODE...
..., PowerPoint Annotation, Switch Windows (Alt + Tab), Esc, Show Desktop (Cmd + D), Open Windows Explorer (Cmd + E), Middle Mouse, Double Click and Disable (See "Using the Interactive Pen (for S500wi only)" on the Interactive Pen. Available options are : Fast, Medium, and Low. •Fast - Function as toggling among Normal, Draw, and Stable mode. •PowerPoint Annotation - PAIRING MODE...


