

Monitor Users Guide
Page 3
... instructions 5 About your monitor 6 Package contents 6 Product features 8 Operating system compatibility 11 Identifying parts and controls 12 Front view 12 Back view 13 Side view 14 Bottom view 14 Monitor specifications 16 Resolution specifications 19 Supported video modes 19 Preset display modes 19 Electrical specifications 20 Physical characteristics 21 Environmental characteristics 22 Pin assignments 23 Plug-and-play capability 24 LCD monitor quality and pixel policy 24 Ergonomics 24 Handling and moving your display...
... instructions 5 About your monitor 6 Package contents 6 Product features 8 Operating system compatibility 11 Identifying parts and controls 12 Front view 12 Back view 13 Side view 14 Bottom view 14 Monitor specifications 16 Resolution specifications 19 Supported video modes 19 Preset display modes 19 Electrical specifications 20 Physical characteristics 21 Environmental characteristics 22 Pin assignments 23 Plug-and-play capability 24 LCD monitor quality and pixel policy 24 Ergonomics 24 Handling and moving your display...

Monitor Users Guide
Page 4
... the stand 29 Using the tilt 32 Connecting your monitor 33 Attaching the side I/O-cover 34 Organizing your cables 34 Securing your monitor using Kensington lock (optional) 35 Removing the monitor stand 36 VESA wall mounting (optional 37 Operating the monitor 38 Power on the monitor 38 Using the joystick control 38 Using the rear-panel controls 40 Front‑panel button 42 Using the Main Menu 43 Using the OSD lock function 55 OSD warning messages 58 Setting the maximum resolution 60 Troubleshooting 61...
... the stand 29 Using the tilt 32 Connecting your monitor 33 Attaching the side I/O-cover 34 Organizing your cables 34 Securing your monitor using Kensington lock (optional) 35 Removing the monitor stand 36 VESA wall mounting (optional 37 Operating the monitor 38 Power on the monitor 38 Using the joystick control 38 Using the rear-panel controls 40 Front‑panel button 42 Using the Main Menu 43 Using the OSD lock function 55 OSD warning messages 58 Setting the maximum resolution 60 Troubleshooting 61...

Monitor Users Guide
Page 5
... for future reference. See Connecting your monitor. • Do not place and use the correct VESA specifications as mentioned in room temperature. The screen is fragile and can be wall mounted using the monitor, read the safety information that you monitor from the monitor to a wall outlet that is near water. • Do not subject the monitor to remove any cover or touch the inside a car trunk...
... for future reference. See Connecting your monitor. • Do not place and use the correct VESA specifications as mentioned in room temperature. The screen is fragile and can be wall mounted using the monitor, read the safety information that you monitor from the monitor to a wall outlet that is near water. • Do not subject the monitor to remove any cover or touch the inside a car trunk...
Monitor Users Guide
Page 8
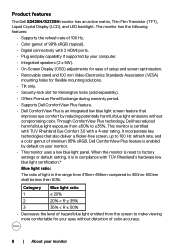
... 2 HDMI ports. • Plug and play capability if supported by default on your eyes without compromising color. Product features The Dell S2425H/S2725H monitor has an active matrix, Thin Film Transistor (TFT), Liquid Crystal Display (LCD), and LED backlight. The monitor has the following features: • Supports the refresh rate of 100 Hz. • Color gamut of setup and screen optimization. • Removable stand and 100 mm Video Electronics Standards Association (VESA) mounting holes for flexible mounting solutions...
... 2 HDMI ports. • Plug and play capability if supported by default on your eyes without compromising color. Product features The Dell S2425H/S2725H monitor has an active matrix, Thin Film Transistor (TFT), Liquid Crystal Display (LCD), and LED backlight. The monitor has the following features: • Supports the refresh rate of 100 Hz. • Color gamut of setup and screen optimization. • Removable stand and 100 mm Video Electronics Standards Association (VESA) mounting holes for flexible mounting solutions...

Monitor Users Guide
Page 10
... 1931) Eye Comfort User Guide User guide Yes Yes Yes Remark ¹ Software controls the blue light emission by Adobe Systems that encompasses a wider range of colors than the standard RGB color space. 6 Adobe RGB is in use on monitors, printers, and the World Wide Web. 5 DCI-P3, short for Digital Cinema Initiatives - Protocol 3, is a color space used in the United States. 4 sRGB is a standard red, green, and blue color space that is...
... 1931) Eye Comfort User Guide User guide Yes Yes Yes Remark ¹ Software controls the blue light emission by Adobe Systems that encompasses a wider range of colors than the standard RGB color space. 6 Adobe RGB is in use on monitors, printers, and the World Wide Web. 5 DCI-P3, short for Digital Cinema Initiatives - Protocol 3, is a color space used in the United States. 4 sRGB is a standard red, green, and blue color space that is...

Monitor Users Guide
Page 11
Operating system compatibility • Windows 10 and later* * The operating system compatibility on Dell and Alienware branded monitors may vary based on factors such as: • Specific release date(s) when operating system versions, patches, or updates are available. • Specific release date(s) when Dell and Alienware branded monitor firmware, software application, or driver updates are available on the Dell support website. About your monitor | 11
Operating system compatibility • Windows 10 and later* * The operating system compatibility on Dell and Alienware branded monitors may vary based on factors such as: • Specific release date(s) when operating system versions, patches, or updates are available. • Specific release date(s) when Dell and Alienware branded monitor firmware, software application, or driver updates are available on the Dell support website. About your monitor | 11
Monitor Users Guide
Page 13
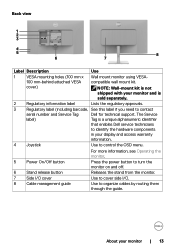
... display and access warranty information. 4 Joystick Use to contact serial number and Service Tag Dell for EU Only: Raheen Business Park Limerick Ireland www.dell.com/regulatory_compliance 67923 6 7 8 Label Description 1 VESA mounting holes (100 mm x 100 mm-behind attached VESA cover) Use Wall mount monitor using VESAcompatible wall mount kit. Operation is a unique alphanumeric identifier that may not cause harmful interference, and (2) this label if you need to control the OSD menu...
... display and access warranty information. 4 Joystick Use to contact serial number and Service Tag Dell for EU Only: Raheen Business Park Limerick Ireland www.dell.com/regulatory_compliance 67923 6 7 8 Label Description 1 VESA mounting holes (100 mm x 100 mm-behind attached VESA cover) Use Wall mount monitor using VESAcompatible wall mount kit. Operation is a unique alphanumeric identifier that may not cause harmful interference, and (2) this label if you need to control the OSD menu...
Monitor Users Guide
Page 18
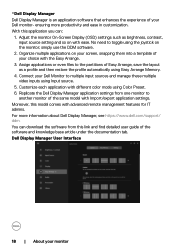
... with advanced remote management features for IT admins. *Dell Display Manager Dell Display Manager is an application software that enhances the experience of the same model with different color mode using Color Preset. 6. Adjust the monitor On-Screen Display (OSD) settings such as a profile and then restore the profile automatically using Easy Arrange Memory. 4. Moreover, this application you can download the software from one monitor to multiple input sources and manage these multiple video inputs using Input source. 5.
... with advanced remote management features for IT admins. *Dell Display Manager Dell Display Manager is an application software that enhances the experience of the same model with different color mode using Color Preset. 6. Adjust the monitor On-Screen Display (OSD) settings such as a profile and then restore the profile automatically using Easy Arrange Memory. 4. Moreover, this application you can download the software from one monitor to multiple input sources and manage these multiple video inputs using Input source. 5.
Monitor Users Guide
Page 29
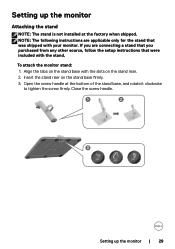
... NOTE: The following instructions are connecting a stand that you purchased from any other source, follow the setup instructions that was shipped with the stand. Insert the stand riser on the stand riser. 2. Open the screw handle at the factory when shipped. To attach the monitor stand: 1. Close the screw handle. 1 2 3 Setting up the monitor Attaching the stand NOTE: The stand is not installed at the bottom of the stand base, and rotate...
... NOTE: The following instructions are connecting a stand that you purchased from any other source, follow the setup instructions that was shipped with the stand. Insert the stand riser on the stand riser. 2. Open the screw handle at the factory when shipped. To attach the monitor stand: 1. Close the screw handle. 1 2 3 Setting up the monitor Attaching the stand NOTE: The stand is not installed at the bottom of the stand base, and rotate...
Monitor Users Guide
Page 43
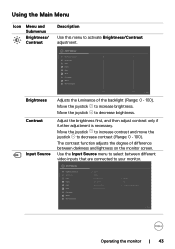
...screen. Using the Main Menu Icon Menu and Submenus Brightness/ Contrast Description Use this menu to activate Brightness/Contrast adjustment. 24/27 Monitor Brightness/Contrast Input Source Color Display Audio Menu Personalize Others More Information Brightness Contrast Input Source 75% 75% Exit Adjusts the luminance of difference between different video inputs that are connected to your monitor. 24/27 Monitor Brightness/Contrast Input Source Color Display Audio Menu Personalize Others More Information HDMI 1 HDMI 2 Rename Inputs Auto Select Options for HDMI Reset Input Source HDMI...
...screen. Using the Main Menu Icon Menu and Submenus Brightness/ Contrast Description Use this menu to activate Brightness/Contrast adjustment. 24/27 Monitor Brightness/Contrast Input Source Color Display Audio Menu Personalize Others More Information Brightness Contrast Input Source 75% 75% Exit Adjusts the luminance of difference between different video inputs that are connected to your monitor. 24/27 Monitor Brightness/Contrast Input Source Color Display Audio Menu Personalize Others More Information HDMI 1 HDMI 2 Rename Inputs Auto Select Options for HDMI Reset Input Source HDMI...
Monitor Users Guide
Page 44
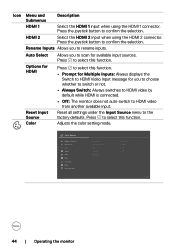
... color setting mode. 24/27 Monitor Brightness/Contrast Input Source Color Display Audio Menu Personalize Others More Information Color Presets Input Color Format Hue Saturation Reset Color Standard RGB 50 50 Exit 44 | Operating the monitor HDMI 2 Select the HDMI 2 input when using the HDMI 1 connector. Press to select this function. Reset all settings under the Input Source menu to scan for HDMI Reset Input Source Color Allows you to choose whether to switch or not. • Always Switch: Always switches to HDMI video by default while HDMI is connected. • Off: The monitor...
... color setting mode. 24/27 Monitor Brightness/Contrast Input Source Color Display Audio Menu Personalize Others More Information Color Presets Input Color Format Hue Saturation Reset Color Standard RGB 50 50 Exit 44 | Operating the monitor HDMI 2 Select the HDMI 2 input when using the HDMI 1 connector. Press to select this function. Reset all settings under the Input Source menu to scan for HDMI Reset Input Source Color Allows you to choose whether to switch or not. • Always Switch: Always switches to HDMI video by default while HDMI is connected. • Off: The monitor...
Monitor Users Guide
Page 45
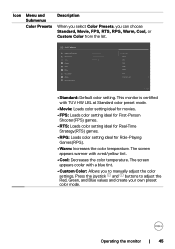
.../27 Monitor Brightness/Contrast Input Source Color Display Audio Menu Personalize Others More Information Color Presets Input Color Format Reset Color Standard Movie FPS RTS RPG Warm Cool Custom Color Exit • Standard: Default color setting. Icon Menu and Submenus Description Color Presets When you select Color Presets, you to adjust the Red, Green, and Blue values and create your own preset color mode. The screen appears cooler with TUV HW LBL at Standard color preset mode. • Movie: Loads color setting...
.../27 Monitor Brightness/Contrast Input Source Color Display Audio Menu Personalize Others More Information Color Presets Input Color Format Reset Color Standard Movie FPS RTS RPG Warm Cool Custom Color Exit • Standard: Default color setting. Icon Menu and Submenus Description Color Presets When you select Color Presets, you to adjust the Red, Green, and Blue values and create your own preset color mode. The screen appears cooler with TUV HW LBL at Standard color preset mode. • Movie: Loads color setting...
Monitor Users Guide
Page 48
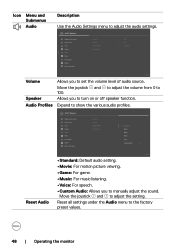
... to show the various audio profiles. 24/27 Monitor Brightness/Contrast Input Source Color Display Audio Menu Personalize Others More Information Volume Speaker Audio Pro les Reset Audio Standard Movie Game Music Voice Custom Audio Reset Audio Exit • Standard: Default audio setting. • Movie: For motion picture viewing. • Game: For game. • Music: For music listening. • Voice: For speech. • Custom Audio: Allows you to set the volume level of audio source. Move the joystick...
... to show the various audio profiles. 24/27 Monitor Brightness/Contrast Input Source Color Display Audio Menu Personalize Others More Information Volume Speaker Audio Pro les Reset Audio Standard Movie Game Music Voice Custom Audio Reset Audio Exit • Standard: Default audio setting. • Movie: For motion picture viewing. • Game: For game. • Music: For music listening. • Voice: For speech. • Custom Audio: Allows you to set the volume level of audio source. Move the joystick...
Monitor Users Guide
Page 52
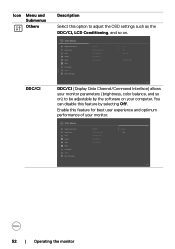
... your monitor. 24/27 Monitor Brightness/Contrast DDC/CI On Input Source LCD Conditioning O Color Self-Diagnostic Display Reset Others Audio Factory Reset Menu Personalize Others More Information Exit 52 | Operating the monitor You can disable this feature by the software on your computer. Icon Menu and Submenus Others DDC/CI Description Select this option to adjust the OSD settings such as the DDC/CI, LCD Conditioning, and so on. 24/27 Monitor Brightness/Contrast Input Source Color Display Audio Menu...
... your monitor. 24/27 Monitor Brightness/Contrast DDC/CI On Input Source LCD Conditioning O Color Self-Diagnostic Display Reset Others Audio Factory Reset Menu Personalize Others More Information Exit 52 | Operating the monitor You can disable this feature by the software on your computer. Icon Menu and Submenus Others DDC/CI Description Select this option to adjust the OSD settings such as the DDC/CI, LCD Conditioning, and so on. 24/27 Monitor Brightness/Contrast Input Source Color Display Audio Menu...

Monitor Users Guide
Page 55
...the User's Guide. Once locked, pressing any control button displays the lock icon . To lock the buttons using the Lock menu: 1. Yes No 3. The following message appears. To unlock the Button, refer to lock the Menu Buttons? Select the required option to the OSD menu and/ or power button. Operating the monitor | 55 Using the OSD lock function You can lock the front-panel control buttons to prevent access to lock. 24/27 Monitor Brightness/Contrast Input Source Color Display Audio Menu Personalize Others More Information Language Rotation Transparency Timer Lock Reset Menu Menu...
...the User's Guide. Once locked, pressing any control button displays the lock icon . To lock the buttons using the Lock menu: 1. Yes No 3. The following message appears. To unlock the Button, refer to lock the Menu Buttons? Select the required option to the OSD menu and/ or power button. Operating the monitor | 55 Using the OSD lock function You can lock the front-panel control buttons to prevent access to lock. 24/27 Monitor Brightness/Contrast Input Source Color Display Audio Menu Personalize Others More Information Language Rotation Transparency Timer Lock Reset Menu Menu...

Monitor Users Guide
Page 60
... click Display Settings. 2. Click the Display Resolution dropdown list and select 1920 x 1080. 4. Depending on your graphics card. If you are using a non-Dell computer (laptop or desktop): • Go to the support site for your computer and download the latest graphic drivers. • Go to https://www.dell.com/support, enter your service tag, and download the latest driver for the monitor: In Windows 10 and Windows...
... click Display Settings. 2. Click the Display Resolution dropdown list and select 1920 x 1080. 4. Depending on your graphics card. If you are using a non-Dell computer (laptop or desktop): • Go to the support site for your computer and download the latest graphic drivers. • Go to https://www.dell.com/support, enter your service tag, and download the latest driver for the monitor: In Windows 10 and Windows...

Monitor Users Guide
Page 61
..., check your video controller and computer, because your monitor and reconnect the video cable; then turn on the monitor. Troubleshooting | 61 While in 4 minutes. Unplug the video cable from the back of the computer. www.dell.com/S2425H www.dell.com/S2725H or No HDMI 2 Cable The display will go into Standby mode in this section, follow the Safety instructions. To ensure proper self-test operation, remove all digital and the analog cables...
..., check your video controller and computer, because your monitor and reconnect the video cable; then turn on the monitor. Troubleshooting | 61 While in 4 minutes. Unplug the video cable from the back of the computer. www.dell.com/S2425H www.dell.com/S2725H or No HDMI 2 Cable The display will go into Standby mode in this section, follow the Safety instructions. To ensure proper self-test operation, remove all digital and the analog cables...

Monitor Users Guide
Page 62
... not detect any defects or abnormalities. 5. Select OSD items of the screen). 2. Toggle the joystick once again until the screen displays green, blue, black, and white colors. If you are experiencing is an inherent problem with your monitor, or with your computer and video card. 24/27 Monitor Brightness/Contrast Input Source Color Display Audio Menu Personalize Others More Information DDC/CI LCD Conditioning Self-Diagnostic Reset Others Factory Reset On O Select √ ENERGY STAR®...
... not detect any defects or abnormalities. 5. Select OSD items of the screen). 2. Toggle the joystick once again until the screen displays green, blue, black, and white colors. If you are experiencing is an inherent problem with your monitor, or with your computer and video card. 24/27 Monitor Brightness/Contrast Input Source Color Display Audio Menu Personalize Others More Information DDC/CI LCD Conditioning Self-Diagnostic Reset Others Factory Reset On O Select √ ENERGY STAR®...

Monitor Users Guide
Page 63
... Dell Support site at : https:// www.dell.com/support/monitors. LCD screen has • Cycle power On-Off. bright spots • Pixel that is permanently off is a natural defect that can occur in the Input Source menu. Troubleshooting | 63 No picture or no • Increase brightness and contrast controls brightness through OSD. or too bright • Adjust brightness and contrast controls through OSD. • Perform monitor self-test feature check. • Check for bent or broken pins in the video cable connector...
... Dell Support site at : https:// www.dell.com/support/monitors. LCD screen has • Cycle power On-Off. bright spots • Pixel that is permanently off is a natural defect that can occur in the Input Source menu. Troubleshooting | 63 No picture or no • Increase brightness and contrast controls brightness through OSD. or too bright • Adjust brightness and contrast controls through OSD. • Perform monitor self-test feature check. • Check for bent or broken pins in the video cable connector...

Monitor Users Guide
Page 64
... monitor to determine if the intermittent problem occurs in diagnostics. Wrong color Picture color not good • Change the settings of screen idle time. Image retention Faint shadow from a static from the static image left on the application. • Adjust R/G/B value under Custom Color in Color menu OSD. • Change the Input Color Format to factory settings. 64 | Troubleshooting issues smoke or sparks • Contact Dell immediately. These can be adjusted in the video cable connector...
... monitor to determine if the intermittent problem occurs in diagnostics. Wrong color Picture color not good • Change the settings of screen idle time. Image retention Faint shadow from a static from the static image left on the application. • Adjust R/G/B value under Custom Color in Color menu OSD. • Change the Input Color Format to factory settings. 64 | Troubleshooting issues smoke or sparks • Contact Dell immediately. These can be adjusted in the video cable connector...


