Display Manager 2.0 for Windows Users Guide
Page 17
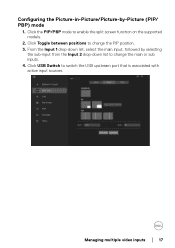
Configuring the Picture-in-Picture/Picture-by selecting the sub-input from the Input 2 drop-down list to enable the split screen function on the supported models. 2. Click the PIP/PBP mode to change the PIP position. 3. From the Input 1 drop-down list, select the main input, followed by -Picture (PIP/ PBP) mode 1. Click USB Switch to change the main or sub inputs. 4. Managing multiple video inputs │ 17 Click Toggle between positions to switch the USB upstream port that is associated with active input sources.
Configuring the Picture-in-Picture/Picture-by selecting the sub-input from the Input 2 drop-down list to enable the split screen function on the supported models. 2. Click the PIP/PBP mode to change the PIP position. 3. From the Input 1 drop-down list, select the main input, followed by -Picture (PIP/ PBP) mode 1. Click USB Switch to change the main or sub inputs. 4. Managing multiple video inputs │ 17 Click Toggle between positions to switch the USB upstream port that is associated with active input sources.

Display Manager 2.0 for Windows Users Guide
Page 25
NOTE: If an application window cannot fit in the zone defined by -side (for DDM 2.0 supported models). NOTE: The Span across multiple monitors can be enabled only for all connected monitors that have the same physical size, resolution, scaling settings, and are placed side-by Easy Arrange, the application may not display properly. Organizing windows with Easy Arrange │ 25
NOTE: If an application window cannot fit in the zone defined by -side (for DDM 2.0 supported models). NOTE: The Span across multiple monitors can be enabled only for all connected monitors that have the same physical size, resolution, scaling settings, and are placed side-by Easy Arrange, the application may not display properly. Organizing windows with Easy Arrange │ 25
Display Manager 2.0 for Windows Users Guide
Page 49
... monitor has turned on . 4. Check the monitor OSD to your monitor and your monitors are correctly connected to the ports. 2. Ensure all your computer. Troubleshooting │ 49 The monitor is turned off. The monitor has Screen Partition turned on Multi-Monitor Sync (MMS). 2. Make sure the video cable or USB upstream cable is properly connected to ensure DDC/CI is enabled. If DDM 2.0 is highly recommended to uninstall DDM 1.x if all the connectors are supported...
... monitor has turned on . 4. Check the monitor OSD to your monitor and your monitors are correctly connected to the ports. 2. Ensure all your computer. Troubleshooting │ 49 The monitor is turned off. The monitor has Screen Partition turned on Multi-Monitor Sync (MMS). 2. Make sure the video cable or USB upstream cable is properly connected to ensure DDC/CI is enabled. If DDM 2.0 is highly recommended to uninstall DDM 1.x if all the connectors are supported...

Monitor Users Guide
Page 3
... parts and controls 10 Front view 10 Back view 11 Bottom view 13 Resolution specifications 16 Supported video modes 16 Preset display modes 17 Electrical specifications 19 Physical characteristics 20 Environmental characteristics 21 Pin assignments 22 LCD monitor quality and pixel policy 24 Ergonomics 24 Handling and moving your display 26 Maintenance guidelines 27 Cleaning your monitor 34 Connecting the HDMI and power cables 34 │3 S2721QS/S2721QSA 31 Connecting your monitor 27 Setting up the monitor 28 Connecting...
... parts and controls 10 Front view 10 Back view 11 Bottom view 13 Resolution specifications 16 Supported video modes 16 Preset display modes 17 Electrical specifications 19 Physical characteristics 20 Environmental characteristics 21 Pin assignments 22 LCD monitor quality and pixel policy 24 Ergonomics 24 Handling and moving your display 26 Maintenance guidelines 27 Cleaning your monitor 34 Connecting the HDMI and power cables 34 │3 S2721QS/S2721QSA 31 Connecting your monitor 27 Setting up the monitor 28 Connecting...

Monitor Users Guide
Page 4
... lock (optional). 37 Removing the monitor stand - S2721Q 38 Removing the monitor stand - S2721QS/S2721QSA . . . . 39 VESA wall mounting (optional 40 Operating the monitor 41 Power on the monitor 41 Using the front-panel controls 41 Front-panel button 42 Using the On-Screen Display (OSD) menu 43 Accessing the menu system 43 OSD warning message 59 Setting the maximum resolution 62 Requirements to DP) cable (optional) and power cable 35 Organizing your cables 35 Turning on your monitor 36 Securing your system . . 67 Troubleshooting...
... lock (optional). 37 Removing the monitor stand - S2721Q 38 Removing the monitor stand - S2721QS/S2721QSA . . . . 39 VESA wall mounting (optional 40 Operating the monitor 41 Power on the monitor 41 Using the front-panel controls 41 Front-panel button 42 Using the On-Screen Display (OSD) menu 43 Accessing the menu system 43 OSD warning message 59 Setting the maximum resolution 62 Requirements to DP) cable (optional) and power cable 35 Organizing your cables 35 Turning on your monitor 36 Securing your system . . 67 Troubleshooting...

Monitor Users Guide
Page 8
.../S2721QSA: Tilt, swivel, pivot, and height adjustment capabilities. • Dual built-in speakers. • Removable stand and Video Electronics Standards Association (VESA™) 100 mm mounting holes for flexible mounting solutions. • Plug and play capability if supported by country) HDMI cable • Quick Setup Guide • Safety, Environmental, and Regulatory Information Product features The Dell S2721Q/S2721QS/S2721QSA monitor has an active matrix, Thin-Film Transistor (TFT), Liquid Crystal Display (LCD) and LED backlight. VESA™ screw cover...
.../S2721QSA: Tilt, swivel, pivot, and height adjustment capabilities. • Dual built-in speakers. • Removable stand and Video Electronics Standards Association (VESA™) 100 mm mounting holes for flexible mounting solutions. • Plug and play capability if supported by country) HDMI cable • Quick Setup Guide • Safety, Environmental, and Regulatory Information Product features The Dell S2721Q/S2721QS/S2721QSA monitor has an active matrix, Thin-Film Transistor (TFT), Liquid Crystal Display (LCD) and LED backlight. VESA™ screw cover...
Monitor Users Guide
Page 9
... of set-up and screen optimization. • Supports Picture by adjusting display parameters, without sacrificing true-to-life colors. • On-Screen Display (OSD) adjustments for them. NOTE: When PIP/PBP is activated, AMD FreeSync™ (in AMD Radeon™ software) is compliant with a flicker-free screen and low blue light feature. • S2721QS/S2721QSA: The Monitor uses Low Blue Light panel and is disabled. • Power and OSD buttons lock. • Security lock slot. • < 0.3 W in the Extreme mode to...
... of set-up and screen optimization. • Supports Picture by adjusting display parameters, without sacrificing true-to-life colors. • On-Screen Display (OSD) adjustments for them. NOTE: When PIP/PBP is activated, AMD FreeSync™ (in AMD Radeon™ software) is compliant with a flicker-free screen and low blue light feature. • S2721QS/S2721QSA: The Monitor uses Low Blue Light panel and is disabled. • Power and OSD buttons lock. • Security lock slot. • < 0.3 W in the Extreme mode to...

Monitor Users Guide
Page 16
...; to 90° Height adjustable stand Not applicable 110 mm Built-in speakers 2 x 3 W sound output Dell Display Manager Easy Arrange and other key features compatibility Security Security lock slot (cable lock sold separately) Resolution specifications Model Horizontal scan range Vertical scan range Maximum preset resolution Supported video modes S2721Q/S2721QS/S2721QSA 130 kHz to 137 kHz (automatic) 40 Hz to 60 Hz (automatic) 3840 x 2160 at 60 Hz Model S2721Q/S2721QS/S2721QSA Video display capabilities (HDMI 480p, 480i...
...; to 90° Height adjustable stand Not applicable 110 mm Built-in speakers 2 x 3 W sound output Dell Display Manager Easy Arrange and other key features compatibility Security Security lock slot (cable lock sold separately) Resolution specifications Model Horizontal scan range Vertical scan range Maximum preset resolution Supported video modes S2721Q/S2721QS/S2721QSA 130 kHz to 137 kHz (automatic) 40 Hz to 60 Hz (automatic) 3840 x 2160 at 60 Hz Model S2721Q/S2721QS/S2721QSA Video display capabilities (HDMI 480p, 480i...

Monitor Users Guide
Page 42
... launch the On-Screen Display (OSD). Front-panel button Use the buttons on or off. Back 42 │ Operating the monitor Power (with power light indicator) Solid white light indicates that the monitor is turned on and functioning normally. See Accessing the menu system. Use the Down button to adjust (increase ranges) items in the OSD menu. Blinking white light indicates that the monitor is in Standby Mode. Use the OK button to exit the OSD main menu. Menu 4 Use this button to confirm...
... launch the On-Screen Display (OSD). Front-panel button Use the buttons on or off. Back 42 │ Operating the monitor Power (with power light indicator) Solid white light indicates that the monitor is turned on and functioning normally. See Accessing the menu system. Use the Down button to adjust (increase ranges) items in the OSD menu. Blinking white light indicates that the monitor is in Standby Mode. Use the OK button to exit the OSD main menu. Menu 4 Use this button to confirm...
Monitor Users Guide
Page 47
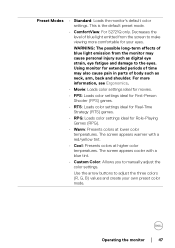
... screen appears cooler with a red/yellow tint. • Cool: Presents colors at lower color temperatures. This is the default preset mode. • ComfortView: For S2721Q only. Operating the monitor │ 47 Using monitor for your own preset color mode. The screen appears warmer with a blue tint. • Custom Color: Allows you to adjust the three colors (R, G, B) values and create your eyes. Use the arrow buttons to manually adjust the color settings. Preset Modes...
... screen appears cooler with a red/yellow tint. • Cool: Presents colors at lower color temperatures. This is the default preset mode. • ComfortView: For S2721Q only. Operating the monitor │ 47 Using monitor for your own preset color mode. The screen appears warmer with a blue tint. • Custom Color: Allows you to adjust the three colors (R, G, B) values and create your eyes. Use the arrow buttons to manually adjust the color settings. Preset Modes...

Monitor Users Guide
Page 55
... by the user. Alternative Lock Method [for 4 seconds. Operating the monitor │ 55 NOTE: To unlock the button(s), press and hold the Menu/ function button next to the Power button for 4 seconds to the Power button for Menu/function buttons]: You can prevent people from accessing the controls. Reset Menu • Menu Buttons: All Menu/function buttons (except the Power button) are locked and not accessible by -side setup. Resets all OSD settings to the factory preset values...
... by the user. Alternative Lock Method [for 4 seconds. Operating the monitor │ 55 NOTE: To unlock the button(s), press and hold the Menu/ function button next to the Power button for 4 seconds to the Power button for Menu/function buttons]: You can prevent people from accessing the controls. Reset Menu • Menu Buttons: All Menu/function buttons (except the Power button) are locked and not accessible by -side setup. Resets all OSD settings to the factory preset values...

Monitor Users Guide
Page 57
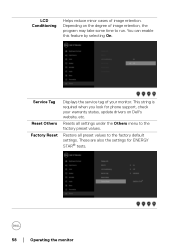
Enable this feature for best user experience and optimum performance of your computer. Operating the monitor │ 57 Display Info DDC/CI Displays the monitor's current settings. DDC/CI (Display Data Channel/Command Interface) allows your monitor parameters (brightness, color balance, and etc.) to adjust the OSD settings, such as DDC/CI, LCD Conditioning, and so on your monitor. You can disable this feature by selecting Off. Others Select this option to be adjustable via the software on .
Enable this feature for best user experience and optimum performance of your computer. Operating the monitor │ 57 Display Info DDC/CI Displays the monitor's current settings. DDC/CI (Display Data Channel/Command Interface) allows your monitor parameters (brightness, color balance, and etc.) to adjust the OSD settings, such as DDC/CI, LCD Conditioning, and so on your monitor. You can disable this feature by selecting Off. Others Select this option to be adjustable via the software on .
Monitor Users Guide
Page 58
... image retention. Resets all preset values to the factory preset values. Depending on Dell's website, etc. You can enable this feature by selecting On. This string is required when you look for ENERGY STAR® tests. 58 │ Operating the monitor Restore all settings under the Others menu to the factory default settings. These are also the settings for phone support, check your monitor. LCD...
... image retention. Resets all preset values to the factory preset values. Depending on Dell's website, etc. You can enable this feature by selecting On. This string is required when you look for ENERGY STAR® tests. 58 │ Operating the monitor Restore all settings under the Others menu to the factory default settings. These are also the settings for phone support, check your monitor. LCD...
Monitor Users Guide
Page 62
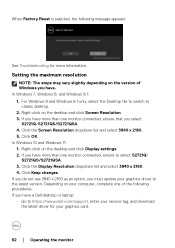
....dell.com/support, enter your service tag, and download the latest driver for more than one monitor connected, ensure to select S2721Q/ S2721QS/S2721QSA. 3. For Windows 8 and Windows 8.1 only, select the Desktop tile to switch to the latest version. If you have more than one monitor connected, ensure that you select S2721Q/S2721QS/S2721QSA. 4. Right-click on the desktop and click Screen Resolution. 3. Click Keep changes. Click the Display Resolution...
....dell.com/support, enter your service tag, and download the latest driver for more than one monitor connected, ensure to select S2721Q/ S2721QS/S2721QSA. 3. For Windows 8 and Windows 8.1 only, select the Desktop tile to switch to the latest version. If you have more than one monitor connected, ensure that you select S2721Q/S2721QS/S2721QSA. 4. Right-click on the desktop and click Screen Resolution. 3. Click Keep changes. Click the Display Resolution...

Monitor Users Guide
Page 63
NOTE: To download and install the latest graphics driver that supports Full Screen Playback mode (e.g. Intel (Integrated Graphics) HDR capable processor: CannonLake or later Suitable HDR player: Windows 10 Movies & TV app Operating System (OS) with HDR support: Windows 10 Redstone 3 Driver with HDR support: see www.nvidia.com. Requirements to view or playback HDR content (1) Through Ultra BluRay DVD or Game consoles...
NOTE: To download and install the latest graphics driver that supports Full Screen Playback mode (e.g. Intel (Integrated Graphics) HDR capable processor: CannonLake or later Suitable HDR player: Windows 10 Movies & TV app Operating System (OS) with HDR support: Windows 10 Redstone 3 Driver with HDR support: see www.nvidia.com. Requirements to view or playback HDR content (1) Through Ultra BluRay DVD or Game consoles...

Monitor Users Guide
Page 67
... using the monitor with a non-Dell computer, you have an Intel® graphics card, select the Intel graphics tab, click Graphic Properties, select the Rotation tab, and then set the preferred rotation. 4. Operating the monitor │ 67 Right-click on your display. If you need to complete the procedure below to go to www.dell.com/support and download the latest driver...
... using the monitor with a non-Dell computer, you have an Intel® graphics card, select the Intel graphics tab, click Graphic Properties, select the Rotation tab, and then set the preferred rotation. 4. Operating the monitor │ 67 Right-click on your display. If you need to complete the procedure below to go to www.dell.com/support and download the latest driver...

Monitor Users Guide
Page 68
.... 68 │ Troubleshooting Turn Off both your monitor and computer are properly connected but the monitor screen remains dark, run the monitor self-test by performing the following steps: 1. While in this section, follow the Safety instructions. Unplug the video cable from the computer. 3. Also, depending upon the selected input, one of the procedures in self-test mode, the power LED remains white. Sel f-test...
.... 68 │ Troubleshooting Turn Off both your monitor and computer are properly connected but the monitor screen remains dark, run the monitor self-test by performing the following steps: 1. While in this section, follow the Safety instructions. Unplug the video cable from the computer. 3. Also, depending upon the selected input, one of the procedures in self-test mode, the power LED remains white. Sel f-test...

Monitor Users Guide
Page 69
... Button 2 to inspect the display in red, green, blue, black, white, and text screens. 7. Troubleshooting │ 69 To run the built-in diagnostic tool that the screen is an inherent problem with your monitor, or with your computer and the monitor. A gray test pattern appears at the beginning of the screen). 2. Repeat steps 4 and 5 to select the diagnostic tool and use the previous procedure, check your video controller...
... Button 2 to inspect the display in red, green, blue, black, white, and text screens. 7. Troubleshooting │ 69 To run the built-in diagnostic tool that the screen is an inherent problem with your monitor, or with your computer and the monitor. A gray test pattern appears at the beginning of the screen). 2. Repeat steps 4 and 5 to select the diagnostic tool and use the previous procedure, check your video controller...

Monitor Users Guide
Page 72
... the Color menu OSD. • Change the Input Color Format to RGB or YPbPr in the Color menu OSD. • Run the built-in diagnostics. 72 │ Troubleshooting Picture color not good • Change the settings of • Do not perform any troubleshooting smoke or sparks steps. • Contact Dell immediately. Monitor • Ensure that the video cable connecting the monitor to the computer is connected properly and is secure. • Reset the monitor to factory settings...
... the Color menu OSD. • Change the Input Color Format to RGB or YPbPr in the Color menu OSD. • Run the built-in diagnostics. 72 │ Troubleshooting Picture color not good • Change the settings of • Do not perform any troubleshooting smoke or sparks steps. • Contact Dell immediately. Monitor • Ensure that the video cable connecting the monitor to the computer is connected properly and is secure. • Reset the monitor to factory settings...
Monitor Users Guide
Page 73
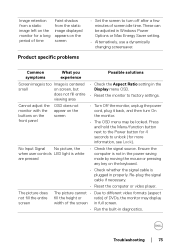
... shadow from the static image displayed appears on the screen Product specific problems • Set the screen to turn On the monitor. • The OSD menu may display width of screen idle time. No Input Signal No picture, the when user controls LED light is not in the power saving mode by moving the mouse or pressing any key on the screen • Turn Off the monitor, unplug the power cord, plug it back, and then turn off after a few...
... shadow from the static image displayed appears on the screen Product specific problems • Set the screen to turn On the monitor. • The OSD menu may display width of screen idle time. No Input Signal No picture, the when user controls LED light is not in the power saving mode by moving the mouse or pressing any key on the screen • Turn Off the monitor, unplug the power cord, plug it back, and then turn off after a few...


