

Monitor Users Guide
Page 3
Contents Safety instructions 5 About your monitor 6 Package contents 6 Product features 7 Identifying parts and controls 8 Front view 8 Back view 9 Bottom view 10 Monitor specifications 11 Resolution specifications 12 Preset display modes 13 Electrical specifications 13 Physical characteristics 14 Environmental characteristics 15 Power management modes 16 Pin Assignments 18 Plug-and-play 19 LCD monitor quality and pixel policy 19 Ergonomics 19 Handling and moving your display 21 Maintenance guidelines 22 Cleaning your monitor 22 Contents | 3
Contents Safety instructions 5 About your monitor 6 Package contents 6 Product features 7 Identifying parts and controls 8 Front view 8 Back view 9 Bottom view 10 Monitor specifications 11 Resolution specifications 12 Preset display modes 13 Electrical specifications 13 Physical characteristics 14 Environmental characteristics 15 Power management modes 16 Pin Assignments 18 Plug-and-play 19 LCD monitor quality and pixel policy 19 Ergonomics 19 Handling and moving your display 21 Maintenance guidelines 22 Cleaning your monitor 22 Contents | 3
Monitor Users Guide
Page 4
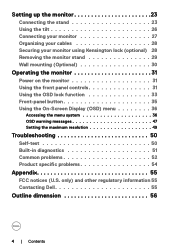
Setting up the monitor 23 Connecting the stand 23 Using the tilt 26 Connecting your monitor 27 Organizing your cables 28 Securing your monitor using Kensington lock (optional) 28 Removing the monitor stand 29 Wall mounting (Optional 30 Operating the monitor 31 Power on the monitor 31 Using the front panel controls 31 Using the OSD lock function 33 Front‑panel button 35 Using the On-Screen Display (OSD) menu 36 Accessing the menu system 36 OSD warning messages 47 Setting the maximum resolution 49 Troubleshooting 50 Self...
Setting up the monitor 23 Connecting the stand 23 Using the tilt 26 Connecting your monitor 27 Organizing your cables 28 Securing your monitor using Kensington lock (optional) 28 Removing the monitor stand 29 Wall mounting (Optional 30 Operating the monitor 31 Power on the monitor 31 Using the front panel controls 31 Using the OSD lock function 33 Front‑panel button 35 Using the On-Screen Display (OSD) menu 36 Accessing the menu system 36 OSD warning messages 47 Setting the maximum resolution 49 Troubleshooting 50 Self...
Monitor Users Guide
Page 7
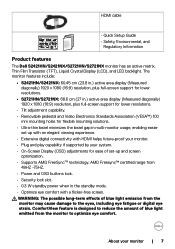
...) • Quick Setup Guide • Safety, Environmental, and Regulatory Information Product features The Dell S2421HN/S2421NX/S2721HN/S2721NX monitor has an active matrix, Thin Film Transistor (TFT), Liquid Crystal Display (LCD), and LED backlight. ComfortView feature is designed to reduce the amount of blue light emitted from the monitor may cause damage to optimize eye comfort. About your system. • On-Screen Display (OSD) adjustments for flexible mounting solutions. •...
...) • Quick Setup Guide • Safety, Environmental, and Regulatory Information Product features The Dell S2421HN/S2421NX/S2721HN/S2721NX monitor has an active matrix, Thin Film Transistor (TFT), Liquid Crystal Display (LCD), and LED backlight. ComfortView feature is designed to reduce the amount of blue light emitted from the monitor may cause damage to optimize eye comfort. About your system. • On-Screen Display (OSD) adjustments for flexible mounting solutions. •...
Monitor Users Guide
Page 9
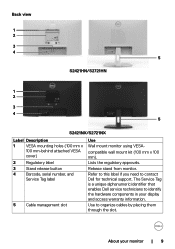
... cause harmful interference, and (2) this label if you need to identify the hardware components in China Manufactured date S2421HN t S2421HN/S2721HN 5 1 2 3 4 5 S2421NX/S2721NX Label Description 1 VESA mounting holes (100 mm x 100 mm-behind attached VESA cover) 2 Regulatory label 3 Stand release button 4 Barcode, serial number, and Service Tag label 5 Cable management slot Use Wall mount monitor using VESA- Release stand from monitor. Use to the following two conditions: ID XXXXXXXXXX ID XXXXXXXXXX...
... cause harmful interference, and (2) this label if you need to identify the hardware components in China Manufactured date S2421HN t S2421HN/S2721HN 5 1 2 3 4 5 S2421NX/S2721NX Label Description 1 VESA mounting holes (100 mm x 100 mm-behind attached VESA cover) 2 Regulatory label 3 Stand release button 4 Barcode, serial number, and Service Tag label 5 Cable management slot Use Wall mount monitor using VESA- Release stand from monitor. Use to the following two conditions: ID XXXXXXXXXX ID XXXXXXXXXX...

Monitor Users Guide
Page 10
Connect your monitor). Only two-channel audio is supported. Connect the power cable (shipped with your computer with HDMI cable. Connect speakers to playback audio coming through HDMI audio channel. Bottom view 12 3 45 S2421HN/S2721HN Label Description 1 Security lock slot 2 Power connector 3 HDMI port 1 4 HDMI port 2 5 Audio Line-out port 12 3 45 S2421NX/S2721NX Use Secures monitor with HDMI cable. NOTE: The audio line-out port does not support headphones. 10 | About your computer with security cable lock (sold separately). Connect your monitor
Connect your monitor). Only two-channel audio is supported. Connect the power cable (shipped with your computer with HDMI cable. Connect speakers to playback audio coming through HDMI audio channel. Bottom view 12 3 45 S2421HN/S2721HN Label Description 1 Security lock slot 2 Power connector 3 HDMI port 1 4 HDMI port 2 5 Audio Line-out port 12 3 45 S2421NX/S2721NX Use Secures monitor with HDMI cable. NOTE: The audio line-out port does not support headphones. 10 | About your computer with security cable lock (sold separately). Connect your monitor

Monitor Users Guide
Page 11
... Horizontal 178° (typical) Vertical 178° (typical) Brightness 250 cd/m² (typical) 300 cd/m² (typical) Contrast ratio 1000 to 1 (typical) Display screen coating Anti-glare treatment of the front polarizer (3H) hard coating Backlight LED edgelight system Response Time (Gray to Gray) 8 ms (normal) 5 ms (fast) 4 ms (extreme) Color depth 16.7 million colors Color gamut* NTSC 72% Connectivity • 2 x HDMI 1.4 • 1 x Audio...
... Horizontal 178° (typical) Vertical 178° (typical) Brightness 250 cd/m² (typical) 300 cd/m² (typical) Contrast ratio 1000 to 1 (typical) Display screen coating Anti-glare treatment of the front polarizer (3H) hard coating Backlight LED edgelight system Response Time (Gray to Gray) 8 ms (normal) 5 ms (fast) 4 ms (extreme) Color depth 16.7 million colors Color gamut* NTSC 72% Connectivity • 2 x HDMI 1.4 • 1 x Audio...

Monitor Users Guide
Page 33
... the User's Guide. To unlock the Buttons, refer to the OSD menu and/ or power button. Yes No S2421HN/S2421NX/S2721HN/S2721NX 3. Select one of the following message appears. The following options. Once locked, pressing any control button will display the lock icon Use the front-panel control button to lock the Menu Buttons? Dell 24/27 Monitor Are you sure you want to lock the button(s). 1234 5 Operating the monitor | 33 Dell 24/27 Monitor Brightness/Contrast Input Source Color Display Menu Personalize Others Language...
... the User's Guide. To unlock the Buttons, refer to the OSD menu and/ or power button. Yes No S2421HN/S2421NX/S2721HN/S2721NX 3. Select one of the following message appears. The following options. Once locked, pressing any control button will display the lock icon Use the front-panel control button to lock the Menu Buttons? Dell 24/27 Monitor Are you sure you want to lock the button(s). 1234 5 Operating the monitor | 33 Dell 24/27 Monitor Brightness/Contrast Input Source Color Display Menu Personalize Others Language...

Monitor Users Guide
Page 35
... the OSD menu. Power Button unlock 3 Use this option to unlock power button to adjust the image settings. OK Operating the monitor | 35 Front Panel Button 1 Up Down 2 1 23 Description Use the Up (increase) and Down (decrease) buttons to run the built-in diagnostics, see Built-in Diagnostics Front‑panel button Use the buttons on the front of the monitor to turn off the monitor. Built-in Diagnostics. Menu Button unlock 2 Use this option to unlock OSD menu and power button to turn...
... the OSD menu. Power Button unlock 3 Use this option to unlock power button to adjust the image settings. OK Operating the monitor | 35 Front Panel Button 1 Up Down 2 1 23 Description Use the Up (increase) and Down (decrease) buttons to run the built-in diagnostics, see Built-in Diagnostics Front‑panel button Use the buttons on the front of the monitor to turn off the monitor. Built-in Diagnostics. Menu Button unlock 2 Use this option to unlock OSD menu and power button to turn...

Monitor Users Guide
Page 38
... to the factory defaults. Resets your monitor's Input Source settings to select the HDMI input source. Dell 24/27 Monitor Brightness/Contrast Input Source Color Display Menu Personalize Others Preset Modes Input Color Format Reset Color Standard RGB 38 | Operating the monitor Use to adjust the color setting mode. Use the Color menu to select Auto Select, the monitor scans for available input sources. Icon Menu and Submenus HDMI 1 HDMI 2 Auto Select Reset Input Source Color Description Select HDMI1 input when you are using the HDMI2 connector. Select HDMI2 input when you...
... to the factory defaults. Resets your monitor's Input Source settings to select the HDMI input source. Dell 24/27 Monitor Brightness/Contrast Input Source Color Display Menu Personalize Others Preset Modes Input Color Format Reset Color Standard RGB 38 | Operating the monitor Use to adjust the color setting mode. Use the Color menu to select Auto Select, the monitor scans for available input sources. Icon Menu and Submenus HDMI 1 HDMI 2 Auto Select Reset Input Source Color Description Select HDMI1 input when you are using the HDMI2 connector. Select HDMI2 input when you...
Monitor Users Guide
Page 40
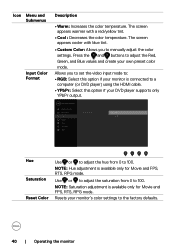
Press the and buttons to adjust the Red, Green, and Blue values and create your monitor's color settings to the factory defaults. 40 | Operating the monitor Icon Menu and Submenus Input Color Format Description • Warm: Increases the color temperature. Use or to adjust the saturation from 0 to 100. Resets your own preset color mode. Dell 24/27 Monitor Brightness/Contrast Input Source Color Display Menu Personalize Others Preset Modes Input Color Format Reset Color RGB YPbPr Hue Saturation Reset Color Use or to adjust the hue from 0 to 100...
Press the and buttons to adjust the Red, Green, and Blue values and create your monitor's color settings to the factory defaults. 40 | Operating the monitor Icon Menu and Submenus Input Color Format Description • Warm: Increases the color temperature. Use or to adjust the saturation from 0 to 100. Resets your own preset color mode. Dell 24/27 Monitor Brightness/Contrast Input Source Color Display Menu Personalize Others Preset Modes Input Color Format Reset Color RGB YPbPr Hue Saturation Reset Color Use or to adjust the hue from 0 to 100...

Monitor Users Guide
Page 43
The buttons are locked. Operating the monitor | 43 Restore the menu settings to adjustments. Icon Menu and Submenus Lock Description Controls user access to factory defaults. Dell 24/27 Monitor Brightness/Contrast Input Source Color Display Menu Personalize Others Language Transparency Timer Lock Reset Menu Menu Buttons Power Button Menu + Power Buttons Disable Reset Menu • Menu Buttons: Through OSD to lock the Menu buttons. • Power Button: Through OSD to lock the Power button. • Menu + Power Buttons: Through OSD to lock the all of Menu and Power buttons...
The buttons are locked. Operating the monitor | 43 Restore the menu settings to adjustments. Icon Menu and Submenus Lock Description Controls user access to factory defaults. Dell 24/27 Monitor Brightness/Contrast Input Source Color Display Menu Personalize Others Language Transparency Timer Lock Reset Menu Menu Buttons Power Button Menu + Power Buttons Disable Reset Menu • Menu Buttons: Through OSD to lock the Menu buttons. • Power Button: Through OSD to lock the Power button. • Menu + Power Buttons: Through OSD to lock the all of Menu and Power buttons...

Monitor Users Guide
Page 44
..., Brightness/Contrast, Input Source, Aspect Ratio set as shortcut key 2. LED Reset Restores shortcut keys to save energy. Persona- lization 44 | Operating the monitor Power Button Allows you to set the state of the power light to factory defaults. Icon Menu and Submenus Personalize Description Dell 24/27 Monitor Brightness/Contrast Input Source Color Display Menu Personalize Others Shortcut Key 1 Shortcut Key 2 Power Button LED Reset Personalization Preset Modes Input Source On In On Mode Shortcut key 1 Select from Preset Modes, Brightness/Contrast, Input Source...
..., Brightness/Contrast, Input Source, Aspect Ratio set as shortcut key 2. LED Reset Restores shortcut keys to save energy. Persona- lization 44 | Operating the monitor Power Button Allows you to set the state of the power light to factory defaults. Icon Menu and Submenus Personalize Description Dell 24/27 Monitor Brightness/Contrast Input Source Color Display Menu Personalize Others Shortcut Key 1 Shortcut Key 2 Power Button LED Reset Personalization Preset Modes Input Source On In On Mode Shortcut key 1 Select from Preset Modes, Brightness/Contrast, Input Source...

Monitor Users Guide
Page 45
...turn off this feature for best user experience and optimum performance of your computer. Dell 24/27 Monitor Brightness/Contrast Display Info Input Source DDC/CI On Color LCD Conditioning O Display Menu Personalize Firmware Service Tag Reset Others Others Factory Reset Operating the monitor | 45 DDC/CI (Display Data Channel/Command Interface) allows you to adjust the monitor settings using software on . Enable this feature. Dell 24/27 Monitor Brightness/Contrast Input Source Color Display Menu Personalize Others Display Info DDC/CI LCD Conditioning Firmware Service...
...turn off this feature for best user experience and optimum performance of your computer. Dell 24/27 Monitor Brightness/Contrast Display Info Input Source DDC/CI On Color LCD Conditioning O Display Menu Personalize Firmware Service Tag Reset Others Others Factory Reset Operating the monitor | 45 DDC/CI (Display Data Channel/Command Interface) allows you to adjust the monitor settings using software on . Enable this feature. Dell 24/27 Monitor Brightness/Contrast Input Source Color Display Menu Personalize Others Display Info DDC/CI LCD Conditioning Firmware Service...
Monitor Users Guide
Page 48
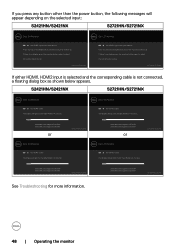
....dell.com/support/S2421HN www.dell.com/support/S2421NX or Dell 24 Monitor No HDMI2 Cable The display will go into Standby Mode in 4 minutes. S2421HN/S2421NX www.dell.com/support/S2721HN www.dell.com/support/S2721NX or S2721HN/S2721NX Dell 27 Monitor No HDMI2 Cable The display will go into Power Save Mode in 4 minutes. Dell 27 Monitor No HDMI1 Cable The display will go into Standby Mode in 4 minutes. If there is no display, press the monitor button...
....dell.com/support/S2421HN www.dell.com/support/S2421NX or Dell 24 Monitor No HDMI2 Cable The display will go into Standby Mode in 4 minutes. S2421HN/S2421NX www.dell.com/support/S2721HN www.dell.com/support/S2721NX or S2721HN/S2721NX Dell 27 Monitor No HDMI2 Cable The display will go into Power Save Mode in 4 minutes. Dell 27 Monitor No HDMI1 Cable The display will go into Standby Mode in 4 minutes. If there is no display, press the monitor button...
Monitor Users Guide
Page 50
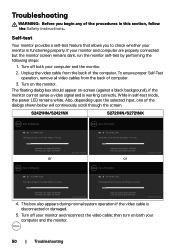
...-test by performing the following steps: 1. Turn on -screen (against a black background), if the monitor cannot sense a video signal and is disconnected or damaged. 5. The floating dialog box should appear on the monitor. www.dell.com/support/S2421HN www.dell.com/support/S2421NX or Dell 24 Monitor No HDMI2 Cable The display will go into Power Save Mode in 4 minutes. then turn on both your computer and the monitor. 50 | Troubleshooting
...-test by performing the following steps: 1. Turn on -screen (against a black background), if the monitor cannot sense a video signal and is disconnected or damaged. 5. The floating dialog box should appear on the monitor. www.dell.com/support/S2421HN www.dell.com/support/S2421NX or Dell 24 Monitor No HDMI2 Cable The display will go into Power Save Mode in 4 minutes. then turn on both your computer and the monitor. 50 | Troubleshooting

Monitor Users Guide
Page 51
... green, blue, black, white, and text screens. Ensure that helps you determine if the screen abnormality you are experiencing is an inherent problem with your monitor, or with your monitor is functioning properly. To exit, press Button 1 again. Check the video card and computer. Troubleshooting | 51 Select the built-in diagnostic tool, the monitor is functioning properly. Repeat steps 5 to 6 to inspect the display when it changes to red...
... green, blue, black, white, and text screens. Ensure that helps you determine if the screen abnormality you are experiencing is an inherent problem with your monitor, or with your monitor is functioning properly. To exit, press Button 1 again. Check the video card and computer. Troubleshooting | 51 Select the built-in diagnostic tool, the monitor is functioning properly. Repeat steps 5 to 6 to inspect the display when it changes to red...
Monitor Users Guide
Page 52
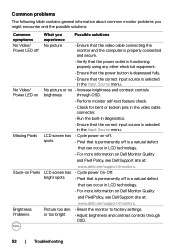
... is permanently off is selected in the Input Source menu. Brightness Problems Picture too dim • Reset the monitor to factory settings. No Video/ No picture or no • Increase brightness and contrast controls Power LED on brightness through OSD. 52 | Troubleshooting Stuck-on -off. or too bright • Adjust brightness and contrast controls through OSD. • Perform monitor self-test feature check. • Check for bent or broken pins in the video cable connector. • Run the built-in diagnostics. •...
... is permanently off is selected in the Input Source menu. Brightness Problems Picture too dim • Reset the monitor to factory settings. No Video/ No picture or no • Increase brightness and contrast controls Power LED on brightness through OSD. 52 | Troubleshooting Stuck-on -off. or too bright • Adjust brightness and contrast controls through OSD. • Perform monitor self-test feature check. • Check for bent or broken pins in the video cable connector. • Run the built-in diagnostics. •...

Monitor Users Guide
Page 53
.... • Adjust R/G/B value under Custom Color in Color menu OSD. • Change the Input Color Format to the computer is connected properly and is secure. • Reset the monitor to factory settings. • Perform monitor self-test feature check to turn from a static from the static off and is secure. • Check for appears on the modes). Missing Color Picture missing color • Perform monitor self-test. • Ensure that the video cable connecting the...
.... • Adjust R/G/B value under Custom Color in Color menu OSD. • Change the Input Color Format to the computer is connected properly and is secure. • Reset the monitor to factory settings. • Perform monitor self-test feature check to turn from a static from the static off and is secure. • Check for appears on the modes). Missing Color Picture missing color • Perform monitor self-test. • Ensure that the video cable connecting the...

Monitor Users Guide
Page 54
.... 54 | Troubleshooting area Cannot adjust the monitor with the buttons on the front panel OSD does not appear on the screen • Turn off the monitor, unplug the monitor power cable, plug it back, and then turn on screen, but does Display menu OSD. Connect the signal cable again, if necessary. • Reset the computer or video player. Product specific problems Problem What you experience Possible solutions Screen image is Image is centered • Check the Aspect Ratio setting in properly...
.... 54 | Troubleshooting area Cannot adjust the monitor with the buttons on the front panel OSD does not appear on the screen • Turn off the monitor, unplug the monitor power cable, plug it back, and then turn on screen, but does Display menu OSD. Connect the signal cable again, if necessary. • Reset the computer or video player. Product specific problems Problem What you experience Possible solutions Screen image is Image is centered • Check the Aspect Ratio setting in properly...
Monitor Display Manager Users Guide
Page 4
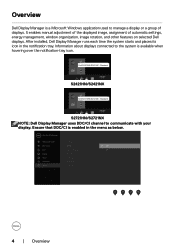
...Dell 24/27 Monitor Brightness/Contrast Display Info Input Source DDC/CI On Color LCD Conditioning O Display Menu Personalize Firmware Service Tag Reset Others Others Factory Reset 4 | Overview It enables manual adjustment of the displayed image, assignment of displays. Standard S2421HN/S2421NX Dell S2721HN/S2721NX - Overview Dell Display Manager is a Microsoft Windows application used to manage a display or a group of automatic settings, energy management, window organization, image rotation, and other features on selected Dell displays. After installed, Dell...
...Dell 24/27 Monitor Brightness/Contrast Display Info Input Source DDC/CI On Color LCD Conditioning O Display Menu Personalize Firmware Service Tag Reset Others Others Factory Reset 4 | Overview It enables manual adjustment of the displayed image, assignment of displays. Standard S2421HN/S2421NX Dell S2721HN/S2721NX - Overview Dell Display Manager is a Microsoft Windows application used to manage a display or a group of automatic settings, energy management, window organization, image rotation, and other features on selected Dell displays. After installed, Dell...


