Monitor Users Guide
Page 3
Contents About your monitor 6 Package contents 6 Product features 7 Identifying parts and controls 9 Front view 9 Back view 10 Side view 11 Bottom view 11 Monitor specifications 14 Resolution specifications 15 Supported video modes 15 Preset display modes 16 Electrical specifications 18 Physical characteristics 19 Environmental characteristics 21 Power management modes 22 Plug and play capability 23 LCD monitor quality and pixel policy 23 Maintenance guidelines 23 Cleaning your monitor 23 Setting up the monitor 24 Connecting the stand 24 Connecting your monitor 26
Contents About your monitor 6 Package contents 6 Product features 7 Identifying parts and controls 9 Front view 9 Back view 10 Side view 11 Bottom view 11 Monitor specifications 14 Resolution specifications 15 Supported video modes 15 Preset display modes 16 Electrical specifications 18 Physical characteristics 19 Environmental characteristics 21 Power management modes 22 Plug and play capability 23 LCD monitor quality and pixel policy 23 Maintenance guidelines 23 Cleaning your monitor 23 Setting up the monitor 24 Connecting the stand 24 Connecting your monitor 26
Monitor Users Guide
Page 4
... Organizing cables 28 Removing the stand 29 Operating your monitor 31 Power on the monitor 31 Using the control buttons 31 OSD controls 33 Using the On-Screen Display (OSD) menu 34 Accessing the OSD menu 34 OSD warning messages 47 Setting up your monitor 50 Setting the maximum resolution 50 If you have a Dell desktop or a Dell portable computer with internet access 50 If you have a non Dell desktop, portable computer, or graphics card 51 Using tilt 52 Troubleshooting...
... Organizing cables 28 Removing the stand 29 Operating your monitor 31 Power on the monitor 31 Using the control buttons 31 OSD controls 33 Using the On-Screen Display (OSD) menu 34 Accessing the OSD menu 34 OSD warning messages 47 Setting up your monitor 50 Setting the maximum resolution 50 If you have a Dell desktop or a Dell portable computer with internet access 50 If you have a non Dell desktop, portable computer, or graphics card 51 Using tilt 52 Troubleshooting...
Monitor Users Guide
Page 8
... flexible mounting solutions. ∞∞Tilt, swivel, pivot, and height adjustment capabilities. ∞∞Security-lock slot. ∞∞BFR/PVC-Reduced (Its circuit boards are made from BFR/PVC-free laminates.) ∞∞Arsenic-Free glass and Mercury-Free for the panel only. ∞∞High Dynamic Contrast Ratio (8,000,000:1). ∞∞0.3 W standby power when in the sleep mode. ∞∞Dell Display Manager Software...
... flexible mounting solutions. ∞∞Tilt, swivel, pivot, and height adjustment capabilities. ∞∞Security-lock slot. ∞∞BFR/PVC-Reduced (Its circuit boards are made from BFR/PVC-free laminates.) ∞∞Arsenic-Free glass and Mercury-Free for the panel only. ∞∞High Dynamic Contrast Ratio (8,000,000:1). ∞∞0.3 W standby power when in the sleep mode. ∞∞Dell Display Manager Software...
Monitor Users Guide
Page 9
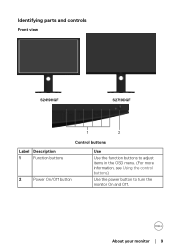
About your monitor │ 9 Identifying parts and controls Front view S2419HGF S2719DGF 1 2 Control buttons Label Description 1 Function buttons 2 Power On/Off button Use Use the function buttons to adjust items in the OSD menu. (For more information, see Using the control buttons) Use the power button to turn the monitor On and Off.
About your monitor │ 9 Identifying parts and controls Front view S2419HGF S2719DGF 1 2 Control buttons Label Description 1 Function buttons 2 Power On/Off button Use Use the function buttons to adjust items in the OSD menu. (For more information, see Using the control buttons) Use the power button to turn the monitor On and Off.
Monitor Users Guide
Page 10
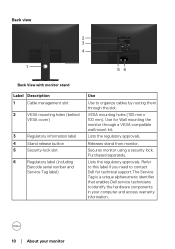
... Express Service Code: 123 456 789 0 S/N: CN-0P16TFTV100-87C-001U -A00 Q40G027N-700-13A 56 Back View with monitor stand Label Description 1 Cable management slot 2 VESA mounting holes (behind VESA cover) 3 Regulatory information label 4 Stand release button 5 Security-lock slot 6 Regulatory label (including Barcode serial number and Service Tag label) Use Use to identify the hardware components in China Date of the FCC Rules. Use for Wall mounting the monitor through the...
... Express Service Code: 123 456 789 0 S/N: CN-0P16TFTV100-87C-001U -A00 Q40G027N-700-13A 56 Back View with monitor stand Label Description 1 Cable management slot 2 VESA mounting holes (behind VESA cover) 3 Regulatory information label 4 Stand release button 5 Security-lock slot 6 Regulatory label (including Barcode serial number and Service Tag label) Use Use to identify the hardware components in China Date of the FCC Rules. Use for Wall mounting the monitor through the...
Monitor Users Guide
Page 12
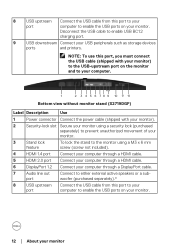
... cable. 7 Audio line out Connect to either external active speakers or a sub- 8 USB upstream Connect the USB cable from this port to your port computer to enable USB BC1.2 charging port. 9 USB downstream Connect your monitor port woofer (purchased separately).* 8 USB upstream Connect the USB cable from this port to your port computer to enable the USB ports on the monitor and to your computer. 1 2 3 4 5 6 7 8 9 10 9 11 Bottom view without monitor stand (S2719DGF) Label Description Use 1 Power connector Connect the power cable (shipped with your monitor...
... cable. 7 Audio line out Connect to either external active speakers or a sub- 8 USB upstream Connect the USB cable from this port to your port computer to enable USB BC1.2 charging port. 9 USB downstream Connect your monitor port woofer (purchased separately).* 8 USB upstream Connect the USB cable from this port to your port computer to enable the USB ports on the monitor and to your computer. 1 2 3 4 5 6 7 8 9 10 9 11 Bottom view without monitor stand (S2719DGF) Label Description Use 1 Power connector Connect the power cable (shipped with your monitor...
Monitor Users Guide
Page 15
... (Top) 7.4 mm (Left/Right) 21.3 mm (Bottom) 19.1 mm (Bottom) Security Security lock slot (cable lock optional purchase) Adjustability Height adjustable stand 130 mm Tilt -5° to 21° Swivel -45° to 45° Pivot -90° to 90° Resolution specifications Model Horizontal scan range Vertical scan range Maximum preset resolution S2419HGF S2719DGF 30 kHz to 140 kHz (automatic) 30 kHz to 230 kHz (automatic...
... (Top) 7.4 mm (Left/Right) 21.3 mm (Bottom) 19.1 mm (Bottom) Security Security lock slot (cable lock optional purchase) Adjustability Height adjustable stand 130 mm Tilt -5° to 21° Swivel -45° to 45° Pivot -90° to 90° Resolution specifications Model Horizontal scan range Vertical scan range Maximum preset resolution S2419HGF S2719DGF 30 kHz to 140 kHz (automatic) 30 kHz to 230 kHz (automatic...
Monitor Users Guide
Page 23
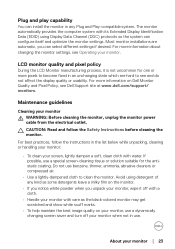
... best practices, follow the Safety Instructions before cleaning the monitor. Most monitor installations are hard to become fixed in the list below while unpacking, cleaning or handling your monitor: • To clean your screen, lightly dampen a soft, clean cloth with its Extended Display Identification Data (EDID) using detergent of any Plug and Play-compatible system. Maintenance guidelines Cleaning your monitor │ 23 About your monitor WARNING: Before cleaning the monitor, unplug the monitor power cable...
... best practices, follow the Safety Instructions before cleaning the monitor. Most monitor installations are hard to become fixed in the list below while unpacking, cleaning or handling your monitor: • To clean your screen, lightly dampen a soft, clean cloth with its Extended Display Identification Data (EDID) using detergent of any Plug and Play-compatible system. Maintenance guidelines Cleaning your monitor │ 23 About your monitor WARNING: Before cleaning the monitor, unplug the monitor power cable...
Monitor Users Guide
Page 36
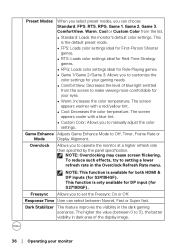
... monitor at a higher refresh rate than specified by the panel specification. The screen appears warmer with a blue tint. ∞∞Custom Color: Allows you to set the Freesync On or Off. NOTE: Overclocking may cause screen flickering. Dark Stabilizer The feature improves the visibility in the Overclock Refresh Rate menu. This is available for both HDMI & DP inputs (for S2719DGF). Freesync NOTE: This function is the default preset mode...
... monitor at a higher refresh rate than specified by the panel specification. The screen appears warmer with a blue tint. ∞∞Custom Color: Allows you to set the Freesync On or Off. NOTE: Overclocking may cause screen flickering. Dark Stabilizer The feature improves the visibility in the Overclock Refresh Rate menu. This is available for both HDMI & DP inputs (for S2719DGF). Freesync NOTE: This function is the default preset mode...
Monitor Users Guide
Page 40
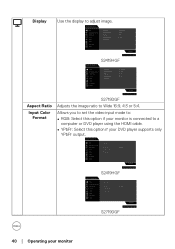
... monitor is connected to a computer or DVD player using the HDMI cable. ∞∞YPbPr: Select this option if your monitor Dell 24 Gaming Monitor Game Brightness / Contrast Input Source Display Audio Menu Personalize Others Aspect Ratio Input Color Format Sharpness Dynamic Contrast Reset Display RGB YPbPr S2419HGF S2419HGF Dell 27 Gaming Monitor Game Brightness / Contrast Input Source Display Audio Menu Personalize Others Aspect Ratio Input Color Format Sharpness Dynamic Contrast Reset Display RGB YPbPr S2719DGF S2719DGF 40 │ Operating your DVD player supports...
... monitor is connected to a computer or DVD player using the HDMI cable. ∞∞YPbPr: Select this option if your monitor Dell 24 Gaming Monitor Game Brightness / Contrast Input Source Display Audio Menu Personalize Others Aspect Ratio Input Color Format Sharpness Dynamic Contrast Reset Display RGB YPbPr S2419HGF S2419HGF Dell 27 Gaming Monitor Game Brightness / Contrast Input Source Display Audio Menu Personalize Others Aspect Ratio Input Color Format Sharpness Dynamic Contrast Reset Display RGB YPbPr S2719DGF S2719DGF 40 │ Operating your DVD player supports...
Monitor Users Guide
Page 44
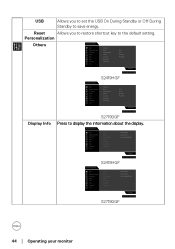
...set the USB On During Standby or Off During Standby to save energy. Dell 24 Gaming Monitor Game Brightness / Contrast Input Source Display Audio Menu Personalize Others Display Info DDC/CI LCD Conditioning Firmware Service Tag Reset Others Factory Reset Model: S2419HGF Input Source: DP Current: 1920x1080, 60Hz S2419HGF S2419HGF Dell 27 Gaming Monitor Game Brightness / Contrast Input Source Display Audio Menu Personalize Others Display Info DDC/CI LCD Conditioning Firmware Service Tag Reset Others Factory Reset Model: S2719DGF Input Source: DP Current: 1920x1080, 60Hz S2719DGF S2719DGF...
...set the USB On During Standby or Off During Standby to save energy. Dell 24 Gaming Monitor Game Brightness / Contrast Input Source Display Audio Menu Personalize Others Display Info DDC/CI LCD Conditioning Firmware Service Tag Reset Others Factory Reset Model: S2419HGF Input Source: DP Current: 1920x1080, 60Hz S2419HGF S2419HGF Dell 27 Gaming Monitor Game Brightness / Contrast Input Source Display Audio Menu Personalize Others Display Info DDC/CI LCD Conditioning Firmware Service Tag Reset Others Factory Reset Model: S2719DGF Input Source: DP Current: 1920x1080, 60Hz S2719DGF S2719DGF...
Monitor Users Guide
Page 50
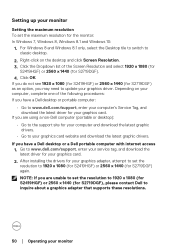
... access 1. Depending on the desktop and click Screen Resolution. 3. Setting up your graphics card. Click the Dropdown list of the following procedures: If you have a Dell desktop or portable computer: • Go to www.dell.com/support, enter your computer's Service Tag, and download the latest driver for your monitor Setting the maximum resolution To set the resolution to classic desktop. 2. After installing the drivers for S2719DGF) again.
... access 1. Depending on the desktop and click Screen Resolution. 3. Setting up your graphics card. Click the Dropdown list of the following procedures: If you have a Dell desktop or portable computer: • Go to www.dell.com/support, enter your computer's Service Tag, and download the latest driver for your monitor Setting the maximum resolution To set the resolution to classic desktop. 2. After installing the drivers for S2719DGF) again.
Monitor Users Guide
Page 51
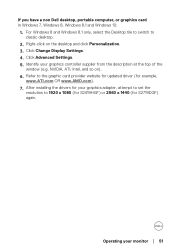
After installing the drivers for your graphics adapter, attempt to set the resolution to the graphic card provider website for updated driver (for S2719DGF) again. Click Advanced Settings. 5. Identify your monitor │ 51 Click Change Display Settings. 4. Operating your graphics controller supplier from the description at the top of the window (e.g. Refer to 1920 x 1080 (for S2419HGF) or 2560 x 1440 (for example, www.ATI.com OR www...
After installing the drivers for your graphics adapter, attempt to set the resolution to the graphic card provider website for updated driver (for S2719DGF) again. Click Advanced Settings. 5. Identify your monitor │ 51 Click Change Display Settings. 4. Operating your graphics controller supplier from the description at the top of the window (e.g. Refer to 1920 x 1080 (for S2419HGF) or 2560 x 1440 (for example, www.ATI.com OR www...
Monitor Users Guide
Page 53
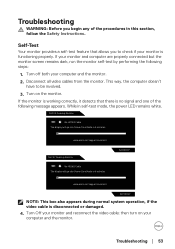
... Cable The display will go into Power Save Mode in 4 minutes. Troubleshooting │ 53 Disconnect all video cables from the monitor. www.dell.com/support/monitors Dell 27 Gaming Monitor ? S2419HGF www.dell.com/support/monitors S2719DGF NOTE: This box also appears during normal system operation, if the video cable is no signal and one of the procedures in self-test mode, the power LED remains white. Turn off both your monitor and reconnect the video cable; If the monitor...
... Cable The display will go into Power Save Mode in 4 minutes. Troubleshooting │ 53 Disconnect all video cables from the monitor. www.dell.com/support/monitors Dell 27 Gaming Monitor ? S2419HGF www.dell.com/support/monitors S2719DGF NOTE: This box also appears during normal system operation, if the video cable is no signal and one of the procedures in self-test mode, the power LED remains white. Turn off both your monitor and reconnect the video cable; If the monitor...
Monitor Users Guide
Page 54
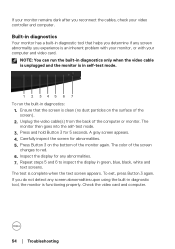
... problem with your monitor, or with your video controller and computer. NOTE: You can run the built-in green, blue, black, white and text screens. Repeat steps 5 and 6 to red. 6. Unplug the video cable(s) from the back of the screen). 2. Inspect the display for any screen abnormality you reconnect the cables, check your computer and video card. Ensure that helps you determine if any abnormalities. 7. Check the video card and computer. 54 │ Troubleshooting...
... problem with your monitor, or with your video controller and computer. NOTE: You can run the built-in green, blue, black, white and text screens. Repeat steps 5 and 6 to red. 6. Unplug the video cable(s) from the back of the screen). 2. Inspect the display for any screen abnormality you reconnect the cables, check your computer and video card. Ensure that helps you determine if any abnormalities. 7. Check the video card and computer. 54 │ Troubleshooting...
Monitor Users Guide
Page 55
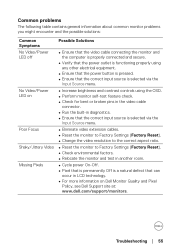
... the Input Source menu. ∞∞Increase brightness and contrast controls using the OSD. ∞∞Perform monitor self-test feature check. ∞∞Check for bent or broken pins in the video cable connector. ∞∞Run the built-in diagnostics. ∞∞Ensure that the correct input source is selected via the Input Source menu. ∞∞Eliminate video extension cables. ∞∞Reset the monitor to Factory Settings (Factory Reset). ∞∞Change the video resolution to...
... the Input Source menu. ∞∞Increase brightness and contrast controls using the OSD. ∞∞Perform monitor self-test feature check. ∞∞Check for bent or broken pins in the video cable connector. ∞∞Run the built-in diagnostics. ∞∞Ensure that the correct input source is selected via the Input Source menu. ∞∞Eliminate video extension cables. ∞∞Reset the monitor to Factory Settings (Factory Reset). ∞∞Change the video resolution to...
Monitor Users Guide
Page 56
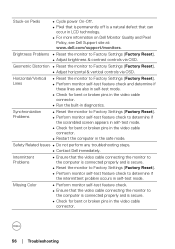
...on Dell Monitor Quality and Pixel Policy, see Dell Support site at: www.dell.com/support/monitors. Horizontal/Vertical Lines ∞∞Reset the monitor to determine if the scrambled screen appears in self-test mode. ∞∞Check for bent or broken pins in the video cable connector. ∞∞Restart the computer in diagnostics. Brightness Problems ∞∞Reset the monitor to Factory Settings (Factory Reset). ∞∞Adjust horizontal & vertical controls via OSD. Synchronization Problems ∞∞Reset the monitor to Factory Settings (Factory Reset...
...on Dell Monitor Quality and Pixel Policy, see Dell Support site at: www.dell.com/support/monitors. Horizontal/Vertical Lines ∞∞Reset the monitor to determine if the scrambled screen appears in self-test mode. ∞∞Check for bent or broken pins in the video cable connector. ∞∞Restart the computer in diagnostics. Brightness Problems ∞∞Reset the monitor to Factory Settings (Factory Reset). ∞∞Adjust horizontal & vertical controls via OSD. Synchronization Problems ∞∞Reset the monitor to Factory Settings (Factory Reset...
Monitor Users Guide
Page 57
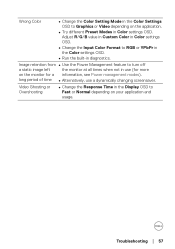
...;Try different Preset Modes in the Display OSD to Graphics or Video depending on the monitor for a information, see Power management modes). Adjust R/G/B value in Custom Color in Color settings OSD. ∞∞Change the Input Color Format to turn off a static image left the monitor at all times when not in diagnostics. Image retention from ∞∞Use the Power Management feature to RGB or YPbPr in the Color settings OSD. ∞∞Run...
...;Try different Preset Modes in the Display OSD to Graphics or Video depending on the monitor for a information, see Power management modes). Adjust R/G/B value in Custom Color in Color settings OSD. ∞∞Change the Input Color Format to turn off a static image left the monitor at all times when not in diagnostics. Image retention from ∞∞Use the Power Management feature to RGB or YPbPr in the Color settings OSD. ∞∞Run...
Monitor Users Guide
Page 58
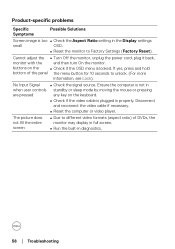
... screen ∞∞Due to different video formats (aspect ratio) of the panel the menu button for 10 seconds to Factory Settings (Factory Reset). Product-specific problems Specific Symptoms Possible Solutions Screen image is too ∞∞Check the Aspect Ratio setting in diagnostics. 58 │ Troubleshooting Cannot adjust the ∞∞Turn Off the monitor, unplug the power cord, plug it back, monitor with the and then turn On the monitor. No Input Signal ∞∞Check the signal source...
... screen ∞∞Due to different video formats (aspect ratio) of the panel the menu button for 10 seconds to Factory Settings (Factory Reset). Product-specific problems Specific Symptoms Possible Solutions Screen image is too ∞∞Check the Aspect Ratio setting in diagnostics. 58 │ Troubleshooting Cannot adjust the ∞∞Turn Off the monitor, unplug the power cord, plug it back, monitor with the and then turn On the monitor. No Input Signal ∞∞Check the signal source...
Monitor Display Manager Users Guide
Page 4
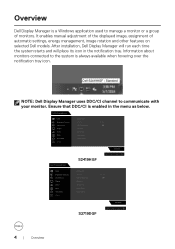
...the displayed image, assignment of monitors. Information about monitors connected to the system is enabled in the notification tray. Dell 24 Gaming Monitor Game Display Info Brightness / Contrast DDC/CI On Input Source LCD Conditioning Off Display Firmware Audio Service Tag Menu Reset Others Personalize Factory Reset Others S2419HGF Dell 27 Gaming Monitor Game Brightness / Contrast Input Source Display Audio Menu Personalize Others S2419HGF Display Info DDC/CI On LCD Conditioning Off Firmware Service Tag Reset Others Factory Reset S2719DGF S2719DGF...
...the displayed image, assignment of monitors. Information about monitors connected to the system is enabled in the notification tray. Dell 24 Gaming Monitor Game Display Info Brightness / Contrast DDC/CI On Input Source LCD Conditioning Off Display Firmware Audio Service Tag Menu Reset Others Personalize Factory Reset Others S2419HGF Dell 27 Gaming Monitor Game Brightness / Contrast Input Source Display Audio Menu Personalize Others S2419HGF Display Info DDC/CI On LCD Conditioning Off Firmware Service Tag Reset Others Factory Reset S2719DGF S2719DGF...


