
Monitor Users Guide
Page 3
Contents About your monitor 5 Contents of the box 5 Product features 6 Identifying features and controls 7 Monitor specifications 9 Plug-and-play 14 LCD monitor quality and pixel policy 14 Setting up the monitor 15 Connecting your monitor 15 Organizing your cables 18 Using the tilt 18 Operating the monitor 19 Turning on the monitor 19 Using the front panel controls 19 Front‑panel button 21 Using the On-Screen Display (OSD) menu 22 Troubleshooting 37 Self-test 37 Built-in diagnostics 38 Contents | 3
Contents About your monitor 5 Contents of the box 5 Product features 6 Identifying features and controls 7 Monitor specifications 9 Plug-and-play 14 LCD monitor quality and pixel policy 14 Setting up the monitor 15 Connecting your monitor 15 Organizing your cables 18 Using the tilt 18 Operating the monitor 19 Turning on the monitor 19 Using the front panel controls 19 Front‑panel button 21 Using the On-Screen Display (OSD) menu 22 Troubleshooting 37 Self-test 37 Built-in diagnostics 38 Contents | 3
Monitor Users Guide
Page 6
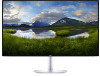
... to optimize eye comfort. • Adapted High Dynamic Range appropriate for monitor usage. • Supports AMD FreeSync technology. • On-screen display (OSD) adjustments for easy setup and screen optimization. • CFR/BFR/PVC-Reduced (Circuit boards are made from the monitor to the eyes, including eye fatigue or digital eye strain. Product features The Dell S2719DC monitor has an active matrix, Thin-Film Transistor (TFT), liquid crystal display (LCD), and LED backlight.
... to optimize eye comfort. • Adapted High Dynamic Range appropriate for monitor usage. • Supports AMD FreeSync technology. • On-screen display (OSD) adjustments for easy setup and screen optimization. • CFR/BFR/PVC-Reduced (Circuit boards are made from the monitor to the eyes, including eye fatigue or digital eye strain. Product features The Dell S2719DC monitor has an active matrix, Thin-Film Transistor (TFT), liquid crystal display (LCD), and LED backlight.

Monitor Users Guide
Page 7
About your monitor | 7 Identifying features and controls Front view Label Description 1 Function buttons 2 Power button Use Use the function buttons to adjust items in the OSD menu. (For more information, see Using the front panel controls) Power on/off button (with LED indicator) Use the power button to turn the monitor On and Off.
About your monitor | 7 Identifying features and controls Front view Label Description 1 Function buttons 2 Power button Use Use the function buttons to adjust items in the OSD menu. (For more information, see Using the front panel controls) Power on/off button (with LED indicator) Use the power button to turn the monitor On and Off.

Monitor Users Guide
Page 8
... ports Connect your computer with battery icon supports Battery Charging Rev. 1.2. Cable-management slot Use to your monitor Port with an HDMI cable. NOTE: The audio line-out port does not support headphones. NOTE: USB Type-C is located at the base of up to the monitor. USB Type-C/DisplayPort WARNING: Excessive sound pressure from the computer to contact Dell for technical support. Back and bottom view Label 1 2 3 4 5 6 7 Description Use Audio line-out port Connect speakers...
... ports Connect your computer with battery icon supports Battery Charging Rev. 1.2. Cable-management slot Use to your monitor Port with an HDMI cable. NOTE: The audio line-out port does not support headphones. NOTE: USB Type-C is located at the base of up to the monitor. USB Type-C/DisplayPort WARNING: Excessive sound pressure from the computer to contact Dell for technical support. Back and bottom view Label 1 2 3 4 5 6 7 Description Use Audio line-out port Connect speakers...

Monitor Users Guide
Page 9
Monitor specifications Screen type Active matrix - TFT LCD Panel type Plane to Line Switching Aspect ratio 16:9 Viewable image dimensions: Diagonal 684.7 mm (27 in.) Active area: Horizontal 596.74 mm (23.49 in.) Vertical 335.66 mm (13.21 in.) Area 200301.75 mm² (310.47 in.²) Pixel pitch 0.233 mm x 0.233 mm Pixel per inch (PPI) 109 Viewing angle: Horizontal Vertical Brightness 178°...
Monitor specifications Screen type Active matrix - TFT LCD Panel type Plane to Line Switching Aspect ratio 16:9 Viewable image dimensions: Diagonal 684.7 mm (27 in.) Active area: Horizontal 596.74 mm (23.49 in.) Vertical 335.66 mm (13.21 in.) Area 200301.75 mm² (310.47 in.²) Pixel pitch 0.233 mm x 0.233 mm Pixel per inch (PPI) 109 Viewing angle: Horizontal Vertical Brightness 178°...

Monitor Users Guide
Page 10
Adjustability Tilt Dell Display Manager (DDM) Compatibility Resolution specifications -5° to 21° Easy Arrange and other key features Horizontal scan range Vertical scan range Maximum preset resolution Video input capabilities (HDMI/USB Type-C playback) Preset display modes 30 kHz to 120 kHz (HDMI 1.4/USB Type-C) 30 kHz to 140 kHz (HDMI 2.0) 48 Hz to 75 Hz (HDMI 1.4/HDMI 2.0/USB Type-C) 2560 x 1440 at 60 Hz 480p, 576p, 720p, 1080p (HDMI 1.4/HDMI 2.0/USB Type-C) 2160p (HDMI 2.0) Display mode 720 x 400 VESA, 640...
Adjustability Tilt Dell Display Manager (DDM) Compatibility Resolution specifications -5° to 21° Easy Arrange and other key features Horizontal scan range Vertical scan range Maximum preset resolution Video input capabilities (HDMI/USB Type-C playback) Preset display modes 30 kHz to 120 kHz (HDMI 1.4/USB Type-C) 30 kHz to 140 kHz (HDMI 2.0) 48 Hz to 75 Hz (HDMI 1.4/HDMI 2.0/USB Type-C) 2560 x 1440 at 60 Hz 480p, 576p, 720p, 1080p (HDMI 1.4/HDMI 2.0/USB Type-C) 2160p (HDMI 2.0) Display mode 720 x 400 VESA, 640...

Monitor Users Guide
Page 13
... power save mode1. White (Glowing) Off Power consumption 130 W (maximum)2 35 W (typical) Less than 0.5 W Less than 0.3 W Power Consumption Pon Total Energy Consumption (TEC) 21.46 W 68.59 kWh The OSD operates only in making decisions about electrical tolerances or otherwise. This document is expressed or implied. Vertical Video Power indicator sync Active Active White Inactive Off - - If the computer detects input from the monitor. 2 Adapter...
... power save mode1. White (Glowing) Off Power consumption 130 W (maximum)2 35 W (typical) Less than 0.5 W Less than 0.3 W Power Consumption Pon Total Energy Consumption (TEC) 21.46 W 68.59 kWh The OSD operates only in making decisions about electrical tolerances or otherwise. This document is expressed or implied. Vertical Video Power indicator sync Active Active White Inactive Off - - If the computer detects input from the monitor. 2 Adapter...
Monitor Users Guide
Page 16
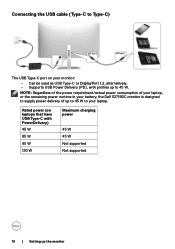
... the power requirement/actual power consumption of your laptop, or the remaining power runtime in your battery, the Dell S2719DC monitor is designed to supply power delivery of up to your monitor: • Can be used as USB Type-C or DisplayPort 1.2, alternatively. • Supports USB Power Delivery (PD), with PowerDelivery) 45 W 65 W 90 W 130 W Maximum charging power 45 W 45 W Not supported Not supported 16 | Setting up the monitor Rated power (on...
... the power requirement/actual power consumption of your laptop, or the remaining power runtime in your battery, the Dell S2719DC monitor is designed to supply power delivery of up to your monitor: • Can be used as USB Type-C or DisplayPort 1.2, alternatively. • Supports USB Power Delivery (PD), with PowerDelivery) 45 W 65 W 90 W 130 W Maximum charging power 45 W 45 W Not supported Not supported 16 | Setting up the monitor Rated power (on...
Monitor Users Guide
Page 26
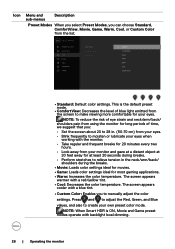
The screen appears cooler with backlight local dimming. 26 | Operating the monitor Press and to adjust the Red, Green, and Blue values, and also to moisten or lubricate your monitor and gaze at a distant ...Color from your eyes when working with a red/yellow tint. • Cool: Decreases the color temperature. Icon Menu and sub-menus Description Preset Modes When you select Preset Modes, you to manually adjust the color settings. NOTE: When Smart HDR is the default preset mode. • ComfortView: Decreases the level of blue light emitted from the screen to make viewing...
The screen appears cooler with backlight local dimming. 26 | Operating the monitor Press and to adjust the Red, Green, and Blue values, and also to moisten or lubricate your monitor and gaze at a distant ...Color from your eyes when working with a red/yellow tint. • Cool: Decreases the color temperature. Icon Menu and sub-menus Description Preset Modes When you select Preset Modes, you to manually adjust the color settings. NOTE: When Smart HDR is the default preset mode. • ComfortView: Decreases the level of blue light emitted from the screen to make viewing...
Monitor Users Guide
Page 28
... preset mode. Reference: Best used with a desktop computer. Reset Display Restores the display settings to Normal or Fast. Icon Menu and sub-menus Description Aspect Ratio Adjust the image ratio to switch the Smart HDR feature between Desktop, Movie HDR, Game HDR, Reference, and Off. Sharpness Makes the image look sharper or softer. Push to Wide 16:9, 4:3, or 5:4. HDMI switches to expand the contrast ratio, brightness, and color palette...
... preset mode. Reference: Best used with a desktop computer. Reset Display Restores the display settings to Normal or Fast. Icon Menu and sub-menus Description Aspect Ratio Adjust the image ratio to switch the Smart HDR feature between Desktop, Movie HDR, Game HDR, Reference, and Off. Sharpness Makes the image look sharper or softer. Push to Wide 16:9, 4:3, or 5:4. HDMI switches to expand the contrast ratio, brightness, and color palette...

Monitor Users Guide
Page 29
.... Language Set the OSD display to factory defaults. Restores the menu settings to one of eight languages. Reset Menu Use and to adjust the slider in 1-second increments, from 5 to adjust the OSD settings, such as, the OSD languages, the amount of time the OSD remains active after you press a button. Icon Menu and sub-menus Menu Description Select this option to change the menu transparency by using and (0% to 100%). Operating the monitor | 29 Label Languages 1 English...
.... Language Set the OSD display to factory defaults. Restores the menu settings to one of eight languages. Reset Menu Use and to adjust the slider in 1-second increments, from 5 to adjust the OSD settings, such as, the OSD languages, the amount of time the OSD remains active after you press a button. Icon Menu and sub-menus Menu Description Select this option to change the menu transparency by using and (0% to 100%). Operating the monitor | 29 Label Languages 1 English...

Monitor Users Guide
Page 31
Select Off to turn off this option to adjust the monitor settings using software on . DDC/CI (Display Data Channel/Command Interface) enables you to adjust the OSD settings, such as the DDC/CI, LCD conditioning, and so on your monitor. Enable this feature for best user experience and optimum performance of your computer. Displays the monitor's current settings. Operating the monitor | 31 Icon Menu and sub-menus Others Description Display Info DDC/CI Select this feature.
Select Off to turn off this option to adjust the monitor settings using software on . DDC/CI (Display Data Channel/Command Interface) enables you to adjust the OSD settings, such as the DDC/CI, LCD conditioning, and so on your monitor. Enable this feature for best user experience and optimum performance of your computer. Displays the monitor's current settings. Operating the monitor | 31 Icon Menu and sub-menus Others Description Display Info DDC/CI Select this feature.

Monitor Users Guide
Page 37
Troubleshooting WARNING: Before you to check whether your monitor is working correctly but the monitor screen remains dark, run the monitor self-test by performing the following steps: 1 Turn off both your monitor and computer are properly connected but does not detect a video signal. To ensure proper Self-Test operation, remove all digital and analog cables from the back of the dialog box is displayed and will continuously...
Troubleshooting WARNING: Before you to check whether your monitor is working correctly but the monitor screen remains dark, run the monitor self-test by performing the following steps: 1 Turn off both your monitor and computer are properly connected but does not detect a video signal. To ensure proper Self-Test operation, remove all digital and analog cables from the back of the dialog box is displayed and will continuously...

Monitor Users Guide
Page 38
... display for 5 seconds. A gray screen appears. 4 Carefully inspect the screen for abnormalities. 5 Press Button 1 on both your monitor is in diagnostics only when the video cable is unplugged and the monitor is functioning properly. The test is an inherent problem with your monitor, or with your monitor and reconnect the video cable; Check the video card and computer. 38 | Troubleshooting Built-in diagnostics Your monitor has a built-in green, blue, black, white...
... display for 5 seconds. A gray screen appears. 4 Carefully inspect the screen for abnormalities. 5 Press Button 1 on both your monitor is in diagnostics only when the video cable is unplugged and the monitor is functioning properly. The test is an inherent problem with your monitor, or with your monitor and reconnect the video cable; Check the video card and computer. 38 | Troubleshooting Built-in diagnostics Your monitor has a built-in green, blue, black, white...
Monitor Users Guide
Page 40
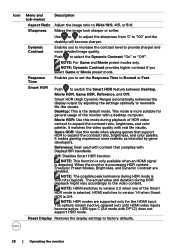
....dell.com/support/monitors. • Reset the monitor to factory settings. • Adjust brightness and contrast controls through OSD. • Do not perform any other electrical equipment. • Ensure that the power button is depressed fully. • Ensure that the correct input source is selected in the Input Source menu. • If current HDMI version is 2.0, switch to determine if the intermittent problem occurs in selftest mode. 40 | Troubleshooting Issue No Video/Power LED off No Video/Power LED on...
....dell.com/support/monitors. • Reset the monitor to factory settings. • Adjust brightness and contrast controls through OSD. • Do not perform any other electrical equipment. • Ensure that the power button is depressed fully. • Ensure that the correct input source is selected in the Input Source menu. • If current HDMI version is 2.0, switch to determine if the intermittent problem occurs in selftest mode. 40 | Troubleshooting Issue No Video/Power LED off No Video/Power LED on...

Monitor Users Guide
Page 41
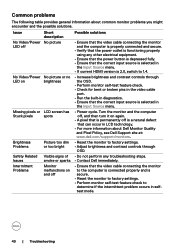
... Color in Color menu OSD. • Change the Input Color Format to computer RGB or YPbPr in the Color menu OSD. • Run the built-in diagnostics. • Use the Power Management feature to turn off the monitor, unplug the monitor power cable, plug it back, and then turn on the screen Possible solutions • Check the Aspect Ratio setting in use (for the graphics card. • Ensure that the HDMI 2.0 cable that the video cable connecting the monitor to factory settings. • Turn...
... Color in Color menu OSD. • Change the Input Color Format to computer RGB or YPbPr in the Color menu OSD. • Run the built-in diagnostics. • Use the Power Management feature to turn off the monitor, unplug the monitor power cable, plug it back, and then turn on the screen Possible solutions • Check the Aspect Ratio setting in use (for the graphics card. • Ensure that the HDMI 2.0 cable that the video cable connecting the monitor to factory settings. • Turn...

Monitor Users Guide
Page 42
... maximum power consumption of device is over 45 W. • Ensure that you experience Possible solutions No Input Signal when user controls are pressed No picture, the • Check the signal source. Problem What you use only Dell approved adapter or the adapter that comes with the product. • Ensure that the USB Type-C cable is not damaged. 42 | Troubleshooting Connect the signal cable again, if necessary. • Reset the computer or video...
... maximum power consumption of device is over 45 W. • Ensure that you experience Possible solutions No Input Signal when user controls are pressed No picture, the • Check the signal source. Problem What you use only Dell approved adapter or the adapter that comes with the product. • Ensure that the USB Type-C cable is not damaged. 42 | Troubleshooting Connect the signal cable again, if necessary. • Reset the computer or video...
Monitor Users Guide
Page 44
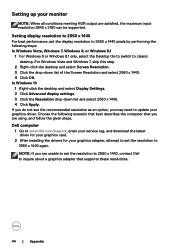
... are using, and follow the given steps. Dell computer 1 Go to www.dell.com/support, enter your service tag, and download the latest driver for your graphics card. 2 After installing the drivers for your graphics driver. Setting display resolution to 2560 x 1440 For best performance, set the resolution to classic desktop. Choose the following steps: In Windows Vista, Windows 7, Windows 8, or Windows 8.1 1 For Windows 8 or Windows 8.1 only, select the Desktop tile to switch to...
... are using, and follow the given steps. Dell computer 1 Go to www.dell.com/support, enter your service tag, and download the latest driver for your graphics card. 2 After installing the drivers for your graphics driver. Setting display resolution to 2560 x 1440 For best performance, set the resolution to classic desktop. Choose the following steps: In Windows Vista, Windows 7, Windows 8, or Windows 8.1 1 For Windows 8 or Windows 8.1 only, select the Desktop tile to switch to...
Monitor Users Guide
Page 45
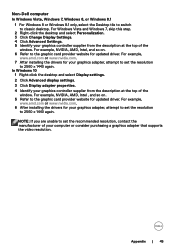
... installing the drivers for updated driver. For Windows Vista and Windows 7, skip this step. 2 Right-click the desktop and select Personalization. 3 Click Change Display Settings. 4 Click Advanced Settings. 5 Identify your graphics controller supplier from the description at the top of your computer or consider purchasing a graphics adapter that supports the video resolution. Non-Dell computer In Windows Vista, Windows 7, Windows 8, or Windows 8.1 1 For Windows 8 or Windows 8.1 only, select the Desktop tile to switch...
... installing the drivers for updated driver. For Windows Vista and Windows 7, skip this step. 2 Right-click the desktop and select Personalization. 3 Click Change Display Settings. 4 Click Advanced Settings. 5 Identify your graphics controller supplier from the description at the top of your computer or consider purchasing a graphics adapter that supports the video resolution. Non-Dell computer In Windows Vista, Windows 7, Windows 8, or Windows 8.1 1 For Windows 8 or Windows 8.1 only, select the Desktop tile to switch...

Monitor Display Manager Users Guide
Page 4
... automatic settings, energy management, window organization, image rotation, and other features on selected Dell monitors. Information about monitors connected to the system is a Microsoft Windows application used to communicate with your monitor. Ensure that DDC/CI is enabled in the notification tray. After installation, Dell Display Manager runs each time the system starts and places its icon in the menu as below. 4 | Overview Overview Dell Display Manager...
... automatic settings, energy management, window organization, image rotation, and other features on selected Dell monitors. Information about monitors connected to the system is a Microsoft Windows application used to communicate with your monitor. Ensure that DDC/CI is enabled in the notification tray. After installation, Dell Display Manager runs each time the system starts and places its icon in the menu as below. 4 | Overview Overview Dell Display Manager...


