Low Blue Light Monitor - Important Information
Page 1
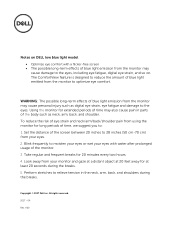
...tension in parts of time, we suggest you to: 1. Copyright © 2017 Dell Inc. Using the monitor for long periods of the body such as digital eye strain, eye fatigue and damage...screen • The possible long-term effects of eye strain and neck/arm/back/shoulder pain from your monitor and gaze at a distant object at 20 feet away for 20 minutes every two hours. 4. Set the ...distance of blue light emitted from the monitor may cause personal injury such as neck, arm, back, and shoulder. Notes on . The ComfortView feature...
...tension in parts of time, we suggest you to: 1. Copyright © 2017 Dell Inc. Using the monitor for long periods of the body such as digital eye strain, eye fatigue and damage...screen • The possible long-term effects of eye strain and neck/arm/back/shoulder pain from your monitor and gaze at a distant object at 20 feet away for 20 minutes every two hours. 4. Set the ...distance of blue light emitted from the monitor may cause personal injury such as neck, arm, back, and shoulder. Notes on . The ComfortView feature...
Quick Start Guide
Page 1
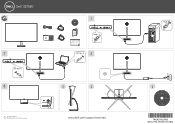
...: • Device drivers • Quick Setup Guide • User's Guide • Dell Display Manager Software P/N M4YXH Rev. A00 P/N 790.A1V39.0001 March 2017 Made in China. © 2017 Dell Inc. Printed in China © 2017 Dell Inc. S2718D Drivers and Documentation Dell™ S2718D Monitor Contents: • Device drivers • Quick Setup Guide • User's Guide •...
...: • Device drivers • Quick Setup Guide • User's Guide • Dell Display Manager Software P/N M4YXH Rev. A00 P/N 790.A1V39.0001 March 2017 Made in China. © 2017 Dell Inc. Printed in China © 2017 Dell Inc. S2718D Drivers and Documentation Dell™ S2718D Monitor Contents: • Device drivers • Quick Setup Guide • User's Guide •...
Users Guide
Page 3
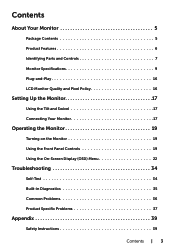
Contents About Your Monitor 5 Package Contents 5 Product Features 6 Identifying Parts and Controls 7 Monitor Specifications 9 Plug-and-Play 16 LCD Monitor Quality and Pixel Policy 16 Setting Up the Monitor 17 Using the Tilt and Swivel 17 Connecting Your Monitor 17 Operating the Monitor 19 Turning on the Monitor 19 Using the Front Panel Controls 19 Using the On-Screen Display (OSD) Menu 22 Troubleshooting 34 Self-Test 34 Built-in Diagnostics 35 Common Problems 36 Product Specific Problems 37 Appendix 39 Safety Instructions 39 Contents | 3
Contents About Your Monitor 5 Package Contents 5 Product Features 6 Identifying Parts and Controls 7 Monitor Specifications 9 Plug-and-Play 16 LCD Monitor Quality and Pixel Policy 16 Setting Up the Monitor 17 Using the Tilt and Swivel 17 Connecting Your Monitor 17 Operating the Monitor 19 Turning on the Monitor 19 Using the Front Panel Controls 19 Using the On-Screen Display (OSD) Menu 22 Troubleshooting 34 Self-Test 34 Built-in Diagnostics 35 Common Problems 36 Product Specific Problems 37 Appendix 39 Safety Instructions 39 Contents | 3

Users Guide
Page 4
only) and Other Regulatory Information 39 Contacting Dell 39 Setting Up Your Monitor 40 Maintenance Guidelines 42 4 | Contents FCC Notices (U.S.
only) and Other Regulatory Information 39 Contacting Dell 39 Setting Up Your Monitor 40 Maintenance Guidelines 42 4 | Contents FCC Notices (U.S.
Users Guide
Page 5
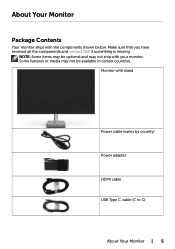
About Your Monitor Package Contents Your monitor ships with stand Power cable (varies by country) Power adapter HDMI cable USB Type C cable (C to C) About Your Monitor | 5 Monitor with the components shown below. Make sure that you have received all the components and contact Dell if something is missing. Some features or media may not ship with your monitor. NOTE: Some items may be optional and may not be available in certain countries.
About Your Monitor Package Contents Your monitor ships with stand Power cable (varies by country) Power adapter HDMI cable USB Type C cable (C to C) About Your Monitor | 5 Monitor with the components shown below. Make sure that you have received all the components and contact Dell if something is missing. Some features or media may not ship with your monitor. NOTE: Some items may be optional and may not be available in certain countries.
Users Guide
Page 6
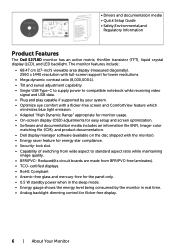
...; BFR/PVC- • Drivers and documentation media • Quick Setup Guide • Safety,Environmental,and Regulatory Information Product Features The Dell S2718D monitor has an active matrix, thinfilm transistor (TFT), liquid crystal display (LCD), and LED backlight. Reduced(Its circuit boards are made from ... documentation media includes an information file (INF), Image‑color matching file (ICM), and product documentation. • Dell display manager software (available on the disc shipped with the monitor). • Energy saver feature for flicker free display. 6 | About Your...
...; BFR/PVC- • Drivers and documentation media • Quick Setup Guide • Safety,Environmental,and Regulatory Information Product Features The Dell S2718D monitor has an active matrix, thinfilm transistor (TFT), liquid crystal display (LCD), and LED backlight. Reduced(Its circuit boards are made from ... documentation media includes an information file (INF), Image‑color matching file (ICM), and product documentation. • Dell display manager software (available on the disc shipped with the monitor). • Energy saver feature for flicker free display. 6 | About Your...
Users Guide
Page 7
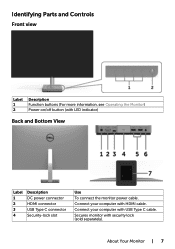
Connect your computer with security lock (sold separately). About Your Monitor | 7 Identifying Parts and Controls Front view Label 1 2 Description Function buttons (For more information, see Operating the Monitor) Power on/off button (with USB Type C cable. Connect your computer with LED indicator) Back and Bottom View Label 1 2 3 4 Description DC power connector HDMI connector USB Type C connector Security-lock slot Use To connect the monitor power cable. Secures monitor with HDMI cable.
Connect your computer with security lock (sold separately). About Your Monitor | 7 Identifying Parts and Controls Front view Label 1 2 Description Function buttons (For more information, see Operating the Monitor) Power on/off button (with USB Type C cable. Connect your computer with LED indicator) Back and Bottom View Label 1 2 3 4 Description DC power connector HDMI connector USB Type C connector Security-lock slot Use To connect the monitor power cable. Secures monitor with HDMI cable.
Users Guide
Page 8
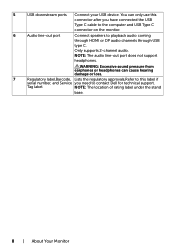
Only supports 2-channel audio. Tag label NOTE: The location of rating label under the stand base. 8 | About Your Monitor NOTE: The audio line-out port does not support headphones. You can cause hearing damage or loss. 7 Regulatory label,Barcode, Lists the regulatory approvals,Refer ... only use this label if serial number, and Service you have connected the USB Type C cable to the computer and USB Type C connector on the monitor. 6 Audio line-out port Connect speakers to contact Dell for technical support. 5 USB downstream ports Connect your USB device.
Only supports 2-channel audio. Tag label NOTE: The location of rating label under the stand base. 8 | About Your Monitor NOTE: The audio line-out port does not support headphones. You can cause hearing damage or loss. 7 Regulatory label,Barcode, Lists the regulatory approvals,Refer ... only use this label if serial number, and Service you have connected the USB Type C cable to the computer and USB Type C connector on the monitor. 6 Audio line-out port Connect speakers to contact Dell for technical support. 5 USB downstream ports Connect your USB device.
Users Guide
Page 9
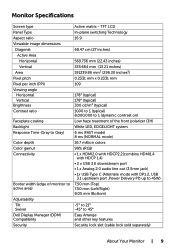
Monitor Specifications Screen type Panel Type Aspect ratio Viewable image dimensions Diagonal Active Area Horizontal ... 7.50 mm (Left/Right) 8.05 mm (Bottom) -5° to 21° -45° to active area) Adjustability Tilt Swivel Dell Display Manager (DDM) Compatibility Security Active matrix - TFT LCD In-plane switching Technology 16:9 68.47 cm (27 inches) 569.736 mm...300 cd/m² (typical) 1000 to 1 (typical) 8,000,000 to 1 (dynamic contrast on) Low haze treatment of monitor to 45° Easy Arrange and other key features Security lock slot (cable lock sold separately) About Your...
Monitor Specifications Screen type Panel Type Aspect ratio Viewable image dimensions Diagonal Active Area Horizontal ... 7.50 mm (Left/Right) 8.05 mm (Bottom) -5° to 21° -45° to active area) Adjustability Tilt Swivel Dell Display Manager (DDM) Compatibility Security Active matrix - TFT LCD In-plane switching Technology 16:9 68.47 cm (27 inches) 569.736 mm...300 cd/m² (typical) 1000 to 1 (typical) 8,000,000 to 1 (dynamic contrast on) Low haze treatment of monitor to 45° Easy Arrange and other key features Security lock slot (cable lock sold separately) About Your...

Users Guide
Page 11
...-240 VAC / 50 or 60 Hz ± 3 Hz / 1.8A (maximum) Output voltage/current Output: 19.5 VDC /6.67 A Inrush current No function error,no damage Brand Dell Dell Manufacturer Delta Chicony Model HA130PM130 DA130PM130 Polarity Physical Characteristics Connector type Signal cable type Dimensions (with stand) Height Width Depth Dimensions (without stand) Height Width....5 mm (10.45 inches) 150.0 mm (5.91 inches) 180.4 mm (7.10 inches) 10.30 kg (22.71 lb) 6.85 kg (15.10 lb) About Your Monitor | 11
...-240 VAC / 50 or 60 Hz ± 3 Hz / 1.8A (maximum) Output voltage/current Output: 19.5 VDC /6.67 A Inrush current No function error,no damage Brand Dell Dell Manufacturer Delta Chicony Model HA130PM130 DA130PM130 Polarity Physical Characteristics Connector type Signal cable type Dimensions (with stand) Height Width Depth Dimensions (without stand) Height Width....5 mm (10.45 inches) 150.0 mm (5.91 inches) 180.4 mm (7.10 inches) 10.30 kg (22.71 lb) 6.85 kg (15.10 lb) About Your Monitor | 11

Users Guide
Page 12
Environmental Characteristics Temperature Operating Non-operating Humidity Operating Non-operating Altitude Operating Non-operating Thermal dissipation 0°C to 40°C (32°F to 104°F) -20°C to 60°C (-4°F to 140°F) 10% to 80% (non-condensing) 5% to 90% (non-condensing) 5,000 m (16,404 ft) (maximum) 12,192 m (40,000 ft) (maximum) 119.5 BTU/hour (maximum) 102.4 BTU/hour (typical) 12 | About Your Monitor
Environmental Characteristics Temperature Operating Non-operating Humidity Operating Non-operating Altitude Operating Non-operating Thermal dissipation 0°C to 40°C (32°F to 104°F) -20°C to 60°C (-4°F to 140°F) 10% to 80% (non-condensing) 5% to 90% (non-condensing) 5,000 m (16,404 ft) (maximum) 12,192 m (40,000 ft) (maximum) 119.5 BTU/hour (maximum) 102.4 BTU/hour (typical) 12 | About Your Monitor

Users Guide
Page 13
... implied. Your product may perform differently, depending on mode as defined in Energy Star 7.0 version. ****Total energy consumption in use. About Your Monitor | 13 This is displayed: *Zero power consumption in OFF mode can automatically reduce its power consumption when not in kWh as to the OSD... Sync Active Active Active White Inactive - If you press any button in Energy Star 7.0 version. Activate the computer and the monitor to gain access to accuracy or completeness is informational only and reflects laboratory performance. If the computer detects input from the...
... implied. Your product may perform differently, depending on mode as defined in Energy Star 7.0 version. ****Total energy consumption in use. About Your Monitor | 13 This is displayed: *Zero power consumption in OFF mode can automatically reduce its power consumption when not in kWh as to the OSD... Sync Active Active Active White Inactive - If you press any button in Energy Star 7.0 version. Activate the computer and the monitor to gain access to accuracy or completeness is informational only and reflects laboratory performance. If the computer detects input from the...

Users Guide
Page 14
NOTE: This monitor is ENERGY STAR -compliant. Pin Assignments HDMI connector Pin number 1 2 3 4 5 6 7 8 9 10 11 12 13 14 15 16 17 18 19 19-pin side of the connected signal cable TMDS DATA 2+ TMDS DATA 2 SHIELD TMDS DATA 2TMDS DATA 1+ TMDS DATA 1 SHIELD TMDS DATA 1TMDS DATA 0+ TMDS DATA 0 SHIELD TMDS DATA 0TMDS CLOCK+ TMDS CLOCK SHIELD TMDS CLOCKCEC Reserved (N.C. on device) DDC CLOCK (SCL) DDC DATA (SDA) DDC/CEC Ground +5 V POWER HOT PLUG DETECT 14 | About Your Monitor
NOTE: This monitor is ENERGY STAR -compliant. Pin Assignments HDMI connector Pin number 1 2 3 4 5 6 7 8 9 10 11 12 13 14 15 16 17 18 19 19-pin side of the connected signal cable TMDS DATA 2+ TMDS DATA 2 SHIELD TMDS DATA 2TMDS DATA 1+ TMDS DATA 1 SHIELD TMDS DATA 1TMDS DATA 0+ TMDS DATA 0 SHIELD TMDS DATA 0TMDS CLOCK+ TMDS CLOCK SHIELD TMDS CLOCKCEC Reserved (N.C. on device) DDC CLOCK (SCL) DDC DATA (SDA) DDC/CEC Ground +5 V POWER HOT PLUG DETECT 14 | About Your Monitor

Users Guide
Page 15
A4 VBUS B9 VBUS A5 CC B8 SBU2 A6 D + B7 D - B3 TX2- USB Type C Connector Pin Signal Assignment Pin Signal Assignment A1 GND B12 GND A2 TX1+ B11 RX1+ A3 TX1- B6 D + A8 SBU1 B5 VCONN A9 VBUS B4 VBUS A10 RX2- A11 RX2+ B2 TX2+ A12 GND B1 GND About Your Monitor | 15 B10 RX1- A7 D -
A4 VBUS B9 VBUS A5 CC B8 SBU2 A6 D + B7 D - B3 TX2- USB Type C Connector Pin Signal Assignment Pin Signal Assignment A1 GND B12 GND A2 TX1+ B11 RX1+ A3 TX1- B6 D + A8 SBU1 B5 VCONN A9 VBUS B4 VBUS A10 RX2- A11 RX2+ B2 TX2+ A12 GND B1 GND About Your Monitor | 15 B10 RX1- A7 D -
Users Guide
Page 16
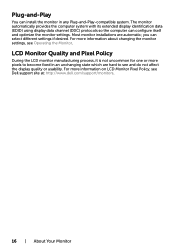
...protocols so the computer can select different settings if desired. you can configure itself and optimize the monitor settings. LCD Monitor Quality and Pixel Policy During the LCD monitor manufacturing process, it is not uncommon for one or more pixels to see and do not ... Plug-and-Play You can install the monitor in an unchanging state which are automatic; For more information on LCD Monitor Pixel Policy, see Operating the Monitor. For more information about changing the monitor settings, see Dell support site at: http://www.dell.com/support/monitors. 16 | About Your...
...protocols so the computer can select different settings if desired. you can configure itself and optimize the monitor settings. LCD Monitor Quality and Pixel Policy During the LCD monitor manufacturing process, it is not uncommon for one or more pixels to see and do not ... Plug-and-Play You can install the monitor in an unchanging state which are automatic; For more information on LCD Monitor Pixel Policy, see Operating the Monitor. For more information about changing the monitor settings, see Dell support site at: http://www.dell.com/support/monitors. 16 | About Your...

Users Guide
Page 17
To connect your monitor to the computer: 1 Turn off your computer. 2 Connect the HDMI/USB Type C cable from your monitor to the computer. 3 Switch on your monitor. 4 Select the correct input source at Monitor OSD Menu and turn on your computer. Setting Up the Monitor | 17 Setting Up the Monitor Using the Tilt and Swivel Tilt and Swivel You can tilt the monitor for the most comfortable viewing angle. Connecting Your Monitor WARNING: Before you begin any of the procedures in this section, follow the Safety Instructions.
To connect your monitor to the computer: 1 Turn off your computer. 2 Connect the HDMI/USB Type C cable from your monitor to the computer. 3 Switch on your monitor. 4 Select the correct input source at Monitor OSD Menu and turn on your computer. Setting Up the Monitor | 17 Setting Up the Monitor Using the Tilt and Swivel Tilt and Swivel You can tilt the monitor for the most comfortable viewing angle. Connecting Your Monitor WARNING: Before you begin any of the procedures in this section, follow the Safety Instructions.

Users Guide
Page 18
Connecting the HDMI cable Connecting the USB Type C cable(C to C) NOTE: 1 Support USB Type C Alternate mode with DP 1.2, DP1.1 is not supported. 2 Support USB PD (Power Delivery) profiles up to 45W. 3 If your Notebook required >45W to operate and the battery is drained, it may not power up or charge with S2718D USB PD. 18 | Setting Up the Monitor
Connecting the HDMI cable Connecting the USB Type C cable(C to C) NOTE: 1 Support USB Type C Alternate mode with DP 1.2, DP1.1 is not supported. 2 Support USB PD (Power Delivery) profiles up to 45W. 3 If your Notebook required >45W to operate and the battery is drained, it may not power up or charge with S2718D USB PD. 18 | Setting Up the Monitor
Users Guide
Page 19
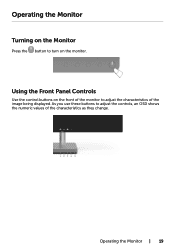
Operating the Monitor Turning on the Monitor Press the button to turn on the front of the monitor to adjust the controls, an OSD shows the numeric values of the image being displayed. Operating the Monitor | 19 As you use these buttons to adjust the characteristics of the characteristics as they change. Using the Front Panel Controls Use the control buttons on the monitor.
Operating the Monitor Turning on the Monitor Press the button to turn on the front of the monitor to adjust the controls, an OSD shows the numeric values of the image being displayed. Operating the Monitor | 19 As you use these buttons to adjust the characteristics of the characteristics as they change. Using the Front Panel Controls Use the control buttons on the monitor.

Users Guide
Page 20
.... Shortcut key: Preset Modes 2 Use this menu button to directly access the "Brightness/ Contrast" bar. Power (with power light indicator) The white LED indicates the monitor is On and fully functional. Shortcut key: Brightness/Contrast 3 Use this button to launch the on-screen display (OSD) and select the OSD menu. A glowing...
.... Shortcut key: Preset Modes 2 Use this menu button to directly access the "Brightness/ Contrast" bar. Power (with power light indicator) The white LED indicates the monitor is On and fully functional. Shortcut key: Brightness/Contrast 3 Use this button to launch the on-screen display (OSD) and select the OSD menu. A glowing...

Users Guide
Page 21
Back Operating the Monitor | 21 Front Panel Button 1 Up 2 Down Description Use the Up (increase) and Down (decrease) keys to confirm your selection. Use the OK button to adjust items in the OSD menu. OK 3 Use the Back button to go back to adjust the image settings. Front‑Panel Button Use the buttons on the front of the monitor to the previous menu.
Back Operating the Monitor | 21 Front Panel Button 1 Up 2 Down Description Use the Up (increase) and Down (decrease) keys to confirm your selection. Use the OK button to adjust items in the OSD menu. OK 3 Use the Back button to go back to adjust the image settings. Front‑Panel Button Use the buttons on the front of the monitor to the previous menu.


