
Dell Display Manager Installation
Page 1
... Settings Dialog Setting Basic Display Functions Assigning Preset Modes to Applications Applying Energy Conservation Features Organizing windows with Easy Arrange Overview Dell Display Manager is always available when hovering over the notification tray icon. It allows manual adjustment of the displayed image, assignment...'s Brightness and Contrast levels, Preset Modes can be manually selected or set to Auto Mode, and the screen resolution can be changed. When more than one supported Dell model is connected to the system is a Windows application used to manage a monitor or a group of...
... Settings Dialog Setting Basic Display Functions Assigning Preset Modes to Applications Applying Energy Conservation Features Organizing windows with Easy Arrange Overview Dell Display Manager is always available when hovering over the notification tray icon. It allows manual adjustment of the displayed image, assignment...'s Brightness and Contrast levels, Preset Modes can be manually selected or set to Auto Mode, and the screen resolution can be changed. When more than one supported Dell model is connected to the system is a Windows application used to manage a monitor or a group of...
User's Guide
Page 5
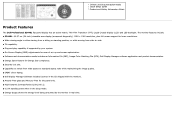
... play capability if supported by your system. ■ On-Screen Display (OSD) adjustments for ease of set-up and screen optimization. ■ Software and documentation media includes an Information File (INF), Image Color Matching File (ICM), Dell Display Manager software application and product documentation. ■ Energy Saver... in real time. Drivers and Documentation media Quick Setup Guide Product and Safety Information Guide Product Features The Dell Professional S2440L flat panel display has an active matrix, Thin-Film Transistor (TFT), Liquid Crystal Display (LCD) and LED backlight.
... play capability if supported by your system. ■ On-Screen Display (OSD) adjustments for ease of set-up and screen optimization. ■ Software and documentation media includes an Information File (INF), Image Color Matching File (ICM), Dell Display Manager software application and product documentation. ■ Energy Saver... in real time. Drivers and Documentation media Quick Setup Guide Product and Safety Information Guide Product Features The Dell Professional S2440L flat panel display has an active matrix, Thin-Film Transistor (TFT), Liquid Crystal Display (LCD) and LED backlight.
User's Guide
Page 9
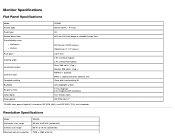
...8M to 76 Hz (automatic) 1920 x 1080 at 60 Hz Resolution Specifications Model Horizontal scan range Vertical scan range Maximum preset resolution S2440L 30 kHz to 83 kHz (automatic) 56 Hz to 1 (typical Dynamic Contrast On) Glare with hard-coating 3H LED edgelight system...(typical) with Overdrive 16.7 million colors CIE1976 (86%)* *S2440L color gamut (typical) is based on CIE1976 (86%) and CIE1931 (72%) test standards. Monitor Specifications Flat Panel Specifications Model Screen type Panel type Screen dimensions Preset display area: Horizontal Vertical Pixel pitch Viewing angle ...
...8M to 76 Hz (automatic) 1920 x 1080 at 60 Hz Resolution Specifications Model Horizontal scan range Vertical scan range Maximum preset resolution S2440L 30 kHz to 83 kHz (automatic) 56 Hz to 1 (typical Dynamic Contrast On) Glare with hard-coating 3H LED edgelight system...(typical) with Overdrive 16.7 million colors CIE1976 (86%)* *S2440L color gamut (typical) is based on CIE1976 (86%) and CIE1931 (72%) test standards. Monitor Specifications Flat Panel Specifications Model Screen type Panel type Screen dimensions Preset display area: Horizontal Vertical Pixel pitch Viewing angle ...
User's Guide
Page 15
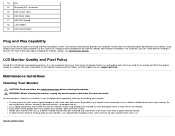
... so the system can install the monitor in use a dynamically changing screen saver and turn off with care as some detergents leave a milky film on Dell Monitor Quality and Pixel Policy, see Dell Support site at: support.dell.com. Back to clean the monitor. For more information on the ...monitor. LCD Monitor Quality and Pixel Policy During the LCD Monitor manufacturing process, it off your anti-static screen, lightly dampen a ...
... so the system can install the monitor in use a dynamically changing screen saver and turn off with care as some detergents leave a milky film on Dell Monitor Quality and Pixel Policy, see Dell Support site at: support.dell.com. Back to clean the monitor. For more information on the ...monitor. LCD Monitor Quality and Pixel Policy During the LCD Monitor manufacturing process, it off your anti-static screen, lightly dampen a ...

User's Guide
Page 19
... to the respective stand setup guide for the purpose of the computer may vary. Removing the Monitor Stand NOTE: To prevent scratches on the LCD screen while removing the stand, ensure that the monitor is bought, please refer to your monitor and computer, (See Connecting Your Monitor for a monitor with a stand...
... to the respective stand setup guide for the purpose of the computer may vary. Removing the Monitor Stand NOTE: To prevent scratches on the LCD screen while removing the stand, ensure that the monitor is bought, please refer to your monitor and computer, (See Connecting Your Monitor for a monitor with a stand...
User's Guide
Page 21
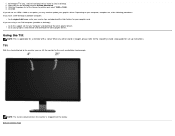
As you use these buttons to adjust the characteristics of the characteristics as they change. Back to Contents Page Operating the Monitor Dell™ S2440L Monitor User's Guide Power On the Monitor Using the Front Panel Controls Using the On-Screen Display (OSD) Menu Setting the Maximum Resolution Using the Tilt Power On the Monitor Press the button to turn on the monitor Using the Front Panel Controls Use the control buttons on the front of the monitor to adjust the controls, an OSD shows the numeric values of the image being displayed.
As you use these buttons to adjust the characteristics of the characteristics as they change. Back to Contents Page Operating the Monitor Dell™ S2440L Monitor User's Guide Power On the Monitor Using the Front Panel Controls Using the On-Screen Display (OSD) Menu Setting the Maximum Resolution Using the Tilt Power On the Monitor Press the button to turn on the monitor Using the Front Panel Controls Use the control buttons on the front of the monitor to adjust the controls, an OSD shows the numeric values of the image being displayed.

User's Guide
Page 22
... back to the main menu or exit the OSD main menu. Power (with power light indicator) Exit Use the Power button to launch the On-Screen Display (OSD) and select the OSD Menu. Shortcut key/ Preset Modes 2 Use this button to directly access the "Brightness/Contrast" menu. An amber light indicates...
... back to the main menu or exit the OSD main menu. Power (with power light indicator) Exit Use the Power button to launch the On-Screen Display (OSD) and select the OSD Menu. Shortcut key/ Preset Modes 2 Use this button to directly access the "Brightness/Contrast" menu. An amber light indicates...

User's Guide
Page 23
Use the OK button to launch the OSD menu and display the main menu. Using the On-Screen Display (OSD) Menu Accessing the Menu System NOTE: If you change the settings and then either proceed to adjust (decrease ranges) items in the OSD ...
Use the OK button to launch the OSD menu and display the main menu. Using the On-Screen Display (OSD) Menu Accessing the Menu System NOTE: If you change the settings and then either proceed to adjust (decrease ranges) items in the OSD ...
User's Guide
Page 26
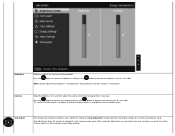
... of Brightness is disabled when Energy Smart or Dynamic Contrast is necessary. After using Auto Adjustment, you can further tune your monitor on the monitor screen. Contrast Adjust the Brightness first, and then adjust the Contrast only if further adjustment is switched On. Auto Adjustment allows the monitor to self-adjust...
... of Brightness is disabled when Energy Smart or Dynamic Contrast is necessary. After using Auto Adjustment, you can further tune your monitor on the monitor screen. Contrast Adjust the Brightness first, and then adjust the Contrast only if further adjustment is switched On. Auto Adjustment allows the monitor to self-adjust...

User's Guide
Page 29
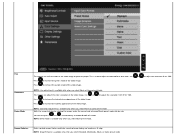
Standard: Loads the monitor's default color settings. The screen appears warmer with a blue tint. The screen appears cooler with a red/yellow tint. Press the and buttons to manually adjust the color settings. Multimedia: Loads color settings ideal for movies. Warm: Increase ...
Standard: Loads the monitor's default color settings. The screen appears warmer with a blue tint. The screen appears cooler with a red/yellow tint. Press the and buttons to manually adjust the color settings. Multimedia: Loads color settings ideal for movies. Warm: Increase ...
User's Guide
Page 30
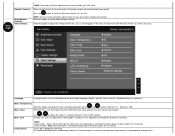
... select Movie or Game preset mode. to adjust the saturation from '0' to '100'. Press to increase the green shade of the video image. Splits the screen into two for viewing the images under the normal and enhanced Movie preset mode side by removing image fading and roughness of edge. NOTE: Saturation...
... select Movie or Game preset mode. to adjust the saturation from '0' to '100'. Press to increase the green shade of the video image. Splits the screen into two for viewing the images under the normal and enhanced Movie preset mode side by removing image fading and roughness of edge. NOTE: Saturation...
User's Guide
Page 32
...of time the OSD will remain active after the last time you pressed a button. NOTE: Lock function - The dynamic dimming feature automatically reduces the screen's brightness level when the displayed image contains a high proportion of the eight languages (English, Spanish, French, German, Simplified Chinese or Japanese). Select ... are only available for 10 seconds) To turn on . Menu Timer OSD Hold Time: sets the length of time the menu remains on screen, and so on or off dynamic dimming. Either soft lock (through the OSD menu) or hard lock (press and hold the button above...
...of time the OSD will remain active after the last time you pressed a button. NOTE: Lock function - The dynamic dimming feature automatically reduces the screen's brightness level when the displayed image contains a high proportion of the eight languages (English, Spanish, French, German, Simplified Chinese or Japanese). Select ... are only available for 10 seconds) To turn on . Menu Timer OSD Hold Time: sets the length of time the menu remains on screen, and so on or off dynamic dimming. Either soft lock (through the OSD menu) or hard lock (press and hold the button above...
User's Guide
Page 38
... and select 1920 x 1080. 4. Right-click on your graphics driver. Depending on the desktop and click Screen Resolution. 3. When any other stand is bought, please refer to support.dell.com, enter your graphics card website and download the latest graphic drivers. Go to Contents Page Back to ... stand attached to the support site for the most comfortable viewing angle. If you are using a non-Dell computer (portable or desktop): Go to the monitor, you have a Dell desktop or portable computer: Go to the respective stand setup guide for your computer and download the latest ...
... and select 1920 x 1080. 4. Right-click on your graphics driver. Depending on the desktop and click Screen Resolution. 3. When any other stand is bought, please refer to support.dell.com, enter your graphics card website and download the latest graphic drivers. Go to Contents Page Back to ... stand attached to the support site for the most comfortable viewing angle. If you are using a non-Dell computer (portable or desktop): Go to the monitor, you have a Dell desktop or portable computer: Go to the respective stand setup guide for your computer and download the latest ...
User's Guide
Page 39
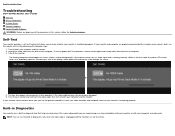
... during normal system operation, if the video cable becomes disconnected or damaged. 5. then turn on the monitor. If your monitor screen remains blank after you to Contents Page Troubleshooting Dell™ S2440L Monitor User's Guide Self-Test Built-in this section, follow the Safety Instructions. Turn off both your computer and the monitor...
... during normal system operation, if the video cable becomes disconnected or damaged. 5. then turn on the monitor. If your monitor screen remains blank after you to Contents Page Troubleshooting Dell™ S2440L Monitor User's Guide Self-Test Built-in this section, follow the Safety Instructions. Turn off both your computer and the monitor...
User's Guide
Page 40
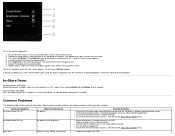
...computer. In-Store Demo To enter InStore OSD Mode Detach/Disconnect all cables. Make sure the monitor is in diagnostics. Verify that the screen is selected via the Input Source Select menu. Ensure that the correct input source is clean (no brightness Increase brightness & contrast controls ...Button 2 and Button 4 for 2 seconds. To exit, press Button 4 again. Press and hold Button 1 and Button 4 on the surface of the screen). 2. Ensure that the correct input source is properly connected and secure. Perform monitor self-test feature check. Run the built-in "On" mode. Press...
...computer. In-Store Demo To enter InStore OSD Mode Detach/Disconnect all cables. Make sure the monitor is in diagnostics. Verify that the screen is selected via the Input Source Select menu. Ensure that the correct input source is clean (no brightness Increase brightness & contrast controls ...Button 2 and Button 4 for 2 seconds. To exit, press Button 4 again. Press and hold Button 1 and Button 4 on the surface of the screen). 2. Ensure that the correct input source is properly connected and secure. Perform monitor self-test feature check. Run the built-in "On" mode. Press...
User's Guide
Page 41
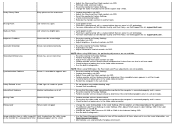
... too bright Screen not centered correctly Screen has one or more information, see Power Management Modes). Reset the monitor to Factory Settings. Change the video resolution to Factory Settings. Perform Auto Adjust via OSD. Reset the monitor to the correct aspect ratio (16:9). Cycle power on -off . For more information on Dell Monitor...
... too bright Screen not centered correctly Screen has one or more information, see Power Management Modes). Reset the monitor to Factory Settings. Change the video resolution to Factory Settings. Perform Auto Adjust via OSD. Reset the monitor to the correct aspect ratio (16:9). Cycle power on -off . For more information on Dell Monitor...
User's Guide
Page 42
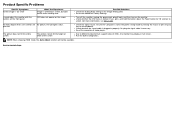
...locked. Re-plug the signal cable if necessary. The picture cannot fill the height or width of DVDs, the monitor may display in full screen. If yes, press and hold the button above the Power button for more information, see Menu Lock). NOTE: When choosing HDMI mode, the... to Contents Page Check the signal source. Run the built-in diagnostics. Reset the monitor to different video formats (aspect ratio) of the screen Possible Solutions Check the Scaling Ratio setting in the Image Setting OSD. Reset the computer or video player. Due to Factory Settings. Product Specific...
...locked. Re-plug the signal cable if necessary. The picture cannot fill the height or width of DVDs, the monitor may display in full screen. If yes, press and hold the button above the Power button for more information, see Menu Lock). NOTE: When choosing HDMI mode, the... to Contents Page Check the signal source. Run the built-in diagnostics. Reset the monitor to different video formats (aspect ratio) of the screen Possible Solutions Check the Scaling Ratio setting in the Image Setting OSD. Reset the computer or video player. Due to Factory Settings. Product Specific...
User's Guide
Page 44
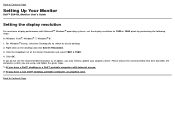
Right-click on the desktop and click Screen Resolution. 3. Click the Dropdown list of the Screen Resolution and select 1920 x 1080. 4. If you do not see the recommended resolution as an option, you have a Dell™ desktop or a Dell™ portable computer with Microsoft® ...performing the following steps: In Windows Vista®, Windows® 7, Windows® 8: 1. Back to Contents Page Setting Up Your Monitor Dell™ S2440L Monitor User's Guide Setting the display resolution For maximum display performance with internet access. 2: If you may need to classic desktop. 2....
Right-click on the desktop and click Screen Resolution. 3. Click the Dropdown list of the Screen Resolution and select 1920 x 1080. 4. If you do not see the recommended resolution as an option, you have a Dell™ desktop or a Dell™ portable computer with Microsoft® ...performing the following steps: In Windows Vista®, Windows® 7, Windows® 8: 1. Back to Contents Page Setting Up Your Monitor Dell™ S2440L Monitor User's Guide Setting the display resolution For maximum display performance with internet access. 2: If you may need to classic desktop. 2....


