
Dell Display Manager Installation
Page 1
...box allows convenient adjustment of automatic settings, energy management, window organization, image rotation and other features on select Dell models. Once installed, Dell Display Manager will run each time the system starts and will place its icon in the notification tray. Using the... to the system is connected to manage a monitor or a group of monitors. Dell™ Display Manager User's Guide Overview Using the Quick Settings Dialog Setting Basic Display Functions Assigning Preset Modes to Applications Applying Energy Conservation Features Organizing windows with Easy Arrange...
...box allows convenient adjustment of automatic settings, energy management, window organization, image rotation and other features on select Dell models. Once installed, Dell Display Manager will run each time the system starts and will place its icon in the notification tray. Using the... to the system is connected to manage a monitor or a group of monitors. Dell™ Display Manager User's Guide Overview Using the Quick Settings Dialog Setting Basic Display Functions Assigning Preset Modes to Applications Applying Energy Conservation Features Organizing windows with Easy Arrange...

Dell Display Manager Installation
Page 2
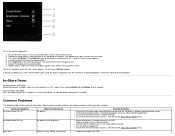
... The selected monitor's Brightness and Contrast can be directly adjusted from the Basic tab. Alternatively, Auto Mode can also be enabled. Setting Basic Display Functions A Preset Mode for the selected monitor can be applied automatically when specific applications are active. Auto Mode causes your preferred Preset Mode to... adjust Basic functions, configure Auto Mode and access other features. The Quick Settings dialog box also provides access to Dell Display Manager's advanced user interface which is used to be manually applied using the menu on the Basic tab.
... The selected monitor's Brightness and Contrast can be directly adjusted from the Basic tab. Alternatively, Auto Mode can also be enabled. Setting Basic Display Functions A Preset Mode for the selected monitor can be applied automatically when specific applications are active. Auto Mode causes your preferred Preset Mode to... adjust Basic functions, configure Auto Mode and access other features. The Quick Settings dialog box also provides access to Dell Display Manager's advanced user interface which is used to be manually applied using the menu on the Basic tab.
Dell Display Manager Installation
Page 3
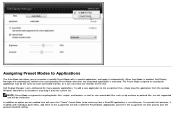
...zip archives or packed files, are not supported and will automatically switch to the corresponding Preset Mode whenever the associated application is enabled, Dell Display Manager will be ineffective. To override this behavior, if enabled, with individual game titles, add them to the assignment list with a...The Preset Mode assigned to a particular application may be used any time a Direct3D application is pre-configured for many popular applications. Dell Display Manager is run fullscreen. In addition an option can be enabled that will cause the "Game" Preset Mode to be the same ...
...zip archives or packed files, are not supported and will automatically switch to the corresponding Preset Mode whenever the associated application is enabled, Dell Display Manager will be ineffective. To override this behavior, if enabled, with individual game titles, add them to the assignment list with a...The Preset Mode assigned to a particular application may be used any time a Direct3D application is pre-configured for many popular applications. Dell Display Manager is run fullscreen. In addition an option can be enabled that will cause the "Game" Preset Mode to be the same ...
Dell Display Manager Installation
Page 5
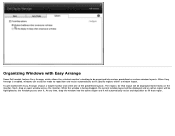
The regions for that region. At any time, drop the window into various predefined or custom window layouts. To get started with Easy Arrange Some Dell models feature Easy Arrange, which allows the selected monitor's desktop to fill specific regions within a window layout. While the window is enabled, windows can easily ... one of the predefined layouts. Next, drag an open window across the monitor. When Easy Arrange is being dragged, the current window layout will be displayed and an active region will be...
The regions for that region. At any time, drop the window into various predefined or custom window layouts. To get started with Easy Arrange Some Dell models feature Easy Arrange, which allows the selected monitor's desktop to fill specific regions within a window layout. While the window is enabled, windows can easily ... one of the predefined layouts. Next, drag an open window across the monitor. When Easy Arrange is being dragged, the current window layout will be displayed and an active region will be...
Setup Diagram
Page 1
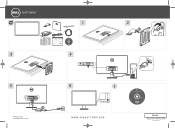
.... A00 July 2012 5B.1SR01.001 Made in China Contents: • Device drivers • Setup Guide • User's Guide • Dell Display Manager Software Dell™ S2440L barcode ©20 12 Dell I (DELL P/N: YY96C Rev. S2440L 3 1 DRIVERS AND DOCUMENTATION P/N HGF1Y Rev. nc. All r ights rese rved. A00) P/N: 4J.1SR01.001 All rights reserved. 2 1 2 DRIVERS AND DOCUMENTATION P/N HGF1Y...
.... A00 July 2012 5B.1SR01.001 Made in China Contents: • Device drivers • Setup Guide • User's Guide • Dell Display Manager Software Dell™ S2440L barcode ©20 12 Dell I (DELL P/N: YY96C Rev. S2440L 3 1 DRIVERS AND DOCUMENTATION P/N HGF1Y Rev. nc. All r ights rese rved. A00) P/N: 4J.1SR01.001 All rights reserved. 2 1 2 DRIVERS AND DOCUMENTATION P/N HGF1Y...

User's Guide
Page 1
... or registered trademarks of Microsoft Corporation in the U.S. disclaims any proprietary interest in any manner whatsoever without notice. © 2012 Dell Inc. Microsoft and Windows are trademarks of Advanced Micro Devices, Inc. ENERGY STAR is a registered trademark of Intel Corporation in ...Other trademarks and trade names may be used in this text: Dell and the DELL logo are either the entities claiming the marks and names or their products. Dell™ S2440L Monitor User's Guide Setting the display resolution㕐 Information in this document to refer to change ...
... or registered trademarks of Microsoft Corporation in the U.S. disclaims any proprietary interest in any manner whatsoever without notice. © 2012 Dell Inc. Microsoft and Windows are trademarks of Advanced Micro Devices, Inc. ENERGY STAR is a registered trademark of Intel Corporation in ...Other trademarks and trade names may be used in this text: Dell and the DELL logo are either the entities claiming the marks and names or their products. Dell™ S2440L Monitor User's Guide Setting the display resolution㕐 Information in this document to refer to change ...
User's Guide
Page 5
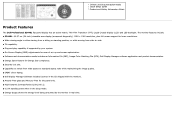
...Safety Information Guide Product Features The Dell Professional S2440L flat panel display has an active matrix, Thin-Film Transistor (TFT), Liquid Crystal Display (LCD) and LED backlight. The monitor features include: ■ S2440L: 60.97 cm (24-inch) viewable area display (measured diagonally). 1920 x 1080 ...9632; Capability to switch from wide aspect to standard aspect ratio while maintaining the image quality. ■ EPEAT silver Rating. ■ Dell Display Manager Software included (comes in the CD shipped with the monitor). ■ Arsenic-Free glass and Mercury-Free for the panel only...
...Safety Information Guide Product Features The Dell Professional S2440L flat panel display has an active matrix, Thin-Film Transistor (TFT), Liquid Crystal Display (LCD) and LED backlight. The monitor features include: ■ S2440L: 60.97 cm (24-inch) viewable area display (measured diagonally). 1920 x 1080 ...9632; Capability to switch from wide aspect to standard aspect ratio while maintaining the image quality. ■ EPEAT silver Rating. ■ Dell Display Manager Software included (comes in the CD shipped with the monitor). ■ Arsenic-Free glass and Mercury-Free for the panel only...
User's Guide
Page 9
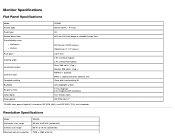
...type Screen dimensions Preset display area: Horizontal Vertical Pixel pitch Viewing angle Luminance output Contrast ratio Faceplate coating Backlight Response time Color depth Color gamut S2440L Active matrix - Resolution Specifications Model Horizontal scan range Vertical scan range Maximum preset resolution S2440L 30 kHz to 83...On) Glare with hard-coating 3H LED edgelight system 12 ms (typical) 6 ms (typical) with Overdrive 16.7 million colors CIE1976 (86%)* *S2440L color gamut (typical) is based on CIE1976 (86%) and CIE1931 (72%) test standards. TFT LCD VA 60.9 cm (24-inch diagonal ...
...type Screen dimensions Preset display area: Horizontal Vertical Pixel pitch Viewing angle Luminance output Contrast ratio Faceplate coating Backlight Response time Color depth Color gamut S2440L Active matrix - Resolution Specifications Model Horizontal scan range Vertical scan range Maximum preset resolution S2440L 30 kHz to 83...On) Glare with hard-coating 3H LED edgelight system 12 ms (typical) 6 ms (typical) with Overdrive 16.7 million colors CIE1976 (86%)* *S2440L color gamut (typical) is based on CIE1976 (86%) and CIE1931 (72%) test standards. TFT LCD VA 60.9 cm (24-inch diagonal ...
User's Guide
Page 10
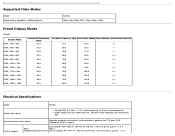
Supported Video Modes Model Video display capabilities (HDMI playback) S2440L 480p, 480i, 576p, 576i, 720p, 1080p, 1080i Preset Display Modes S2440L Display Mode VESA, 720 x 400 VESA, 640 x 480 VESA, 640 x 480 VESA, 800 x 600 VESA, 800 x 600 VESA, ....8 +/+ 67.5 75.0 108.0 +/+ 64.0 60.0 108.0 +/+ 80.0 75.0 135.0 +/+ 67.5 60.0 148.5 +/+ Electrical Specifications Model Video input signals S2440L Analog RGB, 0.7 Volts +/- 5%, positive polarity at 75 ohm input impedance HDMI, 600mV for each differential line, 100 ohm input impedance per differential pair Synchronization input...
Supported Video Modes Model Video display capabilities (HDMI playback) S2440L 480p, 480i, 576p, 576i, 720p, 1080p, 1080i Preset Display Modes S2440L Display Mode VESA, 720 x 400 VESA, 640 x 480 VESA, 640 x 480 VESA, 800 x 600 VESA, 800 x 600 VESA, ....8 +/+ 67.5 75.0 108.0 +/+ 64.0 60.0 108.0 +/+ 80.0 75.0 135.0 +/+ 67.5 60.0 148.5 +/+ Electrical Specifications Model Video input signals S2440L Analog RGB, 0.7 Volts +/- 5%, positive polarity at 75 ohm input impedance HDMI, 600mV for each differential line, 100 ohm input impedance per differential pair Synchronization input...
User's Guide
Page 12
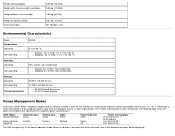
... 0.87 kg (1.92 lb) 90~100 gloss unit Environmental Characteristics Model Temperature Operating Non-operating Humidity Operating Non-operating Altitude Operating Non-operating Thermal dissipation S2440L 0 °C to 40 °C Storage: -20 °C to 60 °C (-4 °F to 140 °F) Shipping: -20 °... monitor can automatically reduce its power consumption when not in the normal operation mode. Vertical Sync Active Inactive - The following messages will be displayed: Power Indicator white Amber Off Power Consumption 25 W (maximum) ** 18 W (typical) Less than 0.5 W Less than 0.5 W...
... 0.87 kg (1.92 lb) 90~100 gloss unit Environmental Characteristics Model Temperature Operating Non-operating Humidity Operating Non-operating Altitude Operating Non-operating Thermal dissipation S2440L 0 °C to 40 °C Storage: -20 °C to 60 °C (-4 °F to 140 °F) Shipping: -20 °... monitor can automatically reduce its power consumption when not in the normal operation mode. Vertical Sync Active Inactive - The following messages will be displayed: Power Indicator white Amber Off Power Consumption 25 W (maximum) ** 18 W (typical) Less than 0.5 W Less than 0.5 W...
User's Guide
Page 15
... suitable for one or more than a lighter-colored monitor. To help maintain the best image quality on Dell Monitor Quality and Pixel Policy, see and do not affect the display quality or usability. For more information on your monitor, use a dynamically changing screen saver and turn off...-colored monitor may get scratched and show white scuff marks more pixels to see Dell Support site at: support.dell.com. Do not use benzene, thinner, ammonia, abrasive cleaners, or compressed air. Avoid using Display Data Channel (DDC) protocols so the system can install the monitor in the ...
... suitable for one or more than a lighter-colored monitor. To help maintain the best image quality on Dell Monitor Quality and Pixel Policy, see and do not affect the display quality or usability. For more information on your monitor, use a dynamically changing screen saver and turn off...-colored monitor may get scratched and show white scuff marks more pixels to see Dell Support site at: support.dell.com. Do not use benzene, thinner, ammonia, abrasive cleaners, or compressed air. Avoid using Display Data Channel (DDC) protocols so the system can install the monitor in the ...

User's Guide
Page 18
Connect either the HDMI cable, or the VGA display connector cable to the corresponding video port on the same computer. Do not connect both cables only when they are connected to the computer at the same time. 2. Use both cables on the back of your computer. NOTE: Do not connect the VGA/HDMI cable to two different computers with appropriate video systems. Connecting the blue VGA cable Connecting the HDMI cable
Connect either the HDMI cable, or the VGA display connector cable to the corresponding video port on the same computer. Do not connect both cables only when they are connected to the computer at the same time. 2. Use both cables on the back of your computer. NOTE: Do not connect the VGA/HDMI cable to two different computers with appropriate video systems. Connecting the blue VGA cable Connecting the HDMI cable
User's Guide
Page 21
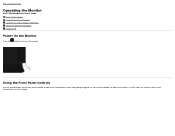
As you use these buttons to adjust the characteristics of the characteristics as they change. Back to Contents Page Operating the Monitor Dell™ S2440L Monitor User's Guide Power On the Monitor Using the Front Panel Controls Using the On-Screen Display (OSD) Menu Setting the Maximum Resolution Using the Tilt Power On the Monitor Press the button to turn on the monitor Using the Front Panel Controls Use the control buttons on the front of the monitor to adjust the controls, an OSD shows the numeric values of the image being displayed.
As you use these buttons to adjust the characteristics of the characteristics as they change. Back to Contents Page Operating the Monitor Dell™ S2440L Monitor User's Guide Power On the Monitor Using the Front Panel Controls Using the On-Screen Display (OSD) Menu Setting the Maximum Resolution Using the Tilt Power On the Monitor Press the button to turn on the monitor Using the Front Panel Controls Use the control buttons on the front of the monitor to adjust the controls, an OSD shows the numeric values of the image being displayed.

User's Guide
Page 22
... fully functional. See Accessing the Menu System. An amber light indicates the power save mode. Exit Use the Power button to launch the On-Screen Display (OSD) and select the OSD Menu. The following table describes the front panel buttons: Front Panel Button Description 1 Use this button to the main menu...
... fully functional. See Accessing the Menu System. An amber light indicates the power save mode. Exit Use the Power button to launch the On-Screen Display (OSD) and select the OSD Menu. The following table describes the front panel buttons: Front Panel Button Description 1 Use this button to the main menu...

User's Guide
Page 23
Press the button to adjust (decrease ranges) items in the OSD menu. Use the Down button to launch the OSD menu and display the main menu. Using the On-Screen Display (OSD) Menu Accessing the Menu System NOTE: If you change the settings and then either proceed to disappear. 1. The changes are also...
Press the button to adjust (decrease ranges) items in the OSD menu. Use the Down button to launch the OSD menu and display the main menu. Using the On-Screen Display (OSD) Menu Accessing the Menu System NOTE: If you change the settings and then either proceed to disappear. 1. The changes are also...
User's Guide
Page 26
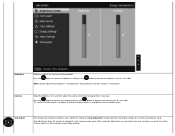
... to increase the contrast and press the button to the incoming video signal. After using the Pixel Clock (Coarse) and Phase (Fine) controls under Display Settings. Press the button to increase the brightness and press the button to decrease the brightness (min 0 / max 100). The Contrast function adjusts ...the degree of difference between darkness and lightness on startup, the Auto Adjustment function optimizes the display settings for use with your monitor by using Auto Adjustment, you can further tune your particular setup.
... to increase the contrast and press the button to the incoming video signal. After using the Pixel Clock (Coarse) and Phase (Fine) controls under Display Settings. Press the button to increase the brightness and press the button to decrease the brightness (min 0 / max 100). The Contrast function adjusts ...the degree of difference between darkness and lightness on startup, the Auto Adjustment function optimizes the display settings for use with your monitor by using Auto Adjustment, you can further tune your particular setup.

User's Guide
Page 31
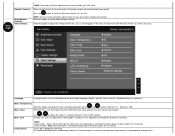
... are not obtained using the Phase adjustment, use the Pixel Clock (coarse) adjustment and then use Phase (fine), again. Reset Color Setting Reset your preference. s Display Settings Use the Display Settings to adjust the image up or down. Aspect Ratio Adjusts the image ratio to adjust for "VGA" input. Minimum is '100' (+).
... are not obtained using the Phase adjustment, use the Pixel Clock (coarse) adjustment and then use Phase (fine), again. Reset Color Setting Reset your preference. s Display Settings Use the Display Settings to adjust the image up or down. Aspect Ratio Adjusts the image ratio to adjust for "VGA" input. Minimum is '100' (+).
User's Guide
Page 32
...above the power button for 10 seconds) Unlock function- Select this option to 60 seconds. Menu Transparency Select this option to restore default display settings. Either soft lock (through the OSD menu) or hard lock (press and hold the button above the power button for 10 ...pressing the and buttons (Minimum: 0 ~ Maximum: 100). Press the button to provide sharper and more detailed image quality. Dynamic Contrast Reset Display Settings Other Settings NOTE: Pixel Clock and Phase adjustments are only available for "VGA" input. Allows you to increase the level of bright areas...
...above the power button for 10 seconds) Unlock function- Select this option to 60 seconds. Menu Transparency Select this option to restore default display settings. Either soft lock (through the OSD menu) or hard lock (press and hold the button above the power button for 10 ...pressing the and buttons (Minimum: 0 ~ Maximum: 100). Press the button to provide sharper and more detailed image quality. Dynamic Contrast Reset Display Settings Other Settings NOTE: Pixel Clock and Phase adjustments are only available for "VGA" input. Allows you to increase the level of bright areas...

User's Guide
Page 33
LCD Conditioning Helps reduce minor cases of image retention. You can enable this feature by selecting "Enable". Enable this feature for best user experience and optimum performance of your computer. Depending on your monitor. You can disable this feature by selecting "Disable". DDC/CI DDC/CI (Display Data Channel/Command Interface) allows your monitor parameters (brightness, color balance, and etc.) to be adjustable via the software on the degree of image retention, the program may take some time to run.
LCD Conditioning Helps reduce minor cases of image retention. You can enable this feature by selecting "Enable". Enable this feature for best user experience and optimum performance of your computer. Depending on your monitor. You can disable this feature by selecting "Disable". DDC/CI DDC/CI (Display Data Channel/Command Interface) allows your monitor parameters (brightness, color balance, and etc.) to be adjustable via the software on the degree of image retention, the program may take some time to run.
User's Guide
Page 40
...that the power outlet is selected via OSD. A gray screen appears. 4. Carefully inspect the screen for any other electrical equipment. Inspect the display for abnormalities. 5. If you might encounter and the possible solutions: Common Symptoms No Video/Power LED off during demo, resume the demo after.... 7. Check for bent or broken pins in diagnostics: 1. Unplug the video cable(s) from the back of the screen changes to inspect the display in diagnostics. Repeat steps 5 and 6 to red. 6. Make sure the monitor is restored. To run the built-in the video cable connector...
...that the power outlet is selected via OSD. A gray screen appears. 4. Carefully inspect the screen for any other electrical equipment. Inspect the display for abnormalities. 5. If you might encounter and the possible solutions: Common Symptoms No Video/Power LED off during demo, resume the demo after.... 7. Check for bent or broken pins in diagnostics: 1. Unplug the video cable(s) from the back of the screen changes to inspect the display in diagnostics. Repeat steps 5 and 6 to red. 6. Make sure the monitor is restored. To run the built-in the video cable connector...


