
Monitor Teardown Instructions
Page 1
... arrow preference for unlocking mechanisms of the S7 interface board. Remove the rear cover and put the LCD S4 monitor on whether users returning the accessories) power cable QSG USB Type-C cable manual label(optinal) Take out the base and molded pulp from the carton, S3 then take out the monitor and stand from the carton. Tear off 3pcs aluminum foils, then disconnect speaker's cable away from...
... arrow preference for unlocking mechanisms of the S7 interface board. Remove the rear cover and put the LCD S4 monitor on whether users returning the accessories) power cable QSG USB Type-C cable manual label(optinal) Take out the base and molded pulp from the carton, S3 then take out the monitor and stand from the carton. Tear off 3pcs aluminum foils, then disconnect speaker's cable away from...

Monitor Teardown Instructions
Page 4
... the connective cable and panel lamp cable from the hooks of the cables. 1 3 2 DELL S2422HZ 4 Put the middle bezel into a fixture. No.2~8 screw size=M3x7.5, Torque=5±0.5kgfxcm) Turn over the middle bezel, and then tear off the aluminum foil. (No.1~2 screw size=M2x2.4, Torque=1±0.2kgfxcm) Disassemble the front bezel with the panel module, S18 then remove the front bezel. Use a Philipshead screwdriver to remove 2pcs screws to unlock...
... the connective cable and panel lamp cable from the hooks of the cables. 1 3 2 DELL S2422HZ 4 Put the middle bezel into a fixture. No.2~8 screw size=M3x7.5, Torque=5±0.5kgfxcm) Turn over the middle bezel, and then tear off the aluminum foil. (No.1~2 screw size=M2x2.4, Torque=1±0.2kgfxcm) Disassemble the front bezel with the panel module, S18 then remove the front bezel. Use a Philipshead screwdriver to remove 2pcs screws to unlock...

Monitor Users Guide
Page 3
... view 8 Back view 9 Bottom view 10 Monitor specifications 11 Resolution specifications 12 Preset display modes 13 Electrical specifications 15 Webcam specifications 16 Microphone specifications 16 Speaker specifications 16 Physical characteristics 16 Environmental characteristics 18 Pin assignments 19 Plug-and-Play 23 LCD monitor quality and pixel policy 23 Ergonomics 24 Handling and moving your display 25 Maintenance guidelines 27 Cleaning your monitor 27 Setting up the monitor 28 Connecting the stand 28 Using the tilt, swivel, and vertical...
... view 8 Back view 9 Bottom view 10 Monitor specifications 11 Resolution specifications 12 Preset display modes 13 Electrical specifications 15 Webcam specifications 16 Microphone specifications 16 Speaker specifications 16 Physical characteristics 16 Environmental characteristics 18 Pin assignments 19 Plug-and-Play 23 LCD monitor quality and pixel policy 23 Ergonomics 24 Handling and moving your display 25 Maintenance guidelines 27 Cleaning your monitor 27 Setting up the monitor 28 Connecting the stand 28 Using the tilt, swivel, and vertical...

Monitor Users Guide
Page 4
... cables 35 Securing your monitor using Kensington lock (optional 35 Removing the monitor stand 36 Wall mounting (optional 37 Operating the monitor 38 Power on the monitor 38 Using the front-panel controls 38 Using the OSD lock function 40 Front‑panel buttons 43 Using the On-Screen Display (OSD) menu 44 Accessing the menu system 44 OSD warning messages 53 Setting the maximum resolution 58 Setting up Windows Hello 59 Setting up the monitor webcam as default setting 63 Setting up the monitor speaker as default setting 67 Troubleshooting...
... cables 35 Securing your monitor using Kensington lock (optional 35 Removing the monitor stand 36 Wall mounting (optional 37 Operating the monitor 38 Power on the monitor 38 Using the front-panel controls 38 Using the OSD lock function 40 Front‑panel buttons 43 Using the On-Screen Display (OSD) menu 44 Accessing the menu system 44 OSD warning messages 53 Setting the maximum resolution 58 Setting up Windows Hello 59 Setting up the monitor webcam as default setting 63 Setting up the monitor speaker as default setting 67 Troubleshooting...
Monitor Users Guide
Page 7
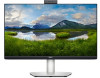
... resolution. • Plug and play capability if supported by your computer. • On-Screen Display (OSD) adjustments for ease of set-up and screen optimization. • Power and OSD buttons lock. • Security lock slot. • ≤ 0.3 W in Standby Mode. • Premium Panel Exchange for peace of mind. • Optimizes eye comfort with a flicker-free screen and minimizes hazard blue light emission. • Uses Low Blue Light panel and is compliant with TUV Rheinland (Hardware Solution) at factory reset/default setting model...
... resolution. • Plug and play capability if supported by your computer. • On-Screen Display (OSD) adjustments for ease of set-up and screen optimization. • Power and OSD buttons lock. • Security lock slot. • ≤ 0.3 W in Standby Mode. • Premium Panel Exchange for peace of mind. • Optimizes eye comfort with a flicker-free screen and minimizes hazard blue light emission. • Uses Low Blue Light panel and is compliant with TUV Rheinland (Hardware Solution) at factory reset/default setting model...
Monitor Users Guide
Page 9
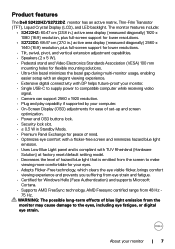
x 100 mm-behind attached compatible wall mount kit (100 mm x 100 VESA cover) mm). 2 Regulatory label Lists the regulatory approvals. 3 Stand release button Releases stand from the monitor. 4 Barcode, serial number, and See this label if you have to organize cables by inserting them through the slot. The Service Tag is a unique alphanumeric identifier that enables Dell service technicians to identify the hardware components in your...
x 100 mm-behind attached compatible wall mount kit (100 mm x 100 VESA cover) mm). 2 Regulatory label Lists the regulatory approvals. 3 Stand release button Releases stand from the monitor. 4 Barcode, serial number, and See this label if you have to organize cables by inserting them through the slot. The Service Tag is a unique alphanumeric identifier that enables Dell service technicians to identify the hardware components in your...

Monitor Users Guide
Page 39
... Accessing the menu system. Solid white light indicates that the monitor is not sync (Icon shows unmute). 2 Use this button to go back to choose from a list of preset color modes. Menu 4 Use this button to the main menu or exit the OSD main menu. Blinking white light indicates that the monitor is turned Power button (with power-status light) on or off. Operating the monitor | 39 NOTE: Mute function on the Dell S2422HZ or S2722DZ works by...
... Accessing the menu system. Solid white light indicates that the monitor is not sync (Icon shows unmute). 2 Use this button to go back to choose from a list of preset color modes. Menu 4 Use this button to the main menu or exit the OSD main menu. Blinking white light indicates that the monitor is turned Power button (with power-status light) on or off. Operating the monitor | 39 NOTE: Mute function on the Dell S2422HZ or S2722DZ works by...
Monitor Users Guide
Page 46
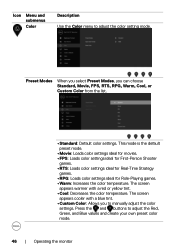
... Menu and submenus Color Description Use the Color menu to adjust the Red, Green, and Blue values and create your own preset color mode. 46 | Operating the monitor The screen appears warmer with a blue tint. • Custom Color: Allows you can choose Standard, Movie, FPS, RTS, RPG, Warm, Cool, or Custom Color from the list. • Standard: Default color settings. Press the and buttons to adjust the color setting mode. The screen appears cooler with a red...
... Menu and submenus Color Description Use the Color menu to adjust the Red, Green, and Blue values and create your own preset color mode. 46 | Operating the monitor The screen appears warmer with a blue tint. • Custom Color: Allows you can choose Standard, Movie, FPS, RTS, RPG, Warm, Cool, or Custom Color from the list. • Standard: Default color settings. Press the and buttons to adjust the color setting mode. The screen appears cooler with a red...

Monitor Users Guide
Page 48
... user connects the HDMI cable to play audio and then plug in the USB-C cable, the audio channel moves to adjust the settings. Volume Allows you to set the Response Time to default settings. Webcam Select Enable or Disable the Webcam function. Use or to adjust the sharpness from '0' to increase the speaker volume. Status Indicator Select Off or Temporary to '100'. NOTE: With the USB cable audio volume sync with computer. 48 | Operating the monitor Reset Display Resets...
... user connects the HDMI cable to play audio and then plug in the USB-C cable, the audio channel moves to adjust the settings. Volume Allows you to set the Response Time to default settings. Webcam Select Enable or Disable the Webcam function. Use or to adjust the sharpness from '0' to increase the speaker volume. Status Indicator Select Off or Temporary to '100'. NOTE: With the USB cable audio volume sync with computer. 48 | Operating the monitor Reset Display Resets...
Monitor Users Guide
Page 50
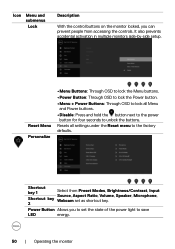
... control buttons on the monitor locked, you can prevent people from Preset Modes, Brightness/Contrast, Input Source, Aspect Ratio, Volume, Speaker, Microphone, Shortcut key Webcam set as shortcut key. 2 Power Button Allows you to set the state of the power light to save LED energy. 50 | Operating the monitor Shortcut key 1 Select from accessing the controls. Resets all Menu and Power buttons. • Disable: Press and hold the button next to the power button for four seconds to the factory defaults...
... control buttons on the monitor locked, you can prevent people from Preset Modes, Brightness/Contrast, Input Source, Aspect Ratio, Volume, Speaker, Microphone, Shortcut key Webcam set as shortcut key. 2 Power Button Allows you to set the state of the power light to save LED energy. 50 | Operating the monitor Shortcut key 1 Select from accessing the controls. Resets all Menu and Power buttons. • Disable: Press and hold the button next to the power button for four seconds to the factory defaults...

Monitor Users Guide
Page 51
... Interface) allows your monitor. Enable this feature for best user experience and optimum performance of your monitor parameters such as the DDC/CI, LCD conditioning, and so on to enable or disable Other USB Charging function during monitor power off mode. Select this feature by selecting Off. Operating the monitor | 51 Resets all settings under the Personalize menu to adjust the OSD settings such as brightness, color balance, and...
... Interface) allows your monitor. Enable this feature for best user experience and optimum performance of your monitor parameters such as the DDC/CI, LCD conditioning, and so on to enable or disable Other USB Charging function during monitor power off mode. Select this feature by selecting Off. Operating the monitor | 51 Resets all settings under the Personalize menu to adjust the OSD settings such as brightness, color balance, and...

Monitor Users Guide
Page 70
... mode, the power LED remains white. Unplug the video cable from the back of computer. 3. or or 70 | Troubleshooting Depending upon the selected input, one of the computer. Turn off both your monitor and computer are properly connected but the monitor screen remains dark, run the monitor self-test by performing the following steps, follow the Safety instructions. To ensure proper Self-Test operation, remove all digital...
... mode, the power LED remains white. Unplug the video cable from the back of computer. 3. or or 70 | Troubleshooting Depending upon the selected input, one of the computer. Turn off both your monitor and computer are properly connected but the monitor screen remains dark, run the monitor self-test by performing the following steps, follow the Safety instructions. To ensure proper Self-Test operation, remove all digital...

Monitor Users Guide
Page 71
... appears during normal operation and when the video cable is displayed. Repeat steps 5 and 6 until the screen displays green, blue, black, and white colors. To exit, press Button 1 again. Press Button 1 on the screen. 3. Observe if the screen has any abnormalities or defects. A gray screen is functioning properly. Troubleshooting | 71 Then, turn on the surface of the screen changes to red. 6. If your monitor screen remains blank after you do not detect...
... appears during normal operation and when the video cable is displayed. Repeat steps 5 and 6 until the screen displays green, blue, black, and white colors. To exit, press Button 1 again. Press Button 1 on the screen. 3. Observe if the screen has any abnormalities or defects. A gray screen is functioning properly. Troubleshooting | 71 Then, turn on the surface of the screen changes to red. 6. If your monitor screen remains blank after you do not detect...

Monitor Users Guide
Page 72
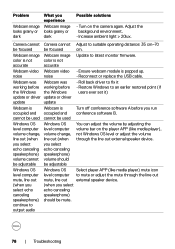
... is connected properly and secure. • Verify that the power outlet is functioning properly using any other electrical equipment. • Ensure that the power button is pressed fully. • Ensure that the correct input source is selected in the Input Source menu. • Increase brightness and contrast controls through OSD. • Perform monitor self-test feature check. • Check for bent or broken pins in the video cable connector. •...
... is connected properly and secure. • Verify that the power outlet is functioning properly using any other electrical equipment. • Ensure that the power button is pressed fully. • Ensure that the correct input source is selected in the Input Source menu. • Increase brightness and contrast controls through OSD. • Perform monitor self-test feature check. • Check for bent or broken pins in the video cable connector. •...

Monitor Users Guide
Page 73
... USB cable. • USB cable not • Select the monitor webcam as the default in plugged in the video cable connector. the correct USB source is secure. • Check for appears on the application. • Adjust R/G/B value under Custom Color in Color menu OSD. • Change the Input Color Format to PC RGB or YCbCr in the Color menu OSD. • Run the built-in diagnostics. a long period screen • Alternatively, use a dynamically changing screensaver. Webcam does not work...
... USB cable. • USB cable not • Select the monitor webcam as the default in plugged in the video cable connector. the correct USB source is secure. • Check for appears on the application. • Adjust R/G/B value under Custom Color in Color menu OSD. • Change the Input Color Format to PC RGB or YCbCr in the Color menu OSD. • Run the built-in diagnostics. a long period screen • Alternatively, use a dynamically changing screensaver. Webcam does not work...

Monitor Users Guide
Page 74
... power charging. • USB-C interface of DVDs, the monitor may display in full screen. • Run the built-in the power-saving mode by moving the mouse or pressing any key on the monitor. • Check the signal source. Ensure that the USB-C cable is not damaged. 74 | Troubleshooting Download and install the latest graphics card driver. • Some DP 1.1a graphics card cannot support DP 1.2 monitors. Connect the signal cable again, if necessary. • Reset...
... power charging. • USB-C interface of DVDs, the monitor may display in full screen. • Run the built-in the power-saving mode by moving the mouse or pressing any key on the monitor. • Check the signal source. Ensure that the USB-C cable is not damaged. 74 | Troubleshooting Download and install the latest graphics card driver. • Some DP 1.1a graphics card cannot support DP 1.2 monitors. Connect the signal cable again, if necessary. • Reset...

Monitor Users Guide
Page 77
... system. • Unplug or plug USB-C cable can recover. Adjust the background environment. • Increase ambient light > 20lux Troubleshooting | 77 Webcam blurry Webcam blurry Remove protection film on the camera lens. Ensure that the USB-C upstream cable is connected between the monitor and the Manager computer or notebook. • Reconnect the USB-C upstream cable to 50 flicker flicker Hz in app. image image Webcam image Webcam image Switch Flicker reduction rate from Windows sound settings.
... system. • Unplug or plug USB-C cable can recover. Adjust the background environment. • Increase ambient light > 20lux Troubleshooting | 77 Webcam blurry Webcam blurry Remove protection film on the camera lens. Ensure that the USB-C upstream cable is connected between the monitor and the Manager computer or notebook. • Reconnect the USB-C upstream cable to 50 flicker flicker Hz in app. image image Webcam image Webcam image Switch Flicker reduction rate from Windows sound settings.
Monitor Users Guide
Page 78
... • Reconnect or replace the USB cable. Camera cannot Camera cannot Adjust to latest monitor firmware. Webcam was Webcam was working before working before you run occupied and occupied and conference software B. Adjust the background environment. • Increase ambient light > 20lux. Webcam video Webcam video • Ensure webcam module is Turn off conference software A before the Windows the Windows update or driver update or driver update update • Roll back driver to fix it ) Webcam...
... • Reconnect or replace the USB cable. Camera cannot Camera cannot Adjust to latest monitor firmware. Webcam was Webcam was working before working before you run occupied and occupied and conference software B. Adjust the background environment. • Increase ambient light > 20lux. Webcam video Webcam video • Ensure webcam module is Turn off conference software A before the Windows the Windows update or driver update or driver update update • Roll back driver to fix it ) Webcam...

Monitor Display Manager Users Guide
Page 5
... indicate which monitor you to switch between preset modes automatically or to easily adjust the brightness, contrast, resolution, window layout, and so on. Using the Quick Settings dialog box | 5 The Quick Settings dialog box is used to open the miniUI under the mouse pointer. The Quick Settings dialog box enables you to select a preset mode manually. When more than one monitor is connected to open DDM UI Control individual display in multiple display setup Description Ctrl...
... indicate which monitor you to switch between preset modes automatically or to easily adjust the brightness, contrast, resolution, window layout, and so on. Using the Quick Settings dialog box | 5 The Quick Settings dialog box is used to open the miniUI under the mouse pointer. The Quick Settings dialog box enables you to select a preset mode manually. When more than one monitor is connected to open DDM UI Control individual display in multiple display setup Description Ctrl...

Monitor Display Manager Users Guide
Page 7
... can vary from one monitor to the corresponding Preset Mode whenever the selected application is pre-configured for batch files, scripts, loaders, and nonexecutable files such as zip archives or packed files, are not supported. Dell S2422HZ/S2722DZ Assigning Preset Modes to select a specific Preset Mode with a specific application, and apply it . When Auto Mode is enabled, Dell Display Manager automatically switches to another.
... can vary from one monitor to the corresponding Preset Mode whenever the selected application is pre-configured for batch files, scripts, loaders, and nonexecutable files such as zip archives or packed files, are not supported. Dell S2422HZ/S2722DZ Assigning Preset Modes to select a specific Preset Mode with a specific application, and apply it . When Auto Mode is enabled, Dell Display Manager automatically switches to another.


