
Monitor Users Guide
Page 3
Contents Safety instructions 5 About your monitor 6 Package contents 6 Product features 7 Identifying parts and controls 8 Front view 8 Back view 9 Bottom view 10 Monitor specifications 11 Resolution specifications 12 Preset display modes 12 Electrical specifications 13 Speaker specifications 13 Physical characteristics 13 Environmental characteristics 14 Power management modes 15 Pin assignments 17 Plug-and-play 18 LCD monitor quality and pixel policy 18 Ergonomics 18 Handling and moving your display 20 Maintenance guidelines 21 Cleaning your monitor 21...
Contents Safety instructions 5 About your monitor 6 Package contents 6 Product features 7 Identifying parts and controls 8 Front view 8 Back view 9 Bottom view 10 Monitor specifications 11 Resolution specifications 12 Preset display modes 12 Electrical specifications 13 Speaker specifications 13 Physical characteristics 13 Environmental characteristics 14 Power management modes 15 Pin assignments 17 Plug-and-play 18 LCD monitor quality and pixel policy 18 Ergonomics 18 Handling and moving your display 20 Maintenance guidelines 21 Cleaning your monitor 21...

Monitor Users Guide
Page 4
...; Setting up the monitor 22 Connecting the stand 22 Using the tilt 25 Connecting your monitor 26 Organizing your cables 27 Securing your monitor using Kensington lock (optional) . 27 Removing the monitor stand 28 Wall mounting (Optional 29 Operating the monitor 30 Power on the monitor 30 Using the front panel controls 30 Using the OSD lock function 32 Front‑panel button 35 Using the On-Screen Display (OSD) menu 36 Accessing the menu system 36 OSD warning messages 46 Setting the maximum resolution 48 Troubleshooting 49...
...; Setting up the monitor 22 Connecting the stand 22 Using the tilt 25 Connecting your monitor 26 Organizing your cables 27 Securing your monitor using Kensington lock (optional) . 27 Removing the monitor stand 28 Wall mounting (Optional 29 Operating the monitor 30 Power on the monitor 30 Using the front panel controls 30 Using the OSD lock function 32 Front‑panel button 35 Using the On-Screen Display (OSD) menu 36 Accessing the menu system 36 OSD warning messages 46 Setting the maximum resolution 48 Troubleshooting 49...
Monitor Users Guide
Page 7
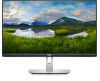
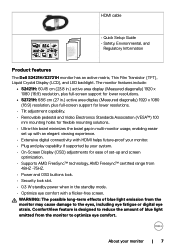
...; Quick Setup Guide • Safety, Environmental, and Regulatory Information Product features The Dell S2421H/S2721H monitor has an active matrix, Thin Film Transistor (TFT), Liquid Crystal Display (LCD), and LED backlight. About your system. • On-Screen Display (OSD) adjustments for flexible mounting solutions. • Ultra-thin bezel minimizes the bezel gap in multi-monitor usage, enabling easier set -up with an elegant viewing experience. • Extensive digital connectivity with a flicker-free screen. HDMI cable Dell S2421H/S2721H 1 3 1 HDMI Dell S2421H...
...; Quick Setup Guide • Safety, Environmental, and Regulatory Information Product features The Dell S2421H/S2721H monitor has an active matrix, Thin Film Transistor (TFT), Liquid Crystal Display (LCD), and LED backlight. About your system. • On-Screen Display (OSD) adjustments for flexible mounting solutions. • Ultra-thin bezel minimizes the bezel gap in multi-monitor usage, enabling easier set -up with an elegant viewing experience. • Extensive digital connectivity with a flicker-free screen. HDMI cable Dell S2421H/S2721H 1 3 1 HDMI Dell S2421H...

Monitor Users Guide
Page 10
... HDMI audio channel. Connect your monitor Provides audio output. 10 | About your computer with HDMI cable. Bottom view 1 23 4 56 7 Label Description 1 Built-in right speaker 2 Security lock slot 3 Power connector 4 HDMI port 1 5 HDMI port 2 6 Audio line-out port 7 Built-in left speaker Use Provides audio output. Connect the power cable (shipped with your computer with security cable lock (sold separately). Only two-channel audio is supported. NOTE: The audio line-out port does not support headphones. Connect your monitor). Secures monitor with HDMI cable...
... HDMI audio channel. Connect your monitor Provides audio output. 10 | About your computer with HDMI cable. Bottom view 1 23 4 56 7 Label Description 1 Built-in right speaker 2 Security lock slot 3 Power connector 4 HDMI port 1 5 HDMI port 2 6 Audio line-out port 7 Built-in left speaker Use Provides audio output. Connect the power cable (shipped with your computer with security cable lock (sold separately). Only two-channel audio is supported. NOTE: The audio line-out port does not support headphones. Connect your monitor). Secures monitor with HDMI cable...

Monitor Users Guide
Page 11
...) 5 ms (fast) Color depth Color gamut* Connectivity 4 ms (extreme) 16.7 million colors NTSC 72% • 2 x HDMI1.4 • 1 x Audio line out (3.5 mm jack) Border width (edge of monitor to active area) Top/Left/Right 5.4 mm Bottom 20.7 mm Adjustability Height adjustable NA stand Tilt -5° to 21° 6.0 mm 21.3 mm Swivel NA Pivot NA About your monitor | 11 Monitor specifications Model S2421H S2721H Screen type Active matrix -
...) 5 ms (fast) Color depth Color gamut* Connectivity 4 ms (extreme) 16.7 million colors NTSC 72% • 2 x HDMI1.4 • 1 x Audio line out (3.5 mm jack) Border width (edge of monitor to active area) Top/Left/Right 5.4 mm Bottom 20.7 mm Adjustability Height adjustable NA stand Tilt -5° to 21° 6.0 mm 21.3 mm Swivel NA Pivot NA About your monitor | 11 Monitor specifications Model S2421H S2721H Screen type Active matrix -

Monitor Users Guide
Page 13
...specifications Model Video input signals Input voltage/ frequency/ current Inrush current S2421H/S2721H • Digital video signal for each differential line Per differential line at 100 ohm impedance • HDMI signal input support 100-240 VAC / 50 or 60 Hz ± 3 Hz / 1.5 A (maximum) 120 V: 30 A (maximum) 240 V: 60 A (maximum) Speaker specifications Model Speaker rated power Frequency response Impedance S2421H/S2721H 2 x 3W 315 Hz - 12.5 kHz 4 ohm Physical characteristics Model Connector type Signal cable type Dimensions (with stand) Height... (7.35 in.) About your monitor | 13
...specifications Model Video input signals Input voltage/ frequency/ current Inrush current S2421H/S2721H • Digital video signal for each differential line Per differential line at 100 ohm impedance • HDMI signal input support 100-240 VAC / 50 or 60 Hz ± 3 Hz / 1.5 A (maximum) 120 V: 30 A (maximum) 240 V: 60 A (maximum) Speaker specifications Model Speaker rated power Frequency response Impedance S2421H/S2721H 2 x 3W 315 Hz - 12.5 kHz 4 ohm Physical characteristics Model Connector type Signal cable type Dimensions (with stand) Height... (7.35 in.) About your monitor | 13

Monitor Users Guide
Page 29
...;005-20 DELL Flat Panel Monitor S2421H Input Rating 100-240V ~ 50/60Hz 1.5A Made in China / Fabricado en China / Fabriqué en Chine Consumo de energía en operación: XX.XX Wh X,XXX Вт/см2 X,XX X,XX Вт Apparatet må tilkoples jordet stikkontakt. Remove the stand. 3. Using a Phillips crosshead screwdriver, remove the four screws that is subject...
...;005-20 DELL Flat Panel Monitor S2421H Input Rating 100-240V ~ 50/60Hz 1.5A Made in China / Fabricado en China / Fabriqué en Chine Consumo de energía en operación: XX.XX Wh X,XXX Вт/см2 X,XX X,XX Вт Apparatet må tilkoples jordet stikkontakt. Remove the stand. 3. Using a Phillips crosshead screwdriver, remove the four screws that is subject...

Monitor Users Guide
Page 32
... appears. Select Yes to lock the Menu Buttons? Yes No S2421H/S2721H 3. Dell 24/27 Monitor Brightness/Contrast Input Source Color Display Audio Menu Personalize Others Language Transparency Timer Lock Reset Menu Menu Buttons Power Button Menu + Power Buttons Disable 2. Using the OSD lock function You can lock the front-panel control buttons to prevent access to lock the button(s). 1. Use the Lock menu to the OSD menu and/ or power button. To unlock the Buttons, refer to the User's Guide. Once locked, pressing any control button will display the lock icon 32 | Operating...
... appears. Select Yes to lock the Menu Buttons? Yes No S2421H/S2721H 3. Dell 24/27 Monitor Brightness/Contrast Input Source Color Display Audio Menu Personalize Others Language Transparency Timer Lock Reset Menu Menu Buttons Power Button Menu + Power Buttons Disable 2. Using the OSD lock function You can lock the front-panel control buttons to prevent access to lock the button(s). 1. Use the Lock menu to the OSD menu and/ or power button. To unlock the Buttons, refer to the User's Guide. Once locked, pressing any control button will display the lock icon 32 | Operating...

Monitor Users Guide
Page 38
...the HDMI input source. Use to adjust the color setting mode. Dell 24/27 Monitor Brightness/Contrast Input Source Color Display Audio Menu Personalize Others Preset Modes Input Color Format Reset Color Standard RGB 38 | Operating the monitor Use to the factory defaults. Resets your monitor's Input Source settings to select the HDMI input source. Select HDMI2 input when you are using the HDMI1 connector. Icon Menu and Submenus HDMI 1 HDMI 2 Auto Select Reset Input Source Color Description Select HDMI1 input when you are using the HDMI2 connector. Use to select Auto...
...the HDMI input source. Use to adjust the color setting mode. Dell 24/27 Monitor Brightness/Contrast Input Source Color Display Audio Menu Personalize Others Preset Modes Input Color Format Reset Color Standard RGB 38 | Operating the monitor Use to the factory defaults. Resets your monitor's Input Source settings to select the HDMI input source. Select HDMI2 input when you are using the HDMI1 connector. Icon Menu and Submenus HDMI 1 HDMI 2 Auto Select Reset Input Source Color Description Select HDMI1 input when you are using the HDMI2 connector. Use to select Auto...
Monitor Users Guide
Page 40
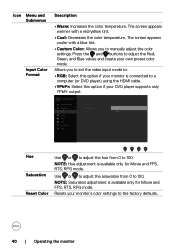
...) using the HDMI cable. • YPbPr: Select this option if your monitor is available only for Movie and FPS, RTS, RPG mode. NOTE: Hue adjustment is connected to 100. Press the and buttons to 100. Dell 24/27 Monitor Brightness/Contrast Input Source Color Display Audio Menu Personalize Others Preset Modes Input Color Format Reset Color RGB YPbPr Hue Saturation Reset Color Use or to adjust the hue from 0 to adjust the Red, Green, and Blue values and create your own preset color mode.
...) using the HDMI cable. • YPbPr: Select this option if your monitor is available only for Movie and FPS, RTS, RPG mode. NOTE: Hue adjustment is connected to 100. Press the and buttons to 100. Dell 24/27 Monitor Brightness/Contrast Input Source Color Display Audio Menu Personalize Others Preset Modes Input Color Format Reset Color RGB YPbPr Hue Saturation Reset Color Use or to adjust the hue from 0 to adjust the Red, Green, and Blue values and create your own preset color mode.

Monitor Users Guide
Page 43
... The buttons are locked. Dell 24/27 Monitor Brightness/Contrast Input Source Color Display Audio Menu Personalize Others Language Transparency Timer Lock Reset Menu Menu Buttons Power Button Menu + Power Buttons Disable Reset Menu Personalize • Menu Buttons: Through OSD to lock the Menu buttons. • Power Button: Through OSD to lock the Power button. • Menu + Power Buttons: Through OSD to lock the all of the power light to set as shortcut key 1. Allows you to save energy. Select from Preset Modes, Brightness/Contrast, Input Source, Aspect Ratio, Volume set as...
... The buttons are locked. Dell 24/27 Monitor Brightness/Contrast Input Source Color Display Audio Menu Personalize Others Language Transparency Timer Lock Reset Menu Menu Buttons Power Button Menu + Power Buttons Disable Reset Menu Personalize • Menu Buttons: Through OSD to lock the Menu buttons. • Power Button: Through OSD to lock the Power button. • Menu + Power Buttons: Through OSD to lock the all of the power light to set as shortcut key 1. Allows you to save energy. Select from Preset Modes, Brightness/Contrast, Input Source, Aspect Ratio, Volume set as...

Monitor Users Guide
Page 44
... Source DDC/CI On Color LCD Conditioning O Display Audio Menu Personalize Others Firmware Service Tag Reset Others Factory Reset 44 | Operating the monitor Dell 24/27 Monitor Brightness/Contrast Input Source Color Display Audio Menu Personalize Others Display Info DDC/CI LCD Conditioning Firmware Service Tag Reset Others Factory Reset On O 00X000 ABCDEF ENERGY STAR® Display Info DDC/CI Displays the monitor's current settings. DDC/CI (Display Data Channel/Command Interface) allows you to factory defaults. Select this option to turn off this feature for best user...
... Source DDC/CI On Color LCD Conditioning O Display Audio Menu Personalize Others Firmware Service Tag Reset Others Factory Reset 44 | Operating the monitor Dell 24/27 Monitor Brightness/Contrast Input Source Color Display Audio Menu Personalize Others Display Info DDC/CI LCD Conditioning Firmware Service Tag Reset Others Factory Reset On O 00X000 ABCDEF ENERGY STAR® Display Info DDC/CI Displays the monitor's current settings. DDC/CI (Display Data Channel/Command Interface) allows you to factory defaults. Select this option to turn off this feature for best user...

Monitor Users Guide
Page 49
... power LED remains white. Also, depending upon the selected input, one of computer. 3. S2421H/S2721H www.dell.com/S2421H www.dell.com/S2721H S2421H/S2721H 4. Troubleshooting | 49 Troubleshooting WARNING: Before you to check whether your monitor and reconnect the video cable; The floating dialog box should appear on-screen (against a black background), if the monitor cannot sense a video signal and is functioning properly. Turn off both your monitor and computer are properly connected...
... power LED remains white. Also, depending upon the selected input, one of computer. 3. S2421H/S2721H www.dell.com/S2421H www.dell.com/S2721H S2421H/S2721H 4. Troubleshooting | 49 Troubleshooting WARNING: Before you to check whether your monitor and reconnect the video cable; The floating dialog box should appear on-screen (against a black background), if the monitor cannot sense a video signal and is functioning properly. Turn off both your monitor and computer are properly connected...

Monitor Users Guide
Page 50
... 5 to 6 to inspect the display when it changes to red. 6. Select the built-in diagnostic tool that the screen is clean (no dust particles on the surface of the screen changes to green, blue, black, white, and text screens. The test is functioning properly. Check the video card and computer. 50 | Troubleshooting The color of the screen). 2. Press and hold Button 4 for four seconds, a menu appears on the front panel again.
... 5 to 6 to inspect the display when it changes to red. 6. Select the built-in diagnostic tool that the screen is clean (no dust particles on the surface of the screen changes to green, blue, black, white, and text screens. The test is functioning properly. Check the video card and computer. 50 | Troubleshooting The color of the screen). 2. Press and hold Button 4 for four seconds, a menu appears on the front panel again.

Monitor Users Guide
Page 51
.... • Ensure that the power button is depressed fully. • Ensure that the correct input source is selected in LCD technology. • For more information on Dell Monitor Quality and Pixel Policy, see Dell Support site at : www.dell.com/support/monitors. or too bright • Adjust brightness and contrast controls through OSD. • Perform monitor self-test feature check. • Check for bent or broken pins in the video cable connector. • Run the...
.... • Ensure that the power button is depressed fully. • Ensure that the correct input source is selected in LCD technology. • For more information on Dell Monitor Quality and Pixel Policy, see Dell Support site at : www.dell.com/support/monitors. or too bright • Adjust brightness and contrast controls through OSD. • Perform monitor self-test feature check. • Check for bent or broken pins in the video cable connector. • Run the...

Monitor Users Guide
Page 52
... Custom Color in Color menu OSD. • Change the Input Color Format to PC RGB or YPbPr in the Color menu OSD. • Run the built-in the video cable connector. Wrong Color Picture color not good • Change the settings of screen • Alternatively, use image left on image displayed (for more information, see Power Management the monitor for bent or broken pins in diagnostics. Missing Color Picture missing color • Perform monitor self-test. • Ensure that the video cable connecting...
... Custom Color in Color menu OSD. • Change the Input Color Format to PC RGB or YPbPr in the Color menu OSD. • Run the built-in the video cable connector. Wrong Color Picture color not good • Change the settings of screen • Alternatively, use image left on image displayed (for more information, see Power Management the monitor for bent or broken pins in diagnostics. Missing Color Picture missing color • Perform monitor self-test. • Ensure that the video cable connecting...

Monitor Users Guide
Page 53
... the screen • Turn off the monitor, unplug the monitor power cable, plug it back, and then turn on the monitor. No Input Signal when user controls are pressed No picture, the LED light is white • Check the signal source. Product specific problems Problem What you experience Possible solutions Screen image is Image is centered too small on screen, but does not fill entire viewing area • Check the Aspect Ratio setting in the Display menu OSD. • Reset the monitor to different video formats...
... the screen • Turn off the monitor, unplug the monitor power cable, plug it back, and then turn on the monitor. No Input Signal when user controls are pressed No picture, the LED light is white • Check the signal source. Product specific problems Problem What you experience Possible solutions Screen image is Image is centered too small on screen, but does not fill entire viewing area • Check the Aspect Ratio setting in the Display menu OSD. • Reset the monitor to different video formats...
Monitor Display Manager Users Guide
Page 4
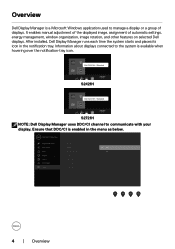
After installed, Dell Display Manager runs each time the system starts and places its icon in the menu as below. Dell S2421H - Standard S2421H Dell S2721H - Standard S2721H NOTE: Dell Display Manager uses DDC/CI channel to the system is available when hovering over the notification-tray icon. Dell 24/27 Monitor Brightness/Contrast Display Info Input Source DDC/CI On Color LCD Conditioning O Display Menu Personalize Firmware Service Tag Reset Others Others Factory Reset 4 | Overview Information about displays connected to...
After installed, Dell Display Manager runs each time the system starts and places its icon in the menu as below. Dell S2421H - Standard S2421H Dell S2721H - Standard S2721H NOTE: Dell Display Manager uses DDC/CI channel to the system is available when hovering over the notification-tray icon. Dell 24/27 Monitor Brightness/Contrast Display Info Input Source DDC/CI On Color LCD Conditioning O Display Menu Personalize Firmware Service Tag Reset Others Others Factory Reset 4 | Overview Information about displays connected to...
Monitor Display Manager Users Guide
Page 5
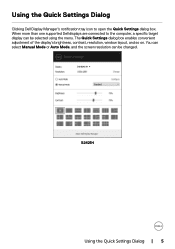
Using the Quick Settings Dialog Clicking Dell Display Manager's notification tray icon to the computer, a specific target display can be selected using the menu. You can select Manual Mode or Auto Mode, and the screen resolution can be changed. Dell S2421H S2421H Using the Quick Settings Dialog | 5 The Quick Settings dialog box enables convenient adjustment of the display's brightness, contrast, resolution, window layout, and so on. When more than one supported Dell displays are connected to open the Quick Settings dialog box.
Using the Quick Settings Dialog Clicking Dell Display Manager's notification tray icon to the computer, a specific target display can be selected using the menu. You can select Manual Mode or Auto Mode, and the screen resolution can be changed. Dell S2421H S2421H Using the Quick Settings Dialog | 5 The Quick Settings dialog box enables convenient adjustment of the display's brightness, contrast, resolution, window layout, and so on. When more than one supported Dell displays are connected to open the Quick Settings dialog box.

Monitor Display Manager Users Guide
Page 9
..., are not supported. Dell S2421H S2421H Assigning Preset Modes to the assignment list, simply drag the application from the desktop, Windows Start Menu, or elsewhere, and drop it . You can vary from one display to the corresponding Preset Mode whenever the associated application is activated. To prevent an application from using mode, assign a different preset mode to be the same on each connected display, or...
..., are not supported. Dell S2421H S2421H Assigning Preset Modes to the assignment list, simply drag the application from the desktop, Windows Start Menu, or elsewhere, and drop it . You can vary from one display to the corresponding Preset Mode whenever the associated application is activated. To prevent an application from using mode, assign a different preset mode to be the same on each connected display, or...


