Monitor Users Guide
Page 3
Contents About Your Monitor 5 Package Contents 5 Product Features 6 Identifying Parts and Controls 7 Monitor Specifications 11 Plug and Play Capability 17 Universal Serial Bus (USB) Interface 18 LCD Monitor Quality and Pixel Policy 20 Maintenance Guidelines 20 Setting Up the Monitor 21 Attaching the Stand 21 Connecting Your Monitor 23 Organizing Your Cables 24 Removing the Monitor Stand 25 Wall Mounting (Optional 26 Operating the Monitor 27 Power On the Monitor 27 Using the Front-Panel Controls 27 Contents | 3
Contents About Your Monitor 5 Package Contents 5 Product Features 6 Identifying Parts and Controls 7 Monitor Specifications 11 Plug and Play Capability 17 Universal Serial Bus (USB) Interface 18 LCD Monitor Quality and Pixel Policy 20 Maintenance Guidelines 20 Setting Up the Monitor 21 Attaching the Stand 21 Connecting Your Monitor 23 Organizing Your Cables 24 Removing the Monitor Stand 25 Wall Mounting (Optional 26 Operating the Monitor 27 Power On the Monitor 27 Using the Front-Panel Controls 27 Contents | 3
Monitor Users Guide
Page 6
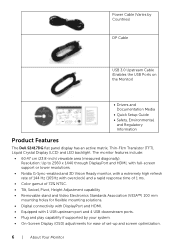
...Height Adjustment capability • Removable stand and Video Electronics Standards Association (VESA™) 100 mm mounting holes for flexible mounting solutions. • Digital connectivity with DisplayPort and HDMI. • Equipped with 1 USB upstream port and 4 USB downstream ports. • Plug and play capability if supported by Countries) DP Cable USB 3.0 Upstream Cable (Enables the USB Ports on the Monitor) • Drivers and Documentation Media • Quick Setup Guide • Safety, Environmental, and Regulatory Information Product Features The Dell S2417DG flat panel display...
...Height Adjustment capability • Removable stand and Video Electronics Standards Association (VESA™) 100 mm mounting holes for flexible mounting solutions. • Digital connectivity with DisplayPort and HDMI. • Equipped with 1 USB upstream port and 4 USB downstream ports. • Plug and play capability if supported by Countries) DP Cable USB 3.0 Upstream Cable (Enables the USB Ports on the Monitor) • Drivers and Documentation Media • Quick Setup Guide • Safety, Environmental, and Regulatory Information Product Features The Dell S2417DG flat panel display...

Monitor Users Guide
Page 7
.... • Security lock slot. • Stand lock. • Arsenic-Free glass and Mercury-Free for the panel only. • 0.5 W standby power when in sleep mode. • Energy Gauge shows the energy level being consumed by the monitor in real time. • Analog backlight dimming control for flicker-free display. Identifying Parts and Controls Front View Label Description 1 Function buttons (For more information, see Operating the Monitor) 2 Power On/Off button (with LED indicator) NOTE...
.... • Security lock slot. • Stand lock. • Arsenic-Free glass and Mercury-Free for the panel only. • 0.5 W standby power when in sleep mode. • Energy Gauge shows the energy level being consumed by the monitor in real time. • Analog backlight dimming control for flicker-free display. Identifying Parts and Controls Front View Label Description 1 Function buttons (For more information, see Operating the Monitor) 2 Power On/Off button (with LED indicator) NOTE...
Monitor Users Guide
Page 9
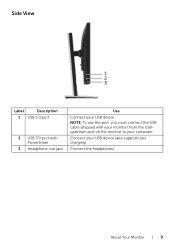
Side View Label Description 1 USB 3.0 port 2 USB 3.0 port with your monitor) from the USBupstream port on the monitor to your computer. Connect your USB device. NOTE: To use this port, you must connect the USB cable (shipped with PowerShare 3 Headphone-out jack Use Connect your USB device (also supports fast charging). About Your Monitor | 9 Connect the headphones.
Side View Label Description 1 USB 3.0 port 2 USB 3.0 port with your monitor) from the USBupstream port on the monitor to your computer. Connect your USB device. NOTE: To use this port, you must connect the USB cable (shipped with PowerShare 3 Headphone-out jack Use Connect your USB device (also supports fast charging). About Your Monitor | 9 Connect the headphones.
Monitor Users Guide
Page 10
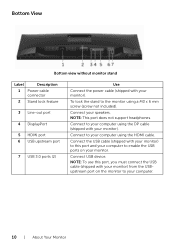
... to your monitor). Connect USB device. Connect to enable the USB ports on the monitor to the monitor using the HDMI cable. Connect the USB cable (shipped with your monitor) to this port, you must connect the USB cable (shipped with your monitor) from the USBupstream port on your speakers. Connect your monitor. Bottom View Bottom view without monitor stand Label Description 1 Power cable connector 2 Stand lock feature 3 Line-out port 4 DisplayPort 5 HDMI port 6 USB upstream port 7 USB 3.0 ports (2) Use Connect the power cable (shipped with your computer. 10 | About...
... to your monitor). Connect USB device. Connect to enable the USB ports on the monitor to the monitor using the HDMI cable. Connect the USB cable (shipped with your monitor) to this port, you must connect the USB cable (shipped with your monitor) from the USBupstream port on your speakers. Connect your monitor. Bottom View Bottom view without monitor stand Label Description 1 Power cable connector 2 Stand lock feature 3 Line-out port 4 DisplayPort 5 HDMI port 6 USB upstream port 7 USB 3.0 ports (2) Use Connect the power cable (shipped with your computer. 10 | About...
Monitor Users Guide
Page 11
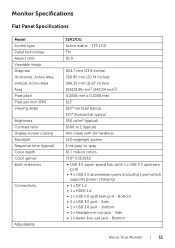
Monitor Specifications Flat Panel Specifications Model Screen type Panel technology Aspect ratio Viewable image Diagonal Horizontal, Active Area Vertical, Active Area Area Pixel pitch Pixel per inch (PPI) Viewing angle Brightness Contrast ratio Display screen coating Backlight Response time (typical) Color depth Color gamut Built-in devices Connectivity Adjustability S2417DG Active matrix - Bottom About Your Monitor | 11 Bottom • 2 x USB 3.0 port - Bottom • 1 x Headphone-out jack - Side • 1 x Audio line-out jack - TFT LCD TN 16:9 604.7 mm (23.8 inches) 526.85 mm...
Monitor Specifications Flat Panel Specifications Model Screen type Panel technology Aspect ratio Viewable image Diagonal Horizontal, Active Area Vertical, Active Area Area Pixel pitch Pixel per inch (PPI) Viewing angle Brightness Contrast ratio Display screen coating Backlight Response time (typical) Color depth Color gamut Built-in devices Connectivity Adjustability S2417DG Active matrix - Bottom About Your Monitor | 11 Bottom • 2 x USB 3.0 port - Bottom • 1 x Headphone-out jack - Side • 1 x Audio line-out jack - TFT LCD TN 16:9 604.7 mm (23.8 inches) 526.85 mm...
Monitor Users Guide
Page 12
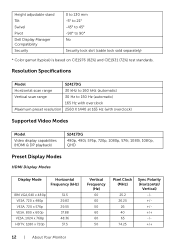
Resolution Specifications Model S2417DG Horizontal scan range 30 kHz to 160 kHz (automatic) Vertical scan range 30 Hz to 90° No Security lock slot (cable lock sold separately) * Color gamut (typical) is based on CIE1976 (82%) and CIE1931 (72%) test standards. Height adjustable stand Tilt Swivel Pivot Dell Display Manager Compatibility Security 0 to 130 mm -5° to 21° -45° to 45° -90° to 150 Hz (automatic...
Resolution Specifications Model S2417DG Horizontal scan range 30 kHz to 160 kHz (automatic) Vertical scan range 30 Hz to 90° No Security lock slot (cable lock sold separately) * Color gamut (typical) is based on CIE1976 (82%) and CIE1931 (72%) test standards. Height adjustable stand Tilt Swivel Pivot Dell Display Manager Compatibility Security 0 to 130 mm -5° to 21° -45° to 45° -90° to 150 Hz (automatic...
Monitor Users Guide
Page 13
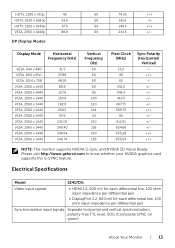
Electrical Specifications Model S2417DG Video input signals • HDMI 1.4, 600 mV for each differential line, 100 ohm input impedance per differential pair • DisplayPort 1.2, 600 mV for each differential line, 100 ohm input impedance per differential pair Synchronization input signals Separate horizontal and vertical synchronization, polarity-free TTL level, SOG (Composite SYNC on green) About Your Monitor | 13 Display Mode Horizontal Frequency (kHz) VESA, 640 x 480 VESA, 800 x 600 VESA, 1024 x 768 VESA, 2560 x 1440 VESA, 2560...
Electrical Specifications Model S2417DG Video input signals • HDMI 1.4, 600 mV for each differential line, 100 ohm input impedance per differential pair • DisplayPort 1.2, 600 mV for each differential line, 100 ohm input impedance per differential pair Synchronization input signals Separate horizontal and vertical synchronization, polarity-free TTL level, SOG (Composite SYNC on green) About Your Monitor | 13 Display Mode Horizontal Frequency (kHz) VESA, 640 x 480 VESA, 800 x 600 VESA, 1024 x 768 VESA, 2560 x 1440 VESA, 2560...

Monitor Users Guide
Page 15
... White (blinking) Less than 0.3 W * Zero power consumption in OFF mode can automatically reduce its power consumption when not in your PC, the monitor can only be achieved by disconnecting the main cable from the keyboard, mouse, or other input devices, the monitor automatically resumes functioning. Environmental Characteristics Model S2417DG Compliant Standards • RoHS-compliant • Arsenic-Free glass and Mercury-Free for the panel...
... White (blinking) Less than 0.3 W * Zero power consumption in OFF mode can automatically reduce its power consumption when not in your PC, the monitor can only be achieved by disconnecting the main cable from the keyboard, mouse, or other input devices, the monitor automatically resumes functioning. Environmental Characteristics Model S2417DG Compliant Standards • RoHS-compliant • Arsenic-Free glass and Mercury-Free for the panel...
Monitor Users Guide
Page 21
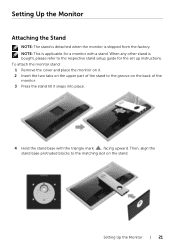
... applicable for the set up instructions. Setting Up the Monitor | 21 To attach the monitor stand: 1 Remove the cover and place the monitor on it. 2 Insert the two tabs on the upper part of the monitor. 3 Press the stand till it snaps into place. 4 Hold the stand base with a stand. When any other stand is shipped from the factory. Setting Up the Monitor Attaching the Stand NOTE: The stand is detached...
... applicable for the set up instructions. Setting Up the Monitor | 21 To attach the monitor stand: 1 Remove the cover and place the monitor on it. 2 Insert the two tabs on the upper part of the monitor. 3 Press the stand till it snaps into place. 4 Hold the stand base with a stand. When any other stand is shipped from the factory. Setting Up the Monitor Attaching the Stand NOTE: The stand is detached...

Monitor Users Guide
Page 24
... display an image, see Universal Serial Bus (USB) Specific Problems. 5 Use the cable slot on the monitor. 3 Plug the power cables for cable attachment,) organize all cables as shown above. 24 | Setting Up the Monitor Connecting the USB 3.0 cable After you have completed connecting the DP/HDMI cable, follow the procedures below to connect the USB 3.0 cable to the computer and complete your monitor setup: 1 Connect the upstream USB 3.0 port (cable supplied) to an appropriate USB 3.0 port on your computer. (See Bottom View for details.) 2 Connect...
... display an image, see Universal Serial Bus (USB) Specific Problems. 5 Use the cable slot on the monitor. 3 Plug the power cables for cable attachment,) organize all cables as shown above. 24 | Setting Up the Monitor Connecting the USB 3.0 cable After you have completed connecting the DP/HDMI cable, follow the procedures below to connect the USB 3.0 cable to the computer and complete your monitor setup: 1 Connect the upstream USB 3.0 port (cable supplied) to an appropriate USB 3.0 port on your computer. (See Bottom View for details.) 2 Connect...

Monitor Users Guide
Page 28
... turn the monitor On and Off. Up 2 Use the Down button to confirm your selection. Down 3 Use the Select button to adjust (decrease ranges) items in the OSD menu. Shortcut key/ Volume 3 Use the MENU button to the main menu or exit the OSD main menu. See Accessing the Menu Menu System. 4 Use this button to go back to adjust the volume. A blinking white light indicates the power save mode. Front-Panel Button Use the buttons on the front of the monitor to adjust the image settings...
... turn the monitor On and Off. Up 2 Use the Down button to confirm your selection. Down 3 Use the Select button to adjust (decrease ranges) items in the OSD menu. Shortcut key/ Volume 3 Use the MENU button to the main menu or exit the OSD main menu. See Accessing the Menu Menu System. 4 Use this button to go back to adjust the volume. A blinking white light indicates the power save mode. Front-Panel Button Use the buttons on the front of the monitor to adjust the image settings...
Monitor Users Guide
Page 31
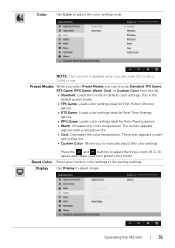
... mode or ULMB mode. Reset Color Display Press the and buttons to manually adjust the color settings. The screen appears cooler with a red/yellow tint. • Cool: Decreases the color temperature. The screen appears warmer with a blue tint. • Custom Color: Allows you can choose Standard, FPS Game, RTS Game, RPG Game, Warm, Cool, or Custom Color from the list. • Standard: Loads the monitor's default color settings. Use Display to the factory settings. Preset Modes...
... mode or ULMB mode. Reset Color Display Press the and buttons to manually adjust the color settings. The screen appears cooler with a red/yellow tint. • Cool: Decreases the color temperature. The screen appears warmer with a blue tint. • Custom Color: Allows you can choose Standard, FPS Game, RTS Game, RPG Game, Warm, Cool, or Custom Color from the list. • Standard: Loads the monitor's default color settings. Use Display to the factory settings. Preset Modes...

Monitor Users Guide
Page 32
... Mode is only available when using DP (DisplayPort) input. Refresh Rate Use or to adjust the frequency in the NVIDIA Control Panel, ULMB will be automatically enabled. Response Allows you to operate the monitor at a higher refresh rate than specified by the panel specification. When the graphics card supports G-SYNC, make sure that the Enable G-SYNC function is displayed. Smaller values decrease motion blur and brightness. NOTE: Overclocking may cause screen flickering. If your displays refresh rate...
... Mode is only available when using DP (DisplayPort) input. Refresh Rate Use or to adjust the frequency in the NVIDIA Control Panel, ULMB will be automatically enabled. Response Allows you to operate the monitor at a higher refresh rate than specified by the panel specification. When the graphics card supports G-SYNC, make sure that the Enable G-SYNC function is displayed. Smaller values decrease motion blur and brightness. NOTE: Overclocking may cause screen flickering. If your displays refresh rate...
Monitor Users Guide
Page 35
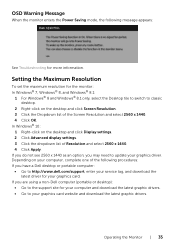
... to switch to classic desktop. 2 Right-click on the desktop and click Display settings. 2 Click Advanced display settings. 3 Click the dropdown list of the Screen Resolution and select 2560 x 1440. 4 Click OK. If you are using a non-Dell computer (portable or desktop): • Go to the support site for your graphics card. Operating the Monitor | 35 OSD Warning Message When the monitor enters the Power Saving mode...
... to switch to classic desktop. 2 Right-click on the desktop and click Display settings. 2 Click Advanced display settings. 3 Click the dropdown list of the Screen Resolution and select 2560 x 1440. 4 Click OK. If you are using a non-Dell computer (portable or desktop): • Go to the support site for your graphics card. Operating the Monitor | 35 OSD Warning Message When the monitor enters the Power Saving mode...
Monitor Users Guide
Page 38
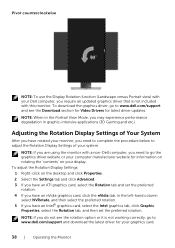
... tab, click Graphic Properties, select the Rotation tab, and then set the preferred rotation. 4 If you do not see the Download section for Video Drivers for your graphics card. 38 | Operating the Monitor To download the graphics driver, go to www.dell.com/support and download the latest driver for latest driver updates. Adjusting the Rotation Display Settings of Your System After you have an nVidia graphics...
... tab, click Graphic Properties, select the Rotation tab, and then set the preferred rotation. 4 If you do not see the Download section for Video Drivers for your graphics card. 38 | Operating the Monitor To download the graphics driver, go to www.dell.com/support and download the latest driver for latest driver updates. Adjusting the Rotation Display Settings of Your System After you have an nVidia graphics...

Monitor Users Guide
Page 39
Troubleshooting WARNING: Before you begin any of computer. 3 Turn on -screen (against a black background), if the monitor cannot sense a video signal and is functioning properly. If your monitor screen remains blank after you to check whether your monitor is functioning properly. NOTE: A dialog box should appear on the monitor. then turn On both your monitor is working correctly. To ensure proper Self-Test operation, remove all digital cables from...
Troubleshooting WARNING: Before you begin any of computer. 3 Turn on -screen (against a black background), if the monitor cannot sense a video signal and is functioning properly. If your monitor screen remains blank after you to check whether your monitor is functioning properly. NOTE: A dialog box should appear on the monitor. then turn On both your monitor is working correctly. To ensure proper Self-Test operation, remove all digital cables from...
Monitor Users Guide
Page 41
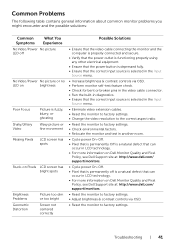
... power button is depressed fully. • Ensure that the correct input source is selected in the Input Source menu. • Increase brightness & contrast controls via OSD. • Perform monitor self-test feature check. • Check for bent or broken pins in the video cable connector. • Run the built-in diagnostics. • Ensure that the correct input source is selected in the Input Source menu. • Eliminate video extension cables. • Reset the monitor to factory settings. • Change...
... power button is depressed fully. • Ensure that the correct input source is selected in the Input Source menu. • Increase brightness & contrast controls via OSD. • Perform monitor self-test feature check. • Check for bent or broken pins in the video cable connector. • Run the built-in diagnostics. • Ensure that the correct input source is selected in the Input Source menu. • Eliminate video extension cables. • Reset the monitor to factory settings. • Change...
Monitor Users Guide
Page 42
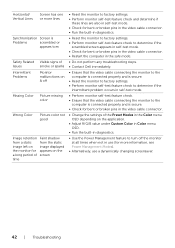
... or broken pins in the video cable connector. • Change the settings of the Preset Modes in the Color menu OSD depending on the application. • Adjust R/G/B value under Custom Color in Color menu OSD. • Run the built-in diagnostics. • Use the Power Management feature to turn off the monitor at all times when not in use (for more information, see Power Management Modes). • Alternatively, use a dynamically changing screensaver. 42 | Troubleshooting
... or broken pins in the video cable connector. • Change the settings of the Preset Modes in the Color menu OSD depending on the application. • Adjust R/G/B value under Custom Color in Color menu OSD. • Run the built-in diagnostics. • Use the Power Management feature to turn off the monitor at all times when not in use (for more information, see Power Management Modes). • Alternatively, use a dynamically changing screensaver. 42 | Troubleshooting

Monitor Users Guide
Page 43
... to different video formats (aspect ratio) of the screen Possible Solutions • Reset the monitor to factory settings. • Turn Off the monitor, unplug the power cord, plug it back, and then turn On the monitor. • Check the signal source. Ensure the computer is not in the power saving mode by moving the mouse or pressing any key on the screen No Input Signal No picture, the when user LED light is plugged in diagnostics. Troubleshooting | 43...
... to different video formats (aspect ratio) of the screen Possible Solutions • Reset the monitor to factory settings. • Turn Off the monitor, unplug the power cord, plug it back, and then turn On the monitor. • Check the signal source. Ensure the computer is not in the power saving mode by moving the mouse or pressing any key on the screen No Input Signal No picture, the when user LED light is plugged in diagnostics. Troubleshooting | 43...


