Dell Display Manager User's Guide
Page 1
... notification tray icon. Once installed, Dell Display Manager will run each time the system starts and will place its icon in the notification tray. It allows manual adjustment of the displayed image, assignment of monitors. Dell™ Display Manager User's Guide Overview Using the Quick Settings Dialog Setting Basic Display Functions Assigning Preset Modes to manage a monitor or a group of automatic settings, energy management, window organization, image rotation and other features on select Dell models.
... notification tray icon. Once installed, Dell Display Manager will run each time the system starts and will place its icon in the notification tray. It allows manual adjustment of the displayed image, assignment of monitors. Dell™ Display Manager User's Guide Overview Using the Quick Settings Dialog Setting Basic Display Functions Assigning Preset Modes to manage a monitor or a group of automatic settings, energy management, window organization, image rotation and other features on select Dell models.
Dell Display Manager User's Guide
Page 2
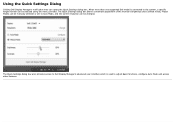
.... The Quick Settings dialog box also provides access to Dell Display Manager's advanced user interface which is connected to Auto Mode, and the screen resolution can be changed. Using the Quick Settings Dialog Clicking Dell Display Manager's notification tray icon opens the Quick Settings dialog box. The Quick Settings dialog box allows convenient adjustment of the monitor's Brightness and Contrast levels, Preset Modes can be manually selected or set to the system, a specific target monitor can be selected using the menu provided.
.... The Quick Settings dialog box also provides access to Dell Display Manager's advanced user interface which is connected to Auto Mode, and the screen resolution can be changed. Using the Quick Settings Dialog Clicking Dell Display Manager's notification tray icon opens the Quick Settings dialog box. The Quick Settings dialog box allows convenient adjustment of the monitor's Brightness and Contrast levels, Preset Modes can be manually selected or set to the system, a specific target monitor can be selected using the menu provided.
Dell Display Manager User's Guide
Page 4
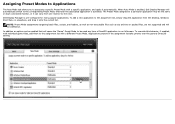
... Modes to Applications The Auto Mode tab allows you to associate a specific Preset Mode with a different Preset Mode. The Preset Mode assigned to a particular application may be the same on each connected monitor, or it onto the current list. Dell Display Manager is run fullscreen. To add a new application to be ineffective. In addition an option can vary from the desktop, Windows Start Menu...
... Modes to Applications The Auto Mode tab allows you to associate a specific Preset Mode with a different Preset Mode. The Preset Mode assigned to a particular application may be the same on each connected monitor, or it onto the current list. Dell Display Manager is run fullscreen. To add a new application to be ineffective. In addition an option can vary from the desktop, Windows Start Menu...

User's Guide
Page 3
... scenario below that best describes the computer system you are using, and follow the provided directions: 1: If you have a non Dell™ desktop, portable computer, or graphics card. Back to Contents Page Setting Up Your Monitor Dell™ S2340T Monitor Setting the display resolution to 1920 x 1080 (maximum) For maximum display performance with internet access. 2: If you may need to update your graphics driver. Back to...
... scenario below that best describes the computer system you are using, and follow the provided directions: 1: If you have a non Dell™ desktop, portable computer, or graphics card. Back to Contents Page Setting Up Your Monitor Dell™ S2340T Monitor Setting the display resolution to 1920 x 1080 (maximum) For maximum display performance with internet access. 2: If you may need to update your graphics driver. Back to...
User's Guide
Page 4
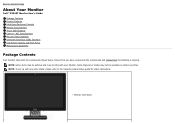
... (USB) Interface LCD Monitor Quality and Pixel Policy Maintenance Guidelines Package Contents Your monitor ships with stand NOTE: Some items may not ship with any other stand, please refer to Contents Page About Your Monitor Dell™ S2340T Monitor User's Guide Package Contents Product Features Identifying Parts and Controls Monitor Specifications Touch Specifications Camera - Monitor with the components shown below. NOTE: To set up with your Monitor. Back to the respective stand setup guide for setup instructions...
... (USB) Interface LCD Monitor Quality and Pixel Policy Maintenance Guidelines Package Contents Your monitor ships with stand NOTE: Some items may not ship with any other stand, please refer to Contents Page About Your Monitor Dell™ S2340T Monitor User's Guide Package Contents Product Features Identifying Parts and Controls Monitor Specifications Touch Specifications Camera - Monitor with the components shown below. NOTE: To set up with your Monitor. Back to the respective stand setup guide for setup instructions...
User's Guide
Page 6
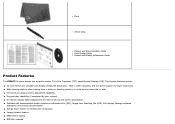
Cloth Velcro strap Drivers and Documentation media Quick Setup Guide Product and Safety Information Guide Product Features The S2340T flat panel display has an active matrix, Thin-Film Transistor (TFT), Liquid Crystal Display (LCD). The monitor features include: ■ 23-inch (58.42 cm) viewable area display (Measured diagonally). 1920 x 1080 resolution, and full-screen support for lower resolutions. ■ Wide viewing angle to allow viewing from a sitting or standing position, or while moving from...
Cloth Velcro strap Drivers and Documentation media Quick Setup Guide Product and Safety Information Guide Product Features The S2340T flat panel display has an active matrix, Thin-Film Transistor (TFT), Liquid Crystal Display (LCD). The monitor features include: ■ 23-inch (58.42 cm) viewable area display (Measured diagonally). 1920 x 1080 resolution, and full-screen support for lower resolutions. ■ Wide viewing angle to allow viewing from a sitting or standing position, or while moving from...

User's Guide
Page 13
...) Power Management Modes If you have VESA's DPM™ compliance display card or software installed in your PC, the monitor can automatically reduce its power consumption when not in Active-off mode, one of the following table shows the power consumption and signaling of this automatic power saving feature: VESA Modes Horizontal Sync Vertical Sync Video Power Indicator Power Consumption Normal operation Active Active Active White 50 W (maximum) ** 27 W (typical) Active-off - - - The OSD will...
...) Power Management Modes If you have VESA's DPM™ compliance display card or software installed in your PC, the monitor can automatically reduce its power consumption when not in Active-off mode, one of the following table shows the power consumption and signaling of this automatic power saving feature: VESA Modes Horizontal Sync Vertical Sync Video Power Indicator Power Consumption Normal operation Active Active Active White 50 W (maximum) ** 27 W (typical) Active-off - - - The OSD will...

User's Guide
Page 18
... side NOTE: USB 3.0 functionality requires a USB 3.0 compatible computer. Transmit - USB Ports 1 upstream - Pin 3 RX_D2+ Receive + Pin 4 Not Used Not Used Pin 5 Not Used Not Used Pin 6 RX_D2 - Receive - Bi-directional Data- Ethernet port Ethernet port RJ45 pin out for 1000Base-T (Gigabit LAN) Pin Number Name Description Pin 1 TX_D1+ Transmit + Pin 2 TX_D1- Bi-directional Data- These pixels are hard to become fixed in power save mode. back 4 downstream...
... side NOTE: USB 3.0 functionality requires a USB 3.0 compatible computer. Transmit - USB Ports 1 upstream - Pin 3 RX_D2+ Receive + Pin 4 Not Used Not Used Pin 5 Not Used Not Used Pin 6 RX_D2 - Receive - Bi-directional Data- Ethernet port Ethernet port RJ45 pin out for 1000Base-T (Gigabit LAN) Pin Number Name Description Pin 1 TX_D1+ Transmit + Pin 2 TX_D1- Bi-directional Data- These pixels are hard to become fixed in power save mode. back 4 downstream...
User's Guide
Page 22
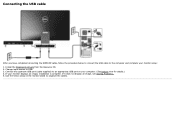
... USB port (cable supplied) to the computer and complete your monitor setup: 1. If it does not display an image, see Solving Problems. 5. Use the Velcro strap on your monitor displays an image, installation is complete. Install the DisplayLink drivers from the Resource CD. 2. If your computer. (See bottom view for details.) 4. Change input source to organize the cables. Connecting the USB cable After you have completed connecting the HDMI/DP cable, follow the procedure below to connect the USB cable...
... USB port (cable supplied) to the computer and complete your monitor setup: 1. If it does not display an image, see Solving Problems. 5. Use the Velcro strap on your monitor displays an image, installation is complete. Install the DisplayLink drivers from the Resource CD. 2. If your computer. (See bottom view for details.) 4. Change input source to organize the cables. Connecting the USB cable After you have completed connecting the HDMI/DP cable, follow the procedure below to connect the USB cable...
User's Guide
Page 24
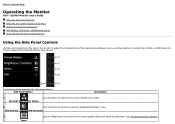
... "Brightness/Contrast" menu. Shortcut key / Brightness/Contrast 3 Use the MENU button to launch the on the side of the monitor to adjust the characteristics of the image being displayed. Shortcut key/ Preset Modes 2 Use this button to choose from a list of the characteristics as they change. See Accessing the Menu System. Back to Contents Page Operating the Monitor Dell™ S2340T Monitor User's Guide Using the Side Panel Controls Using the On-Screen Display (OSD) Menu Setting the Maximum Resolution USB Display, USB Audio, USB Ethernet set up Using the Tilt...
... "Brightness/Contrast" menu. Shortcut key / Brightness/Contrast 3 Use the MENU button to launch the on the side of the monitor to adjust the characteristics of the image being displayed. Shortcut key/ Preset Modes 2 Use this button to choose from a list of the characteristics as they change. See Accessing the Menu System. Back to Contents Page Operating the Monitor Dell™ S2340T Monitor User's Guide Using the Side Panel Controls Using the On-Screen Display (OSD) Menu Setting the Maximum Resolution USB Display, USB Audio, USB Ethernet set up Using the Tilt...

User's Guide
Page 27
... contrast and push the button to select the USB input source. The Contrast function adjusts the degree of difference between different video signals that may be connected to select between darkness and lightness on the monitor screen. Use the Input Source menu to your monitor. Press the to select Auto Select, the monitor auto detects either the HDMI input or the DislpayPort input or USB input. There are using the HDMI connector. Select USB input when you are using the USB monitor. Auto Select HDMI DisplayPort USB Color Settings...
... contrast and push the button to select the USB input source. The Contrast function adjusts the degree of difference between different video signals that may be connected to select between darkness and lightness on the monitor screen. Use the Input Source menu to your monitor. Press the to select Auto Select, the monitor auto detects either the HDMI input or the DislpayPort input or USB input. There are using the HDMI connector. Select USB input when you are using the USB monitor. Auto Select HDMI DisplayPort USB Color Settings...
User's Guide
Page 30
... preset color mode. Vertically splits the screen into two segments. This feature can shift color of video image to manually adjust the color settings. The left half of the screen in the color enhanced mode. The screen appears warmer with a blue tint. NOTE: Saturation adjustment is available only for Movie and Game mode. The screen appears cooler with a red/yellow tint. Press the and buttons to increase the colorful appearance of the video image...
... preset color mode. Vertically splits the screen into two segments. This feature can shift color of video image to manually adjust the color settings. The left half of the screen in the color enhanced mode. The screen appears warmer with a blue tint. NOTE: Saturation adjustment is available only for Movie and Game mode. The screen appears cooler with a red/yellow tint. Press the and buttons to increase the colorful appearance of the video image...

User's Guide
Page 33
... screen's brightness level when the displayed image contains a high proportion of six languages: English, Espanol, Francais, Deutsch, Simplified Chinese or Japanese. When Lock is On, The 'Energy Use indicator' on your monitor. Either soft lock (through OSD menu) or hard lock (Press and hold the button above power button for 10 sec) When Energy Smart is Off, Brightness function shall be adjustable via software on OSD menu should response to the changes...
... screen's brightness level when the displayed image contains a high proportion of six languages: English, Espanol, Francais, Deutsch, Simplified Chinese or Japanese. When Lock is On, The 'Energy Use indicator' on your monitor. Either soft lock (through OSD menu) or hard lock (Press and hold the button above power button for 10 sec) When Energy Smart is Off, Brightness function shall be adjustable via software on OSD menu should response to the changes...

User's Guide
Page 39
... your graphics card website and download the latest graphic drivers. Setting the Maximum Resolution To set the Maximum resolution for more information. Click the Dropdown list of the following procedures: If you are using a non-Dell computer (portable or desktop): Go to update your graphics card. Depending on the desktop and click Screen resolution. 3. For Windows® 8 only, select the Desktop tile to switch to...
... your graphics card website and download the latest graphic drivers. Setting the Maximum Resolution To set the Maximum resolution for more information. Click the Dropdown list of the following procedures: If you are using a non-Dell computer (portable or desktop): Go to update your graphics card. Depending on the desktop and click Screen resolution. 3. For Windows® 8 only, select the Desktop tile to switch to...

User's Guide
Page 41
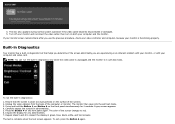
... proper Self-Test operation, remove all Digital (white connector) and the Analog (blue connector) cables from the back of the dialogs shown below will continuously scroll through the screen. or Back to Contents Page Troubleshooting Dell™ S2340T Monitor User's Guide Self-Test Built-in Diagnostics In-Store Demo Common Problems Camera Problems Touch Problem Product Specific Problems Universal Serial Bus Specific Problems DisplayLink Specific Problems WARNING: Before you to check whether your monitor is working correctly. If your...
... proper Self-Test operation, remove all Digital (white connector) and the Analog (blue connector) cables from the back of the dialogs shown below will continuously scroll through the screen. or Back to Contents Page Troubleshooting Dell™ S2340T Monitor User's Guide Self-Test Built-in Diagnostics In-Store Demo Common Problems Camera Problems Touch Problem Product Specific Problems Universal Serial Bus Specific Problems DisplayLink Specific Problems WARNING: Before you to check whether your monitor is working correctly. If your...
User's Guide
Page 42
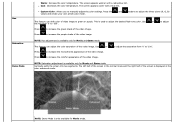
...-in green, blue, black, white, and text screens. Ensure that helps you determine if the screen abnormality you use the previous procedure, check your video controller and computer, because your monitor and reconnect the video cable; Unplug the video cable(s) from the back of the screen changes to inspect the display in diagnostics: 1. Press and hold the Button 1 and Button 4 on the front panel again. Repeat steps 5 and 6 to red. 6. Turn off your monitor is...
...-in green, blue, black, white, and text screens. Ensure that helps you determine if the screen abnormality you use the previous procedure, check your video controller and computer, because your monitor and reconnect the video cable; Unplug the video cable(s) from the back of the screen changes to inspect the display in diagnostics: 1. Press and hold the Button 1 and Button 4 on the front panel again. Repeat steps 5 and 6 to red. 6. Turn off your monitor is...

User's Guide
Page 43
... 5 seconds. Turn on No picture or no brightness Increase brightness & contrast controls via the Input Source Select button. No Video/Power LED on the monitor. 2. Ensure that the correct input source is selected via OSD. Check environmental factors. Pixel that can occur in In-Store Demo, the display becomes to Demo mode. NOTE: In-Store Demo is a natural defect that is permanently off is not a diagnostic tool to Factory Settings. Common Problems The...
... 5 seconds. Turn on No picture or no brightness Increase brightness & contrast controls via the Input Source Select button. No Video/Power LED on the monitor. 2. Ensure that the correct input source is selected via OSD. Check environmental factors. Pixel that can occur in In-Store Demo, the display becomes to Demo mode. NOTE: In-Store Demo is a natural defect that is permanently off is not a diagnostic tool to Factory Settings. Common Problems The...

User's Guide
Page 44
... in the video cable connector. Adjust R/G/B value in Color Settings OSD if the Color Management is turned off Verify if the camera is detected by Windows. the LED is off . Adjust brightness & contrast controls via OSD. Reset the monitor to Factory Settings. Restart the computer in diagnostics. Reset the monitor to Factory Settings. Reset the monitor to determine if the scrambled screen appears in self-test mode. Do not perform any troubleshooting steps. Ensure that the video cable connecting the monitor to the...
... in the video cable connector. Adjust R/G/B value in Color Settings OSD if the Color Management is turned off Verify if the camera is detected by Windows. the LED is off . Adjust brightness & contrast controls via OSD. Reset the monitor to Factory Settings. Restart the computer in diagnostics. Reset the monitor to Factory Settings. Reset the monitor to determine if the scrambled screen appears in self-test mode. Do not perform any troubleshooting steps. Ensure that the video cable connecting the monitor to the...

User's Guide
Page 45
... panel screen No Input Signal when user controls are within the recording area for 10 seconds to HDMI, DP or USB is locked. Click to uncheck the box next to Factory Settings. Check whether OSD is powered and playing video media. Check whether the signal cable is no touch function Possible Solutions Make sure power cord comes with the OSD does not appear on the buttons on the Internet Blank screen Slow frame rate in the power saving mode...
... panel screen No Input Signal when user controls are within the recording area for 10 seconds to HDMI, DP or USB is locked. Click to uncheck the box next to Factory Settings. Check whether OSD is powered and playing video media. Check whether the signal cable is no touch function Possible Solutions Make sure power cord comes with the OSD does not appear on the buttons on the Internet Blank screen Slow frame rate in the power saving mode...
User's Guide
Page 49
... support the video resolution of the window (e.g. Click Advanced Settings. 4. NVIDIA, ATI, Intel etc.). 5. Refer to Contents Page Setting Up Your Monitor Dell™ S2340T Monitor If you are unable to set the resolution to 1920 x 1080 again. 7. Back to the graphic card provider website for updated driver (for example, http://www.ATI.com OR http://www.NVIDIA.com ). 6. After installing the drivers for driver download. Identify your Graphics Adapter...
... support the video resolution of the window (e.g. Click Advanced Settings. 4. NVIDIA, ATI, Intel etc.). 5. Refer to Contents Page Setting Up Your Monitor Dell™ S2340T Monitor If you are unable to set the resolution to 1920 x 1080 again. 7. Back to the graphic card provider website for updated driver (for example, http://www.ATI.com OR http://www.NVIDIA.com ). 6. After installing the drivers for driver download. Identify your Graphics Adapter...


