
User's Guide
Page 3
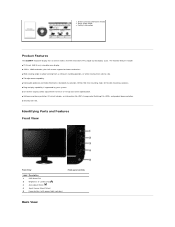
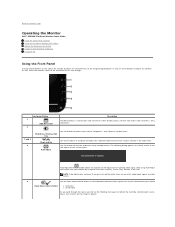
... 1 OSD Menu/Exit 2 Brightness & Contrast/Up ( ) 3 Auto-adjust/Down ( ) 4 Input Source Select/Select 5 Power button (with power light indicator) Front panel controls Back View The monitor features include: ■ 21.5-inch (546.8 mm) viewable area display. ■ 1920 x 1080 resolution, plus full-screen support for lower resolutions. ■ Wide viewing angle to allow viewing from a sitting or standing position, or while moving from side to side. ■ Tilt adjustment capability. ■ Removable pedestal and Video Electronics Standards Association (VESA) 100 mm mounting holes...
... 1 OSD Menu/Exit 2 Brightness & Contrast/Up ( ) 3 Auto-adjust/Down ( ) 4 Input Source Select/Select 5 Power button (with power light indicator) Front panel controls Back View The monitor features include: ■ 21.5-inch (546.8 mm) viewable area display. ■ 1920 x 1080 resolution, plus full-screen support for lower resolutions. ■ Wide viewing angle to allow viewing from a sitting or standing position, or while moving from side to side. ■ Tilt adjustment capability. ■ Removable pedestal and Video Electronics Standards Association (VESA) 100 mm mounting holes...

User's Guide
Page 5
... cable from a keyboard, mouse or other input devices is referred to as Power Save Mode. This is detected by the computer, the monitor will automatically "wake up". The following table shows the power consumption and signaling of the Connected Signal Cable Video-Red Off Less than 2 W Switch off - - - Bottom view Label Description 1 AC power cord connector 2 DVI connector 3 VGA connector Monitor Specifications Power Management Modes If you have VESA's DPMS™ compliance display card or software installed in use. If input from the monitor...
... cable from a keyboard, mouse or other input devices is referred to as Power Save Mode. This is detected by the computer, the monitor will automatically "wake up". The following table shows the power consumption and signaling of the Connected Signal Cable Video-Red Off Less than 2 W Switch off - - - Bottom view Label Description 1 AC power cord connector 2 DVI connector 3 VGA connector Monitor Specifications Power Management Modes If you have VESA's DPMS™ compliance display card or software installed in use. If input from the monitor...

User's Guide
Page 7
... Clock- Resolution Horizontal scan range Vertical scan range Maximum preset resolution Video Supported Modes Video display capabilities (DVI playback) 30 kHz to 83 kHz (automatic) 50 Hz to 1 (typical) Antiglare with hard-coating 3H CCFL edgelight system 5 ms typical 16.7 mil colors 85%* * S2209W Color Gamut (Typical) is based on CIE1976 (85%) and CIE1931 (72%). TFT LCD TN 21.5 inches (21.5-inch viewable image size) 476.64 mm (18.76 inches) 268...
... Clock- Resolution Horizontal scan range Vertical scan range Maximum preset resolution Video Supported Modes Video display capabilities (DVI playback) 30 kHz to 83 kHz (automatic) 50 Hz to 1 (typical) Antiglare with hard-coating 3H CCFL edgelight system 5 ms typical 16.7 mil colors 85%* * S2209W Color Gamut (Typical) is based on CIE1976 (85%) and CIE1931 (72%). TFT LCD TN 21.5 inches (21.5-inch viewable image size) 476.64 mm (18.76 inches) 268...

User's Guide
Page 8
... Analog RGB, 0.7 Volts +/- 5%, positive polarity at 75 ohm input impedance Digital DVI-D TMDS, 600mV for each differential line, positive polarity at 50 ohm input impedance Separate horizontal and vertical synchronizations, polarity-free TTL level, SOG (Composite SYNC on green) 100 to 240 VAC/50 or 60 Hz + 3 Hz/2.0A (Max.) 110 V: 30 A (Max.) 220 V: 60 A (Max.) Physical Characteristics Connector type Signal cable type l D-sub: blue connector l DVI-D: white connector l D-sub: Detachable, Analog...
... Analog RGB, 0.7 Volts +/- 5%, positive polarity at 75 ohm input impedance Digital DVI-D TMDS, 600mV for each differential line, positive polarity at 50 ohm input impedance Separate horizontal and vertical synchronizations, polarity-free TTL level, SOG (Composite SYNC on green) 100 to 240 VAC/50 or 60 Hz + 3 Hz/2.0A (Max.) 110 V: 30 A (Max.) 220 V: 60 A (Max.) Physical Characteristics Connector type Signal cable type l D-sub: blue connector l DVI-D: white connector l D-sub: Detachable, Analog...
User's Guide
Page 9
... leave a milky film on your antistatic screen, lightly dampen a soft, clean cloth with a cloth. Plug and Play Capability You can configure itself and optimize the monitor settings. LCD Monitor Quality & Pixel Policy During the LCD Monitor manufacturing process, it is not uncommon for one or more than lighter-colored monitors. For best practices, follow the Safety Instructions before cleaning the monitor. Avoid using Display Data Channel (DDC) protocols so that...
... leave a milky film on your antistatic screen, lightly dampen a soft, clean cloth with a cloth. Plug and Play Capability You can configure itself and optimize the monitor settings. LCD Monitor Quality & Pixel Policy During the LCD Monitor manufacturing process, it is not uncommon for one or more than lighter-colored monitors. For best practices, follow the Safety Instructions before cleaning the monitor. Avoid using Display Data Channel (DDC) protocols so that...
User's Guide
Page 10
... information on the left side of contacting Dell that is convenient for sales, technical support, or customer service issues: 1. Back to Contents Page Appendix Dell™ S2209W Flat Panel Monitor User's Guide Safety Instructions FCC Notice (U.S. Select the appropriate service or support link based on safety instructions, see the regulatory compliance website located at the bottom of controls, adjustments, or procedures other than those specified in...
... information on the left side of contacting Dell that is convenient for sales, technical support, or customer service issues: 1. Back to Contents Page Appendix Dell™ S2209W Flat Panel Monitor User's Guide Safety Instructions FCC Notice (U.S. Select the appropriate service or support link based on safety instructions, see the regulatory compliance website located at the bottom of controls, adjustments, or procedures other than those specified in...
User's Guide
Page 12
... graphics card 1. Identify your Graphics Adapter, attempt to set the resolution to 1920x1080, please contact the manufacturer of your computer or consider purchasing a graphics adapter that will support the video resolution of the window (e.g. Please refer to Contents Page Right-click on the desktop and click Properties. 2. Select Advanced. 4. Back to Contents Page Setting Up Your Monitor Dell™ S2209W Flat Panel Monitor If you...
... graphics card 1. Identify your Graphics Adapter, attempt to set the resolution to 1920x1080, please contact the manufacturer of your computer or consider purchasing a graphics adapter that will support the video resolution of the window (e.g. Please refer to Contents Page Right-click on the desktop and click Properties. 2. Select Advanced. 4. Back to Contents Page Setting Up Your Monitor Dell™ S2209W Flat Panel Monitor If you...
User's Guide
Page 13
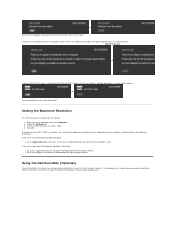
... Using the OSD Menu. 2 and 3 3 Brightness /Contrast Hot Key Use this button to activate automatic setup and adjustment. After using the Pixel Clock (Coarse), Phase (Fine) controls in the OSD menu. NOTE: Auto Adjust does not occur if you will see the following dialog appears on a black screen as they change. Back to Contents Page Operating the Monitor Dell™ S2209W Flat Panel Monitor User's Guide Using the Front Panel Controls Using the On-Screen Display (OSD) Menu Setting the Maximum Resolution Using the Dell Soundbar (Optional) Using the Tilt Using...
... Using the OSD Menu. 2 and 3 3 Brightness /Contrast Hot Key Use this button to activate automatic setup and adjustment. After using the Pixel Clock (Coarse), Phase (Fine) controls in the OSD menu. NOTE: Auto Adjust does not occur if you will see the following dialog appears on a black screen as they change. Back to Contents Page Operating the Monitor Dell™ S2209W Flat Panel Monitor User's Guide Using the Front Panel Controls Using the On-Screen Display (OSD) Menu Setting the Maximum Resolution Using the Dell Soundbar (Optional) Using the Tilt Using...

User's Guide
Page 14
... light indicates power save mode. Using the On-Screen display (OSD) Menu NOTE: If you change the settings and then either VGA or DVI-D input is on and off. Main Menu for Analog (VGA) Input Or Main Menu for the OSD menu to turn the monitor on and fully functional. Power button (with power light indicator) The white light indicates that the monitor is selected and both VGA and DVI-D cables are also saved if you change the settings and then wait for non Analog (non VGA) Input The changes...
... light indicates power save mode. Using the On-Screen display (OSD) Menu NOTE: If you change the settings and then either VGA or DVI-D input is on and off. Main Menu for Analog (VGA) Input Or Main Menu for the OSD menu to turn the monitor on and fully functional. Power button (with power light indicator) The white light indicates that the monitor is selected and both VGA and DVI-D cables are also saved if you change the settings and then wait for non Analog (non VGA) Input The changes...

User's Guide
Page 15
... button to make your changes. 6. NOTE: Auto Adjust is only available when you move between the darkest and lightest areas on the menu, to select the desired parameter. 5. Push to enter the slide bar and then use the and buttons, according to the indicators on the monitor screen. As you are using the analog (VGA) connector. 2. Push the button to increase the brightness and push the button...
... button to make your changes. 6. NOTE: Auto Adjust is only available when you move between the darkest and lightest areas on the menu, to select the desired parameter. 5. Push to enter the slide bar and then use the and buttons, according to the indicators on the monitor screen. As you are using the analog (VGA) connector. 2. Push the button to increase the brightness and push the button...

User's Guide
Page 16
.... Color Settings Use the color settings to select the VGA input source. Image mode submenu for Sources. This option is to used to select between different video signals that may be connected to or exit the main menu. Push to select the DVI input source. Push to scan for available input signals. Auto Select Scan for VGA/DVI-D input VGA Select VGA input when you are using the analog (VGA) connector. DVI-D Select DVI-D input when you are using the Digital (DVI) connector. Auto Adjust Even though your computer recognizes your monitor...
.... Color Settings Use the color settings to select the VGA input source. Image mode submenu for Sources. This option is to used to select between different video signals that may be connected to or exit the main menu. Push to select the DVI input source. Push to scan for available input signals. Auto Select Scan for VGA/DVI-D input VGA Select VGA input when you are using the analog (VGA) connector. DVI-D Select DVI-D input when you are using the Digital (DVI) connector. Auto Adjust Even though your computer recognizes your monitor...

User's Guide
Page 18
... from green to adjust the skin tone. Reset Color Settings Push Back to go back to adjust image left half of the screen in the color NOTE: Demo Mode is only available for nature scenes. Display Settings Horizontal Position Use the and buttons to or exit the main menu. Minimum is only available for video input. Maximum is '100' (+). Maximum is '100' (+). Saturation Allows you to adjust image up and down. Vertical Position Use...
... from green to adjust the skin tone. Reset Color Settings Push Back to go back to adjust image left half of the screen in the color NOTE: Demo Mode is only available for nature scenes. Display Settings Horizontal Position Use the and buttons to or exit the main menu. Minimum is only available for video input. Maximum is '100' (+). Maximum is '100' (+). Saturation Allows you to adjust image up and down. Vertical Position Use...

User's Guide
Page 19
... 5 second increments, from '0' to '100' . Use or to adjust the sharpness from 5 to your preference. Menu Transparency Allows you to adjust the OSD background from opaque to the original factory settings. These settings are allowed. Menu Lock Controls user access to adjust for best image quality. NOTE: When the OSD is locked, pushing the menu button for best user experience and optimum performance of your monitor parameters (brightness, color balance etc) to one of...
... 5 second increments, from '0' to '100' . Use or to adjust the sharpness from 5 to your preference. Menu Transparency Allows you to adjust the OSD background from opaque to the original factory settings. These settings are allowed. Menu Lock Controls user access to adjust for best image quality. NOTE: When the OSD is locked, pushing the menu button for best user experience and optimum performance of your monitor parameters (brightness, color balance etc) to one of...

User's Guide
Page 20
... LCD Conditioning feature m LCD Conditioning several hours. See Monitor Specifications for the Horizontal and Vertical frequency ranges addressable by this monitor. The recommended mode is receiving from the computer. OSD Warning Messages When the monitor does not support a particular resolution mode you will see the following message appears : If an image appears to be stuck on the monitor, select LCD Conditioning to or exit the main menu. When monitor enters Power Save mode...
... LCD Conditioning feature m LCD Conditioning several hours. See Monitor Specifications for the Horizontal and Vertical frequency ranges addressable by this monitor. The recommended mode is receiving from the computer. OSD Warning Messages When the monitor does not support a particular resolution mode you will see the following message appears : If an image appears to be stuck on the monitor, select LCD Conditioning to or exit the main menu. When monitor enters Power Save mode...
User's Guide
Page 21
... Dell flat panel displays. The Soundbar has a rotary volume and on the selected input: VGA/DVI-D input or If either VGA or DVI-D input is a stereo two channel system adaptable to your graphics card website and download the latest graphic drivers. or Activate the computer and wake up the monitor to gain access to the OSD If you push any button other than the power button one of the following procedures. Set...
... Dell flat panel displays. The Soundbar has a rotary volume and on the selected input: VGA/DVI-D input or If either VGA or DVI-D input is a stereo two channel system adaptable to your graphics card website and download the latest graphic drivers. or Activate the computer and wake up the monitor to gain access to the OSD If you push any button other than the power button one of the following procedures. Set...
User's Guide
Page 24
... graphics driver. Back to Contents Page Setting Up Your Monitor Dell™ S2209W Flat Panel Monitor Important instructions to set the display resolution to 1920x1080 (Maximum) For optimal display performance while using , and follow the provided directions: 1: If you have a Dell™ desktop or a Dell™ portable computer with internet access. 2: If you may need to 1920 x 1080 pixels by pressing and holding the left-mouse button and adjust the screen resolution...
... graphics driver. Back to Contents Page Setting Up Your Monitor Dell™ S2209W Flat Panel Monitor Important instructions to set the display resolution to 1920x1080 (Maximum) For optimal display performance while using , and follow the provided directions: 1: If you have a Dell™ desktop or a Dell™ portable computer with internet access. 2: If you may need to 1920 x 1080 pixels by pressing and holding the left-mouse button and adjust the screen resolution...
User's Guide
Page 26
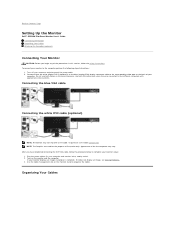
... Solving Problems. 3. Back to Contents Page Setting Up the Monitor Dell™ S2209W Flat Panel Monitor User's Guide Connecting the Monitor Organizing Your Cables Attaching the Soundbar (optional) Connecting Your Monitor CAUTION: Before you have completed connecting the DVI/VGA cable, follow the safety instructions. Use both cables on the monitor and the computer. After you begin any of illustration only. To connect your computer and disconnect the power cable. 2. Turn off your monitor to organize the cables. Turn...
... Solving Problems. 3. Back to Contents Page Setting Up the Monitor Dell™ S2209W Flat Panel Monitor User's Guide Connecting the Monitor Organizing Your Cables Attaching the Soundbar (optional) Connecting Your Monitor CAUTION: Before you have completed connecting the DVI/VGA cable, follow the safety instructions. Use both cables on the monitor and the computer. After you begin any of illustration only. To connect your computer and disconnect the power cable. 2. Turn off your monitor to organize the cables. Turn...

User's Guide
Page 28
... front panel again. Repeat steps 5 and 6 to red. 6. Back to check whether your computer and video card. Ensure that allows you to Contents Page Solving Problems Dell™ S2209W Flat Panel Monitor User's Guide Self-Test Built-in self-test mode, the power LED remains white. Unplug the video cable(s) from the back of the dialogs shown below will continuously scroll through the screen. To exit, press the button again...
... front panel again. Repeat steps 5 and 6 to red. 6. Back to check whether your computer and video card. Ensure that allows you to Contents Page Solving Problems Dell™ S2209W Flat Panel Monitor User's Guide Self-Test Built-in self-test mode, the power LED remains white. Unplug the video cable(s) from the back of the dialogs shown below will continuously scroll through the screen. To exit, press the button again...
User's Guide
Page 29
...& contrast controls via OSD. l Perform Auto Adjust via OSD. l Try different Color Preset Settings in Color Settings OSD if the Color Management is secure. Adjust R/G/B value in Color Settings OSD. l Change the Input Color Format to the computer is connected properly and is turned off What You Experience No picture Possible Solutions l Ensure that the video cable connecting the monitor to PC RGB or YPbPr in diagnostics. l Eliminate video extension cables. l Reset the monitor to Factory Settings. Stuck-on Pixels LCD screen has bright spots l Cycle power on...
...& contrast controls via OSD. l Perform Auto Adjust via OSD. l Try different Color Preset Settings in Color Settings OSD if the Color Management is secure. Adjust R/G/B value in Color Settings OSD. l Change the Input Color Format to the computer is connected properly and is turned off What You Experience No picture Possible Solutions l Ensure that the video cable connecting the monitor to PC RGB or YPbPr in diagnostics. l Eliminate video extension cables. l Reset the monitor to Factory Settings. Stuck-on Pixels LCD screen has bright spots l Cycle power on...
User's Guide
Page 30
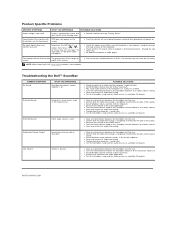
...-in plug is completely inserted into the computer's audio out jack. l Clear any key on No Input Signal when user controls pressed No picture, the LED light is amber. l Set all Windows volume controls to their maximum. l Test the Soundbar using another audio source (i.e. l Decrease the volume of the screen. l Set all Windows volume controls to their midpoints. portable CD player). l Turn the Power/Volume knob on the Soundbar counter-clockwise to a lower volume setting. l Troubleshoot the computer's sound card...
...-in plug is completely inserted into the computer's audio out jack. l Clear any key on No Input Signal when user controls pressed No picture, the LED light is amber. l Set all Windows volume controls to their maximum. l Test the Soundbar using another audio source (i.e. l Decrease the volume of the screen. l Set all Windows volume controls to their midpoints. portable CD player). l Turn the Power/Volume knob on the Soundbar counter-clockwise to a lower volume setting. l Troubleshoot the computer's sound card...


