
Dell Precision Workstation T3610 Owners Manual
Page 3
... Working Inside Your Computer...5 Turning Off Your Computer...6 After Working Inside Your Computer...6 2 Removing and Installing Components 7 Recommended Tools...7 System Overview...7 Removing the Power Supply Unit (PSU)...8 Installing the Power Supply Unit (PSU)...8 Removing the Cover...9 Installing the Cover...10 Removing the PSU Card...10 Installing the PSU Card...12 Removing the Front Bezel...
... Working Inside Your Computer...5 Turning Off Your Computer...6 After Working Inside Your Computer...6 2 Removing and Installing Components 7 Recommended Tools...7 System Overview...7 Removing the Power Supply Unit (PSU)...8 Installing the Power Supply Unit (PSU)...8 Removing the Cover...9 Installing the Cover...10 Removing the PSU Card...10 Installing the PSU Card...12 Removing the Front Bezel...
Dell Precision Workstation T3610 Owners Manual
Page 4
... Installing the Processor...30 Removing the System Board...30 Installing the System Board...32 System Board Components...32 3 Additional Information...35 Memory Module Guidelines...35 Power Supply Unit (PSU) Lock...35 4 System Setup...37 Boot Sequence...37 Navigation Keys...37 System Setup Options...38 Updating the BIOS ...45 System and Setup Password... Diagnostic LEDs...51 Error Messages...54 Errors That Do Not Halt Your Computer...54 Errors That Soft Halt Your Computer...54 7 Technical Specifications...57 8 Contacting Dell...65
... Installing the Processor...30 Removing the System Board...30 Installing the System Board...32 System Board Components...32 3 Additional Information...35 Memory Module Guidelines...35 Power Supply Unit (PSU) Lock...35 4 System Setup...37 Boot Sequence...37 Navigation Keys...37 System Setup Options...38 Updating the BIOS ...45 System and Setup Password... Diagnostic LEDs...51 Error Messages...54 Errors That Do Not Halt Your Computer...54 Errors That Soft Halt Your Computer...54 7 Technical Specifications...57 8 Contacting Dell...65

Dell Precision Workstation T3610 Owners Manual
Page 8
... out of the computer. Hold the handle bar to release the PSU. 4. Hold the PSU handle and slide the PSU into the computer. 2. baffle cover 8. power supply unit (PSU) 9. If the PSU is locked, remove the PSU lock screw to release the PSU. Follow the procedures in Before Working Inside Your Computer.... 2. Follow the procedures in After Working Inside Your Computer. 8 For more information, see PSU Lock Feature. 3. 5. PCI card 10. hard drive 7. intrusion switch Removing the Power Supply Unit (PSU) 1. Installing the Power Supply Unit (PSU) 1.
... out of the computer. Hold the handle bar to release the PSU. 4. Hold the PSU handle and slide the PSU into the computer. 2. baffle cover 8. power supply unit (PSU) 9. If the PSU is locked, remove the PSU lock screw to release the PSU. Follow the procedures in Before Working Inside Your Computer.... 2. Follow the procedures in After Working Inside Your Computer. 8 For more information, see PSU Lock Feature. 3. 5. PCI card 10. hard drive 7. intrusion switch Removing the Power Supply Unit (PSU) 1. Installing the Power Supply Unit (PSU) 1.
Dell Precision Workstation T3610 Owners Manual
Page 15
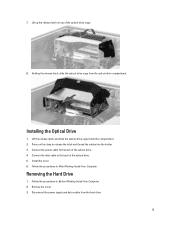
... Drive 1. Lift up the release latch on the clasp to release the latch and thread the cables into the holder. 3. Install the cover. 6. Disconnect the power supply and data cables from the optical-drive compartment. Holding the release latch, slide the optical-drive cage from the hard drive. 15 Connect the data... Computer. Lift the release latch, and slide the optical-drive cage inside the compartment. 2. Follow the procedures in Before Working Inside Your Computer. 2. Connect the power cable to the back of the optical-drive cage. 8. Remove the cover. 3.
... Drive 1. Lift up the release latch on the clasp to release the latch and thread the cables into the holder. 3. Install the cover. 6. Disconnect the power supply and data cables from the optical-drive compartment. Holding the release latch, slide the optical-drive cage from the hard drive. 15 Connect the data... Computer. Lift the release latch, and slide the optical-drive cage inside the compartment. 2. Follow the procedures in Before Working Inside Your Computer. 2. Connect the power cable to the back of the optical-drive cage. 8. Remove the cover. 3.

Dell Precision Workstation T3610 Owners Manual
Page 17
If a 2.5-inch hard drive is installed, remove the screws and lift up the drive to secure the hard drive. 2. Connect the hard-drive power supply cable. 4. Removing the Speaker 1. Installing the Hard Drive 1. Follow the procedures in Before Working On Your Computer. 2. Follow the procedures in After Working Inside Your ...
If a 2.5-inch hard drive is installed, remove the screws and lift up the drive to secure the hard drive. 2. Connect the hard-drive power supply cable. 4. Removing the Speaker 1. Installing the Hard Drive 1. Follow the procedures in Before Working On Your Computer. 2. Follow the procedures in After Working Inside Your ...

Dell Precision Workstation T3610 Owners Manual
Page 32
... 1. Install: a) processor b) memory module(s) c) coin-cell battery d) heatsink fan e) heatsink f) speaker g) I/O panel h) PCI card i) PSU card j) system fan k) hard drive l) optical drive m) thermal sensor n) cover o) power supply unit (PSU) 5. Tighten the screws to secure the system board to the port connectors on the back of the chassis and place the system board...
... 1. Install: a) processor b) memory module(s) c) coin-cell battery d) heatsink fan e) heatsink f) speaker g) I/O panel h) PCI card i) PSU card j) system fan k) hard drive l) optical drive m) thermal sensor n) cover o) power supply unit (PSU) 5. Tighten the screws to secure the system board to the port connectors on the back of the chassis and place the system board...
Dell Precision Workstation T3610 Owners Manual
Page 35
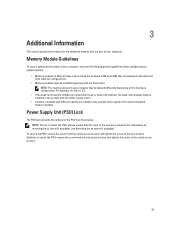
... available), see Removing the air tunnel (if available). For information on the hardware configuration. Similarly, to unlock the PSU, remove the screw from the chassis. Power Supply Unit (PSU) Lock The PSU lock prevents the removal of the slowest installed memory modules. NOTE: To lock or unlock the PSU, always ensure that...
... available), see Removing the air tunnel (if available). For information on the hardware configuration. Similarly, to unlock the PSU, remove the screw from the chassis. Power Supply Unit (PSU) Lock The PSU lock prevents the removal of the slowest installed memory modules. NOTE: To lock or unlock the PSU, always ensure that...
Dell Precision Workstation T3610 Owners Manual
Page 44
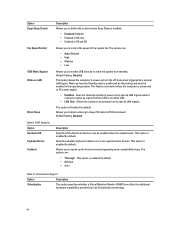
... feature only works when the computer is unaffected by this setting and must be enabled when the system boots. Allows you to power up signal from the off state when triggered by a special LAN signal. Specifies whether keyboard related errors are : • Thorough... compatibility steps. The options are: • Auto (Default) • High • Medium • Low Allows you to AC power supply. • Disabled - Default Setting: Disabled Description Specifies if the NumLock function can utilize the additional hardware capabilities provided by Intel Virtualization technology...
... feature only works when the computer is unaffected by this setting and must be enabled when the system boots. Allows you to power up signal from the off state when triggered by a special LAN signal. Specifies whether keyboard related errors are : • Thorough... compatibility steps. The options are: • Auto (Default) • High • Medium • Low Allows you to AC power supply. • Disabled - Default Setting: Disabled Description Specifies if the NumLock function can utilize the additional hardware capabilities provided by Intel Virtualization technology...
Dell Precision Workstation T3610 Owners Manual
Page 51
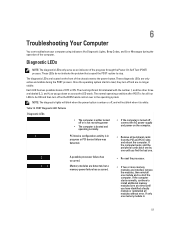
...modules without error. The most significant bit is amber or off and are labeled 2, 3, and 4, as an indicator of the progress through the Power-On Self Test (POST) process. Table 13. 6 Troubleshooting Your Computer You can troubleshoot your computer using indicators like Diagnostic Lights, Beep Codes, ... Diagnostic LEDs • The computer is either turned off or is not receiving power • The computer is booted and operating normally. • If the computer is turned off , connect the AC power-supply and power-on the front of the chassis next to load, they turn off , and...
...modules without error. The most significant bit is amber or off and are labeled 2, 3, and 4, as an indicator of the progress through the Power-On Self Test (POST) process. Table 13. 6 Troubleshooting Your Computer You can troubleshoot your computer using indicators like Diagnostic Lights, Beep Codes, ... Diagnostic LEDs • The computer is either turned off or is not receiving power • The computer is booted and operating normally. • If the computer is turned off , connect the AC power-supply and power-on the front of the chassis next to load, they turn off , and...

Dell Precision Workstation T3610 Owners Manual
Page 52
...-start the computer. • If available, install verified working graphics card into your computer. • Re-seat the 2x2 power connector from the power supply unit. • Ensure that no special requirements for memory module/connector placement exist. • Ensure that the display/ monitor ...is supported by your computer. • Re-seat all power and data cables. • Reinstall all USB devices and check all internal and...
...-start the computer. • If available, install verified working graphics card into your computer. • Re-seat the 2x2 power connector from the power supply unit. • Ensure that no special requirements for memory module/connector placement exist. • Ensure that the display/ monitor ...is supported by your computer. • Re-seat all power and data cables. • Reinstall all USB devices and check all internal and...

Dell Precision Workstation T3610 Owners Manual
Page 54
... Memory fan failure. Alert! PCI fan failure. Alert! Hard Drive fan2 failure. Alert! Alert! You may continue to a higher wattage power supply. Please refer to the RMT Event log screen in BIOS setup for a few seconds, and then continue to boot. The following table ...optimal memory population detected. Please contact Dell Technical support team to learn about upgrading to work. Table 14. Errors that soft halt your system. Hard Drive fan1 failure. CPU 0 fan failure. Memory related failure detected. Your current power supply does not support the recent configuration ...
... Memory fan failure. Alert! PCI fan failure. Alert! Hard Drive fan2 failure. Alert! Alert! You may continue to a higher wattage power supply. Please refer to the RMT Event log screen in BIOS setup for a few seconds, and then continue to boot. The following table ...optimal memory population detected. Please contact Dell Technical support team to learn about upgrading to work. Table 14. Errors that soft halt your system. Hard Drive fan1 failure. CPU 0 fan failure. Memory related failure detected. Your current power supply does not support the recent configuration ...

Dell Precision Workstation T3610 Owners Manual
Page 61
...PCI 2.3 Front I/O: Front USB Internal USB Front panel control Front panel audio HDA header Hard drive/ Optical drive: SATA T3610 / T5610 T7610 Power T3610 T5610 T7610 Table 26. computer is reading data from, or writing data to the hard drive. blinking white light indicates ...light - green light - the computer does not start, indicating a problem with the system board. indicates a problem has occurred with the system board or power supply. A good connection at 1000 Mbs exists between the network and the computer. solid white light - blinking white light - yellow light - A good ...
...PCI 2.3 Front I/O: Front USB Internal USB Front panel control Front panel audio HDA header Hard drive/ Optical drive: SATA T3610 / T5610 T7610 Power T3610 T5610 T7610 Table 26. computer is reading data from, or writing data to the hard drive. blinking white light indicates ...light - green light - the computer does not start, indicating a problem with the system board. indicates a problem has occurred with the system board or power supply. A good connection at 1000 Mbs exists between the network and the computer. solid white light - blinking white light - yellow light - A good ...

Dell Precision Workstation T3610 Owners Manual
Page 62
...mm (6.79 inches) 471.00 mm (18.54 inches) 62 see the service manual for specific diagnostic codes. Table 27. Power Feature Coin-cell battery Voltage Wattage T3610 T5610 T7610 Specification 3 V CR2032 lithium coin cell 100 VAC to 240 VAC 685 / 425 W (input voltage of 100 ...BTU/Hr 1706.5 BTU/Hr NOTE: Heat dissipation is network activity on the connection. flashes when there is calculated by using the power supply wattage rating. Feature Network activity lights (back panel) Diagnostic lights: Specification yellow light - computer is off - amber/blinking light - off or...
...mm (6.79 inches) 471.00 mm (18.54 inches) 62 see the service manual for specific diagnostic codes. Table 27. Power Feature Coin-cell battery Voltage Wattage T3610 T5610 T7610 Specification 3 V CR2032 lithium coin cell 100 VAC to 240 VAC 685 / 425 W (input voltage of 100 ...BTU/Hr 1706.5 BTU/Hr NOTE: Heat dissipation is network activity on the connection. flashes when there is calculated by using the power supply wattage rating. Feature Network activity lights (back panel) Diagnostic lights: Specification yellow light - computer is off - amber/blinking light - off or...

Dell Precision Workstation T3610/T5610/T7610 Setup and Features Information
Page 1
...power button, power light 8. active expansion card slots (6) 14. power supply unit (PSU) release latch Regulatory Model: D01T, D02X Regulatory Type: D01T004, D01T003, D02X002 2013- 05 optical-drive 2. blank slot 15. padlock ring 17. drive-activity light 7. security cable slot 16. back panel 13. diagnostic lights (4) 11. optical-drive (optional) 4. microphone connector 9. USB 3.0 connector 6. T3610.../T5610 - headphone connector 10. optical-drive eject button (optional) 5. Front and Back View Figure 1. Dell Precision Workstation T3610/T5610/T7610...
...power button, power light 8. active expansion card slots (6) 14. power supply unit (PSU) release latch Regulatory Model: D01T, D02X Regulatory Type: D01T004, D01T003, D02X002 2013- 05 optical-drive 2. blank slot 15. padlock ring 17. drive-activity light 7. security cable slot 16. back panel 13. diagnostic lights (4) 11. optical-drive (optional) 4. microphone connector 9. USB 3.0 connector 6. T3610.../T5610 - headphone connector 10. optical-drive eject button (optional) 5. Front and Back View Figure 1. Dell Precision Workstation T3610/T5610/T7610...

Dell Precision Workstation T3610/T5610/T7610 Setup and Features Information
Page 3
...active when a second CPU is installed. network activity light 5. USB 2.0 connector 8. USB 2.0 connectors (2) 11. PS/2 keyboard connector 13. power supply unit (PSU) release latch 14. line-out connector 2. optical-drive eject button 5. optical-drive (optional) 11. back panel 19. T7610...). 3 USB 3.0 connector Quick Setup WARNING: Before you did not order them. 1. For additional best practices information, see www.dell.com/regulatory_compliance NOTE: Some devices may not be included if you begin any of the procedures in /microphone connector 9. padlock ring ...
...active when a second CPU is installed. network activity light 5. USB 2.0 connector 8. USB 2.0 connectors (2) 11. PS/2 keyboard connector 13. power supply unit (PSU) release latch 14. line-out connector 2. optical-drive eject button 5. optical-drive (optional) 11. back panel 19. T7610...). 3 USB 3.0 connector Quick Setup WARNING: Before you did not order them. 1. For additional best practices information, see www.dell.com/regulatory_compliance NOTE: Some devices may not be included if you begin any of the procedures in /microphone connector 9. padlock ring ...

Dell Precision Workstation T3610/T5610/T7610 Setup and Features Information
Page 5
...voltage 181 VAC to ship with feet - 433.40 mm (17.06 inches) 5 Specifications NOTE: Offerings may vary by using the power supply wattage rating. Power Coin-cell battery Voltage Wattage T3610 3 V CR2032 lithium coin-cell 100 VAC to 240 VAC • 685 / 425W (input voltage of 100 VAC to 240 ... / 685W (input voltage of your computer, click Start → Help and Support and select the option to view information about your computer. Physical T3610/T5610 Height Width Depth Weight (minimum) Weight (minimum) T7610 Height Width Depth 414.00 mm (16.30 inches) 172.60 mm (6.79 inches)...
...voltage 181 VAC to ship with feet - 433.40 mm (17.06 inches) 5 Specifications NOTE: Offerings may vary by using the power supply wattage rating. Power Coin-cell battery Voltage Wattage T3610 3 V CR2032 lithium coin-cell 100 VAC to 240 VAC • 685 / 425W (input voltage of 100 VAC to 240 ... / 685W (input voltage of your computer, click Start → Help and Support and select the option to view information about your computer. Physical T3610/T5610 Height Width Depth Weight (minimum) Weight (minimum) T7610 Height Width Depth 414.00 mm (16.30 inches) 172.60 mm (6.79 inches)...


