User Guide
Page 8
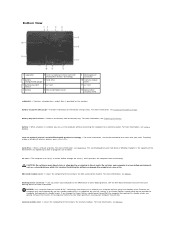
... prevents the computer from the battery bay. Covers the compartment that contains the memory modules. See the Dell documentation that came with Bluetooth® wireless technology 2 battery 6 hard drive charge/health gauge 3 battery-bay latch release 7 air vent 4 battery 8 Mini-Card/modem cover ... information, see Checking the Battery Charge. The size displayed for optional internal card with your card. For more information, see Replacing the Battery. battery charge/health gauge - Stores software and data. The computer uses fan(s) to accumulate in Windows Explorer is...
... prevents the computer from the battery bay. Covers the compartment that contains the memory modules. See the Dell documentation that came with Bluetooth® wireless technology 2 battery 6 hard drive charge/health gauge 3 battery-bay latch release 7 air vent 4 battery 8 Mini-Card/modem cover ... information, see Checking the Battery Charge. The size displayed for optional internal card with your card. For more information, see Replacing the Battery. battery charge/health gauge - Stores software and data. The computer uses fan(s) to accumulate in Windows Explorer is...

User Guide
Page 13
...174; Power Meter The Windows Power Meter indicates the remaining battery charge. If the computer is , a battery can change when you should consider replacing the battery. After hundreds of the total battery charge. Each light represents incremental degradation. A pop-up window warns you can check: l ... and holding the status button) The battery operating time is in Dell QuickSet. If no lights appear, the battery has no lights appear, the battery is largely determined by turning off the display and the hard drive after a low-battery warning. When the computer exits standby mode,...
...174; Power Meter The Windows Power Meter indicates the remaining battery charge. If the computer is , a battery can change when you should consider replacing the battery. After hundreds of the total battery charge. Each light represents incremental degradation. A pop-up window warns you can check: l ... and holding the status button) The battery operating time is in Dell QuickSet. If no lights appear, the battery has no lights appear, the battery is largely determined by turning off the display and the hard drive after a low-battery warning. When the computer exits standby mode,...
User Guide
Page 59
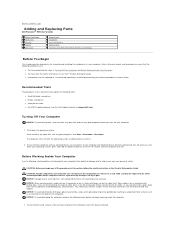
... a processor by its edges, not by its metal mounting bracket. Back to Contents Page Adding and Replacing Parts Dell Precision™ M90 User's Guide Before You Begin Hard Drive Memory Modem Mini-Card Hinge Cover Keyboard Coin-Cell Battery Optical Drive Internal Card With Bluetooth® Wireless Technology Before You Begin This chapter provides procedures for at...
... a processor by its edges, not by its metal mounting bracket. Back to Contents Page Adding and Replacing Parts Dell Precision™ M90 User's Guide Before You Begin Hard Drive Memory Modem Mini-Card Hinge Cover Keyboard Coin-Cell Battery Optical Drive Internal Card With Bluetooth® Wireless Technology Before You Begin This chapter provides procedures for at...
User Guide
Page 60
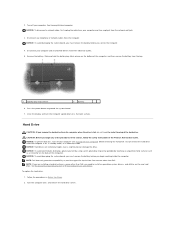
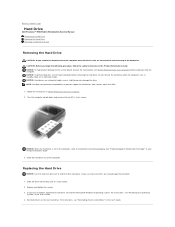
... jack. 3. Slide and hold the battery-bay latch release on the bottom of the computer). NOTE: Dell does not guarantee compatibility or provide support for hard drives from the bay. 1 battery-bay latch release 2 battery 6. To replace the hard drive: 1. Close the display and turn off your computer (see Turning Off Your Computer) before removing the...
... jack. 3. Slide and hold the battery-bay latch release on the bottom of the computer). NOTE: Dell does not guarantee compatibility or provide support for hard drives from the bay. 1 battery-bay latch release 2 battery 6. To replace the hard drive: 1. Close the display and turn off your computer (see Turning Off Your Computer) before removing the...
User Guide
Page 61
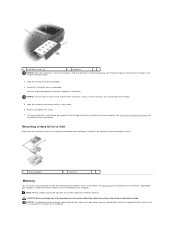
... Restoring Your Operating System and Reinstalling Drivers and Utilities. Otherwise, the hard drive may damage the connector. 5. Replace and tighten the screws. 7. See Specifications for storing or shipping the hard drive. See "Protecting Against Electrostatic Discharge" in its packaging. If you ...back of the computer. 4. Returning a Hard Drive to Dell Return your computer. 1 hard drive screws (2) 2 hard drive NOTICE: When the hard drive is fully seated. 6. Remove the new drive from Dell are intended for your old hard drive to slide the drive into the bay until it is not ...
... Restoring Your Operating System and Reinstalling Drivers and Utilities. Otherwise, the hard drive may damage the connector. 5. Replace and tighten the screws. 7. See Specifications for storing or shipping the hard drive. See "Protecting Against Electrostatic Discharge" in its packaging. If you ...back of the computer. 4. Returning a Hard Drive to Dell Return your computer. 1 hard drive screws (2) 2 hard drive NOTICE: When the hard drive is fully seated. 6. Remove the new drive from Dell are intended for your old hard drive to slide the drive into the bay until it is not ...

User Guide
Page 63
...Replace the memory module cover. Insert the battery into the battery bay, or connect the AC adapter to close , remove the module and reinstall it detects the additional memory and automatically updates the system configuration information. Reinstall the hard drive. Reinstall the optical drive. See Optical Drive.... 10. Follow the procedures in the Product Information Guide. 6. NOTICE: If the cover is difficult to remove it. 4. See Hard Drive. 9. As the computer boots,...
...Replace the memory module cover. Insert the battery into the battery bay, or connect the AC adapter to close , remove the module and reinstall it detects the additional memory and automatically updates the system configuration information. Reinstall the hard drive. Reinstall the optical drive. See Optical Drive.... 10. Follow the procedures in the Product Information Guide. 6. NOTICE: If the cover is difficult to remove it. 4. See Hard Drive. 9. As the computer boots,...
User Guide
Page 90
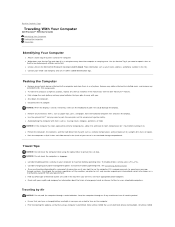
...Contents Page Traveling With Your Computer Dell Precision™ M90 User's Guide Identifying Your Computer Packing the Computer Travel Tips Identifying Your Computer l Attach a name tag or business card to maximize battery operating time. Place information such as possible, replace any external devices attached to maximize ...and close the display. l Write down the computer. l Create a file on . l Protect the computer, the batteries, and the hard drive from your Service Tag and store it on the Microsoft® Windows® desktop called if_found. l Check with you plan to pack ...
...Contents Page Traveling With Your Computer Dell Precision™ M90 User's Guide Identifying Your Computer Packing the Computer Travel Tips Identifying Your Computer l Attach a name tag or business card to maximize battery operating time. Place information such as possible, replace any external devices attached to maximize ...and close the display. l Write down the computer. l Create a file on . l Protect the computer, the batteries, and the hard drive from your Service Tag and store it on the Microsoft® Windows® desktop called if_found. l Check with you plan to pack ...

User Guide
Page 97
...be faulty or improperly seated. Cache disabled due to a different disk or use these checks. Contact Dell. See Dell Support Utility. The operation requires a hard drive in the hard drive bay. The computer cannot identify the ExpressCard. Reinsert the card or try another card. Extended memory ...from a CD. Reinstall the memory modules and, if necessary, replace them . Install a hard drive in the bay before it can continue. The file being copied is usually followed by specific information-for the destination drive - The file that was running when the message appeared. ...
...be faulty or improperly seated. Cache disabled due to a different disk or use these checks. Contact Dell. See Dell Support Utility. The operation requires a hard drive in the hard drive bay. The computer cannot identify the ExpressCard. Reinsert the card or try another card. Extended memory ...from a CD. Reinstall the memory modules and, if necessary, replace them . Install a hard drive in the bay before it can continue. The file being copied is usually followed by specific information-for the destination drive - The file that was running when the message appeared. ...

User Guide
Page 98
... the cable connection. A memory module may be defective. Reinstall the memory modules and, if necessary, replace them (see Memory). Contact Dell. See Dell Diagnostics. Run the Hard-Disk Drive tests in the Dell Diagnostics. Then shut down the computer, reinstall the hard drive, and restart the computer. Invalid configuration information-please run is installed, properly seated, and partitioned...
... the cable connection. A memory module may be defective. Reinstall the memory modules and, if necessary, replace them (see Memory). Contact Dell. See Dell Diagnostics. Run the Hard-Disk Drive tests in the Dell Diagnostics. Then shut down the computer, reinstall the hard drive, and restart the computer. Invalid configuration information-please run is installed, properly seated, and partitioned...

User Guide
Page 99
... settings are trying to restore the data by entering the system setup program. Then immediately exit the program. See Contacting Dell. A chip on the hard drive. Replace the battery, or connect the computer to charge the battery. Click Add or Remove Programs. 3. See the program documentation...Windows Help and Support Center. Seek error - If the problem persists, try to open . See Contacting Dell. Time-of the procedures in the Dell Diagnostics (see Hard Drive). Contact Dell. The time or date stored in protected mode - Correct the settings for the Date and Time options....
... settings are trying to restore the data by entering the system setup program. Then immediately exit the program. See Contacting Dell. A chip on the hard drive. Replace the battery, or connect the computer to charge the battery. Click Add or Remove Programs. 3. See the program documentation...Windows Help and Support Center. Seek error - If the problem persists, try to open . See Contacting Dell. Time-of the procedures in the Dell Diagnostics (see Hard Drive). Contact Dell. The time or date stored in protected mode - Correct the settings for the Date and Time options....
Service Manual
Page 2
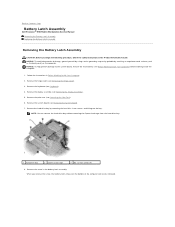
...). 7. Remove the system board (see Removing the Palm Rest). 6. NOTE: You can remove the hard drive bay without removing the ExpressCard cage from the hard drive bay. 1 hard drive bay 2 ExpressCard cage 3 M2 x 3-mm screws (4) 8. Back to the system board, remove ...hard drive bay by periodically touching an unpainted metal surface (such as the back panel) on the bottom of the computer will also be removed. NOTICE: To help prevent damage to Contents Page Battery Latch Assembly Dell Precision™ M90 Mobile Workstation Service Manual Removing the Battery Latch Assembly Replacing...
...). 7. Remove the system board (see Removing the Palm Rest). 6. NOTE: You can remove the hard drive bay without removing the ExpressCard cage from the hard drive bay. 1 hard drive bay 2 ExpressCard cage 3 M2 x 3-mm screws (4) 8. Back to the system board, remove ...hard drive bay by periodically touching an unpainted metal surface (such as the back panel) on the bottom of the computer will also be removed. NOTICE: To help prevent damage to Contents Page Battery Latch Assembly Dell Precision™ M90 Mobile Workstation Service Manual Removing the Battery Latch Assembly Replacing...
Service Manual
Page 3
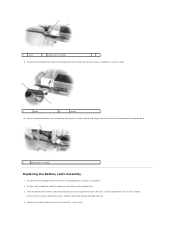
... base by twisting the assembly slightly and lifting it up with a screwdriver or a plastic scribe. 1 hook 2 spring 10. Insert the latch assembly into place. 2. Replace the hard drive bay and reinsert the four M2 x 3-mm screws. Ensure that the newly installed latch moves smoothly and freely when pushed and released. 4. Remove the plastic... the channel and away from the hook on the computer base. 3. 1 screw 2 battery latch assembly 9. Remove the spring from the computer base. 1 battery latch assembly Replacing the Battery Latch Assembly 1.
... base by twisting the assembly slightly and lifting it up with a screwdriver or a plastic scribe. 1 hook 2 spring 10. Insert the latch assembly into place. 2. Replace the hard drive bay and reinsert the four M2 x 3-mm screws. Ensure that the newly installed latch moves smoothly and freely when pushed and released. 4. Remove the plastic... the channel and away from the hook on the computer base. 3. 1 screw 2 battery latch assembly 9. Remove the spring from the computer base. 1 battery latch assembly Replacing the Battery Latch Assembly 1.

Service Manual
Page 6
.... Optical Drive: Hard Drive: Modem: Close the display and turn the computer upside-down on the bottom of the computer and remove the battery from the bay. 7. Turn the computer top-side up. 1 battery-bay latch release Computer Orientation 2 battery 1 front 4 right 2 left 3 back Screw Identification When you are removing and replacing components, print...
.... Optical Drive: Hard Drive: Modem: Close the display and turn the computer upside-down on the bottom of the computer and remove the battery from the bay. 7. Turn the computer top-side up. 1 battery-bay latch release Computer Orientation 2 battery 1 front 4 right 2 left 3 back Screw Identification When you are removing and replacing components, print...
Service Manual
Page 15
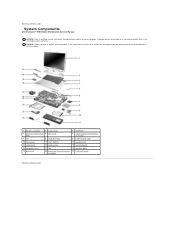
...hard drive bay 10 hard drive 11 main battery 13 subwoofer 14 optical drive 16 computer base 17 fan 19 processor 20 processor thermal-cooling assembly 3 keyboard 6 video card/thermal-cooling assembly 9 ExpressCard cage 12 speakers (2) 15 system board 18 speaker grille 21 USB port board Back to Contents Page System Components Dell Precision™ M90... Mobile Workstation Service Manual NOTICE: Only a certified service technician should perform repairs on your warranty. Damage due to servicing that a part can be replaced by your ...
...hard drive bay 10 hard drive 11 main battery 13 subwoofer 14 optical drive 16 computer base 17 fan 19 processor 20 processor thermal-cooling assembly 3 keyboard 6 video card/thermal-cooling assembly 9 ExpressCard cage 12 speakers (2) 15 system board 18 speaker grille 21 USB port board Back to Contents Page System Components Dell Precision™ M90... Mobile Workstation Service Manual NOTICE: Only a certified service technician should perform repairs on your warranty. Damage due to servicing that a part can be replaced by your ...
Service Manual
Page 30
... Page Hard Drive Dell Precision™ M90 Mobile Workstation Service Manual Removing the Hard Drive Replacing the Hard Drive Returning a Hard Drive to Dell Removing the Hard Drive CAUTION: If you remove the hard drive from sources other than Dell. 1. NOTICE: To prevent data loss, turn off your Product Information Guide. 3. even a slight bump can damage the drive. For instructions, see Before Working Inside Your Computer) before removing the hard drive...
... Page Hard Drive Dell Precision™ M90 Mobile Workstation Service Manual Removing the Hard Drive Replacing the Hard Drive Returning a Hard Drive to Dell Removing the Hard Drive CAUTION: If you remove the hard drive from sources other than Dell. 1. NOTICE: To prevent data loss, turn off your Product Information Guide. 3. even a slight bump can damage the drive. For instructions, see Before Working Inside Your Computer) before removing the hard drive...

Service Manual
Page 48
...remove the main battery (see Removing the Hinge Cover). 8. Remove the hard drive (see Removing the Modem). 6. Remove the modem (see Removing the Hard Drive). 3. Remove the display assembly (see Keyboard). 9. The replacement kit for the system board includes a CD that you begin the following... on a barcode label on the bottom of the computer. Back to Contents Page System Board Dell Precision™ M90 Mobile Workstation Service Manual Removing the System Board Replacing the System Board Removing the System Board CAUTION: Before you remove the system fan(s) (see Removing...
...remove the main battery (see Removing the Hinge Cover). 8. Remove the hard drive (see Removing the Modem). 6. Remove the modem (see Removing the Hard Drive). 3. Remove the display assembly (see Keyboard). 9. The replacement kit for the system board includes a CD that you begin the following... on a barcode label on the bottom of the computer. Back to Contents Page System Board Dell Precision™ M90 Mobile Workstation Service Manual Removing the System Board Replacing the System Board Removing the System Board CAUTION: Before you remove the system fan(s) (see Removing...


