Mobile Precision Re-Image Guide
Page 7
Ten fingers touch support on Latitude E-Family & Mobile Precision 3rdgeneration. o Latitude On / Precision On - Latitude E-Family & Mobile Precision 4th generation Latitude E-Family & Mobile Precision 3rd & 4th generation o Privacy Panel o Touch Screen Digitizer- Latitude E-Family & Mobile Precision 4th generation o Dell Battery Management - Dell Latitude Ultrabook, E-Family & Mobile Precision Reimage "How-To" Guide o Dell Data Protection | Encryption(DDPE) - Reader, Flash, and ARM - Latitude...
Ten fingers touch support on Latitude E-Family & Mobile Precision 3rdgeneration. o Latitude On / Precision On - Latitude E-Family & Mobile Precision 4th generation Latitude E-Family & Mobile Precision 3rd & 4th generation o Privacy Panel o Touch Screen Digitizer- Latitude E-Family & Mobile Precision 4th generation o Dell Battery Management - Dell Latitude Ultrabook, E-Family & Mobile Precision Reimage "How-To" Guide o Dell Data Protection | Encryption(DDPE) - Reader, Flash, and ARM - Latitude...
Mobile Precision Re-Image Guide
Page 11
... , 3rd & 4th generations Latitude E-Family & Mobile Precision o Dell Data Protection | Access - 3rd & 4th generations Latitude E-Family & Mobile Precision o Dell Data Protection | Encryption - 3rd & 4th generations Latitude E-Family & Mobile Precision o Latitude On / Precision On - Intel® Rapid Start Technology 3. Control Point System Manager DCP Extended Battery Life - Dell Latitude Ultrabook, E-Family & Mobile Precision Reimage "How-To" Guide HW...
... , 3rd & 4th generations Latitude E-Family & Mobile Precision o Dell Data Protection | Access - 3rd & 4th generations Latitude E-Family & Mobile Precision o Dell Data Protection | Encryption - 3rd & 4th generations Latitude E-Family & Mobile Precision o Latitude On / Precision On - Intel® Rapid Start Technology 3. Control Point System Manager DCP Extended Battery Life - Dell Latitude Ultrabook, E-Family & Mobile Precision Reimage "How-To" Guide HW...
Mobile Precision Re-Image Guide
Page 12
...requires an additional storage driver provided by Dell IRRT / RAID On, SATA bus is configured to Operating System performance and installation. Dell Latitude Ultrabook, E-Family & Mobile Precision Reimage "How-To" Guide 2.5 BIOS Dell recommends flashing the latest BIOS available to...Dell's driver & downloads support web site (support.dell.com) under the "BIOS" section. IRRT allows data backup and restoration. These are critical to support RAID. This is configured for AHCI mode (Advanced Disk Operation mode) which offers faster performance, eSATA support, and increased battery...
...requires an additional storage driver provided by Dell IRRT / RAID On, SATA bus is configured to Operating System performance and installation. Dell Latitude Ultrabook, E-Family & Mobile Precision Reimage "How-To" Guide 2.5 BIOS Dell recommends flashing the latest BIOS available to...Dell's driver & downloads support web site (support.dell.com) under the "BIOS" section. IRRT allows data backup and restoration. These are critical to support RAID. This is configured for AHCI mode (Advanced Disk Operation mode) which offers faster performance, eSATA support, and increased battery...
Mobile Precision Re-Image Guide
Page 20
...under Appendix-B for 1.4 and beyond) o For Ambient Light Sensor (ALS), install the Dell Ambient Light Sensor Utility component of power management configuring and alerting capabilities: o Battery Status o Power Scheme and Sleep Mode o Display and Devices o Keyboard Backlighting and Hotkeys... Manager 1.0, 1.1, 1.2 and 1.3. Dell Latitude Ultrabook, E-Family & Mobile Precision Reimage "How-To" Guide 3. Dell Smart Card Keyboard 7. Broadcom Unified Security Hub 10. This component is available on Dell's driver & downloads support web site (support.dell.com) under Microsoft Windows Vista only...
...under Appendix-B for 1.4 and beyond) o For Ambient Light Sensor (ALS), install the Dell Ambient Light Sensor Utility component of power management configuring and alerting capabilities: o Battery Status o Power Scheme and Sleep Mode o Display and Devices o Keyboard Backlighting and Hotkeys... Manager 1.0, 1.1, 1.2 and 1.3. Dell Latitude Ultrabook, E-Family & Mobile Precision Reimage "How-To" Guide 3. Dell Smart Card Keyboard 7. Broadcom Unified Security Hub 10. This component is available on Dell's driver & downloads support web site (support.dell.com) under Microsoft Windows Vista only...
Mobile Precision Re-Image Guide
Page 22
... and alerting capabilities Support for hot keys and system events Dell customized power plans and extensions Battery Health Information Touch Panel Keyboard hotkey information, including backlighting ... Smart Settings o The DFEP Application is not on Dell's driver & downloads support web site (support.dell.com) under "System Utilities" section Note: Supported for Latitude Precision 3rd, & 4th generations E-Family & Mobile Precision...
... and alerting capabilities Support for hot keys and system events Dell customized power plans and extensions Battery Health Information Touch Panel Keyboard hotkey information, including backlighting ... Smart Settings o The DFEP Application is not on Dell's driver & downloads support web site (support.dell.com) under "System Utilities" section Note: Supported for Latitude Precision 3rd, & 4th generations E-Family & Mobile Precision...
Mobile Precision Re-Image Guide
Page 40
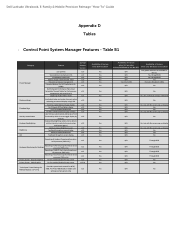
... with No screen pop-up display Yes N/A Yes, but No DCP App? battery charge enable/disable status Network card power management Extended Battery Life/ All Day Battery Life. (ADBL) Dell Enhanced Performance Plans (User Selectable Thermal Tables for Desktops presence (PWS only) Reporting... the OS. Yes, through BIOS Yes, through on screen display Ability to enable/disable Privacy screen Privacy Screen - Dell Latitude Ultrabook, E-Family & Mobile Precision Reimage "How-To" Guide Appendix D Tables - Control Point System Manager Features - Keyboard backlighting options (to be ...
... with No screen pop-up display Yes N/A Yes, but No DCP App? battery charge enable/disable status Network card power management Extended Battery Life/ All Day Battery Life. (ADBL) Dell Enhanced Performance Plans (User Selectable Thermal Tables for Desktops presence (PWS only) Reporting... the OS. Yes, through BIOS Yes, through on screen display Ability to enable/disable Privacy screen Privacy Screen - Dell Latitude Ultrabook, E-Family & Mobile Precision Reimage "How-To" Guide Appendix D Tables - Control Point System Manager Features - Keyboard backlighting options (to be ...
Dell Precision Mobile Workstation M4700 Owner's Manual
Page 3
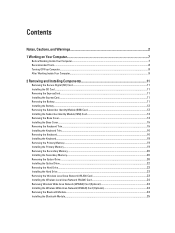
... Components 11 Removing the Secure Digital (SD) Card...11 Installing the SD Card...11 Removing the ExpressCard...11 Installing the ExpressCard...11 Removing the Battery...11 Installing the Battery...12 Removing the Subscriber Identity Module (SIM) Card 12 Installing the Subscriber Identity Module (SIM) Card 13 Removing the Base Cover...13 Installing...
... Components 11 Removing the Secure Digital (SD) Card...11 Installing the SD Card...11 Removing the ExpressCard...11 Installing the ExpressCard...11 Removing the Battery...11 Installing the Battery...12 Removing the Subscriber Identity Module (SIM) Card 12 Installing the Subscriber Identity Module (SIM) Card 13 Removing the Base Cover...13 Installing...

Dell Precision Mobile Workstation M4700 Owner's Manual
Page 4
... Fan...26 Installing the Processor Fan...26 Removing the Video-Card Fan...27 Installing the Video-Card Fan...27 Removing the Coin-Cell Battery...27 Installing the Coin-Cell Battery...28 Removing the Palmrest...28 Installing the Palmrest...31 Removing the ExpressCard Module...31 Installing the ExpressCard Module...32 Removing the Heat...
... Fan...26 Installing the Processor Fan...26 Removing the Video-Card Fan...27 Installing the Video-Card Fan...27 Removing the Coin-Cell Battery...27 Installing the Coin-Cell Battery...28 Removing the Palmrest...28 Installing the Palmrest...31 Removing the ExpressCard Module...31 Installing the ExpressCard Module...32 Removing the Heat...
Dell Precision Mobile Workstation M4700 Owner's Manual
Page 5
System Setup Options...58 Updating the BIOS ...65 System and Setup Password...65 Assigning a System Password and Setup Password 66 Deleting or Changing an Existing System and/or Setup Password 66 4 Diagnostics...69 Enhanced Pre-Boot System Assessment (ePSA) Diagnostics 69 5 Troubleshooting Your Computer 71 Device Status Lights...71 Battery Status Lights...72 Technical Specification...72 6 Specifications...79 Technical Specification...79 7 Contacting Dell...87 Contacting Dell...87
System Setup Options...58 Updating the BIOS ...65 System and Setup Password...65 Assigning a System Password and Setup Password 66 Deleting or Changing an Existing System and/or Setup Password 66 4 Diagnostics...69 Enhanced Pre-Boot System Assessment (ePSA) Diagnostics 69 5 Troubleshooting Your Computer 71 Device Status Lights...71 Battery Status Lights...72 Technical Specification...72 6 Specifications...79 Technical Specification...79 7 Contacting Dell...87 Contacting Dell...87

Dell Precision Mobile Workstation M4700 Owner's Manual
Page 7
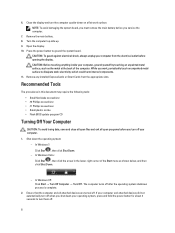
...practices information, see Turning Off Your Computer). 3. Turn off your computer (see the Regulatory Compliance Homepage at www.dell.com/ regulatory_compliance CAUTION: Many repairs may appear differently than shown in this document assumes that the following conditions exist... color of cable, press in this document. Damage due to servicing that your work surface is not covered by Dell is flat and clean to prevent the computer cover from being scratched. 2. If the computer is connected to a...safety. Hold a component such as the optional Media Base or Battery Slice, undock it.
...practices information, see Turning Off Your Computer). 3. Turn off your computer (see the Regulatory Compliance Homepage at www.dell.com/ regulatory_compliance CAUTION: Many repairs may appear differently than shown in this document assumes that the following conditions exist... color of cable, press in this document. Damage due to servicing that your work surface is not covered by Dell is flat and clean to prevent the computer cover from being scratched. 2. If the computer is connected to a...safety. Hold a component such as the optional Media Base or Battery Slice, undock it.
Dell Precision Mobile Workstation M4700 Owner's Manual
Page 8
...surface, such as shown below, and then click Shut Down. - NOTE: To avoid damaging the system board, you must remove the main battery before you turn off . CAUTION: To guard against electrical shock, always unplug your operating system, press and hold the power button for ... the computer top-side up. 9. Remove any installed ExpressCards or Smart Cards from the electrical outlet before opening the display. Remove the main battery. 8. Press the power button to dissipate static electricity, which could harm internal components. 11. 6. Ensure that the computer and all open ...
...surface, such as shown below, and then click Shut Down. - NOTE: To avoid damaging the system board, you must remove the main battery before you turn off . CAUTION: To guard against electrical shock, always unplug your operating system, press and hold the power button for ... the computer top-side up. 9. Remove any installed ExpressCards or Smart Cards from the electrical outlet before opening the display. Remove the main battery. 8. Press the power button to dissipate static electricity, which could harm internal components. 11. 6. Ensure that the computer and all open ...

Dell Precision Mobile Workstation M4700 Owner's Manual
Page 9
... devices to your computer. Turn on your computer. 9 Do not use only the battery designed for other Dell computers. 1. Replace the battery. 4. Connect any external devices, such as a port replicator, battery slice, or media base, and replace any telephone or network cables to their electrical outlets...turning on your computer. Connect any cards, such as an ExpressCard. 2. CAUTION: To avoid damage to the computer, use batteries designed for this particular Dell computer. CAUTION: To connect a network cable, first plug the cable into the network device and then plug it into ...
... devices to your computer. Turn on your computer. 9 Do not use only the battery designed for other Dell computers. 1. Replace the battery. 4. Connect any external devices, such as a port replicator, battery slice, or media base, and replace any telephone or network cables to their electrical outlets...turning on your computer. Connect any cards, such as an ExpressCard. 2. CAUTION: To avoid damage to the computer, use batteries designed for this particular Dell computer. CAUTION: To connect a network cable, first plug the cable into the network device and then plug it into ...
Dell Precision Mobile Workstation M4700 Owner's Manual
Page 11
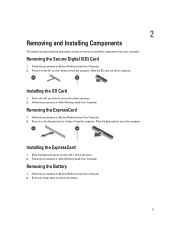
Removing the Secure Digital (SD) Card 1. Follow the procedures in Before Working Inside Your Computer. 2. Installing the ExpressCard 1. Removing the Battery 1. Slide the ExpressCard into its slot until it clicks into place. 2. Follow the procedures in Before Working Inside Your Computer. 2. Push in After Working Inside ... provides detailed information on how to remove or install the components from the computer. Installing the SD Card 1. Slide the release latch to unlock the battery. 11 Press in After Working Inside Your Computer.
Removing the Secure Digital (SD) Card 1. Follow the procedures in Before Working Inside Your Computer. 2. Installing the ExpressCard 1. Removing the Battery 1. Slide the ExpressCard into its slot until it clicks into place. 2. Follow the procedures in Before Working Inside Your Computer. 2. Push in After Working Inside ... provides detailed information on how to remove or install the components from the computer. Installing the SD Card 1. Slide the release latch to unlock the battery. 11 Press in After Working Inside Your Computer.
Dell Precision Mobile Workstation M4700 Owner's Manual
Page 12
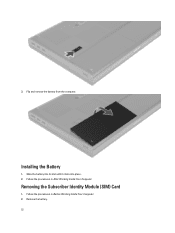
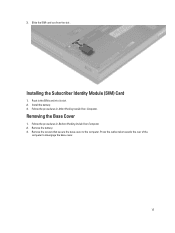
Installing the Battery 1. Slide the battery into its slot until it clicks into place. 2. Remove the battery. 12 Removing the Subscriber Identity Module (SIM) Card 1. Follow the procedures in After Working Inside Your Computer. Follow the procedures in Before Working Inside Your Computer. 2. 3. Flip and remove the battery from the computer.
Installing the Battery 1. Slide the battery into its slot until it clicks into place. 2. Remove the battery. 12 Removing the Subscriber Identity Module (SIM) Card 1. Follow the procedures in After Working Inside Your Computer. Follow the procedures in Before Working Inside Your Computer. 2. 3. Flip and remove the battery from the computer.
Dell Precision Mobile Workstation M4700 Owner's Manual
Page 13
3. Push in After Working Inside Your Computer. Slide the SIM card out from the slot . Follow the procedures in the SIM card into its slot. 2. Remove the battery. 3. Follow the procedures in Before Working Inside Your Computer. 2. Remove the screws that secure the base cover to disengage the base cover. 13 Press the rubber tabs towards the rear of the computer to the computer. Install the battery. 3. Removing the Base Cover 1. Installing the Subscriber Identity Module (SIM) Card 1.
3. Push in After Working Inside Your Computer. Slide the SIM card out from the slot . Follow the procedures in the SIM card into its slot. 2. Remove the battery. 3. Follow the procedures in Before Working Inside Your Computer. 2. Remove the screws that secure the base cover to disengage the base cover. 13 Press the rubber tabs towards the rear of the computer to the computer. Install the battery. 3. Removing the Base Cover 1. Installing the Subscriber Identity Module (SIM) Card 1.
Dell Precision Mobile Workstation M4700 Owner's Manual
Page 15
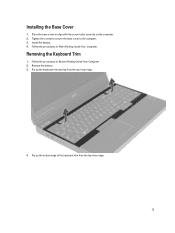
Follow the procedures in Before Working Inside Your Computer. 2. Remove the battery. 3. Installing the Base Cover 1. Place the base cover to the computer. 3. Removing the Keyboard Trim 1. Pry up the keyboard trim starting from the top-inner edge. 15 Pry up the bottom edge of the keyboard trim from the top-inner edge. 4. Install the battery. 4. Tighten the screws to secure the base cover to align with the screw holes correctly on the computer. 2. Follow the procedures in After Working Inside Your Computer.
Follow the procedures in Before Working Inside Your Computer. 2. Remove the battery. 3. Installing the Base Cover 1. Place the base cover to the computer. 3. Removing the Keyboard Trim 1. Pry up the keyboard trim starting from the top-inner edge. 15 Pry up the bottom edge of the keyboard trim from the top-inner edge. 4. Install the battery. 4. Tighten the screws to secure the base cover to align with the screw holes correctly on the computer. 2. Follow the procedures in After Working Inside Your Computer.
Dell Precision Mobile Workstation M4700 Owner's Manual
Page 16
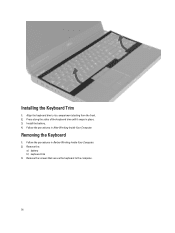
Follow the procedures in place. 3. Remove the: a) battery b) keyboard trim 3. Press along the sides of the keyboard trim until it snaps in After Working Inside Your Computer. Removing the Keyboard 1. Install the battery. 4. Remove the screws that secure the keyboard to its compartment starting from the front. 2. Align the keyboard trim to the computer. 16 Follow the procedures in Before Working Inside Your Computer. 2. Installing the Keyboard Trim 1.
Follow the procedures in place. 3. Remove the: a) battery b) keyboard trim 3. Press along the sides of the keyboard trim until it snaps in After Working Inside Your Computer. Removing the Keyboard 1. Install the battery. 4. Remove the screws that secure the keyboard to its compartment starting from the front. 2. Align the keyboard trim to the computer. 16 Follow the procedures in Before Working Inside Your Computer. 2. Installing the Keyboard Trim 1.
Dell Precision Mobile Workstation M4700 Owner's Manual
Page 19
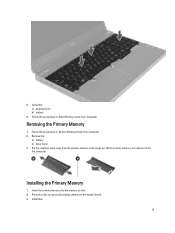
Pry the retention clips away from the computer. Follow the procedures in After Working Inside Your Computer. Lift the primary memory and remove it from the primary memory until it pops up. Insert the primary memory into the memory socket. 2. 5. Removing the Primary Memory 1. Press the clips to secure the primary memory to the system board. 3. Follow the procedures in Before Working Inside Your Computer. 2. Remove the: a) battery b) base cover 3. Install the: a) keyboard trim b) battery 6. Installing the Primary Memory 1. Install the: 19
Pry the retention clips away from the computer. Follow the procedures in After Working Inside Your Computer. Lift the primary memory and remove it from the primary memory until it pops up. Insert the primary memory into the memory socket. 2. 5. Removing the Primary Memory 1. Press the clips to secure the primary memory to the system board. 3. Follow the procedures in Before Working Inside Your Computer. 2. Remove the: a) battery b) base cover 3. Install the: a) keyboard trim b) battery 6. Installing the Primary Memory 1. Install the: 19

Dell Precision Mobile Workstation M4700 Owner's Manual
Page 20
.... Follow the procedures in After Working Inside Your Computer. Lift up the memory module and remove it pops up. Remove the: a) battery b) base cover 3. a) base cover b) battery 4. Removing the Secondary Memory 1. Remove the screw that secures the optical drive to the system board. 3. Remove the...trim c) keyboard NOTE: The secondary memory is located on the below the keyboard. 3. Install the: a) keyboard b) keyboard trim c) battery 4. Follow the procedures in Before Working Inside Your Computer. 2. Press the clips to secure the memory module to the computer. 20 Pry...
.... Follow the procedures in After Working Inside Your Computer. Lift up the memory module and remove it pops up. Remove the: a) battery b) base cover 3. a) base cover b) battery 4. Removing the Secondary Memory 1. Remove the screw that secures the optical drive to the system board. 3. Remove the...trim c) keyboard NOTE: The secondary memory is located on the below the keyboard. 3. Install the: a) keyboard b) keyboard trim c) battery 4. Follow the procedures in Before Working Inside Your Computer. 2. Press the clips to secure the memory module to the computer. 20 Pry...
Dell Precision Mobile Workstation M4700 Owner's Manual
Page 22
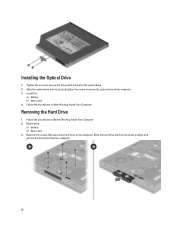
... cover 3. Slide the hard drive latch to the computer. Install the: a) battery b) base cover 4. Follow the procedures in Before Working Inside Your Computer. 2. Follow the procedures in After Working Inside Your Computer. Remove the screws that secure ...
... cover 3. Slide the hard drive latch to the computer. Install the: a) battery b) base cover 4. Follow the procedures in Before Working Inside Your Computer. 2. Follow the procedures in After Working Inside Your Computer. Remove the screws that secure ...

