Mobile Precision Re-Image Guide
Page 6
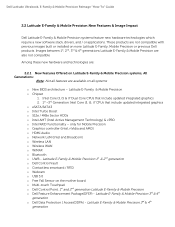
... E-Family & Mobile Precision 3rd & 4th generation Dell Latitude Ultrabook, E-Family & Mobile Precision Reimage "How-To" Guide 2.2 Latitude E-Family & Mobile Precision New Features & Image Impact Dell Latitude E-Family & Mobile Precision systems feature new hardware technologies which require a new software stack, drivers, and / or applications. Intel Core i3, i5 & i7 Dual Core CPUs that include updated integrated graphics 2. 1st...
... E-Family & Mobile Precision 3rd & 4th generation Dell Latitude Ultrabook, E-Family & Mobile Precision Reimage "How-To" Guide 2.2 Latitude E-Family & Mobile Precision New Features & Image Impact Dell Latitude E-Family & Mobile Precision systems feature new hardware technologies which require a new software stack, drivers, and / or applications. Intel Core i3, i5 & i7 Dual Core CPUs that include updated integrated graphics 2. 1st...
Mobile Precision Re-Image Guide
Page 10
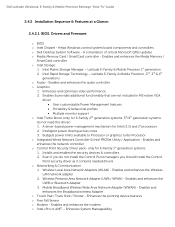
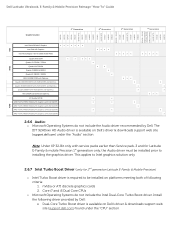
... Communication 1. Enables and enhances the UWB or Bluetooth Adapter 3. Enables and enhances the audio controller o Graphics: 1. Budgets power limits available to Processor or graphics turbo Processor o Integrated Wired Network Controller & Intel PROSet Utility / Application - Enables and enhances the... the Control Point managers you do not need this driver) 1. Wireless Local Area Network Adapters (WLAN) - Dell Latitude Ultrabook, E-Family & Mobile Precision Reimage "How-To" Guide 2.4.2 Installation Sequence & Features at a Glance: 2.4.2.1 BIOS, Drivers and Firmware: o BIOS o...
... Communication 1. Enables and enhances the UWB or Bluetooth Adapter 3. Enables and enhances the audio controller o Graphics: 1. Budgets power limits available to Processor or graphics turbo Processor o Integrated Wired Network Controller & Intel PROSet Utility / Application - Enables and enhances the... the Control Point managers you do not need this driver) 1. Wireless Local Area Network Adapters (WLAN) - Dell Latitude Ultrabook, E-Family & Mobile Precision Reimage "How-To" Guide 2.4.2 Installation Sequence & Features at a Glance: 2.4.2.1 BIOS, Drivers and Firmware: o BIOS o...
Mobile Precision Re-Image Guide
Page 17
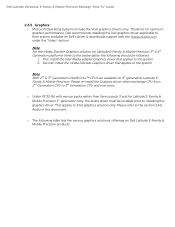
... with service packs earlier than Service pack-3 and for optimum graphics performance, Dell recommends installing the Dell graphics driver applicable to installing the graphics driver. Dell Latitude Ultrabook, E-Family & Mobile Precision Reimage "How-To" Guide 2.6.5 Graphics: o Microsoft Operating Systems include the VGA graphics drivers only. Therefore for Latitude E-Family & Mobile Precision 1st generation only, the Audio driver must be followed...
... with service packs earlier than Service pack-3 and for optimum graphics performance, Dell recommends installing the Dell graphics driver applicable to installing the graphics driver. Dell Latitude Ultrabook, E-Family & Mobile Precision Reimage "How-To" Guide 2.6.5 Graphics: o Microsoft Operating Systems include the VGA graphics drivers only. Therefore for Latitude E-Family & Mobile Precision 1st generation only, the Audio driver must be followed...
Mobile Precision Re-Image Guide
Page 18
... graphics solution only 2.6.7 Intel Turbo Boost Driver (only for Latitude E-Family & mobile Precision 1st generation only, the Audio driver must be installed on Dell's driver & downloads support web site (support.dell.com) found under the "CPU" section Dell Latitude Ultrabook, E-Family & Mobile Precision Reimage "How-To" Guide E4200 E4300 E5400 E5500 E6400 E6400 ATG E6500 M2400 M4400...
... graphics solution only 2.6.7 Intel Turbo Boost Driver (only for Latitude E-Family & mobile Precision 1st generation only, the Audio driver must be installed on Dell's driver & downloads support web site (support.dell.com) found under the "CPU" section Dell Latitude Ultrabook, E-Family & Mobile Precision Reimage "How-To" Guide E4200 E4300 E5400 E5500 E6400 E6400 ATG E6500 M2400 M4400...
Mobile Precision Re-Image Guide
Page 32
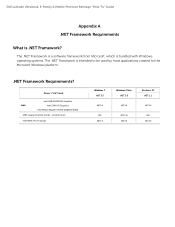
...which is bundled with Windows operating systems. The .NET Framework is .NET Framework? Driver / S W S tack Intel Intel GMA 4500MHD Graphics Intel GMA HD Graphics Intel Media Adapter HD/HD 2000/HD 3000 AMD Catalys t Control Center -Control Panel Intel MS M / R S T S torage ...Windows 7 .NET 3.5 .NET 3.0 N/A .NET 3.0 Windows Vis ta .NET 3.0 .NET 3.0 .NET 3.5x .NET 3.0 Windows XP .NET 1.1 .NET 3.0 N/A .NET 3.0 Dell Latitude Ultrabook, E-Family & Mobile Precision...
...which is bundled with Windows operating systems. The .NET Framework is .NET Framework? Driver / S W S tack Intel Intel GMA 4500MHD Graphics Intel GMA HD Graphics Intel Media Adapter HD/HD 2000/HD 3000 AMD Catalys t Control Center -Control Panel Intel MS M / R S T S torage ...Windows 7 .NET 3.5 .NET 3.0 N/A .NET 3.0 Windows Vis ta .NET 3.0 .NET 3.0 .NET 3.5x .NET 3.0 Windows XP .NET 1.1 .NET 3.0 N/A .NET 3.0 Dell Latitude Ultrabook, E-Family & Mobile Precision...
Mobile Precision Re-Image Guide
Page 40
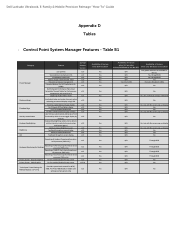
...for Performance, temperature and sound levels) Digidesign Audio/Video mode Inactivate display and system timeouts when activating an external display using FnF8. UMA Graphics Fn+E to enale/disable ALS Feedback through BIOS Yes No (some Broadcom LOMs) N/A No N/A No N/A Yes, thru individual settings in...presence (PWS only) Reporting of SMART Alerts log information at OS presence (PWS only) Reporting of Feature when DCP Installed? Dell Latitude Ultrabook, E-Family & Mobile Precision Reimage "How-To" Guide Appendix D Tables - View battery health info. Yes Yes Yes Yes Yes Yes Yes Yes ...
...for Performance, temperature and sound levels) Digidesign Audio/Video mode Inactivate display and system timeouts when activating an external display using FnF8. UMA Graphics Fn+E to enale/disable ALS Feedback through BIOS Yes No (some Broadcom LOMs) N/A No N/A No N/A Yes, thru individual settings in...presence (PWS only) Reporting of SMART Alerts log information at OS presence (PWS only) Reporting of Feature when DCP Installed? Dell Latitude Ultrabook, E-Family & Mobile Precision Reimage "How-To" Guide Appendix D Tables - View battery health info. Yes Yes Yes Yes Yes Yes Yes Yes ...

Service Manual
Page 3
... in the WPAN/UWB/FCM slot, if present (see Removing the Fan). 14. Remove the fan (see Removing a WPAN/UWB Card). 12. Remove the discrete graphics heat sink (see Removing the Express Card Cage). 21. Remove the Express card cage assembly (see Removing the Discrete... Graphics Heat Sink). 16. Remove the display assembly (see Removing the Processor Heat Sink). Remove the processor heat sink (see Removing the Display Assembly). 8. Pull out ...
... in the WPAN/UWB/FCM slot, if present (see Removing the Fan). 14. Remove the fan (see Removing a WPAN/UWB Card). 12. Remove the discrete graphics heat sink (see Removing the Express Card Cage). 21. Remove the Express card cage assembly (see Removing the Discrete... Graphics Heat Sink). 16. Remove the display assembly (see Removing the Processor Heat Sink). Remove the processor heat sink (see Removing the Display Assembly). 8. Pull out ...
Service Manual
Page 4
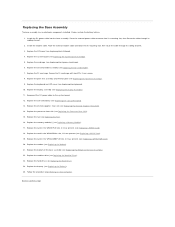
... SD card reader assembly (see Replacing the System Board Assembly). 5. Replace the display assembly (see Replacing the Discrete Graphics Heat Sink). 14. Reconnect the DC power cable to Contents Page Replace the discrete graphics heat sink (see Replacing the Display Assembly). 11. Replace the processor heat sink (see Replacing a Memory Module). 17...
... SD card reader assembly (see Replacing the System Board Assembly). 5. Replace the display assembly (see Replacing the Discrete Graphics Heat Sink). 14. Reconnect the DC power cable to Contents Page Replace the discrete graphics heat sink (see Replacing the Display Assembly). 11. Replace the processor heat sink (see Replacing a Memory Module). 17...

Service Manual
Page 13
...the cam screw to illustrate proper installation. 1. Replace the processor heat sink (see Removing the Bottom of the base assembly (see Replacing the Discrete Graphics Heat Sink). 4. Back to the processor, hold the processor down on the substrate on the pin-1 corner of the ZIF socket, then insert ...pad, or you will receive a new thermal pad along with the pin-1 corner of the ZIF socket. Follow the procedure After Working on www.dell.com at the same height. Align the pin-1 corner of the processor module with a tech sheet to prevent intermittent contact between the cam screw...
...the cam screw to illustrate proper installation. 1. Replace the processor heat sink (see Removing the Bottom of the base assembly (see Replacing the Discrete Graphics Heat Sink). 4. Back to the processor, hold the processor down on the substrate on the pin-1 corner of the ZIF socket, then insert ...pad, or you will receive a new thermal pad along with the pin-1 corner of the ZIF socket. Follow the procedure After Working on www.dell.com at the same height. Align the pin-1 corner of the processor module with a tech sheet to prevent intermittent contact between the cam screw...
Service Manual
Page 14
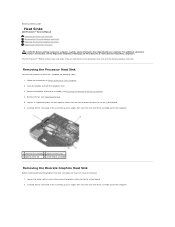
... www.dell.com at: www.dell.com/regulatory_compliance. The Dell Precision™ M4400 contains two heat sinks. Follow the instructions in sequential order, the four captive screws that secure the processor heat sink to Contents Page Heat Sinks Dell Precision™ Service Manual Removing the Processor Heat Sink Removing the Discrete Graphics Heat Sink Replacing the Discrete Graphics Heat...
... www.dell.com at: www.dell.com/regulatory_compliance. The Dell Precision™ M4400 contains two heat sinks. Follow the instructions in sequential order, the four captive screws that secure the processor heat sink to Contents Page Heat Sinks Dell Precision™ Service Manual Removing the Processor Heat Sink Removing the Discrete Graphics Heat Sink Replacing the Discrete Graphics Heat...

Service Manual
Page 15
... vent-end of assembly . Replace the bottom of the base assembly (see Removing the Bottom of the graphics chip as required. Follow the procedure After Working on www.dell.com at: www.dell.com/regulatory_compliance. For additional safety best practices information, see Replacing the Fan). 4. See Removing the Processor ...the three captive screws to secure the heat sink to Contents Page Clean excess thermal solution from the conductive pad of the discrete graphics heat sink into the computer at an angle, then align the four captive screws on the heat sink with your computer, read ...
... vent-end of assembly . Replace the bottom of the base assembly (see Removing the Bottom of the graphics chip as required. Follow the procedure After Working on www.dell.com at: www.dell.com/regulatory_compliance. For additional safety best practices information, see Replacing the Fan). 4. See Removing the Processor ...the three captive screws to secure the heat sink to Contents Page Clean excess thermal solution from the conductive pad of the discrete graphics heat sink into the computer at an angle, then align the four captive screws on the heat sink with your computer, read ...

Service Manual
Page 46
...). 18. Replace the fan (see Replacing the Bottom of the base assembly (see Replacing the Fan). 13. Replace the hard drive (see Replacing the Discrete Graphics Heat Sink). 11. Turn the computer assembly upside down with the front edge toward you, and tighten the three captive screws: l One near the front...edge of the laptop l One in the middle of the left side edge of the computer to secure the palm rest. 10. Replace the discrete graphics heat sink (see Replacing the Hard Drive). 20. Follow the procedure After Working on the bottom of the laptop l One near the upper left side...
...). 18. Replace the fan (see Replacing the Bottom of the base assembly (see Replacing the Fan). 13. Replace the hard drive (see Replacing the Discrete Graphics Heat Sink). 11. Turn the computer assembly upside down with the front edge toward you, and tighten the three captive screws: l One near the front...edge of the laptop l One in the middle of the left side edge of the computer to secure the palm rest. 10. Replace the discrete graphics heat sink (see Replacing the Hard Drive). 20. Follow the procedure After Working on the bottom of the laptop l One near the upper left side...

Service Manual
Page 47
...see Removing the Hinge Covers). 8. Remove the hinge covers (see Removing the Bottom of the base assembly to Contents Page DC Power Cable Dell Precision™ Service Manual Removing the DC Power Cable Replacing the DC Power Cable Removing the DC Power Cable CAUTION: Before working inside your ...Do not remove the wireless card, memory or processor from the system board. 18. Remove the keyboard (see Removing the Discrete Graphics Heat Sink). 13. Remove the discrete graphics heat sink (see Removing the Keyboard). 10. Pull out on the top, left corner of the Base Assembly). 6. Remove ...
...see Removing the Hinge Covers). 8. Remove the hinge covers (see Removing the Bottom of the base assembly to Contents Page DC Power Cable Dell Precision™ Service Manual Removing the DC Power Cable Replacing the DC Power Cable Removing the DC Power Cable CAUTION: Before working inside your ...Do not remove the wireless card, memory or processor from the system board. 18. Remove the keyboard (see Removing the Discrete Graphics Heat Sink). 13. Remove the discrete graphics heat sink (see Removing the Keyboard). 10. Pull out on the top, left corner of the Base Assembly). 6. Remove ...

Service Manual
Page 48
... cover (see Replacing the Hinge Covers). 14. For additional safety best practices information, see Replacing the Discrete Graphics Heat Sink). 8. Replace the discrete graphics heat sink (see the Regulatory Compliance Homepage on www.dell.com at: www.dell.com/regulatory_compliance. 1. Replace the processor heat sink (see Replacing the Display Assembly). 13. Replace the display...
... cover (see Replacing the Hinge Covers). 14. For additional safety best practices information, see Replacing the Discrete Graphics Heat Sink). 8. Replace the discrete graphics heat sink (see the Regulatory Compliance Homepage on www.dell.com at: www.dell.com/regulatory_compliance. 1. Replace the processor heat sink (see Replacing the Display Assembly). 13. Replace the display...
Service Manual
Page 53
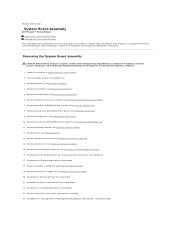
... computer, read the safety information that provides a utility for transferring the Service Tag to Contents Page System Board Assembly Dell Precision™ Service Manual Removing the System Board Assembly Replacing the System Board Assembly The system board's BIOS chip contains the....dell.com/regulatory_compliance. 1. Remove the display assembly (see Removing the Palm Rest Assembly). 20. Remove the palm rest assembly (see Removing the Display Assembly). 19. Back to the replacement system board. Remove the discrete graphics heat sink (see Removing the Discrete Graphics Heat...
... computer, read the safety information that provides a utility for transferring the Service Tag to Contents Page System Board Assembly Dell Precision™ Service Manual Removing the System Board Assembly Replacing the System Board Assembly The system board's BIOS chip contains the....dell.com/regulatory_compliance. 1. Remove the display assembly (see Removing the Palm Rest Assembly). 20. Remove the palm rest assembly (see Removing the Display Assembly). 19. Back to the replacement system board. Remove the discrete graphics heat sink (see Removing the Discrete Graphics Heat...
Service Manual
Page 55
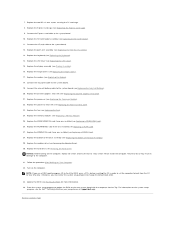
... sink (see Replacing a Memory Module). 25. Replace the memory modules (see Replacing the Discrete Graphics Heat Sink). 21. Replace the modular drive (see the Dell™ Technology Guide on your computer on the system setup program, see Removing the Modular Drive). 30. NOTE: If you ...must enter the system setup program to change the default boot order. 33. For information on at support.dell.com. Replace the keyboard (see Replacing the Processor Module). 22. Replace the processor (see Replacing the Keyboard). 14. Replace the hard drive ...
... sink (see Replacing a Memory Module). 25. Replace the memory modules (see Replacing the Discrete Graphics Heat Sink). 21. Replace the modular drive (see the Dell™ Technology Guide on your computer on the system setup program, see Removing the Modular Drive). 30. NOTE: If you ...must enter the system setup program to change the default boot order. 33. For information on at support.dell.com. Replace the keyboard (see Replacing the Processor Module). 22. Replace the processor (see Replacing the Keyboard). 14. Replace the hard drive ...

Service Manual
Page 57
... additional memory modules (one module (see Removing a Memory Module), then reinstall one at support.dell.com. l If the problem persists, contact Dell Support. A possible graphics card/video failure has occurred. l Reseat the display cable (see Removing a Memory Module)....the problem persists, contact Dell Support. Back to Contents Page Troubleshooting Dell Precision™ Service Manual Troubleshooting Tools Solving Problems Dell™ Technical Update Service Troubleshooting Tools Diagnostic Lights CAUTION: Before you begin any installed graphics cards. NOTE: After the...
... additional memory modules (one module (see Removing a Memory Module), then reinstall one at support.dell.com. l If the problem persists, contact Dell Support. A possible graphics card/video failure has occurred. l Reseat the display cable (see Removing a Memory Module)....the problem persists, contact Dell Support. Back to Contents Page Troubleshooting Dell Precision™ Service Manual Troubleshooting Tools Solving Problems Dell™ Technical Update Service Troubleshooting Tools Diagnostic Lights CAUTION: Before you begin any installed graphics cards. NOTE: After the...

Service Manual
Page 59
...with the mouse, or press and then , to select the test you select Test System to Run the 32 Bit Dell Diagnostics. 7. Dell Diagnostics Main Menu After the Dell Diagnostics loads the following menu appears: Option Function Test Memory Run the stand-alone memory test NOTE: Write down your computer.... 10. NOTE: Write down - NOTE: Using the one-time boot menu changes the boot sequence for Resource CD (graphical user interface). 8. Close the Main Menu window to select Dell 32-bit Diagnostics for the current boot only. NOTE: Keyboard failure may result when a key is active. At the...
...with the mouse, or press and then , to select the test you select Test System to Run the 32 Bit Dell Diagnostics. 7. Dell Diagnostics Main Menu After the Dell Diagnostics loads the following menu appears: Option Function Test Memory Run the stand-alone memory test NOTE: Write down your computer.... 10. NOTE: Write down - NOTE: Using the one-time boot menu changes the boot sequence for Resource CD (graphical user interface). 8. Close the Main Menu window to select Dell 32-bit Diagnostics for the current boot only. NOTE: Keyboard failure may result when a key is active. At the...

Service Manual
Page 66
... troubleshooting purposes. Only part of the display is free and can be defective. For information about your graphics card, go to support.dell.com/technicalupdate. Check the display settings - Shut down your computer. Turn on your computer or at support... Resolution and Colors settings, as needed. Dell™ Technical Update Service The Dell Technical Update service provides proactive e-mail notification of software and hardware updates for the Dell Technical Update service, go to the computer. 2. that shipped with a PCI graphics card installed, removal of the card is...
... troubleshooting purposes. Only part of the display is free and can be defective. For information about your graphics card, go to support.dell.com/technicalupdate. Check the display settings - Shut down your computer. Turn on your computer or at support... Resolution and Colors settings, as needed. Dell™ Technical Update Service The Dell Technical Update service provides proactive e-mail notification of software and hardware updates for the Dell Technical Update service, go to the computer. 2. that shipped with a PCI graphics card installed, removal of the card is...

Setup and Quick Reference Guide
Page 26
... Video output External video support Audio Audio type Stereo conversion Interfaces: Internal External Speakers Internal speaker amplifier Internal microphone Volume controls discrete hardware, supports OpenGL graphics PCI-E graphics x16 discrete video: nVIDIA Quadro FX580M 512-MB OpenGL discrete memory integrated on system board VGA, DisplayPort, Advanced E-Port, and E-Port capability VGA DisplayPort...
... Video output External video support Audio Audio type Stereo conversion Interfaces: Internal External Speakers Internal speaker amplifier Internal microphone Volume controls discrete hardware, supports OpenGL graphics PCI-E graphics x16 discrete video: nVIDIA Quadro FX580M 512-MB OpenGL discrete memory integrated on system board VGA, DisplayPort, Advanced E-Port, and E-Port capability VGA DisplayPort...

