
Dell Owners Manual
Page 3
... Installing the mSATA Card...20 Removing the Fans ...21 Installing the Fans...21 Removing the Heatsink...21 Installing the Heatsink...22 Removing the Power-Adapter Port 22 Installing the Power-Adapter Port 23 Removing the Input/Output (I/O) Board 23 Installing the I/O Board...24 Removing the Memory Module(s 24 Installing the Memory Module...
... Installing the mSATA Card...20 Removing the Fans ...21 Installing the Fans...21 Removing the Heatsink...21 Installing the Heatsink...22 Removing the Power-Adapter Port 22 Installing the Power-Adapter Port 23 Removing the Input/Output (I/O) Board 23 Installing the I/O Board...24 Removing the Memory Module(s 24 Installing the Memory Module...

Dell Owners Manual
Page 6
... in from the right edge of the screen and click Settings. Click the - Click Start . 2. Disconnect all network cables from the appropriate slots. Press the power button to dissipate static electricity, which could harm internal components. 11. CAUTION: Before touching anything inside your computer and all open programs before you work...
... in from the right edge of the screen and click Settings. Click the - Click Start . 2. Disconnect all network cables from the appropriate slots. Press the power button to dissipate static electricity, which could harm internal components. 11. CAUTION: Before touching anything inside your computer and all open programs before you work...

Dell Owners Manual
Page 7
...Inside Your Computer After you complete any telephone or network cables to your computer. 7 Do not use only the battery designed for this particular Dell computer. CAUTION: To connect a network cable, first plug the cable into the network device and then plug it into the computer. 3. Connect...did not automatically turn them off . Connect any replacement procedure, ensure you shut down your operating system, press and hold the power button for other Dell computers. 1. Ensure that the computer and all attached devices to turn off when you connect any cards, such as shown below...
...Inside Your Computer After you complete any telephone or network cables to your computer. 7 Do not use only the battery designed for this particular Dell computer. CAUTION: To connect a network cable, first plug the cable into the network device and then plug it into the computer. 3. Connect...did not automatically turn them off . Connect any replacement procedure, ensure you shut down your operating system, press and hold the power button for other Dell computers. 1. Ensure that the computer and all attached devices to turn off when you connect any cards, such as shown below...

Dell Owners Manual
Page 22
...assembly. 22 Perform the following steps to the system board. 3. Tighten the screws to secure the heatsink to remove the power-adapter port. Follow the procedures in After Working Inside Your Computer. Disconnect the following cables from under the display hinge. b)... Lift the heatsink off the system board. Removing the Power-Adapter Port 1. Follow the procedures in Before Working Inside Your Computer. 2. Installing the Heatsink 1. Remove the: a) base cover b) battery 3....
...assembly. 22 Perform the following steps to the system board. 3. Tighten the screws to secure the heatsink to remove the power-adapter port. Follow the procedures in After Working Inside Your Computer. Disconnect the following cables from under the display hinge. b)... Lift the heatsink off the system board. Removing the Power-Adapter Port 1. Follow the procedures in Before Working Inside Your Computer. 2. Installing the Heatsink 1. Remove the: a) base cover b) battery 3....

Dell Owners Manual
Page 23
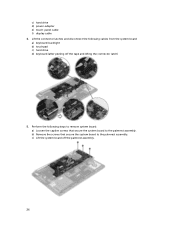
...c) WLAN card 3. b) Remove the screws that secure the I /O board. Connect the following steps to the system board: a) touch-panel b) power-adapter port 4. Perform the following cables to remove the I/O board: a) Disconnect the fan, camera, and I /O) Board 1. Tighten the screw to secure the... power-adapter port to the palmrest assembly. c) Lift the power-adapter port off the palmrest assembly. Removing the Input/Output (I /O board cables from the palmrest assembly. 23 Route the power-adapter port cable under the display hinge. 3.
...c) WLAN card 3. b) Remove the screws that secure the I /O board. Connect the following steps to the system board: a) touch-panel b) power-adapter port 4. Perform the following cables to remove the I/O board: a) Disconnect the fan, camera, and I /O) Board 1. Tighten the screw to secure the... power-adapter port to the palmrest assembly. c) Lift the power-adapter port off the palmrest assembly. Removing the Input/Output (I /O board cables from the palmrest assembly. 23 Route the power-adapter port cable under the display hinge. 3.
Dell Owners Manual
Page 26
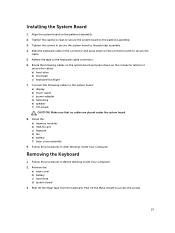
b) Remove the screws that secure the system board to the palmrest assembly. c) Lift the system board off the tape and lifting the connector latch) 5. c) hard drive d) power-adapter e) touch-panel cable f) display cable 4. Lift the connector latches and disconnect the following steps to remove system board: a) Loosen the captive screws that secure the system board to the palmrest assembly. Perform the following cables from the system board: a) keyboard-backlight b) touchpad c) hard drive d) keyboard (after peeling off the palmrest assembly. 26
b) Remove the screws that secure the system board to the palmrest assembly. c) Lift the system board off the tape and lifting the connector latch) 5. c) hard drive d) power-adapter e) touch-panel cable f) display cable 4. Lift the connector latches and disconnect the following steps to remove system board: a) Loosen the captive screws that secure the system board to the palmrest assembly. Perform the following cables from the system board: a) keyboard-backlight b) touchpad c) hard drive d) keyboard (after peeling off the palmrest assembly. 26
Dell Owners Manual
Page 27
Tighten the screws to secure the system board to the system board: a) display b) touch-panel c) power-adapter d) hard drive e) speaker f) I/O-board CAUTION: Make sure that no cables are placed under the system board. 8. Follow the procedures in After Working Inside Your ...
Tighten the screws to secure the system board to the system board: a) display b) touch-panel c) power-adapter d) hard drive e) speaker f) I/O-board CAUTION: Make sure that no cables are placed under the system board. 8. Follow the procedures in After Working Inside Your ...

Dell Owners Manual
Page 32
... away from the display assembly. a) battery b) base cover 6. Remove the: a) base cover b) battery c) hard drive d) speakers e) WLAN card f) coin-cell battery g) mSATA card h) fans i) heatsink j) power-adapter port k) I/O board l) memory modules m) system board n) keyboard 3. Removing the Palmrest Assembly 1.
... away from the display assembly. a) battery b) base cover 6. Remove the: a) base cover b) battery c) hard drive d) speakers e) WLAN card f) coin-cell battery g) mSATA card h) fans i) heatsink j) power-adapter port k) I/O board l) memory modules m) system board n) keyboard 3. Removing the Palmrest Assembly 1.

Dell Owners Manual
Page 34
Follow the procedures in After Working Inside Your Computer. 34 e) power-adapter port f) heatsink g) fans h) mSATA card i) coin-cell battery j) WLAN card k) speakers l) hard drive m) battery n) base cover 5.
Follow the procedures in After Working Inside Your Computer. 34 e) power-adapter port f) heatsink g) fans h) mSATA card i) coin-cell battery j) WLAN card k) speakers l) hard drive m) battery n) base cover 5.

Dell Owners Manual
Page 35
During the Power-on Self Test (POST), when the Dell logo appears, you can: • Access System Setup by pressing key • Bring up the one-time boot menu by pressing key The one-time ... the NVRAM settings after you add or remove hardware • View the system hardware configuration • Enable or disable integrated devices • Set performance and power management thresholds • Manage your computer hardware and specify BIOS‐level options. The boot sequence screen also displays the option to a specific device (for...
During the Power-on Self Test (POST), when the Dell logo appears, you can: • Access System Setup by pressing key • Bring up the one-time boot menu by pressing key The one-time ... the NVRAM settings after you add or remove hardware • View the system hardware configuration • Enable or disable integrated devices • Set performance and power management thresholds • Manage your computer hardware and specify BIOS‐level options. The boot sequence screen also displays the option to a specific device (for...
Dell Owners Manual
Page 40
... file on replacing the system board or if an update is available. Follow the instructions on screen. 4. Password that you must enter to a power outlet 1. If you cannot find the Service Tag, click the Product Category of your computer if it is fully charged and connected to log on... cannot change an existing System Password and/or Setup Password only when Password Status is Locked, you must enter to access and make changes to dell.com/support. 3. Re-start the computer. 2. NOTE: To locate the Service Tag, click Where is shipped with the instructions on the screen. ...
... file on replacing the system board or if an update is available. Follow the instructions on screen. 4. Password that you must enter to a power outlet 1. If you cannot find the Service Tag, click the Product Category of your computer if it is fully charged and connected to log on... cannot change an existing System Password and/or Setup Password only when Password Status is Locked, you must enter to access and make changes to dell.com/support. 3. Re-start the computer. 2. NOTE: To locate the Service Tag, click Where is shipped with the instructions on the screen. ...

Dell Owners Manual
Page 41
... delete the existing setup password and press or . NOTE: If you to save the changes. To enter a system setup, press immediately after a power-on or reboot. 1. Only the following guidelines to assign the system password: - Press to save the changes. 8. Deleting or Changing an Existing System... and/or Setup Password Ensure that you to re-type the setup password. 6. To enter the System Setup, press immediately after a power-on to the computer. Use the following special characters are not allowed. - Select Setup Password, type your system password, and press or . ...
... delete the existing setup password and press or . NOTE: If you to save the changes. To enter a system setup, press immediately after a power-on or reboot. 1. Only the following guidelines to assign the system password: - Press to save the changes. 8. Deleting or Changing an Existing System... and/or Setup Password Ensure that you to re-type the setup password. 6. To enter the System Setup, press immediately after a power-on to the computer. Use the following special characters are not allowed. - Select Setup Password, type your system password, and press or . ...

Dell Owners Manual
Page 43
... diagnostic test on the computer. 2. The diagnostics starts running diagnostics is to stop the diagnostic test. 5. Note the error code and contact Dell. 43 The embedded system diagnostics provides a set of running the tests on all devices detected in an interactive mode • Repeat tests ...about the failed device(s) • View status messages that you are present at the computer terminal when the diagnostic tests are displayed. Power-on a specific device, press and click Yes to test your hardware. Enhanced Pre-Boot System Assessment (ePSA) Diagnostics The ePSA diagnostics...
... diagnostic test on the computer. 2. The diagnostics starts running diagnostics is to stop the diagnostic test. 5. Note the error code and contact Dell. 43 The embedded system diagnostics provides a set of running the tests on all devices detected in an interactive mode • Repeat tests ...about the failed device(s) • View status messages that you are present at the computer terminal when the diagnostic tests are displayed. Power-on a specific device, press and click Yes to test your hardware. Enhanced Pre-Boot System Assessment (ePSA) Diagnostics The ePSA diagnostics...

Dell Owners Manual
Page 44
... computer is connected to an electrical outlet, the battery light operates as follows: Alternately blinking amber light and white light An unauthenticated or unsupported non-Dell AC adapter is attached to indicate battery charge status. Turns on when wireless networking is enabled. Light off Battery in full charge mode with AC.... Alternately blinking amber light with steady white light Constantly blinking amber light Temporary battery failure with AC adapter present. 44 White light on Battery in a power management mode.
... computer is connected to an electrical outlet, the battery light operates as follows: Alternately blinking amber light and white light An unauthenticated or unsupported non-Dell AC adapter is attached to indicate battery charge status. Turns on when wireless networking is enabled. Light off Battery in full charge mode with AC.... Alternately blinking amber light with steady white light Constantly blinking amber light Temporary battery failure with AC adapter present. 44 White light on Battery in a power management mode.

Dell Owners Manual
Page 48
...;C to 65 °C (-40 °F to 60 Hz 130 W 6.67 A 19.50 VDC 48 AC Adapter Feature Input voltage Input current (maximum) Input frequency Output power Output current Rated output voltage Specification 100 VAC to 240 VAC 1.80 A 50 Hz to 149 °F) 3 V CR2032 lithium-ion cell Table 20. Feature Hard...
...;C to 65 °C (-40 °F to 60 Hz 130 W 6.67 A 19.50 VDC 48 AC Adapter Feature Input voltage Input current (maximum) Input frequency Output power Output current Rated output voltage Specification 100 VAC to 240 VAC 1.80 A 50 Hz to 149 °F) 3 V CR2032 lithium-ion cell Table 20. Feature Hard...
Dell Quick Setup Guide
Page 1
...: Pour plus d'informations, consulter la section Manuel de l'utilisateur sur dell.com/support/manuals. M3800 Quick Start Guide Snelstartgids Guide d'information rapide Schnellstart-Handbuch Guida introduttiva rapida 1 Connect the power adapter and turn on your computer Sluit de netadapter aan en schakel ... and Tips Hulp en tips | Aide et astuces Hilfe und Tipps | Aiuto e suggerimenti My Dell Mijn Dell | Mon Dell Mein Dell | Il mio Dell Register your computer Registreer uw computer | Enregistrez votre ordinateur Computer registrieren | Registrare il computer Sign in Benutzerhandbuch unter...
...: Pour plus d'informations, consulter la section Manuel de l'utilisateur sur dell.com/support/manuals. M3800 Quick Start Guide Snelstartgids Guide d'information rapide Schnellstart-Handbuch Guida introduttiva rapida 1 Connect the power adapter and turn on your computer Sluit de netadapter aan en schakel ... and Tips Hulp en tips | Aide et astuces Hilfe und Tipps | Aiuto e suggerimenti My Dell Mijn Dell | Mon Dell Mein Dell | Il mio Dell Register your computer Registreer uw computer | Enregistrez votre ordinateur Computer registrieren | Registrare il computer Sign in Benutzerhandbuch unter...

Dell Statement of Volatility
Page 1
... data and tells you how to retain their data immediately after power is removed from the component. Video memory - Panel EEDID EEPROM Part of Volatility - Non-volatile memory 512 No Bytes. Dell Precision M3800 CAUTION: A CAUTION indicates either potential damage to hardware or loss... Video BIOS for correct operation of embedded Flash No N/A memory for nVidia N15P discrete graphics systems. N/A Power Off system N/A N/A November 2013 Stores memory, manufacturer data, and timing information for basic boot operation, PSA (on the Dell Precision M3800 system board.
... data and tells you how to retain their data immediately after power is removed from the component. Video memory - Panel EEDID EEPROM Part of Volatility - Non-volatile memory 512 No Bytes. Dell Precision M3800 CAUTION: A CAUTION indicates either potential damage to hardware or loss... Video BIOS for correct operation of embedded Flash No N/A memory for nVidia N15P discrete graphics systems. N/A Power Off system N/A N/A November 2013 Stores memory, manufacturer data, and timing information for basic boot operation, PSA (on the Dell Precision M3800 system board.


