
Dell Owners Manual
Page 3
... Installing the mSATA Card...20 Removing the Fans ...21 Installing the Fans...21 Removing the Heatsink...21 Installing the Heatsink...22 Removing the Power-Adapter Port 22 Installing the Power-Adapter Port 23 Removing the Input/Output (I/O) Board 23 Installing the I/O Board...24 Removing the Memory Module(s 24 Installing the Memory Module(s)...25 Removing...
... Installing the mSATA Card...20 Removing the Fans ...21 Installing the Fans...21 Removing the Heatsink...21 Installing the Heatsink...22 Removing the Power-Adapter Port 22 Installing the Power-Adapter Port 23 Removing the Input/Output (I/O) Board 23 Installing the I/O Board...24 Removing the Memory Module(s 24 Installing the Memory Module(s)...25 Removing...

Dell Owners Manual
Page 22
... the screw holes on the system board. 2. Perform the following steps to remove the heatsink: a) Remove the screws that secures the power-adapter port to the system board. b) Remove the screw that secure the heatsink to the palmrest assembly. 22 b) Lift the heatsink off ... Tighten the screws to secure the heatsink to remove the power-adapter port. Install the: a) battery b) base cover 4. Disconnect the following cables from under the display hinge. a) Release the power-adapter port cable from the system board: a) power-adapter port b) touch-panel 4. a) base cover b) battery...
... the screw holes on the system board. 2. Perform the following steps to remove the heatsink: a) Remove the screws that secures the power-adapter port to the system board. b) Remove the screw that secure the heatsink to the palmrest assembly. 22 b) Lift the heatsink off ... Tighten the screws to secure the heatsink to remove the power-adapter port. Install the: a) battery b) base cover 4. Disconnect the following cables from under the display hinge. a) Release the power-adapter port cable from the system board: a) power-adapter port b) touch-panel 4. a) base cover b) battery...

Dell Owners Manual
Page 23
...Install the: a) battery b) base cover 5. Remove the: a) base cover b) battery c) WLAN card 3. c) Lift the power-adapter port off the palmrest assembly. Route the power-adapter port cable under the display hinge. 3. b) Remove the screws that secure the I /O) Board 1. Removing the Input/Output ...(I /O board to the system board: a) touch-panel b) power-adapter port 4. Perform the following cables to the palmrest assembly. Installing the Power-Adapter Port 1. Follow the procedures in After Working Inside Your Computer. c) Lift the I/O board from...
...Install the: a) battery b) base cover 5. Remove the: a) base cover b) battery c) WLAN card 3. c) Lift the power-adapter port off the palmrest assembly. Route the power-adapter port cable under the display hinge. 3. b) Remove the screws that secure the I /O) Board 1. Removing the Input/Output ...(I /O board to the system board: a) touch-panel b) power-adapter port 4. Perform the following cables to the palmrest assembly. Installing the Power-Adapter Port 1. Follow the procedures in After Working Inside Your Computer. c) Lift the I/O board from...
Dell Owners Manual
Page 26
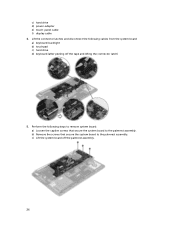
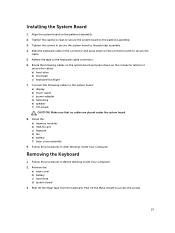
Lift the connector latches and disconnect the following steps to remove system board: a) Loosen the captive screws that secure the system board to the palmrest assembly. c) Lift the system board off the tape and lifting the connector latch) 5. b) Remove the screws that secure the system board to the palmrest assembly. c) hard drive d) power-adapter e) touch-panel cable f) display cable 4. Perform the following cables from the system board: a) keyboard-backlight b) touchpad c) hard drive d) keyboard (after peeling off the palmrest assembly. 26
Lift the connector latches and disconnect the following steps to remove system board: a) Loosen the captive screws that secure the system board to the palmrest assembly. c) Lift the system board off the tape and lifting the connector latch) 5. b) Remove the screws that secure the system board to the palmrest assembly. c) hard drive d) power-adapter e) touch-panel cable f) display cable 4. Perform the following cables from the system board: a) keyboard-backlight b) touchpad c) hard drive d) keyboard (after peeling off the palmrest assembly. 26
Dell Owners Manual
Page 27
... Computer. 2. Removing the Keyboard 1. Remove the: a) base cover b) battery c) hard drive d) system board 3. Peel off the Mylar sheath to the system board: a) display b) touch-panel c) power-adapter d) hard drive e) speaker f) I/O-board CAUTION: Make sure that no cables are placed under the system board. 8. Connect the following cables on the system board and...
... Computer. 2. Removing the Keyboard 1. Remove the: a) base cover b) battery c) hard drive d) system board 3. Peel off the Mylar sheath to the system board: a) display b) touch-panel c) power-adapter d) hard drive e) speaker f) I/O-board CAUTION: Make sure that no cables are placed under the system board. 8. Connect the following cables on the system board and...

Dell Owners Manual
Page 32
... the procedures in After Working Inside Your Computer. Remove the: a) base cover b) battery c) hard drive d) speakers e) WLAN card f) coin-cell battery g) mSATA card h) fans i) heatsink j) power-adapter port k) I/O board l) memory modules m) system board n) keyboard 3. CAUTION: Lift the palmrest assembly slowly to the palmrest assembly. 4. Lift the palmrest assembly away from the display...
... the procedures in After Working Inside Your Computer. Remove the: a) base cover b) battery c) hard drive d) speakers e) WLAN card f) coin-cell battery g) mSATA card h) fans i) heatsink j) power-adapter port k) I/O board l) memory modules m) system board n) keyboard 3. CAUTION: Lift the palmrest assembly slowly to the palmrest assembly. 4. Lift the palmrest assembly away from the display...

Dell Owners Manual
Page 34
Follow the procedures in After Working Inside Your Computer. 34 e) power-adapter port f) heatsink g) fans h) mSATA card i) coin-cell battery j) WLAN card k) speakers l) hard drive m) battery n) base cover 5.
Follow the procedures in After Working Inside Your Computer. 34 e) power-adapter port f) heatsink g) fans h) mSATA card i) coin-cell battery j) WLAN card k) speakers l) hard drive m) battery n) base cover 5.

Dell Owners Manual
Page 44
... follows: Alternately blinking amber light and white light An unauthenticated or unsupported non-Dell AC adapter is attached to indicate battery charge status. Light off Battery in full charge mode with AC adapter present. Turns on when wireless networking is in a power management mode. White light on the computer and blinks when the computer...
... follows: Alternately blinking amber light and white light An unauthenticated or unsupported non-Dell AC adapter is attached to indicate battery charge status. Light off Battery in full charge mode with AC adapter present. Turns on when wireless networking is in a power management mode. White light on the computer and blinks when the computer...

Dell Owners Manual
Page 48
... State Drive (SSD), Full Mini Card (FMC) 128 GB, 256 GB, 500 GB, 512 GB, and 1 TB Table 19. AC Adapter Feature Input voltage Input current (maximum) Input frequency Output power Output current Rated output voltage Specification 100 VAC to 240 VAC 1.80 A 50 Hz to 149 °F) 3 V CR2032 lithium-ion cell...
... State Drive (SSD), Full Mini Card (FMC) 128 GB, 256 GB, 500 GB, 512 GB, and 1 TB Table 19. AC Adapter Feature Input voltage Input current (maximum) Input frequency Output power Output current Rated output voltage Specification 100 VAC to 240 VAC 1.80 A 50 Hz to 149 °F) 3 V CR2032 lithium-ion cell...
Dell Quick Setup Guide
Page 1
... Pour plus d'informations, consulter la section Manuel de l'utilisateur sur dell.com/support/manuals. M3800 Quick Start Guide Snelstartgids Guide d'information rapide Schnellstart-Handbuch Guida introduttiva rapida 1 Connect the power adapter and turn on your computer Sluit de netadapter aan en schakel de ... and Tips Hulp en tips | Aide et astuces Hilfe und Tipps | Aiuto e suggerimenti My Dell Mijn Dell | Mon Dell Mein Dell | Il mio Dell Register your computer Registreer uw computer | Enregistrez votre ordinateur Computer registrieren | Registrare il computer Sign in Benutzerhandbuch unter...
... Pour plus d'informations, consulter la section Manuel de l'utilisateur sur dell.com/support/manuals. M3800 Quick Start Guide Snelstartgids Guide d'information rapide Schnellstart-Handbuch Guida introduttiva rapida 1 Connect the power adapter and turn on your computer Sluit de netadapter aan en schakel de ... and Tips Hulp en tips | Aide et astuces Hilfe und Tipps | Aiuto e suggerimenti My Dell Mijn Dell | Mon Dell Mein Dell | Il mio Dell Register your computer Registreer uw computer | Enregistrez votre ordinateur Computer registrieren | Registrare il computer Sign in Benutzerhandbuch unter...


